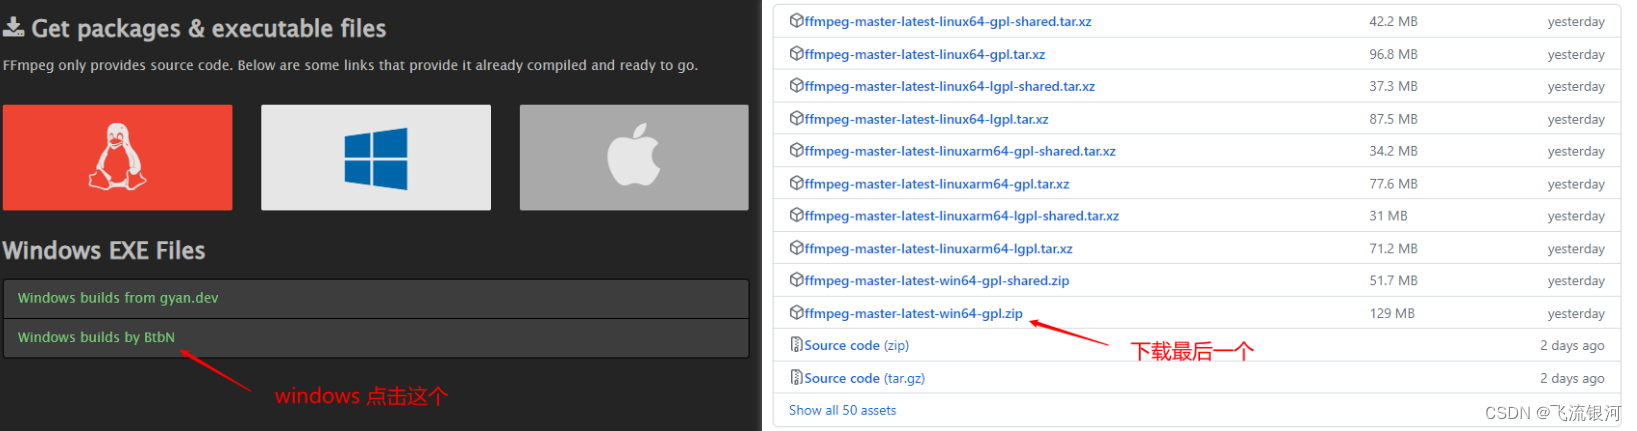
使用ffmpeg软件转换网络视频,先从官网下载对应操作系统环境的包
注意:网络地址需要是视频格式结尾,例如.mp4,.flv 等
官网地址:Download FFmpeg
window包:
linux包:
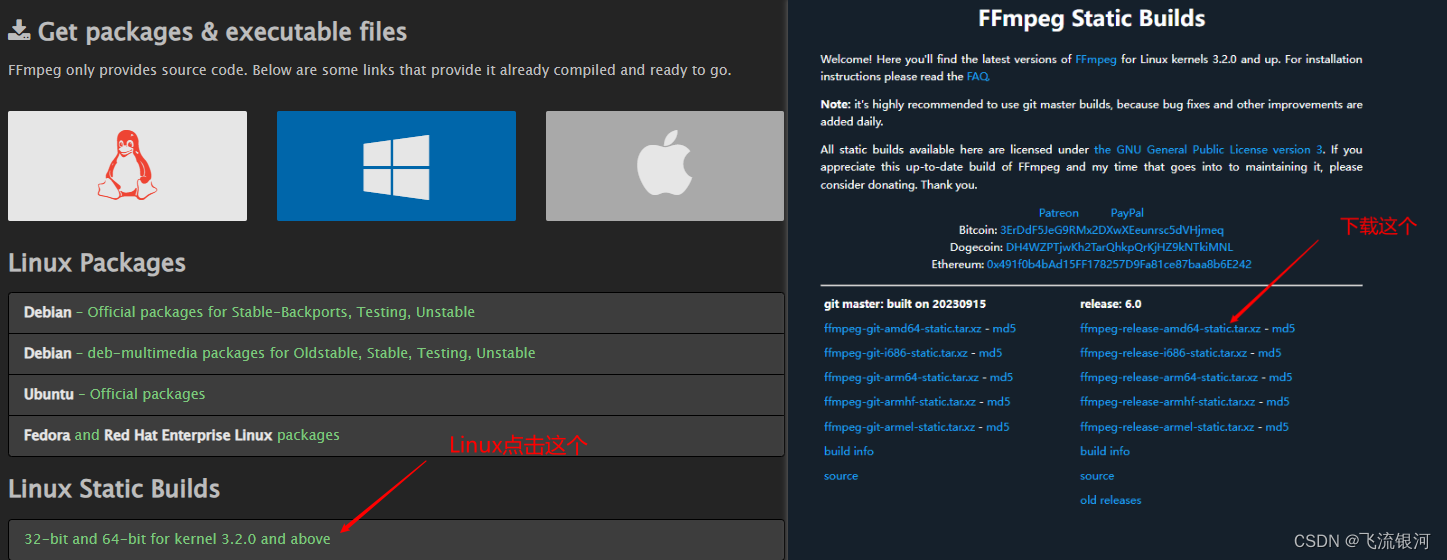
如果下载缓慢,下载迅雷安装使用下载。
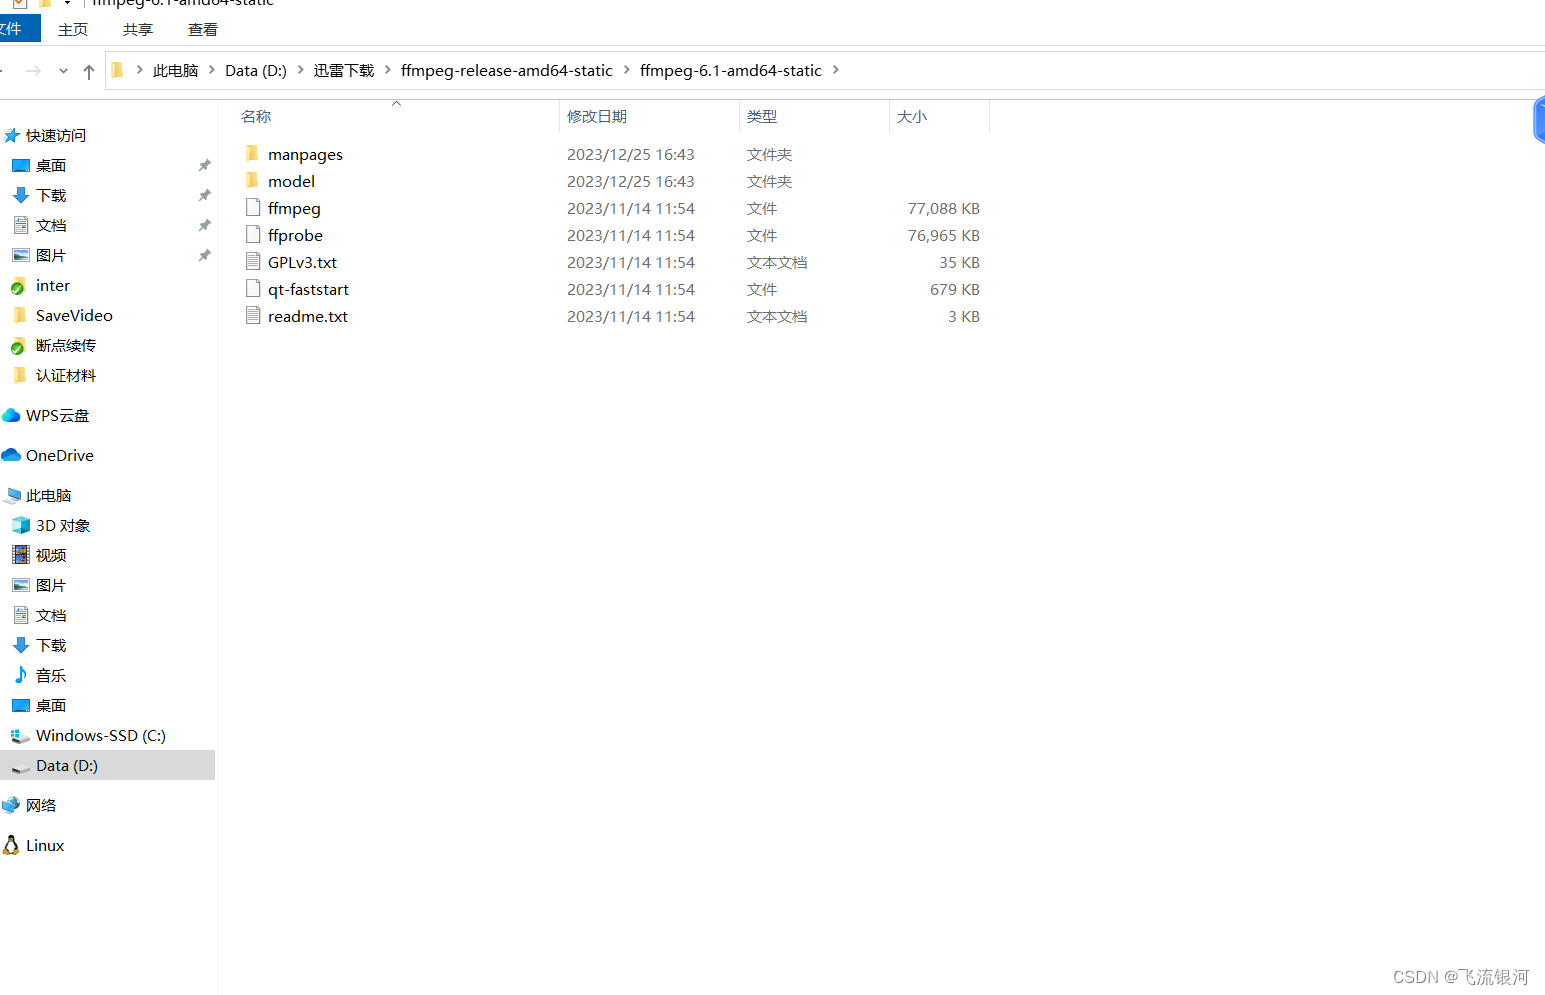
解压缩后对应截图:
window:

linux:
在maven项目的pom.xml引入依赖包:
<dependency><groupId>net.bramp.ffmpeg</groupId><artifactId>ffmpeg</artifactId><version>0.7.0</version></dependency><dependency><groupId>org.bytedeco</groupId><artifactId>javacpp</artifactId><version>1.4.1</version></dependency><dependency><groupId>org.bytedeco</groupId><artifactId>javacv</artifactId><version>1.4.1</version></dependency><dependency><groupId>org.bytedeco.javacpp-presets</groupId><artifactId>ffmpeg-platform</artifactId><version>3.4.2-1.4.1</version></dependency>引入类:
import cn.hutool.core.date.DateUtil;
import lombok.extern.slf4j.Slf4j;
import net.bramp.ffmpeg.FFmpeg;
import net.bramp.ffmpeg.FFmpegExecutor;
import net.bramp.ffmpeg.FFprobe;
import net.bramp.ffmpeg.builder.FFmpegBuilder;
import org.bytedeco.javacv.FFmpegFrameGrabber;
import org.bytedeco.javacv.FrameGrabber;
import org.bytedeco.javacv.Java2DFrameConverter;import javax.imageio.ImageIO;
import java.awt.image.BufferedImage;
import java.io.File;
import java.io.IOException;
import java.io.InputStream;
import java.io.RandomAccessFile;
import java.net.HttpURLConnection;
import java.net.URL;
网络地址转换成本地视频方法:
/*** 视频链接转换成本地视频* @param videoUrl* @param downloadPath* @return*/public static boolean downVideo(String videoUrl,String downloadPath){HttpURLConnection connection = null;InputStream inputStream = null;RandomAccessFile randomAccessFile = null;boolean re;try{URL url = new URL(videoUrl);connection = (HttpURLConnection) url.openConnection();connection.setRequestProperty("Range","bytes=0-");connection.connect();if (connection.getResponseCode() / 100 != 2){System.out.println("链接失败");return false;}inputStream = connection.getInputStream();int downloaded = 0;int fileSize = connection.getContentLength();randomAccessFile = new RandomAccessFile(downloadPath,"rw");while (downloaded < fileSize){byte[] buffer = null;if (fileSize - downloaded >= 1000000){buffer = new byte[1000000];}else{buffer = new byte[fileSize - downloaded];}int read = -1;int currentDownload = 0;while (currentDownload < buffer.length){read = inputStream.read();buffer[currentDownload++] = (byte) read;}randomAccessFile.write(buffer);downloaded += currentDownload;}re = true;return re;} catch (Exception e) {e.printStackTrace();re = false;return re;}finally {try{connection.disconnect();inputStream.close();randomAccessFile.close();}catch (Exception e){e.printStackTrace();}}}网站地址转换成本地视频后,再转换成mp4视频方法:
/*** 其他视频格式地址转换成mp4* @param orginalVideoPath 原视频地址* @param newMp4FilePath 新mp4地址* @return*/public static boolean otherVideoToMp4(String orginalVideoPath,String newMp4FilePath) {try{String ffmpegPath = "";String ffprobePath = "";if (SystemUtils.isWindows()){//目录里放的文件没有提交保存,在本地测试的时候自行添加ffmpegPath = VideoCovertUtil.class.getResource("/ffmpegdir/win/bin/ffmpeg.exe").getPath();ffprobePath = VideoCovertUtil.class.getResource("/ffmpegdir/win/bin/ffprobe.exe").getPath();}else if (SystemUtils.isLinux()){/*ffmpegPath = VideoCovertUtil.class.getResource("/ffmpegdir/linux/ffmpeg").getPath();ffprobePath = VideoCovertUtil.class.getResource("/ffmpegdir/linux/ffprobe").getPath();*///在linux安装ffmpeg后配置路径//安装步骤:https://blog.csdn.net/ysushiwei/article/details/130162831ffmpegPath = "/usr/local/bin/ffmpeg";ffprobePath = "/usr/local/bin/ffprobe";}log.info("ffmpegPath:"+ffmpegPath);log.info("ffmpegPath:"+ffprobePath);FFmpeg fFmpeg = new FFmpeg(ffmpegPath);FFprobe fFprobe = new FFprobe(ffprobePath);FFmpegBuilder builder = new FFmpegBuilder().setInput(orginalVideoPath).addOutput(newMp4FilePath).done();FFmpegExecutor executor = new FFmpegExecutor(fFmpeg,fFprobe);executor.createJob(builder).run();log.info("执行完毕");return true;}catch (IOException e){e.printStackTrace();return false;}}window可以直接放在项目中,但是linux还需要配置。步骤如下。
1、将上方的linux包上传到服务器,解压缩:
tar -xvf ffmpeg-release-amd64-static.tar.xz
2、解压缩后进入根目录分别复制根目录下的ffmpeg和ffprobe到 /usr/local/bin/目录下:
sudo cp 解压缩目录/ffmpeg /usr/local/bin/
sudo cp 解压缩目录/ffprobe /usr/local/bin/
3.还要给文件设置权限,否则运行代码的时候报没有权限:
sudo chmod +x /usr/local/bin/ffmpeg
sudo chmod +x /usr/local/bin/ffprobe
4、最后检查是否配置成功,如果有内容输出来则成功:
ffmpeg -version
ffprobe -version
linux环境配置好后,即可正常解析.
从视频中提取封面和获取时长:
/*** 获取视频的第一帧封面* @param filePath 视频地址* @param targetPath 视频封面地址*/public static void getCover(String filePath,String targetPath){try{// 视频地址FFmpegFrameGrabber grabber = new FFmpegFrameGrabber(new File(filePath));grabber.start();Java2DFrameConverter converter = new Java2DFrameConverter();BufferedImage image = converter.convert(grabber.grabImage());// 本地图片保存地址ImageIO.write(image, "png", new File(targetPath));grabber.stop();image.flush();}catch (Exception e){e.printStackTrace();}}/*** 使用FFmpeg获取视频时长** @param path 视频文件地址* @return 时长,单位为秒* @throws IOException*/public static String getDuration(String path) {// 读取视频文件FFmpegFrameGrabber grabber = new FFmpegFrameGrabber(path);try {grabber.start();} catch (FrameGrabber.Exception e) {e.printStackTrace();}// 获取视频长度(单位:秒)int duration = grabber.getLengthInFrames() / (int) grabber.getFrameRate();try {grabber.stop();} catch (FrameGrabber.Exception e) {e.printStackTrace();}return DateUtil.secondToTime(duration);}由于视频转换下载等速度比较慢,推荐使用异步执行。我用的是若依的框架,代码如下。如用其他框架,可自行参考写异步操作
//异步执行方法。不会等待执行完才执行下一位
AsyncManager.me().execute(AsyncFactory.convertVideoNetUrl(video.getVideoPath(),video.getId(),Constants.CONVERT_VIDEO_NET_VIDEO_URL));#在AsyncManager类里自定义一个异步方法如下/*** * @param videNetUrl 视频网络地址* @param id 类id* @param entityClazz 类 0:视频 1:文章* @return 任务task*/public static TimerTask convertVideoNetUrl(final String videNetUrl,Long id,Integer entityClazz){return new TimerTask(){@Overridepublic void run(){if (entityClazz == null || id == null || StrUtil.isBlank(videNetUrl)){return;}if (entityClazz == 0){IVideoService videoService =  SpringUtils.getBean(IVideoService.class);Video video = videoService.selectVideoById(id);if (video == null){return;}//现在是上传视频地址//先转换视频地址到服务器//后缀String ext = video.getVideoPath().substring(video.getVideoPath().lastIndexOf("."));String videosubpath = StringUtils.format("{}/{}_{}{}", DateUtils.datePath(),IdUtils.fastSimpleUUID(), Seq.getId(Seq.uploadSeqType), ext);String downloadPath = null;try {downloadPath = FileUploadUtils.getAbsoluteFile(HqaConfig.getUploadPath() + "/", videosubpath).getAbsolutePath();}catch (Exception e){e.printStackTrace();}boolean downVideo = VideoCovertUtil.downVideo(video.getVideoPath(),downloadPath);if (downVideo && StrUtil.isNotBlank(downloadPath) && downloadPath != null){if (!ext.contains("mp4")){//下载成功后如果不是mp4格式,转换成mp4格式String newVideosubpath = StringUtils.format("{}/{}_{}{}", DateUtils.datePath(),IdUtils.fastSimpleUUID(), Seq.getId(Seq.uploadSeqType), ".mp4");String newMp4FilePath = null;try {newMp4FilePath = FileUploadUtils.getAbsoluteFile(HqaConfig.getUploadPath() + "/", newVideosubpath).getAbsolutePath();}catch (Exception e){e.printStackTrace();}boolean toMp4 = VideoCovertUtil.otherVideoToMp4(downloadPath,newMp4FilePath);if (toMp4 && StrUtil.isNotBlank(newMp4FilePath) && newMp4FilePath != null){//转换成功后删除之前下载过的视频地址,并且保存新的mp4地址if (new File(downloadPath).exists()){FileUtils.deleteFile(downloadPath);}if (newMp4FilePath.contains("\\")){newMp4FilePath = newMp4FilePath.replace("\\","/");}String newPath = newMp4FilePath.replace(HqaConfig.getProfile(),"/profile");video.setVideoPath(newPath);}}else{if (downloadPath.contains("\\")){downloadPath = downloadPath.replace("\\","/");}//保存地址String newPath = downloadPath.replace(HqaConfig.getProfile(),"/profile");video.setVideoPath(newPath);}//视频截图和时长//获取视频第一帧封面String parentPath = HqaConfig.getUploadPath()+"/"+ DateUtils.datePath();String fileName = IdUtils.fastSimpleUUID()+".png";String targetPath = parentPath+"/"+ fileName;try {FileUploadUtils.getAbsoluteFile(parentPath,fileName);} catch (IOException e) {e.printStackTrace();}String filePath = video.getVideoPath().replace("/profile","");filePath=HqaConfig.getProfile()+filePath;VideoCovertUtil.getCover(filePath,targetPath);video.setCover(targetPath.replace(HqaConfig.getProfile(),"/profile"));String  duration = VideoCovertUtil.getDuration(filePath);video.setDuration(duration);videoService.updateVideo(video);}}else if (entityClazz == 1){IArticleService articleService = SpringUtils.getBean(IArticleService.class);Article article = articleService.selectArticleById(id);if (article == null){return;}//现在是上传视频地址//先转换视频地址到服务器//后缀String ext = article.getVideoPath().substring(article.getVideoPath().lastIndexOf("."));String videosubpath = StringUtils.format("{}/{}_{}{}", DateUtils.datePath(),IdUtils.fastSimpleUUID(), Seq.getId(Seq.uploadSeqType), ext);String downloadPath = null;try {downloadPath = FileUploadUtils.getAbsoluteFile(HqaConfig.getUploadPath() + "/", videosubpath).getAbsolutePath();}catch (Exception e){e.printStackTrace();}boolean downVideo = VideoCovertUtil.downVideo(article.getVideoPath(),downloadPath);if (downVideo && StrUtil.isNotBlank(downloadPath) && downloadPath != null){if (!ext.contains("mp4")){//下载成功后如果不是mp4格式,转换成mp4格式String newVideosubpath = StringUtils.format("{}/{}_{}{}", DateUtils.datePath(),IdUtils.fastSimpleUUID(), Seq.getId(Seq.uploadSeqType), ".mp4");String newMp4FilePath = null;try {newMp4FilePath = FileUploadUtils.getAbsoluteFile(HqaConfig.getUploadPath() + "/", newVideosubpath).getAbsolutePath();}catch (Exception e){e.printStackTrace();}boolean toMp4 = VideoCovertUtil.otherVideoToMp4(downloadPath,newMp4FilePath);if (toMp4 && StrUtil.isNotBlank(newMp4FilePath) && newMp4FilePath != null){//转换成功后删除之前下载过的视频地址,并且保存新的mp4地址if (new File(downloadPath).exists()){FileUtils.deleteFile(downloadPath);}if (newMp4FilePath.contains("\\")){newMp4FilePath = newMp4FilePath.replace("\\","/");}String newPath = newMp4FilePath.replace(HqaConfig.getProfile(),"/profile");article.setVideoPath(newPath);}}else{if (downloadPath.contains("\\")){downloadPath = downloadPath.replace("\\","/");}//保存地址String newPath = downloadPath.replace(HqaConfig.getProfile(),"/profile");article.setVideoPath(newPath);}articleService.updateArticle(article);}}}};}