前言:本文默认读者有JS基础和Vue基础,如果没有这个两个基础,可能阅读比较困难,建议先看下官方文档,当然,也欢迎评论交流😁
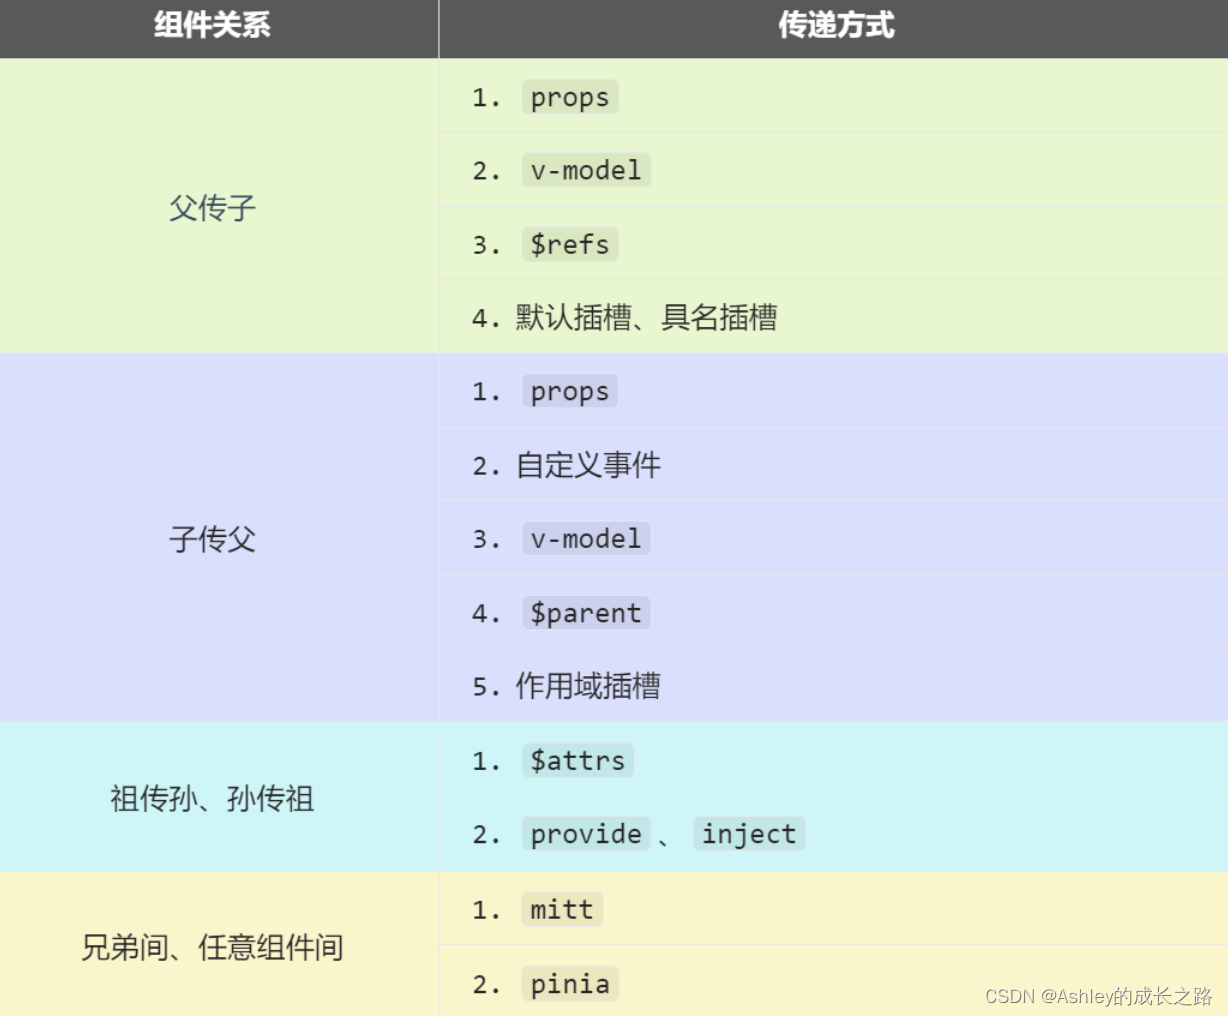
通信方式总结

常见搭配形式
一、props(使用频率最高)
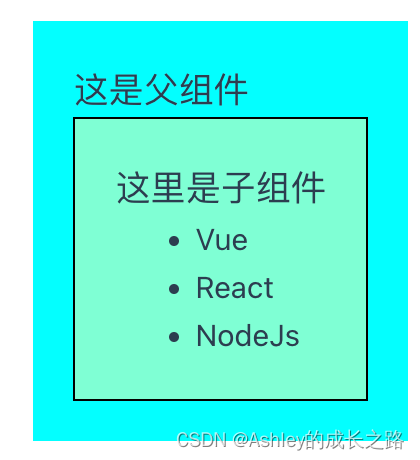
1、父传子
<!-- parent.vue -->
<template><di class="parent"><h3>这是父组件</h3><!-- 通过props把数组传给子组件 --><Child :technologyStack="technologyStack" /></di>
</template><script setup lang='ts' name='propsParent'>
import { ref } from 'vue';
import Child from './child.vue'let technologyStack = ref([{ id: 1, name: 'Vue' },{ id: 2, name: 'React' },{ id: 3, name: 'NodeJs' },
]) //前端技术栈</script>
<style lang='scss' scoped>
.parent{padding: 20px;background-color: aqua;
}
</style>
<!-- child.vue -->
<template><div class="child"><h3>这里是子组件</h3><ul><li v-for="technologyItem in technologyStack" :key="technologyItem.id">{{ technologyItem.name }}</li></ul></div>
</template><script setup lang='ts' name='propsChild'>
//接受父组件通过props传过来的数据
defineProps(['technologyStack'])</script>
<style lang='scss' scoped>
.child {border: 1px solid #000;background-color: aquamarine;padding: 20px;
}
</style>
效果
2、子传父(通过函数)
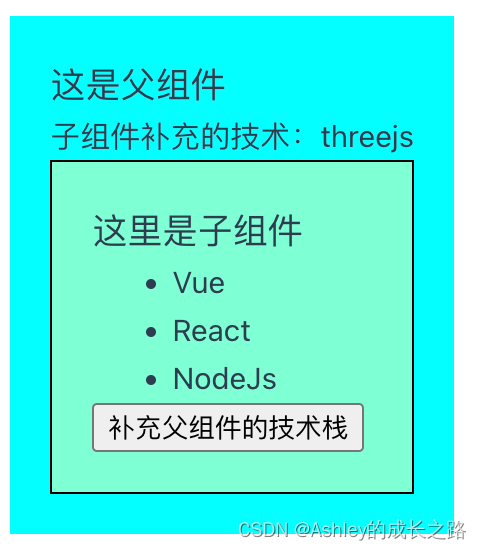
<!-- parent.vue -->
<template><di class="parent"><h3>这是父组件</h3><h4 v-if="childTechnology">子组件补充的技术:{{ childTechnology }}</h4><!-- 通过props把数组传给子组件 --><Child :technologyStack="technologyStack" :getNewTechnology="getNewTechnology" /></di>
</template><script setup lang='ts' name='propsParent'>
import { ref } from 'vue';
import Child from './child.vue'let technologyStack = ref([{ id: 1, name: 'Vue' },{ id: 2, name: 'React' },{ id: 3, name: 'NodeJs' },
]) //前端技术栈//用于接收子组件传的数据
let childTechnology = ref<string>('')
//子组件通过调用这个方法,给父组件传数据
function getNewTechnology(value: string) {childTechnology.value = value
}</script>
<style lang='scss' scoped>
.parent {padding: 20px;background-color: aqua;
}
</style>
<!-- child.vue -->
<template><div class="child"><h3>这里是子组件</h3><ul><li v-for="technologyItem in technologyStack" :key="technologyItem.id">{{ technologyItem.name }}</li></ul><button @click="getNewTechnology('threejs')">补充父组件的技术栈</button></div>
</template><script setup lang='ts' name='propsChild'>
//接受父组件通过props传过来的数据和方法
defineProps(['technologyStack', 'getNewTechnology'])</script>
<style lang='scss' scoped>
.child {border: 1px solid #000;background-color: aquamarine;padding: 20px;
}
</style>
效果:
二、自定义事件(区别于原生事件)
常用于子传父,事件名任意,事件对象$event,是调用emit时所提供的数据,数据可以是任意类型
<!-- parent.vue -->
<template><div class="parent"><h3>父组件</h3><div>技术栈中技术总数:{{ technologySum }}</div><!-- changeSum就是自定义事件  --><Child  @changeSum="getChangeSum" /> </div>
</template><script setup lang='ts' name='xxxxx'>import { ref } from 'vue';import Child from './child.vue'let technologySum = ref<number>(0)function getChangeSum(value: number) {technologySum.value += value}
</script>
<!-- child.vue -->
<template><div class="child"><h3>这里是子组件</h3><button @click="onChangeSum">父组件的技术总数+6</button></div>
</template><script setup lang='ts' name='customEventChild'>const emit = defineEmits(['changeSum'])function onChangeSum(){emit('changeSum', 6) //触发自定义事件,并传数据}
</script>
效果
自定义事件通信
三、mitt(发布订阅)
mitt是一个仓库,与消息订阅与发布(pubsub)功能类似,可以实现任意组件间通信
在使用前我们需要先安装一下
npm i mitt安装完毕后,因为他是一个工具库,我们新建文件:src\utils\emitter.ts
// emitter.ts文件import mitt from 'mitt'// 创建emitter,仓库命名用的是emitter
const emitter = mitt()// 创建并暴露mitt
export default emitter
<!-- provide.vue -->
<template><div class="provide-container"><h3>提供数据的组件</h3><button @click="sendData">发送数据</button></div>
</template><script setup lang='ts' name='xxxxx'>
import { ref } from 'vue';
import emitter from '@/utils/emitter' //引入let sendTxt = ref<string>('我是被发送的数据')
function sendData() {emitter.emit('sendData', sendTxt.value) //触发事件,发送数据
}
</script>
<style lang='scss' scoped>
.provide-container{background-color: aquamarine;text-align: center;padding: 20px;
}
</style>
<!-- accept.vue -->
<template><div class="accept-container"><h3>接收数据的组件</h3><div>接收到的数据: {{ acceptData }}</div></div>
</template><script setup lang='ts' name='xxxxx'>
import { ref, onUnmounted } from 'vue';
import emitter from '@/utils/emitter';let acceptData = ref<string>('')//绑定事件
emitter.on('sendData', (value) => {acceptData.value = value as stringconsole.log('sendData事件被触发,接收到数据value为:', value);
})//组件卸载后
onUnmounted(() => {emitter.off('sendData') //为避免内存泄漏等问题,一定要记得解绑
})</script>
<style lang='scss' scoped>
.accept-container {margin-top: 20px;padding: 20px;background-color: aqua;text-align: center;
}
</style>
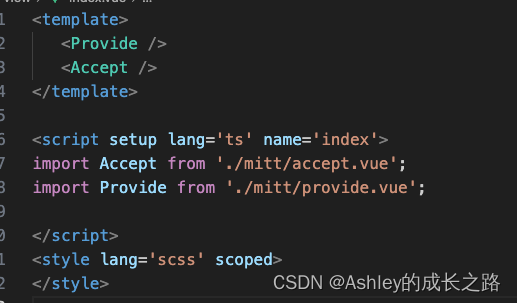
路由文件中的引用,这里以兄弟组件为例,要注意mitt可以在任意组件中使用 不限于兄弟组件
效果:

四、v-model (双向绑定)
通过v-model进行通信的方式在UI组件库底层代码中大量使用,去看一下UI组件库的仓库源码就能看到,自己封装UI组件同理
在使用v-model通信前,我们需要先知道v-model是怎么实现数据和视图的双向绑定的
<template><div>通信方式v-model</div><!-- 直接使用v-model实现双向绑定 --><div>v-model输入框</div><input v-model="userName"/><!-- v-model双向绑定的本质是下面这行代码 --><div style="margin-top:20px;">本质语法输入框</div><input :value="author" @input="author = $event.target.value"/></template><script setup lang='ts' name='VModelFather'>
import { ref } from 'vue';
let userName = ref('Ada King')
let author = ref('hoshino')</script>
value实现了数据到视图,input事件实现视图到数据,两者结合即完成数据双向绑定功能
效果如下图,更改前

输入框更改后

同理,我们在开发过程中,使用UI组件库时,UI组件库的底层代码也是这个原来,下面来模拟一下
<template><h2>通信方式v-model</h2><!-- 使用组件库中的组件,自定义一个输入框组件进行模拟 --><div>组件库input输入框(模拟)</div><CustomInput v-model="userName"/><div style="margin-top:20px;">本质写法=>组件库input输入框(模拟)</div><CustomInput :modelValue="author" @update:model-value="author = $event"/></template><script setup lang='ts' name='VModelFather'>
import { ref } from 'vue';
import CustomInput from './customInput.vue'
let userName = ref('Ada King')
let author = ref('hoshino')</script>
而组件库底层代码如下,通过接受props传入的数据,以及结合触发自定义事件(update:model-value)就实现了v-model进行数据通信的功能
<template><input class="input" type="text" :value="modelValue" @input="emit('update:model-value', (<HTMLInputElement>$event.target).value)">
</template><script setup lang='ts' name='CustomInput'>
defineProps(['modelValue']) //接收props传入的数据
//update:model-value只是一个完整的事件名,这是vue3的写法,中间的冒号不代表分割
const emit = defineEmits(['update:model-value'])
</script>
<style lang='scss' scoped>
.input{border: 2px solid #000;height: 26px;border-radius: 4px;
}
</style>
在我们日常开发中,一般直接使用v-model,那些底层实现,UI组件库已经帮我们处理了,所以本质的写法,我们平时接触不到,负责UI组件封装的小伙伴会接触更多
五、$attrs
$attrs用于祖孙通信,子组件作为中间人传递数据,$attrs是一个对象,包含所有父组件传入的标签属性
注意:$attrs会自动排除props中声明的属性(可以认为声明过的 props 被子组件自己“消费”了)
父组件,可以在控制台看setup中的数据
<!-- father.vue -->
<template><div class="father"><h3>父组件</h3><Child :a="a" :b="b" :c="c" :d="d" v-bind="{ x: 100, y: 200 }" :updateA="updateA" /></div>
</template><script setup lang="ts" name="Father">
import Child from './child.vue'
import { ref } from "vue";
let a = ref(1), b = ref(2), c = ref(3), d = ref(4)function updateA(value: number) {a.value = a.value += value
}
</script>
<style lang="scss" scoped>
.father {padding: 10px;background-color: rgb(160, 64, 219);
}
</style>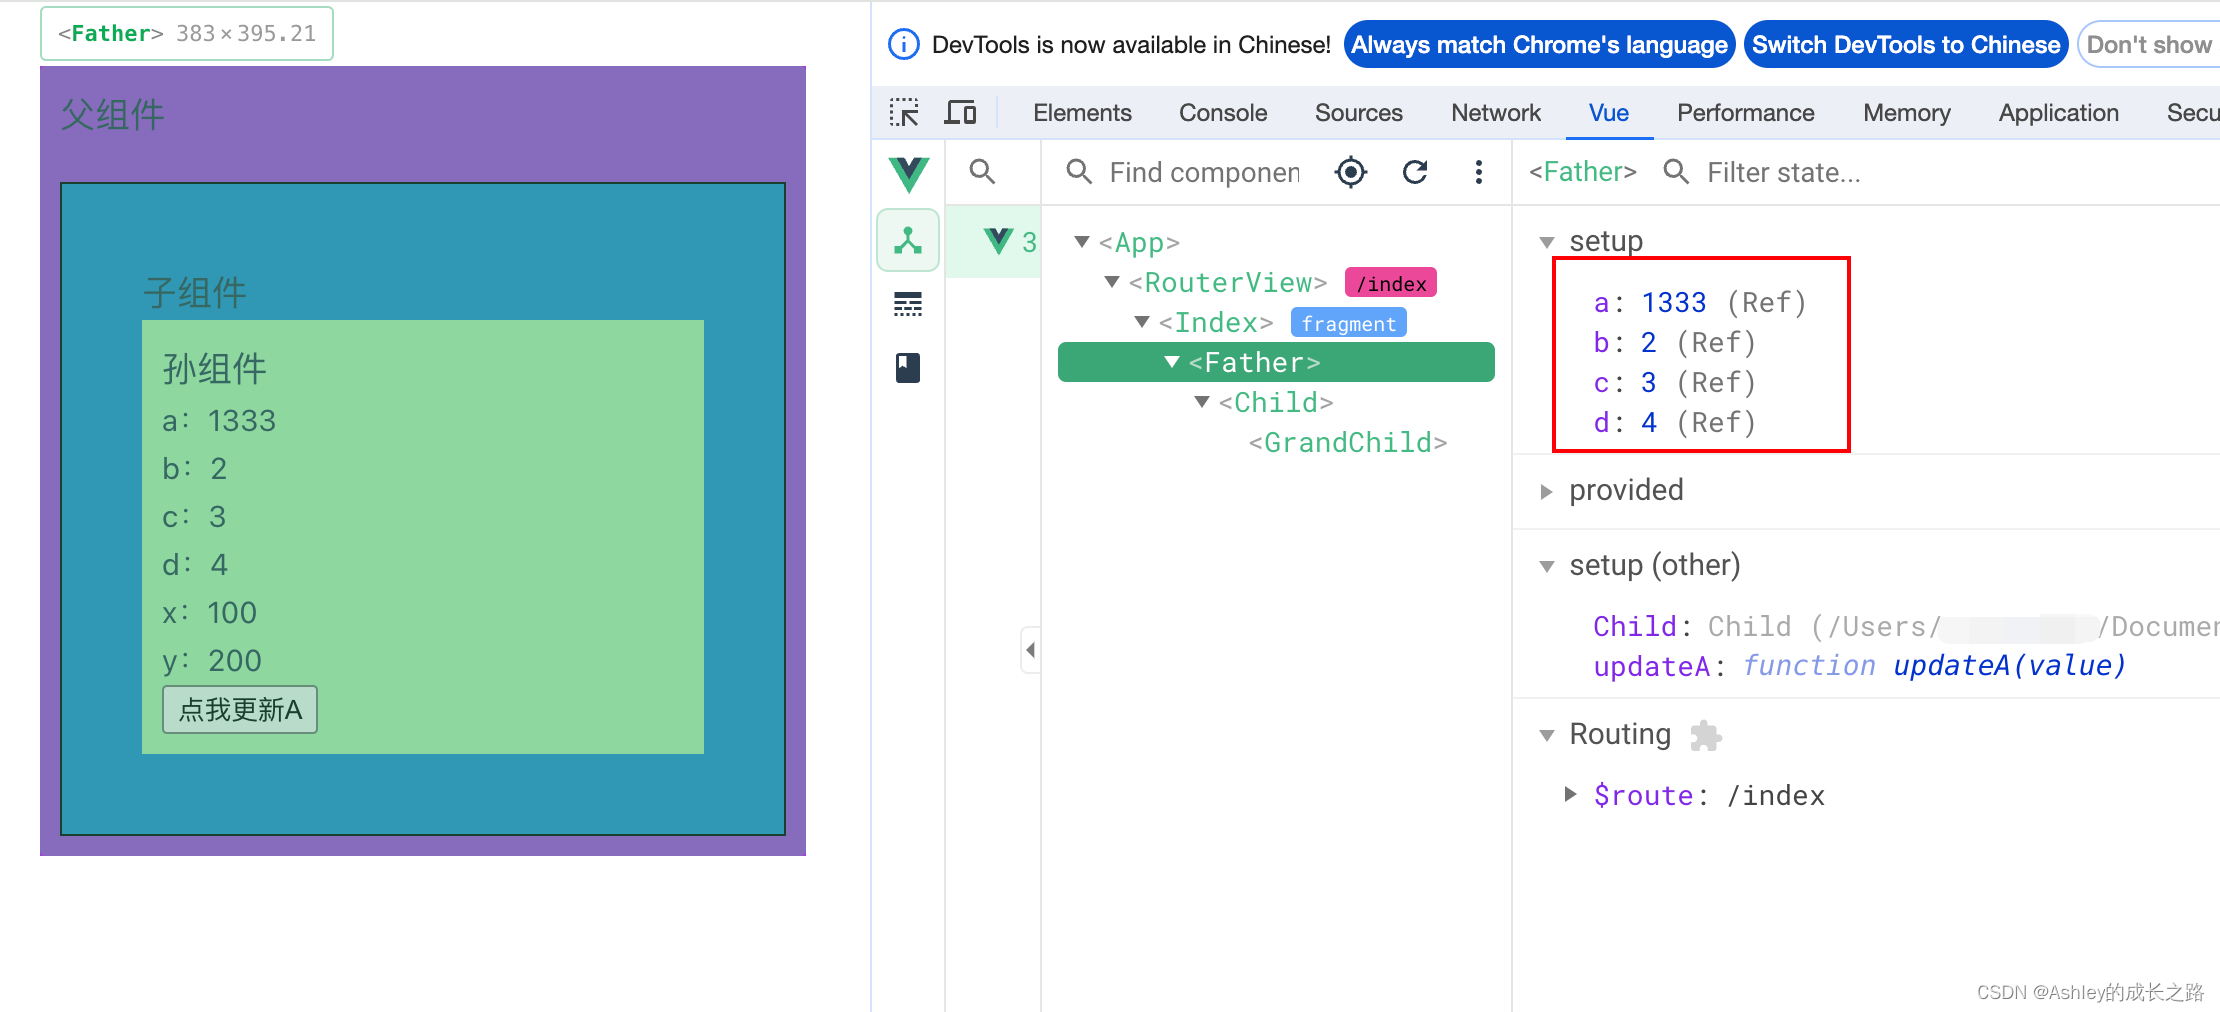 子组件,通过v-bind将$attrs中所有数据都直接传给孙组件,注意不要用props消耗父组件传过来的属性
<template><div class="child"><h3>子组件</h3><!-- v-bind 中间人传递 --><GrandChild v-bind="$attrs" /></div>
</template><script setup lang="ts" name="Child">
import GrandChild from './grandChild.vue'
</script>
<style lang="scss" scoped>
.child {background-color: rgb(36, 135, 205);
}
</style>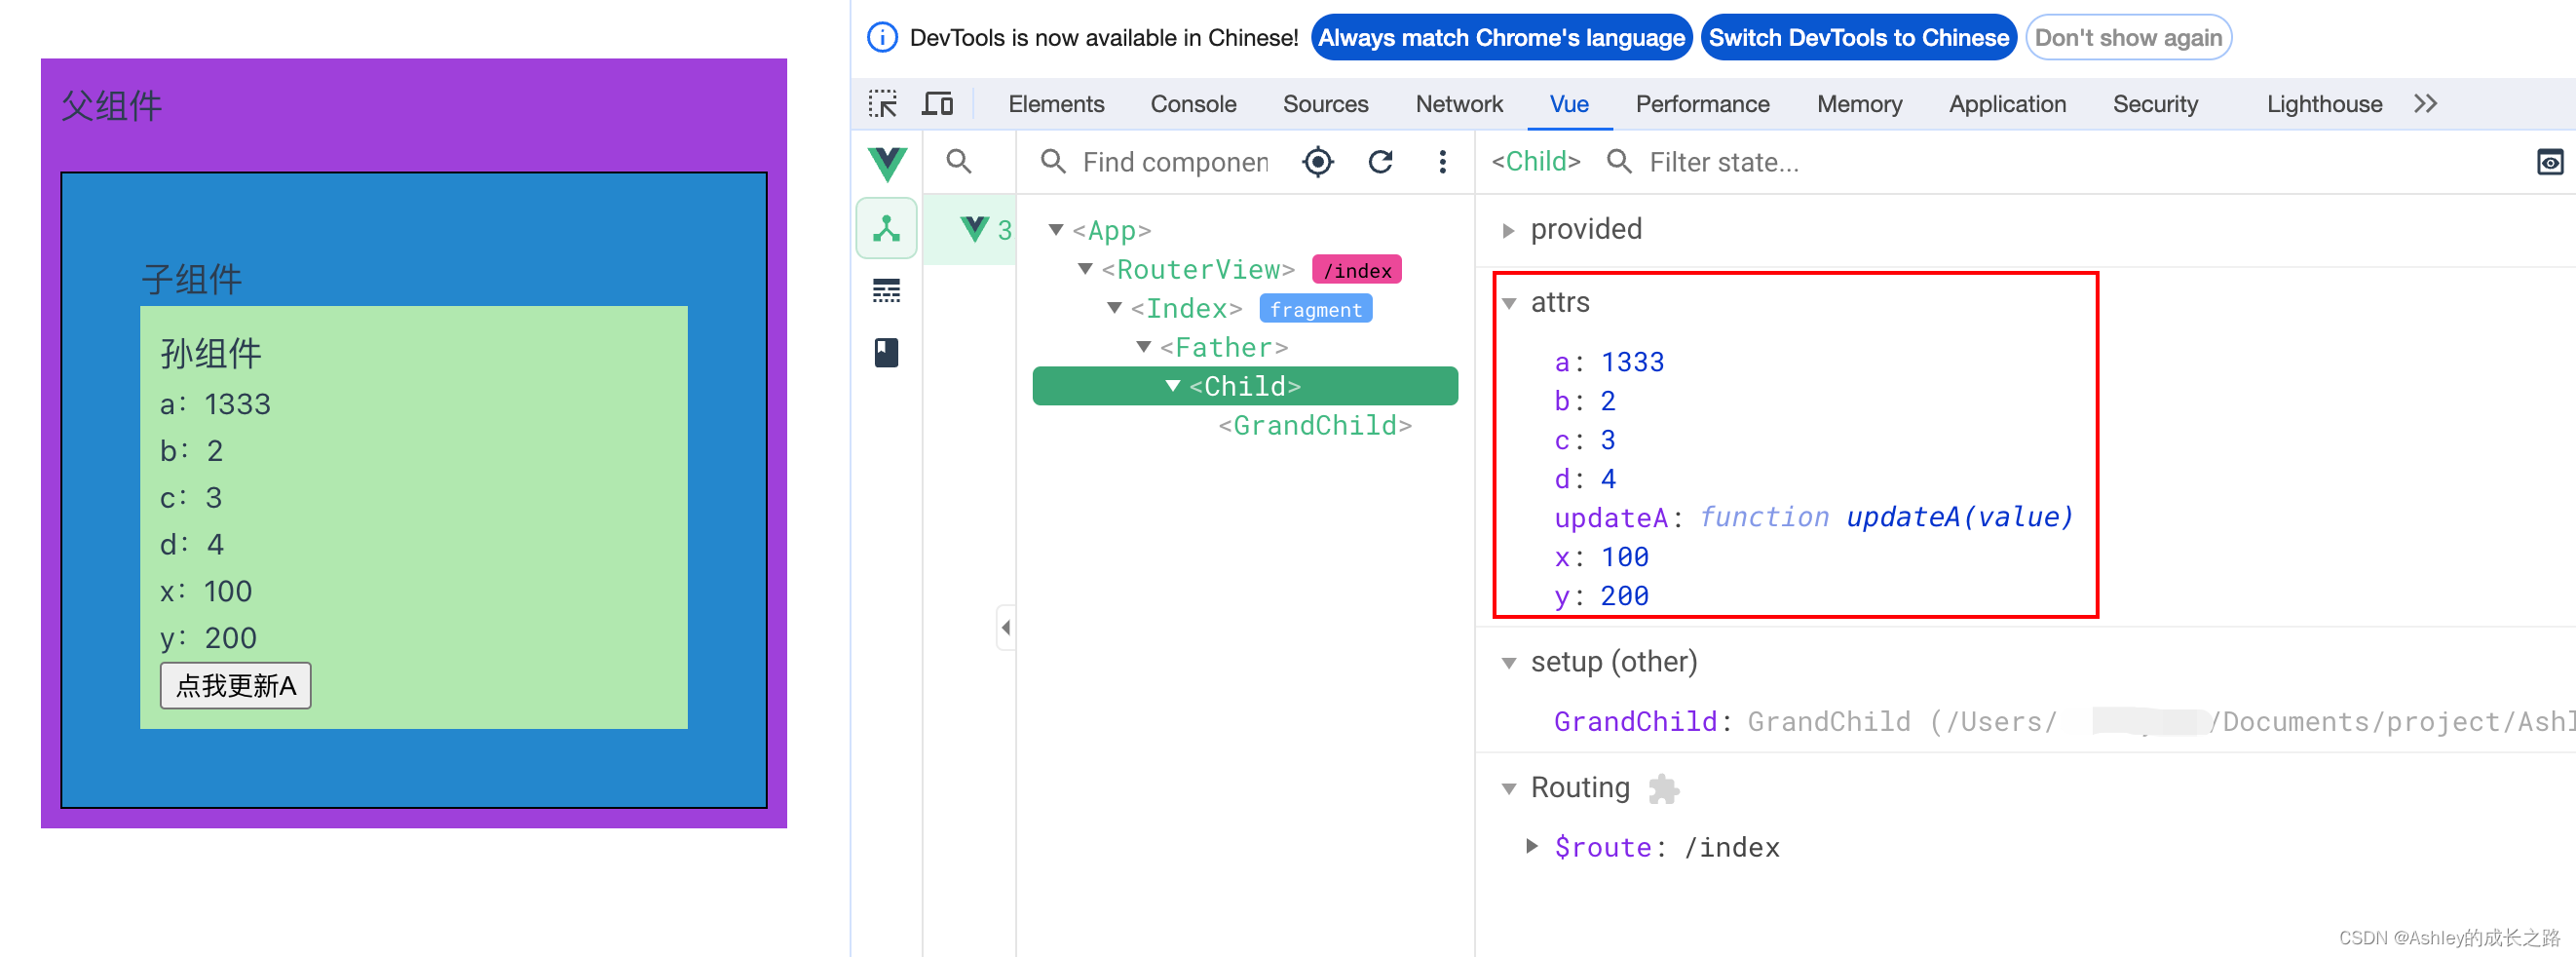 孙组件
孙组件
<template><div class="grand-child"><h3>孙组件</h3><h4>a:{{ a }}</h4><h4>b:{{ b }}</h4><h4>c:{{ c }}</h4><h4>d:{{ d }}</h4><h4>x:{{ x }}</h4><h4>y:{{ y }}</h4><button @click="updateA(666)">点我更新A</button></div>
</template><script setup lang="ts" name="GrandChild">
defineProps(['a', 'b', 'c', 'd', 'x', 'y', 'updateA'])
</script>
<style lang="scss" scoped>
.grand-child {padding: 10px;background-color: rgb(176, 232, 175);
}
</style>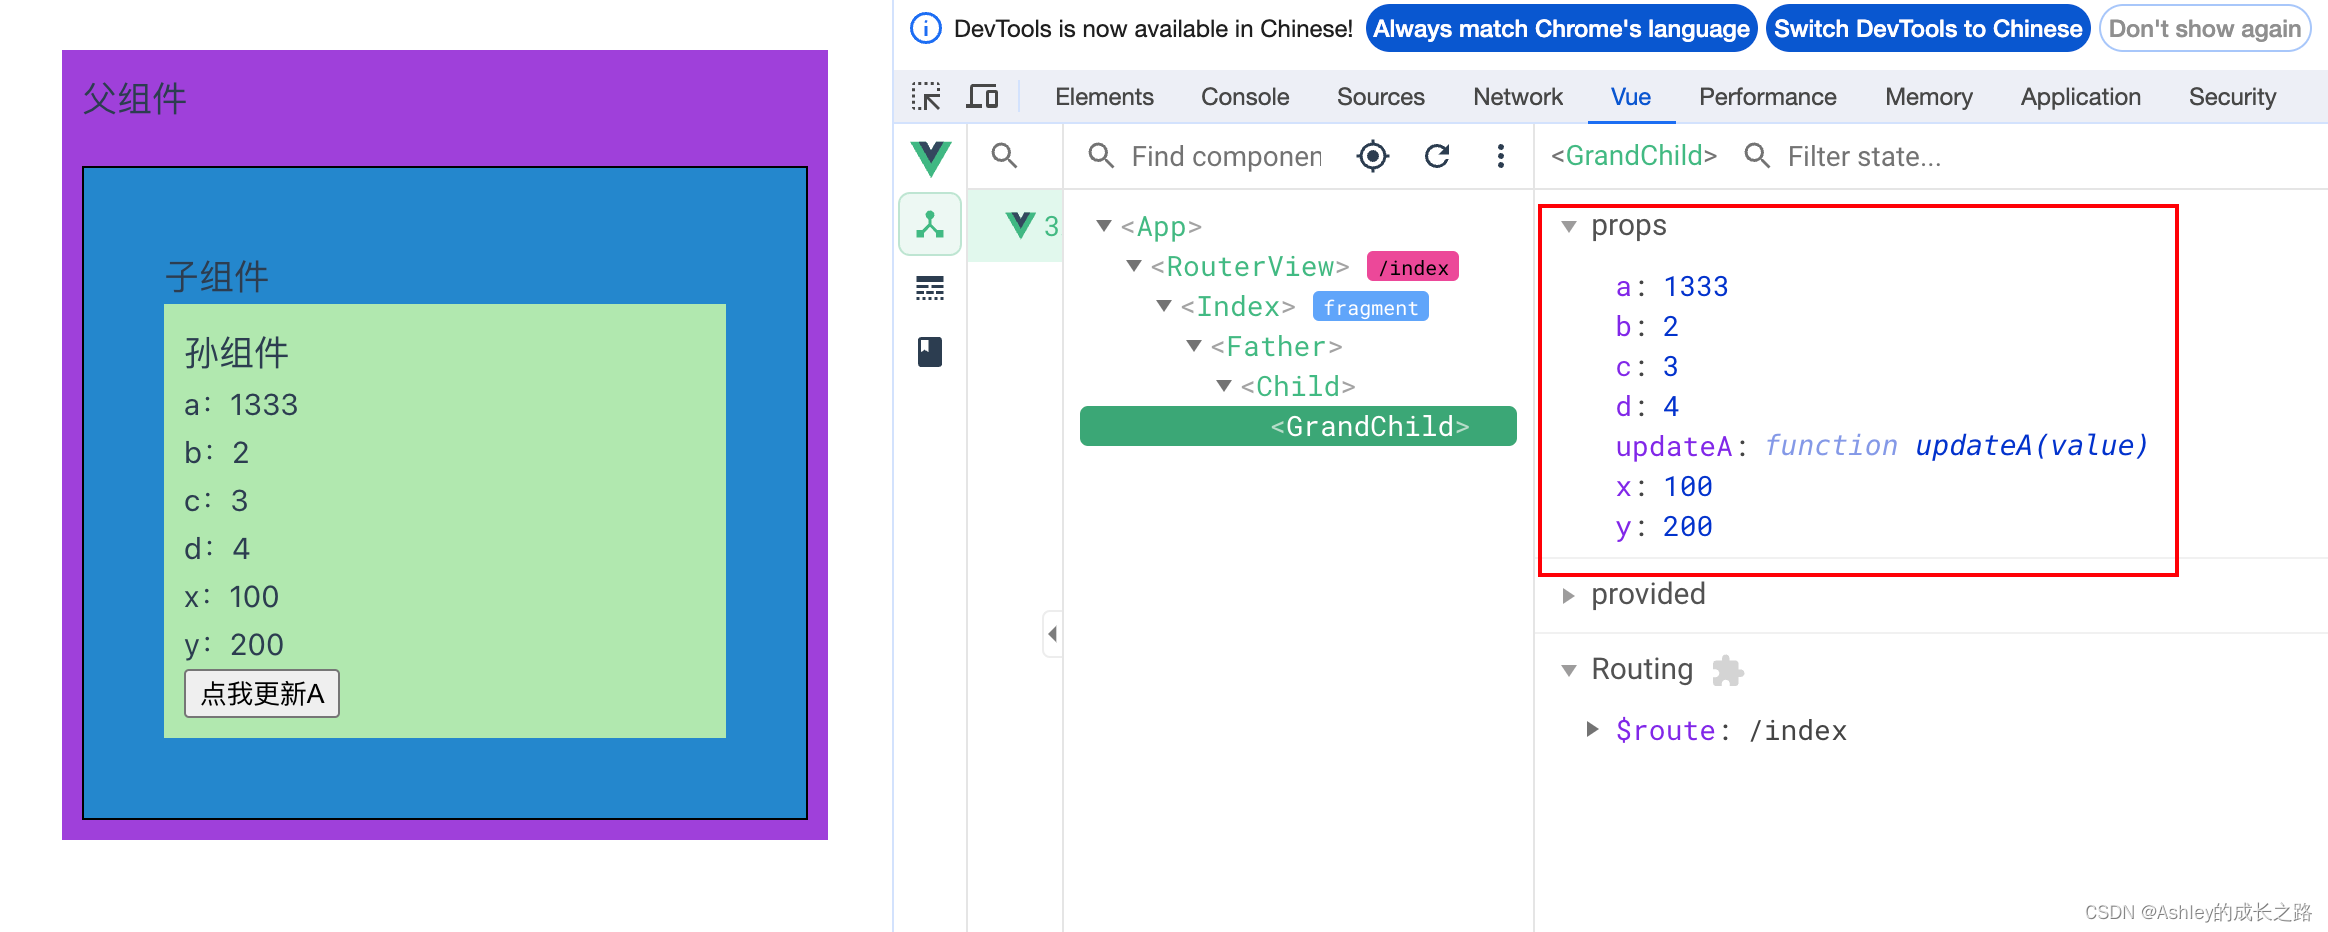
六、$refs & $parent
$refs用于父传子通信,$parent用于子传父通信
- $refs的值为对象,包含所有被
ref属性标识的DOM元素或组件实例。 - $parent的值为对象,是当前组件的父组件实例对象。
1、首先我们看下单个ref实现修改子组件数据的实现
<template><div class="father"><h2>父组件</h2><button @click="onChangeBookNum">修改子组件书的数量</button><Child ref="childRef1" /></div>
</template><script setup lang='ts' name='Father'>
import { ref } from 'vue';
import Child from './child.vue'let childRef1 = ref()function onChangeBookNum() {console.log('触发了onChangeBookNum事件',childRef1.value);childRef1.value.bookCount += 300
}
</script>
<style lang='scss' scoped>
.father {padding: 10px;background-color: rgb(87, 100, 184);
}
</style>
<template><div class="child"><h2>子组件</h2><div>书的总数:{{ bookCount }}</div><div><ul><li v-for="bookItem in bookList" :key="bookItem.id">{{ bookItem.name }}</li></ul></div></div>
</template><script setup lang='ts' name='Child'>
import { ref } from 'vue';
let bookCount = ref<number>(200)
let bookList = ref([{ id: 1, name: '你当象鸟飞往你的山' },{ id: 2, name: '少有人走的路' },
])defineExpose({ bookCount }) //子组件主动向外暴露的数据,父组件才能修改
</script>
<style lang='scss' scoped>
.child {padding: 10px;background-color: aqua;
}
</style>

2、由第1步可以看到,单个ref修改数据已实现, 获取全部ref如下
<template><div class="father"><h2>父组件</h2><!-- $refs是特殊占位符,直接用即可 --><button @click="getAllChildRef($refs)">获取所有ref</button><Child ref="childRef1" /><Child ref="childRef2" /></div>
</template><script setup lang='ts' name='Father'>
import { ref } from 'vue';
import Child from './child.vue'let childRef1 = ref()
let childRef2 = ref()//获取所有
function getAllChildRef(refs: { [key: string]: any }) {console.log('refs', refs);
}
</script>
<style lang='scss' scoped>
.father {padding: 10px;background-color: rgb(87, 100, 184);
}
</style>

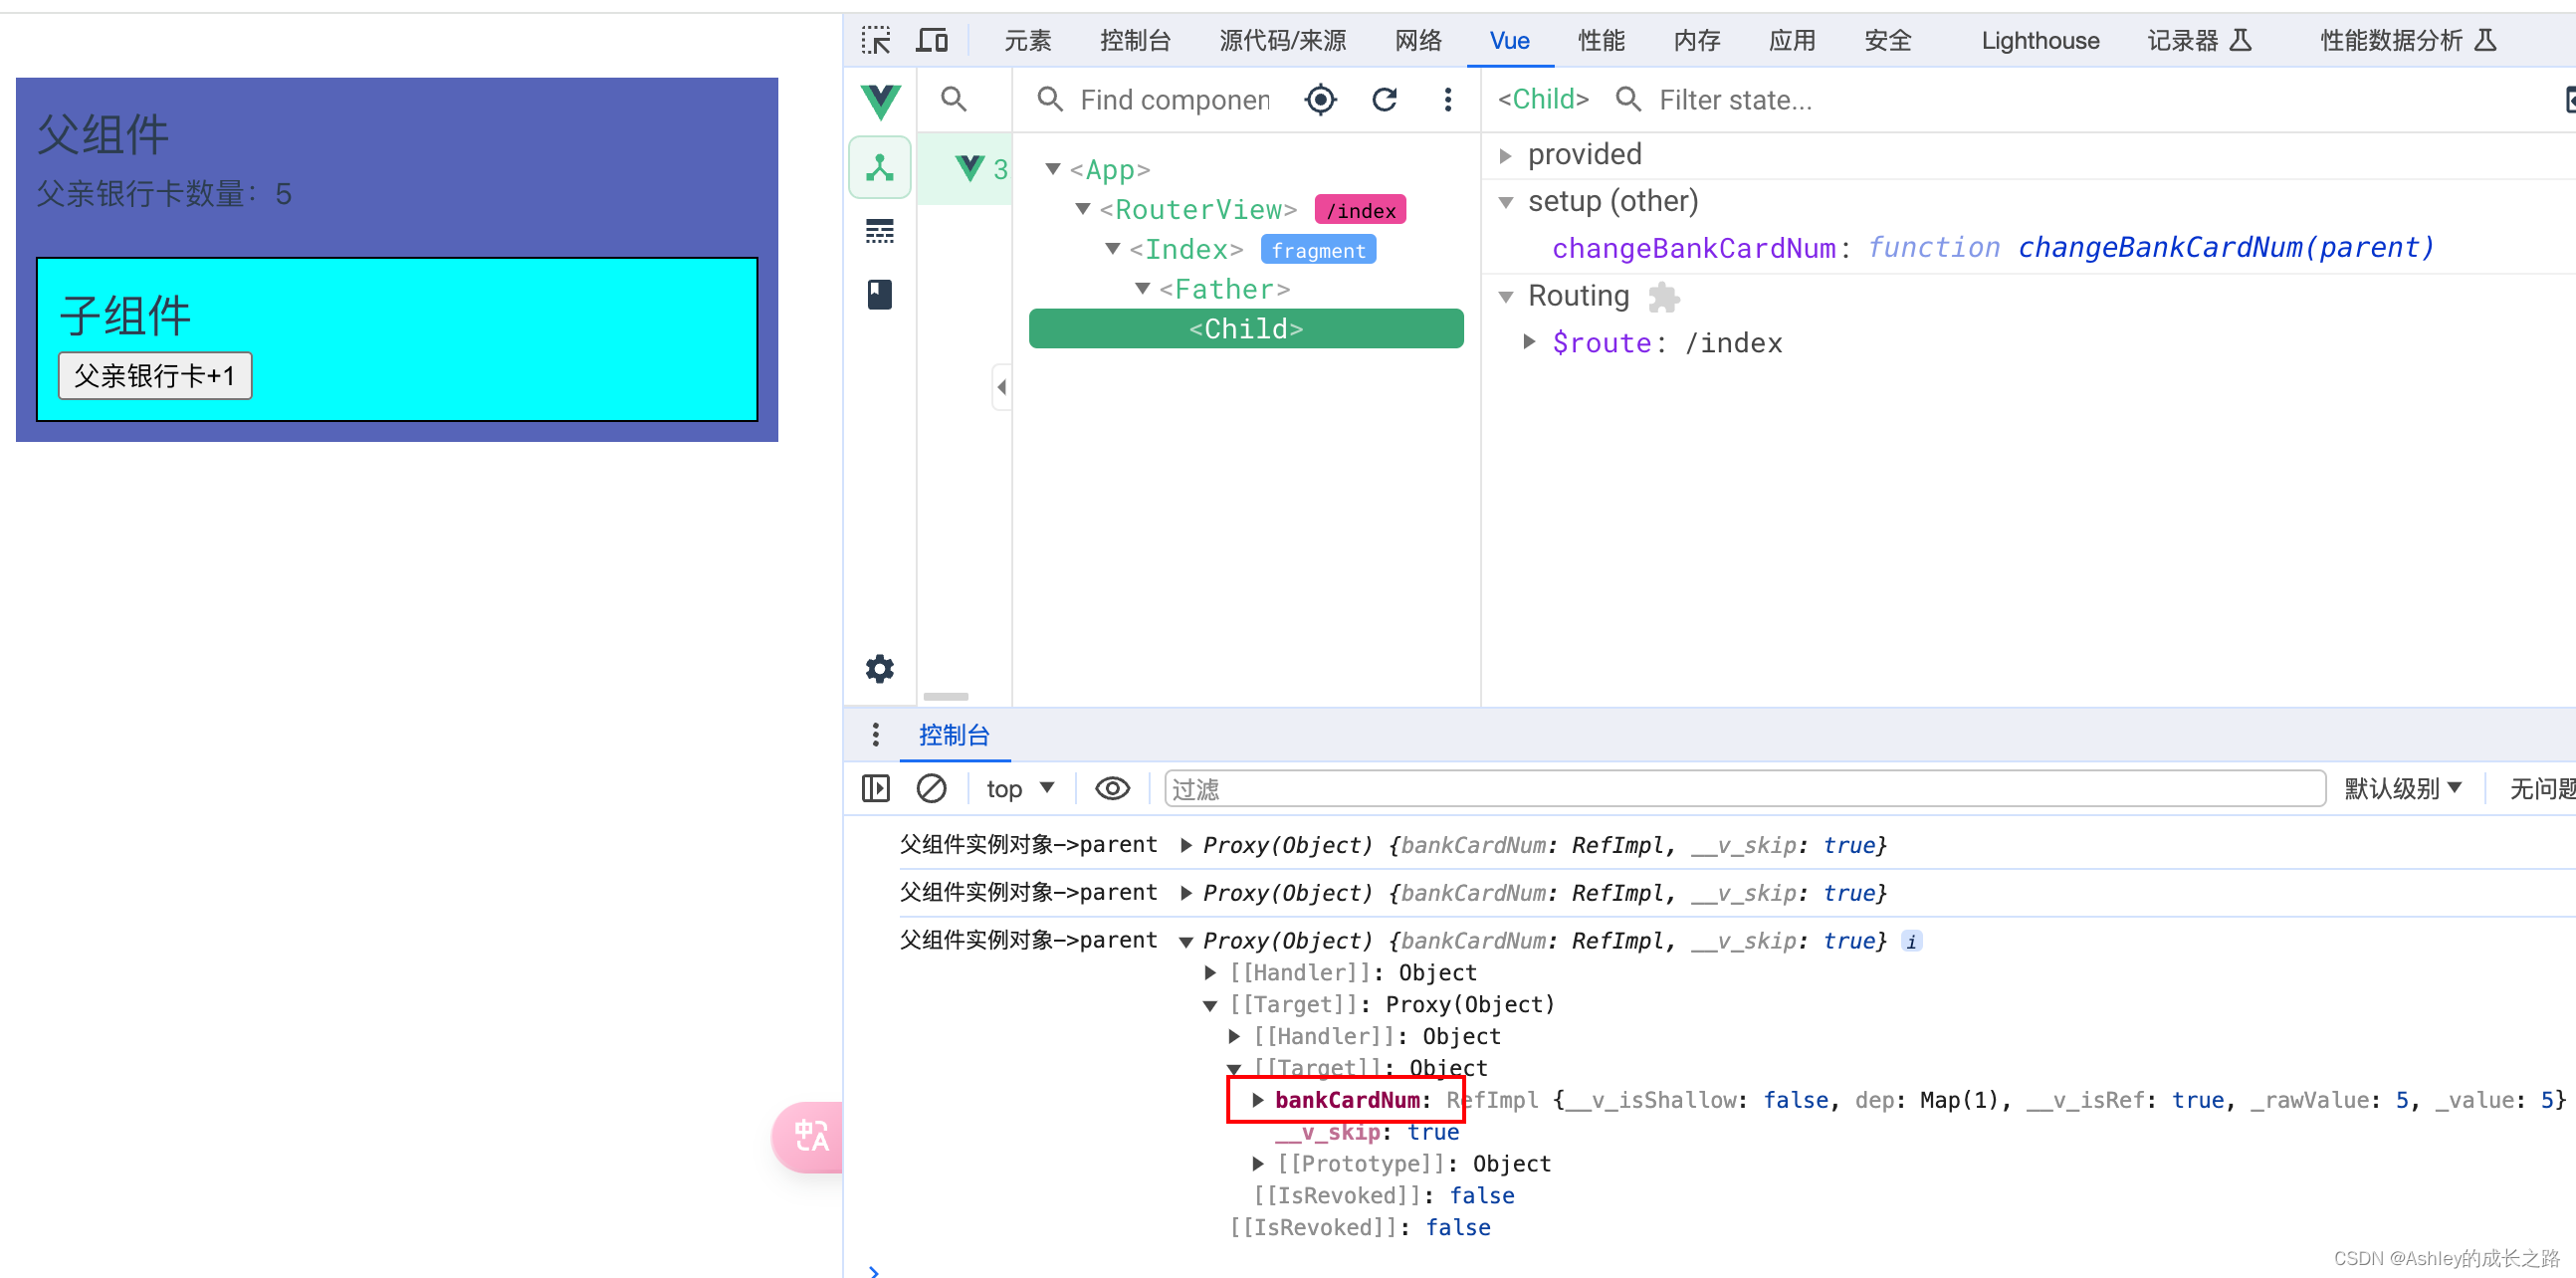
3、$parent与$refs类似,只是方向改为子传父
<template><div class="father"><h2>父组件</h2><div>父亲银行卡数量:{{ bankCardNum }}</div><Child /></div>
</template><script setup lang='ts' name='Father'>
import { ref } from 'vue';
import Child from './child.vue'let bankCardNum = ref(2)
defineExpose({ bankCardNum })</script>
<style lang='scss' scoped>
.father {padding: 10px;background-color: rgb(87, 100, 184);
}
</style>
<template><div class="child"><h2>子组件</h2><button @click="changeBankCardNum($parent)">父亲银行卡+1</button></div>
</template><script setup lang='ts' name='Child'>
function changeBankCardNum(parent: any) {console.log('父组件实例对象->parent', parent);parent.bankCardNum += 1
}
</script>
<style lang='scss' scoped>
.child {padding: 10px;background-color: aqua;
}
</style>
七、provide & inject
常用于祖孙组件直接通信,但不限于祖孙
- 在祖先组件中通过
provide配置向后代组件提供数据 - 在后代组件中通过
inject配置来声明接收数据
<template><div class="provide-container"><div>提供数据的组件</div><Inject /></div>
</template><script setup lang='ts' name='Provide'>
import { ref, provide } from 'vue';
import { v4 as uuidv4 } from 'uuid'
import Inject from './inject.vue'let bookList = ref([{ id: uuidv4(), name: '你当像鸟飞往你的山' },{ id: uuidv4(), name: '允许一切发生' },{ id: uuidv4(), name: '代码整洁之道' },
])
//提供为后代组件提供数据(官方描述是提供一个可以被后代组件注入值)
provide('bookList', bookList)</script>
<style lang='scss' scoped>
.provide-container {padding: 10px;background-color: aqua;}
</style>
<template><div class="inject-container"><h3>接收数据的组件</h3><div>接收到的数据:</div><ul><li v-for="bookItem in bookList" :key="bookItem.id">{{ bookItem.name }}</li></ul></div>
</template><script setup lang='ts' name='Inject'>
import { inject } from 'vue';//接收数据,(官方描述为注入一个由祖先组件或整个应用提供的值)第二个值为默认值
const bookList = inject('bookList', [{ id: '', name: '' }])</script>
<style lang='scss' scoped>
.inject-container {padding: 10px;background-color: aquamarine;
}
</style>
八、pina
和vue2的vuex类似的功能,是一个全局状态管理库,vue3使用pina作为全局状态管理,更符合视觉,他的store直接支持组合式写法
import {defineStore} from 'pinia'
import axios from 'axios'
import {nanoid} from 'nanoid'
import {reactive} from 'vue'export const useTalkStore = defineStore('talk',()=>{// talkList就是stateconst talkList = reactive(JSON.parse(localStorage.getItem('talkList') as string) || [])// getATalk函数相当于actionasync function getATalk(){// 发请求,下面这行的写法是:连续解构赋值+重命名let {data:{content:title}} = await axios.get('https://api.uomg.com/api/rand.qinghua?format=json')// 把请求回来的字符串,包装成一个对象let obj = {id:nanoid(),title}// 放到数组中talkList.unshift(obj)}return {talkList,getATalk}
})
数据的读、改和vuex类似,这里不赘述,可以直接看官方文档
简介 | Pinia值得你喜欢的 Vue Store![]() https://pinia.vuejs.org/zh/introduction.html
https://pinia.vuejs.org/zh/introduction.html
九、slot(插槽)
插槽包含 默认插槽、具名插槽、作用域插槽
1、默认插槽,name=“default”
父组件中:<Category title="今日热门游戏"><ul><li v-for="g in games" :key="g.id">{{ g.name }}</li></ul></Category>
子组件中:<template><div class="item"><h3>{{ title }}</h3><!-- 默认插槽 --><slot></slot></div></template>
2、具名插槽
父组件中:<Category title="今日热门游戏"><template v-slot:s1><ul><li v-for="g in games" :key="g.id">{{ g.name }}</li></ul></template><template #s2><a href="">更多</a></template></Category>
子组件中:<template><div class="item"><h3>{{ title }}</h3><slot name="s1"></slot><slot name="s2"></slot></div></template>
3、作用域插槽
父组件中:<Game v-slot="params"> //这一步是重点<!-- <Game v-slot:default="params"> --><ul><li v-for="g in params.games" :key="g.id">{{ g.name }}</li></ul></Game>子组件中:<template><div class="category"><h2>今日游戏榜单</h2><slot :games="games" a="哈哈"></slot></div></template><script setup lang="ts" name="Category">import {reactive} from 'vue'let games = reactive([{id:'asgdytsa01',name:'英雄联盟'},{id:'asgdytsa02',name:'王者荣耀'},{id:'asgdytsa03',name:'红色警戒'},{id:'asgdytsa04',name:'斗罗大陆'}])</script>ps:学习笔记,如有不恰当之处,欢迎交流
