在今天的文章中,我们将重点介绍如何使用 LangChain 提供的基础设施在 Python 中构建 Elasticsearch agent。 该 agent 应允许用户以自然语言询问有关 Elasticsearch 集群中数据的问题。
Elasticsearch 是一个强大的搜索引擎,支持词法和向量搜索。 ElasticSearch 可以在 RAG(检索增强生成)的上下文中使用,但这不是我们在本故事中的主题。 因此,我们不会使用 Elasticsearch 检索文档来创建注入提示中的上下文。 相反,我们在 agent 的上下文中使用 Elasticsearch,即我们正在构建一个 agent,它以自然语言与 Elasticsearch 进行通信,并执行搜索和聚合查询并解释这些查询。
为了方便大家学习,我们需要克隆如下的两个代码仓库:
- GitHub - liu-xiao-guo/elasticsearch-agent: ElasticSearch agent based on ElasticSearch, LangChain and ChatGPT 4
- GitHub - liu-xiao-guo/elasticsearch-agent-chainlit: Provides a simple UI for the ElasticSearch LangChain Agent
安装
安装 Elasticsearch 及 Kibana
如果你还没有安装好自己的 Elasticsearch 及 Kibana,那么请参考一下的文章来进行安装:
-
如何在 Linux,MacOS 及 Windows 上进行安装 Elasticsearch
-
Kibana:如何在 Linux,MacOS 及 Windows 上安装 Elastic 栈中的 Kibana
在安装的时候,请选择 Elastic Stack 8.x 进行安装。在安装的时候,我们可以看到如下的安装信息:

我们记下上面的 elastic 用户密码以及 fingerprint 的值。它们将在下面的配置中进行使用。
构建代理的秘诀
Elasticsearch agent
如果我们从如何编译 agent 的角度来看,我们将拥有以下成分:
- LLM(大型语言模型):你可以使用使用 ChatGPT 4 8K 模型。 我们也尝试过ChatGPT 3.5 16K模型,但结果不是很好。
- 4 个 自制 agent 工具:
- elastic list indices:获取所有可用 Elasticsearch 索引的工具
- elastic index show details:获取单个Elasticsearch索引信息的工具
- elastic index show data:用于从 Elasticsearch 索引获取条目列表的工具,有助于找出可用的数据。
- elastic search tool:该工具对 Elastisearch 索引执行特定查询并返回所有命中或聚合结果
- Specialised prompting:我们使用了一些特殊的指令来让 agent 正常工作。 提示指示代理首先获取索引的名称,然后获取索引字段名称。 没有内存相关指令的主要 prompt 是:
f"""Make sure that you query first the indices in the ElasticSearch database.Make sure that after querying the indices you query the field names. Then answer this question:{question}"""我们首先使用如下的命令来克隆 elasticsearch-agent 的代码:
git clone https://github.com/liu-xiao-guo/elasticsearch-agent然后我们在当前的目录下创建一个叫做 .env 的文件:
.env
OPENAI_API_KEY=YourOpenAiKey
OPENAI_MODEL=gpt-4-0613
# OPENAI_MODEL=gpt-3.5-turbo-16k-0613
REQUEST_TIMEOUT=300
LANGCHAIN_CACHE=false
CHATGPT_STREAMING=false
LLM_VERBOSE=true# Elastic Search related
ELASTIC_SERVER=https://127.0.0.1:9200
ELASTIC_USER=elastic
ELASTIC_PASSWORD=q2rqAIphl-fx9ndQ36CO
CERT_FINGERPRINT=bce66ed55097f255fc8e4420bdadafc8d609cc8027038c2dd09d805668f3459e
ELASTIC_VERIFY_CERTIFICATES=trueELASTIC_INDEX_DATA_FROM=0
ELASTIC_INDEX_DATA_SIZE=5
ELASTIC_INDEX_DATA_MAX_SIZE=50LANGCHAIN_VERBOSE=true
AGGS_LIMIT=200
TOKEN_LIMIT=6000
MAX_SEARCH_RETRIES = 100
在上面,你需要根据自己的 Elasticsearch 配置来配置:
- OPENAI_API_KEY:你需要申请自己的 OpenAI key
- ELASTIC_SERVER:Elasticsearch 的终端地址
- ELASTIC_USER:超级用户的账号名称。你也可以使用自己创建的其它账号
- ELASTIC_PASSWORD:超级用户 elastic 的密码
- CERT_FINGERPRINT:这个是 Elasticsearch 的证书的 fingerprint。可以在 Elasticsearch 启动的画面中找到
在当前的目录下,我们使用如下的命令来进行打包及安装:
python3 -m venv .venv
source .venv/bin/activate
$ pwd
/Users/liuxg/python/elasticsearch-agent
$ python3 -m venv .venv
$ source .venv/bin/activate我们然后安装 peorty:
pip3 install poetry接下来,我们使用如下的命令来进行打包并安装:
rm poetry.lock
poetry install
(.venv) $ rm poetry.lock
(.venv) $ poetry install
Updating dependencies
Resolving dependencies... Downloading https://files.pythonhosted.org/packages/a7/94/ace0fdea5241a27d13543ee117cbc65868e82213fb31a8eb7fe9ff23f313/numpy-1.26.4-cp310-cp310-macosx_10_9_x86_64.wResolving dependencies... Downloading https://files.pythonhosted.org/packages/a7/94/ace0fdea5241a27d13543ee117cbc65868e82213fb31a8eb7fe9ff23f313/numpy-1.26.4-cp310-cp310-macosx_10_9_x86_64.wResolving dependencies... Downloading https://files.pythonhosted.org/packages/a7/94/ace0fdea5241a27d13543ee117cbc65868e82213fb31a8eb7fe9ff23f313/numpy-1.26.4-cp310-cp310-macosx_10_9_x86_64.wResolving dependencies... Downloading https://files.pythonhosted.org/packages/a7/94/ace0fdea5241a27d13543ee117cbc65868e82213fb31a8eb7fe9ff23f313/numpy-1.26.4-cp310-cp310-macosx_10_9_x86_64.wResolving dependencies... Downloading https://files.pythonhosted.org/packages/a7/94/ace0fdea5241a27d13543ee117cbc65868e82213fb31a8eb7fe9ff23f313/numpy-1.26.4-cp310-cp310-macosx_10_9_x86_64.wResolving dependencies... Downloading https://files.pythonhosted.org/packages/a7/94/ace0fdea5241a27d13543ee117cbc65868e82213fb31a8eb7fe9ff23f313/numpy-1.26.4-cp310-cp310-macosx_10_9_x86_64.wResolving dependencies... Downloading https://files.pythonhosted.org/packages/a7/94/ace0fdea5241a27d13543ee117cbc65868e82213fb31a8eb7fe9ff23f313/numpy-1.26.4-cp310-cp310-macosx_10_9_x86_64.wResolving dependencies... Downloading https://files.pythonhosted.org/packages/a7/94/ace0fdea5241a27d13543ee117cbc65868e82213fb31a8eb7fe9ff23f313/numpy-1.26.4-cp310-cp310-macosx_10_9_x86_64.wResolving dependencies... Downloading https://files.pythonhosted.org/packages/a7/94/ace0fdea5241a27d13543ee117cbc65868e82213fb31a8eb7fe9ff23f313/numpy-1.26.4-cp310-cp310-macosx_10_9_x86_64.wResolving dependencies... Downloading https://files.pythonhosted.org/packages/a7/94/ace0fdea5241a27d13543ee117cbc65868e82213fb31a8eb7fe9ff23f313/numpy-1.26.4-cp310-cp310-macosx_10_9_x86_64.wResolving dependencies... Downloading https://files.pythonhosted.org/packages/a7/94/ace0fdea5241a27d13543ee117cbc65868e82213fb31a8eb7fe9ff23f313/numpy-1.26.4-cp310-cp310-macosx_10_9_x86_64.wResolving dependencies... Downloading https://files.pythonhosted.org/packages/a7/94/ace0fdea5241a27d13543ee117cbc65868e82213fb31a8eb7fe9ff23f313/numpy-1.26.4-cp310-cp310-macosx_10_9_x86_64.wResolving dependencies... Downloading https://files.pythonhosted.org/packages/a7/94/ace0fdea5241a27d13543ee117cbc65868e82213fb31a8eb7fe9ff23f313/numpy-1.26.4-cp310-cp310-macosx_10_9_x86_64.wResolving dependencies... Downloading https://files.pythonhosted.org/packages/a7/94/ace0fdea5241a27d13543ee117cbc65868e82213fb31a8eb7fe9ff23f313/numpy-1.26.4-cp310-cp310-macosx_10_9_x86_64.wResolving dependencies... Downloading https://files.pythonhosted.org/packages/a7/94/ace0fdea5241a27d13543ee117cbc65868e82213fb31a8eb7fe9ff23f313/numpy-1.26.4-cp310-cp310-macosx_10_9_x86_64.wResolving dependencies... Downloading https://files.pythonhosted.org/packages/a7/94/ace0fdea5241a27d13543ee117cbc65868e82213fb31a8eb7fe9ff23f313/numpy-1.26.4-cp310-cp310-macosx_10_9_x86_64.wResolving dependencies... Downloading https://files.pythonhosted.org/packages/a7/94/ace0fdea5241a27d13543ee117cbc65868e82213fb31a8eb7fe9ff23f313/numpy-1.26.4-cp310-cp310-macosx_10_9_x86_64.wResolving dependencies... Downloading https://files.pythonhosted.org/packages/a7/94/ace0fdea5241a27d13543ee117cbc65868e82213fb31a8eb7fe9ff23f313/numpy-1.26.4-cp310-cp310-macosx_10_9_x86_64.wResolving dependencies... Downloading https://files.pythonhosted.org/packages/a7/94/ace0fdea5241a27d13543ee117cbc65868e82213fb31a8eb7fe9ff23f313/numpy-1.26.4-cp310-cp310-macosx_10_9_x86_64.wResolving dependencies... Downloading https://files.pythonhosted.org/packages/a7/94/ace0fdea5241a27d13543ee117cbc65868e82213fb31a8eb7fe9ff23f313/numpy-1.26.4-cp310-cp310-macosx_10_9_x86_64.wResolving dependencies... Downloading https://files.pythonhosted.org/packages/a7/94/ace0fdea5241a27d13543ee117cbc65868e82213fb31a8eb7fe9ff23f313/numpy-1.26.4-cp310-cp310-macosx_10_9_x86_64.wResolving dependencies... Downloading https://files.pythonhosted.org/packages/a7/94/ace0fdea5241a27d13543ee117cbc65868e82213fb31a8eb7fe9ff23f313/numpy-1.26.4-cp310-cp310-macosx_10_9_x86_64.wResolving dependencies... Downloading https://files.pythonhosted.org/packages/a7/94/ace0fdea5241a27d13543ee117cbc65868e82213fb31a8eb7fe9ff23f313/numpy-1.26.4-cp310-cp310-macosx_10_9_x86_64.wResolving dependencies... Downloading https://files.pythonhosted.org/packages/a7/94/ace0fdea5241a27d13543ee117cbc65868e82213fb31a8eb7fe9ff23f313/numpy-1.26.4-cp310-cp310-macosx_10_9_x86_64.wResolving dependencies... Downloading https://files.pythonhosted.org/packages/12/f6/0232cc0c617Resolving dependencies... (22.7s)Package operations: 0 installs, 23 updates, 0 removals• Updating typing-extensions (4.8.0 -> 4.9.0)• Updating certifi (2023.7.22 -> 2024.2.2)• Updating charset-normalizer (3.3.0 -> 3.3.2)• Updating frozenlist (1.4.0 -> 1.4.1)• Updating idna (3.4 -> 3.6)• Updating multidict (6.0.4 -> 6.0.5)• Updating pydantic-core (2.10.1 -> 2.16.2)• Updating urllib3 (1.26.17 -> 2.2.1)• Updating attrs (23.1.0 -> 23.2.0)• Updating marshmallow (3.20.1 -> 3.20.2)• Updating pydantic (2.4.2 -> 2.6.1)• Updating yarl (1.9.2 -> 1.9.4)• Updating aiohttp (3.8.6 -> 3.9.3)• Updating dataclasses-json (0.6.1 -> 0.6.4)• Updating elastic-transport (8.4.1 -> 8.12.0)• Updating langsmith (0.0.43 -> 0.0.92)• Updating numpy (1.25.2 -> 1.26.4)• Updating regex (2023.10.3 -> 2023.12.25)• Updating sqlalchemy (2.0.21 -> 2.0.27)• Updating tqdm (4.66.1 -> 4.66.2)• Updating elasticsearch (8.10.0 -> 8.12.1)• Updating python-dotenv (1.0.0 -> 1.0.1)• Updating tiktoken (0.5.1 -> 0.5.2)Writing lock fileInstalling the current project: elasticsearch-agent (0.1.7)我们使用如下的命令来进行构建:
poetry build(.venv) $ poetry build
Building elasticsearch-agent (0.1.7)- Building sdist- Built elasticsearch_agent-0.1.7.tar.gz- Building wheel- Built elasticsearch_agent-0.1.7-py3-none-any.whl
(.venv) $ ls 我们可以通过如下的命令来进行检查是否已经生成安装文件:
(.venv) $ pwd
/Users/liuxg/python/elasticsearch-agent
(.venv) $ ls
README.md           dist                elasticsearch_agent pyproject.toml
datasets            docs                poetry.lock
(.venv) $ ls dist/
elasticsearch_agent-0.1.7-py3-none-any.whl elasticsearch_agent-0.1.7.tar.gz
elasticsearch-agent-chainlit
我们在另外一个 terminal 中使用如下的命令来克隆代码:
git clone https://github.com/liu-xiao-guo/elasticsearch-agent-chainlit此功能中使用的 prompt 最多包含用户之前的 5 个问题。 这是一种仅通过问题来记忆的简单尝试。 它还包含从 Elasticsearch 获取每个问题的索引和详细信息的说明。
我们使用同样的方法来创建虚拟环境:
python3 -m venv .venv
source .venv/bin/activate
我们在当前的目录下创建一个和上面 elasticsearch-agent 项目中一样的 .env 文件:
.env
OPENAI_API_KEY=YourOpenAIkey
OPENAI_MODEL=gpt-4-0613
# OPENAI_MODEL=gpt-3.5-turbo-16k-0613
REQUEST_TIMEOUT=300
LANGCHAIN_CACHE=false
CHATGPT_STREAMING=false
LLM_VERBOSE=true# Elastic Search related
ELASTIC_SERVER=https://127.0.0.1:9200
ELASTIC_USER=elastic
ELASTIC_PASSWORD=q2rqAIphl-fx9ndQ36CO
CERT_FINGERPRINT=bce66ed55097f255fc8e4420bdadafc8d609cc8027038c2dd09d805668f3459e
ELASTIC_VERIFY_CERTIFICATES=trueELASTIC_INDEX_DATA_FROM=0
ELASTIC_INDEX_DATA_SIZE=5
ELASTIC_INDEX_DATA_MAX_SIZE=50LANGCHAIN_VERBOSE=true
AGGS_LIMIT=200
TOKEN_LIMIT=6000
MAX_SEARCH_RETRIES = 100
QUESTIONS_TO_KEEP=5
但是我们需要额外添加 QUESTIONS_TO_KEEP=5。
在进行安装之前,我们需要根据上一步所生成的安装包的位置来修改 pyproject.toml 文件:
pyproject.toml
[tool.poetry]
name = "elasticsearch-chainlit"
version = "0.1.0"
description = "Provides a simple UI for the ElasticSearch LangChain Agent."
authors = ["Gil Fernandes <gil.fernandes@onepointltd.com>"]
readme = "README.md"[tool.poetry.dependencies]
python = "^3.11"
chainlit = "^0.7.2"
elasticsearch-agent = {path = "../elasticsearch-agent/dist/elasticsearch_agent-0.1.7-py3-none-any.whl", develop = true}[build-system]
requires = ["poetry-core"]
build-backend = "poetry.core.masonry.api"
我们需要修改 elasticsearch-agent 的值。
我们使用如下的命令来运行上面的代码:
poetry install(.venv) $ pwd
/Users/liuxg/python/elasticsearch-agent-chainlit
(.venv) $ poetry install
Installing dependencies from lock fileNo dependencies to install or updateInstalling the current project: elasticsearch-chainlit (0.1.0)我们可以通过如下的命令来查看所安装的包:
(.venv) $ pip3 list | grep elasticsearch
elasticsearch                            8.12.1
elasticsearch-agent                      0.1.7
elasticsearch-chainlit                   0.1.0      /Users/liuxg/python/elasticsearch-agent-chainlit
接下来,我们使用如下的命令来运行:
chainlit run ./elasticsearch_chainlit/ui/agent_chainlit.py 
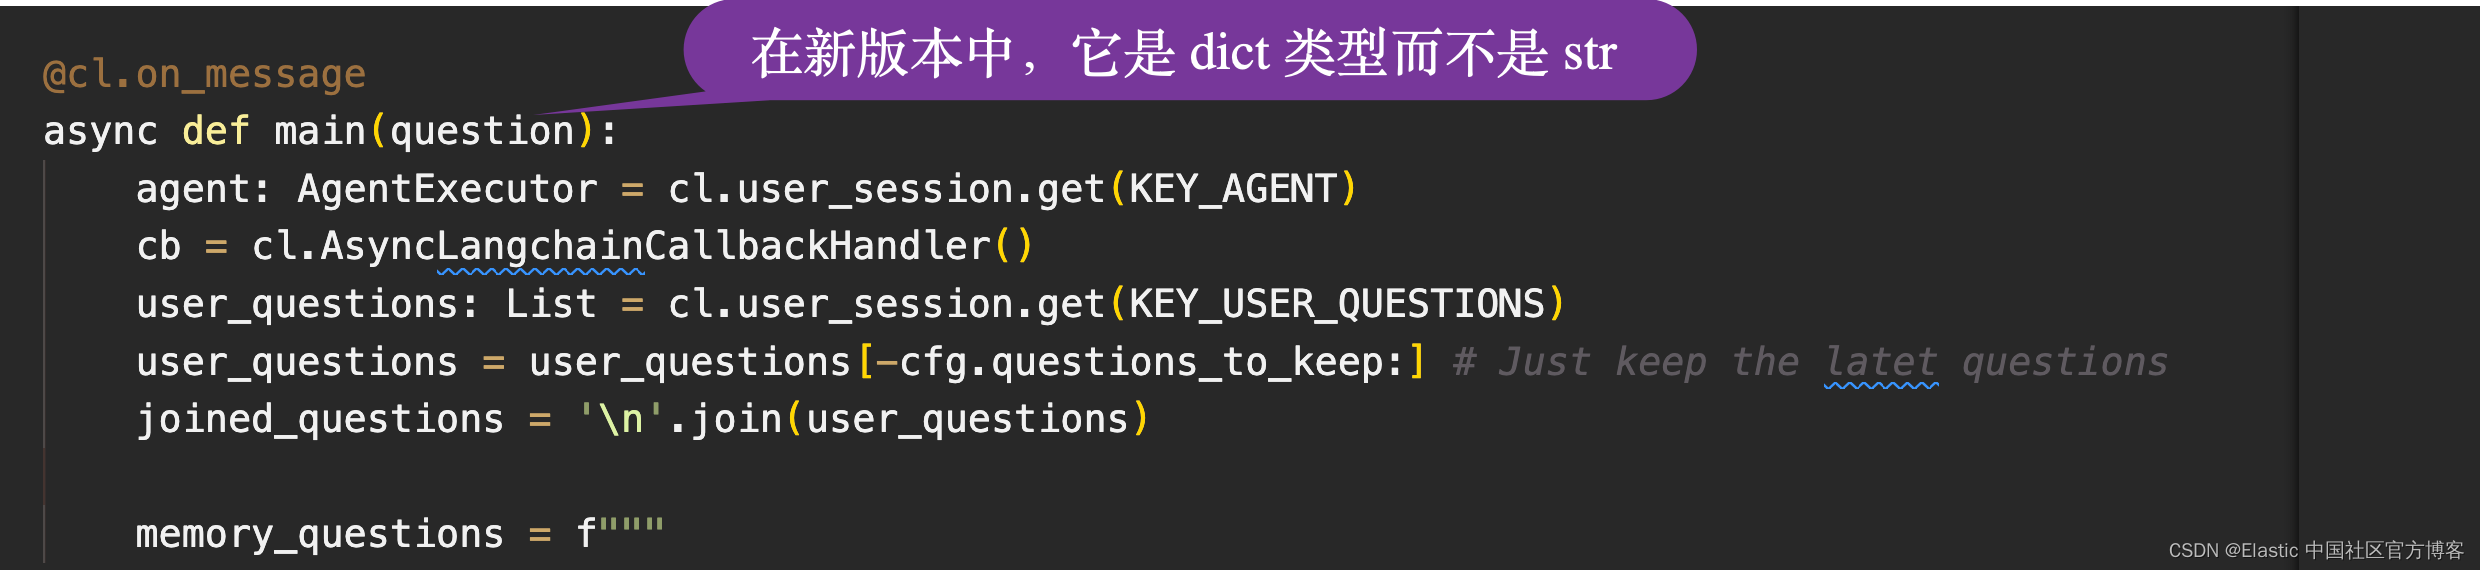
上面是我们能看到的界面。在运行代码时,一定要确保 chainlit 出于最新的版本。在早期的版本中,question 是一个 dict 类型的数据而不是 str:
elasticsearch_chainlit/ui/agent_chainlit.py
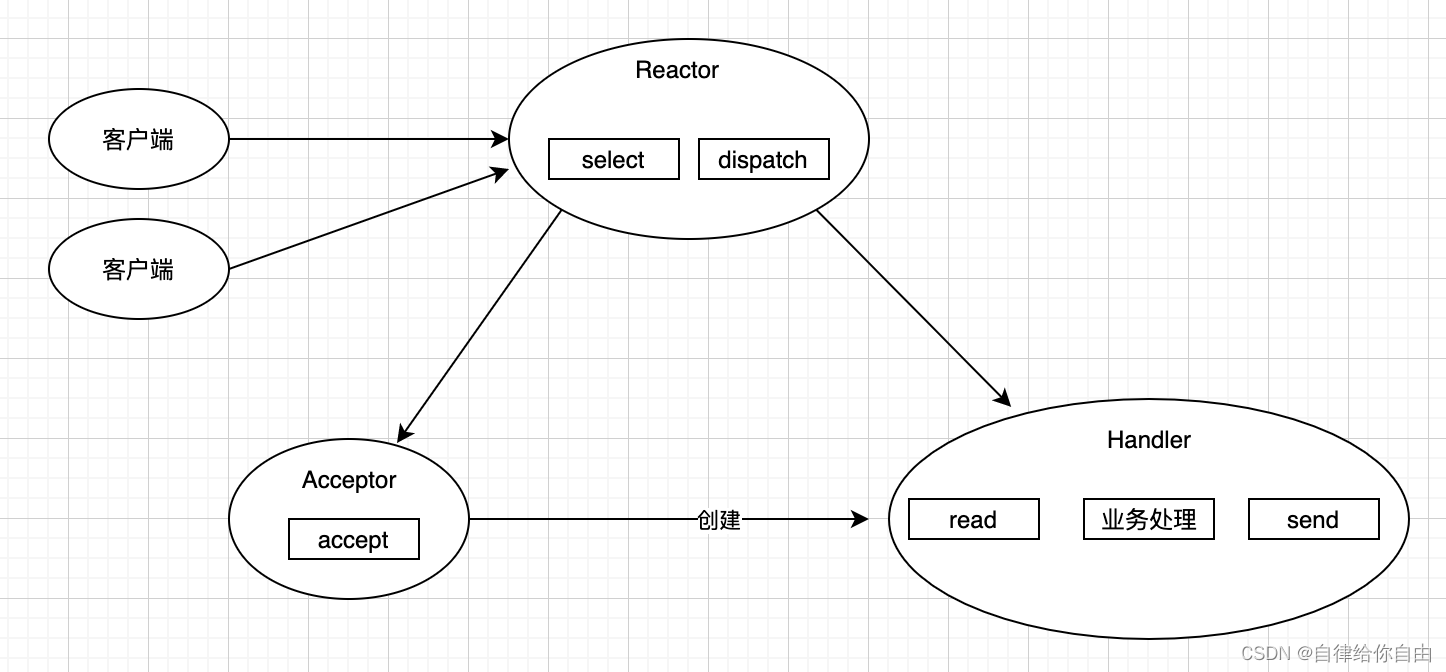
Agent 工作流程
Elasticsearch agent 工作流程
工作流程有两部分:
设置 — 执行三个步骤:
- 初始化工具
- 设置 LLM 模型
- 设置 agent,包括提示
执行流程 — 以下是工作流程步骤:
- 用户提出问题
- LLM 分析问题
- 网关:决定使用哪个工具。 在某些情况下,可能没有任何工具可以完成该任务。
- 网关案例 1:找到工具 — 执行工具并接收其观察结果。 在我们的例子中,这是一个 JSON 响应。
- 网关案例 2:未找到工具 — 工作流程以错误消息结束。
- 如果找到工具:该工具的观察结果将发送回 LLM。
- 网关:决定使用哪个工具,或者是否找不到工具并且流程终止,或者我们是否有最终答案。 如果决定使用该工具,我们将再次循环执行相同的步骤。
执行流程是循环的,直到找到最终答案。 这意味着对于一个问题,agent 可以访问多个工具,甚至多次访问同一个工具。
通常,工作流程会在与 LLM 交互 15 次并出现错误后停止。
工具列表:
- 列表索引工具:此工具列出 Elasticsearch 索引,通常在 agent 每次回答任何问题时调用。 该工具接收分隔符作为输入,并输出由它分隔的索引列表。
- 索引详细信息工具:该工具列出特定索引的别名、映射和设置。 它接收 Elasticsearch 索引名称作为输入。
- 索引数据工具:该工具用于从 Elasticsearch 索引中获取条目列表,有助于找出可用的数据。 根据我的测试,这是 ChatGPT 使用最少的工具。
- 索引搜索工具:此工具是搜索工具,需要输入索引、查询以及查询的起始位置和长度。 它解析查询并尝试确定查询是搜索还是聚合查询,并根据返回结果(如果是搜索)或聚合(如果是聚合查询)。 但它也试图避免响应的 token 大小超过某个阈值,因此可能会重试查询。 这是这个工具的主要方法。在此文件中,你可以找到输入模型(SearchToolInput)和该工具的运行方法(elastic_search):
展示
首先,我们使用 ChatGPT 来生成一个样本文档。

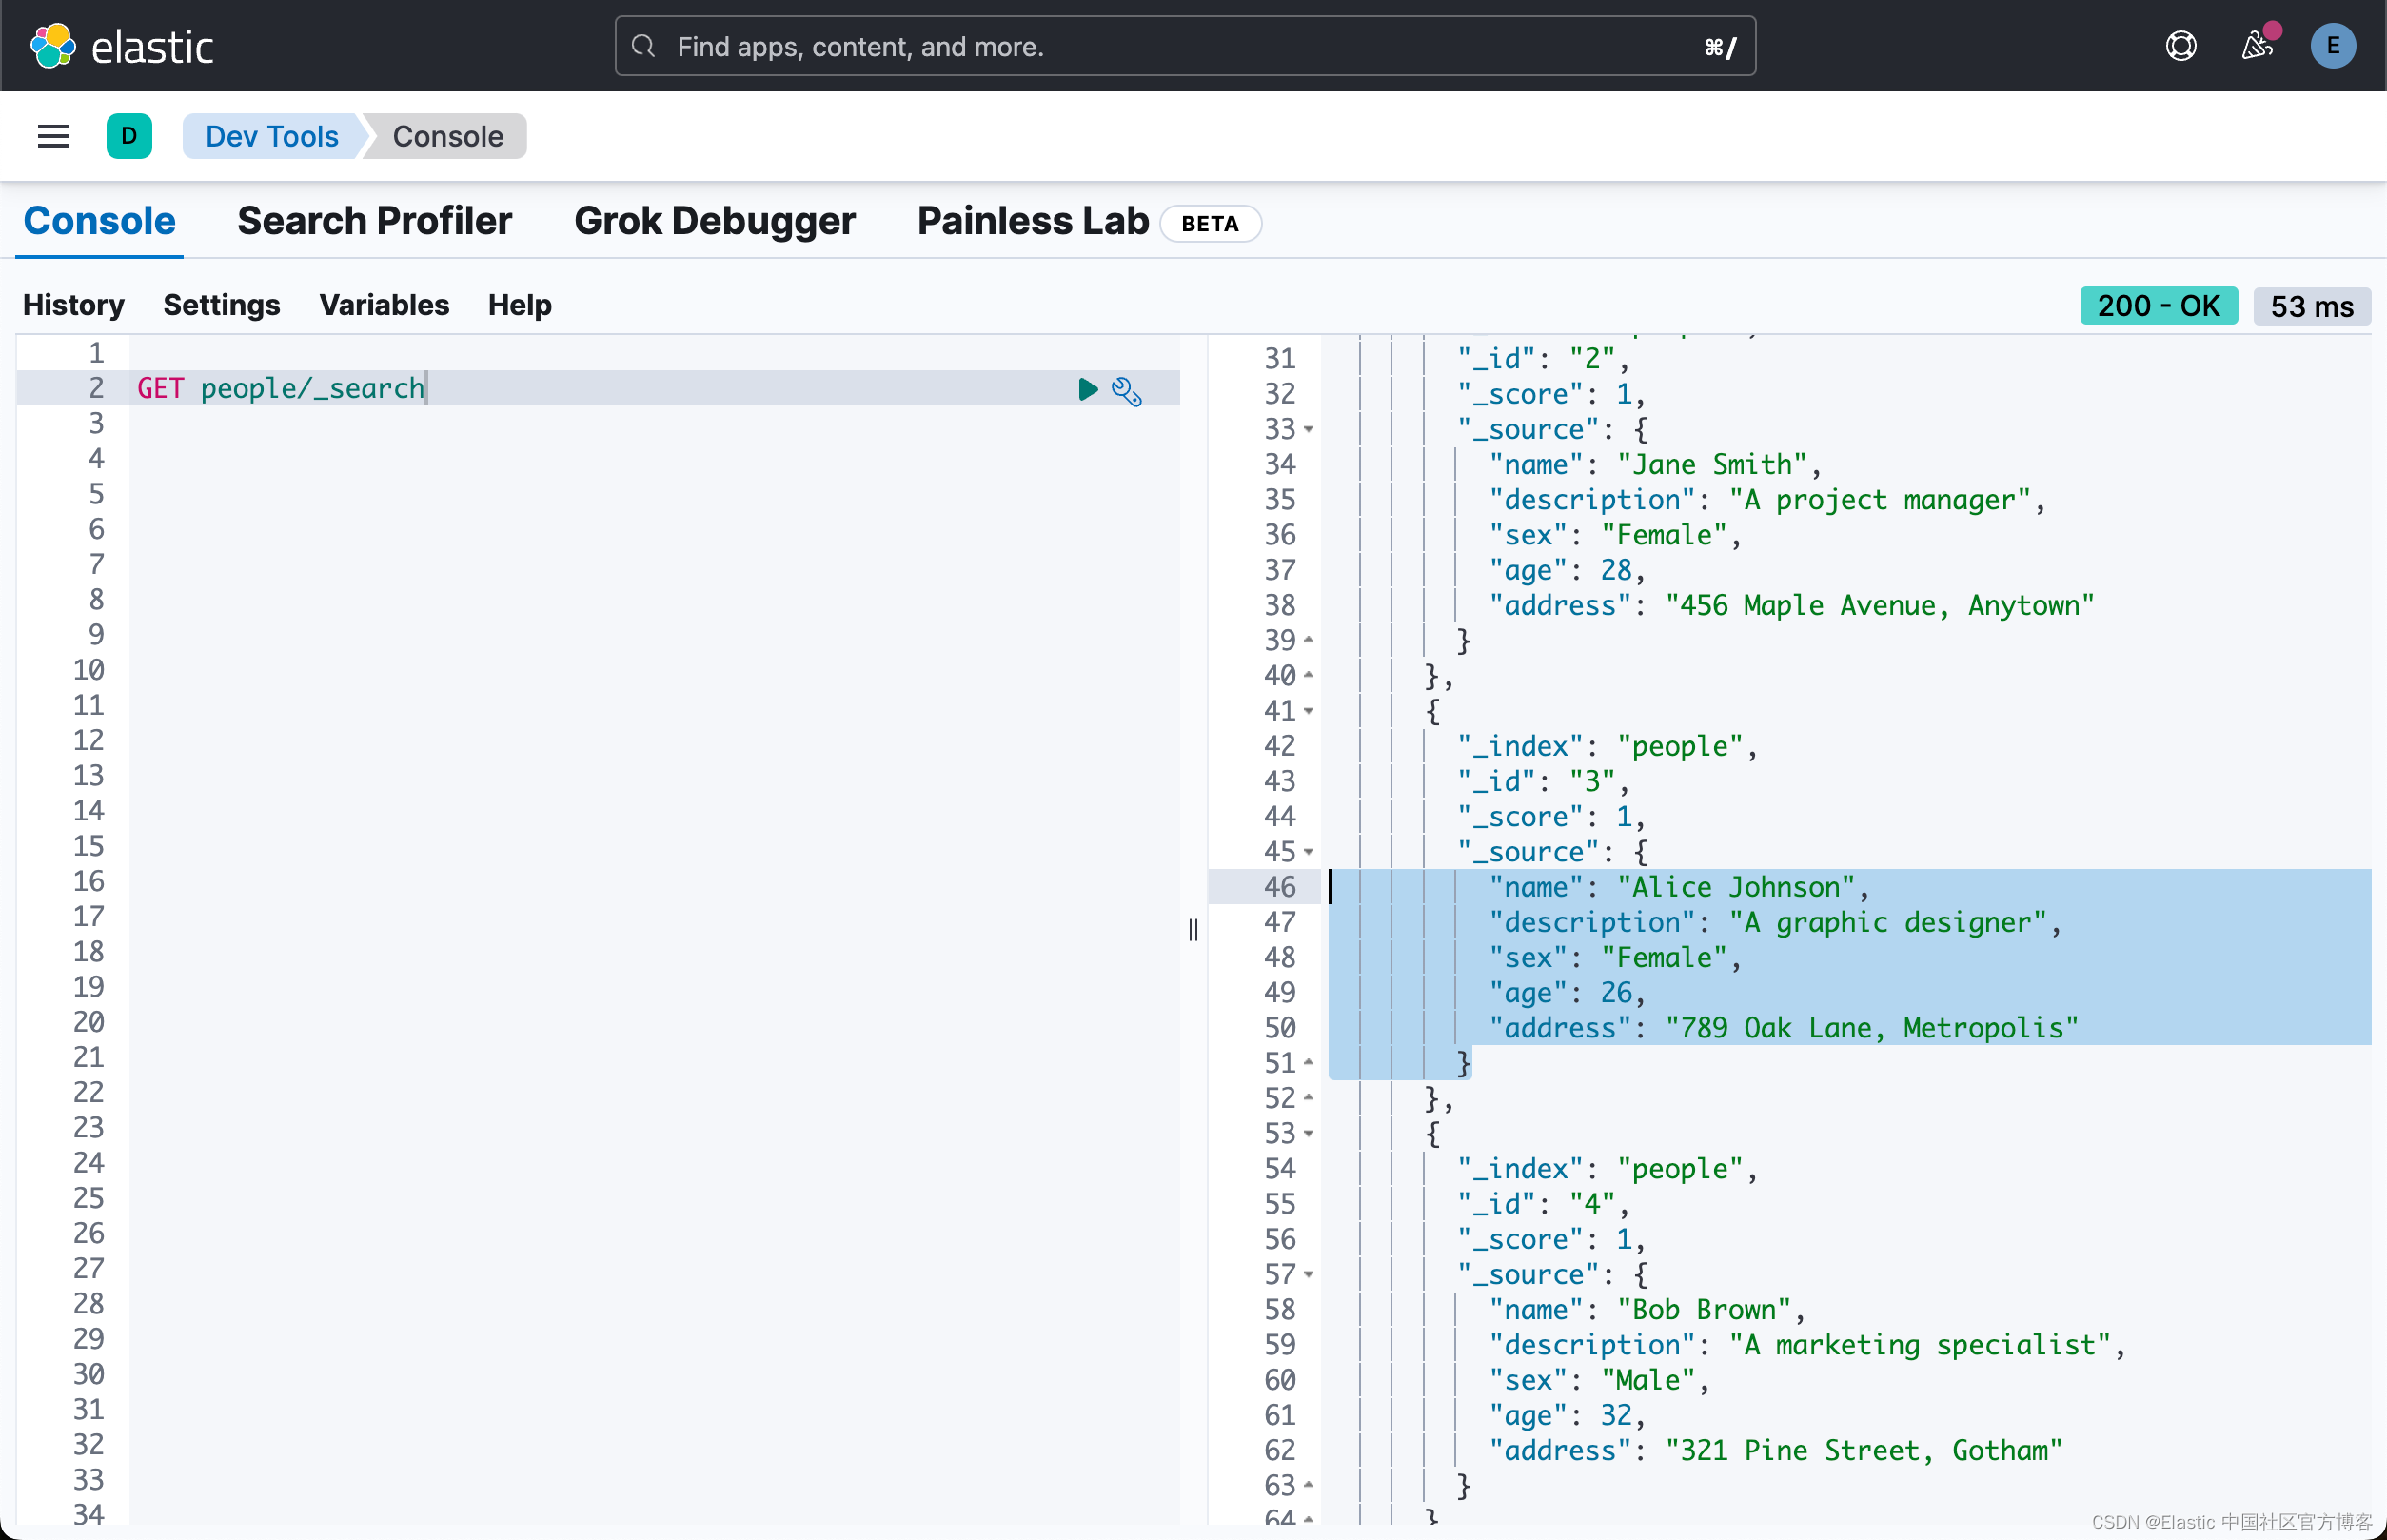
PUT /people
{"mappings": {"properties": {"name": {"type": "text"},"description": {"type": "text"},"sex": {"type": "keyword"},"age": {"type": "integer"},"address": {"type": "text"}}}
}
POST /_bulk
{ "index" : { "_index" : "people", "_id" : "1" } }
{ "name" : "John Doe", "description" : "A software developer", "sex" : "Male", "age" : 30, "address" : "123 Elm Street, Springfield" }
{ "index" : { "_index" : "people", "_id" : "2" } }
{ "name" : "Jane Smith", "description" : "A project manager", "sex" : "Female", "age" : 28, "address" : "456 Maple Avenue, Anytown" }
{ "index" : { "_index" : "people", "_id" : "3" } }
{ "name" : "Alice Johnson", "description" : "A graphic designer", "sex" : "Female", "age" : 26, "address" : "789 Oak Lane, Metropolis" }
{ "index" : { "_index" : "people", "_id" : "4" } }
{ "name" : "Bob Brown", "description" : "A marketing specialist", "sex" : "Male", "age" : 32, "address" : "321 Pine Street, Gotham" }
{ "index" : { "_index" : "people", "_id" : "5" } }
{ "name" : "Charlie Davis", "description" : "An IT analyst", "sex" : "Male", "age" : 29, "address" : "654 Cedar Blvd, Star City" }
{ "index" : { "_index" : "people", "_id" : "6" } }
{ "name" : "Diana Prince", "description" : "A diplomat", "sex" : "Female", "age" : 35, "address" : "987 Birch Road, Themyscira" }
{ "index" : { "_index" : "people", "_id" : "7" } }
{ "name" : "Evan Wright", "description" : "A journalist", "sex" : "Male", "age" : 27, "address" : "213 Willow Lane, Central City" }
{ "index" : { "_index" : "people", "_id" : "8" } }
{ "name" : "Fiona Gallagher", "description" : "A nurse", "sex" : "Female", "age" : 31, "address" : "546 Spruce Street, South Side" }
{ "index" : { "_index" : "people", "_id" : "9" } }
{ "name" : "George King", "description" : "A teacher", "sex" : "Male", "age" : 34, "address" : "879 Elm St, Smallville" }
{ "index" : { "_index" : "people", "_id" : "10" } }
{ "name" : "Helen Parr", "description" : "A full-time superhero", "sex" : "Female", "age" : 37, "address" : "123 Metro Avenue, Metroville" } 
这样我们就创建了一个叫做 people 的索引。我们现在以这个索引为例来进行展示:
what are the indices in the cluster? 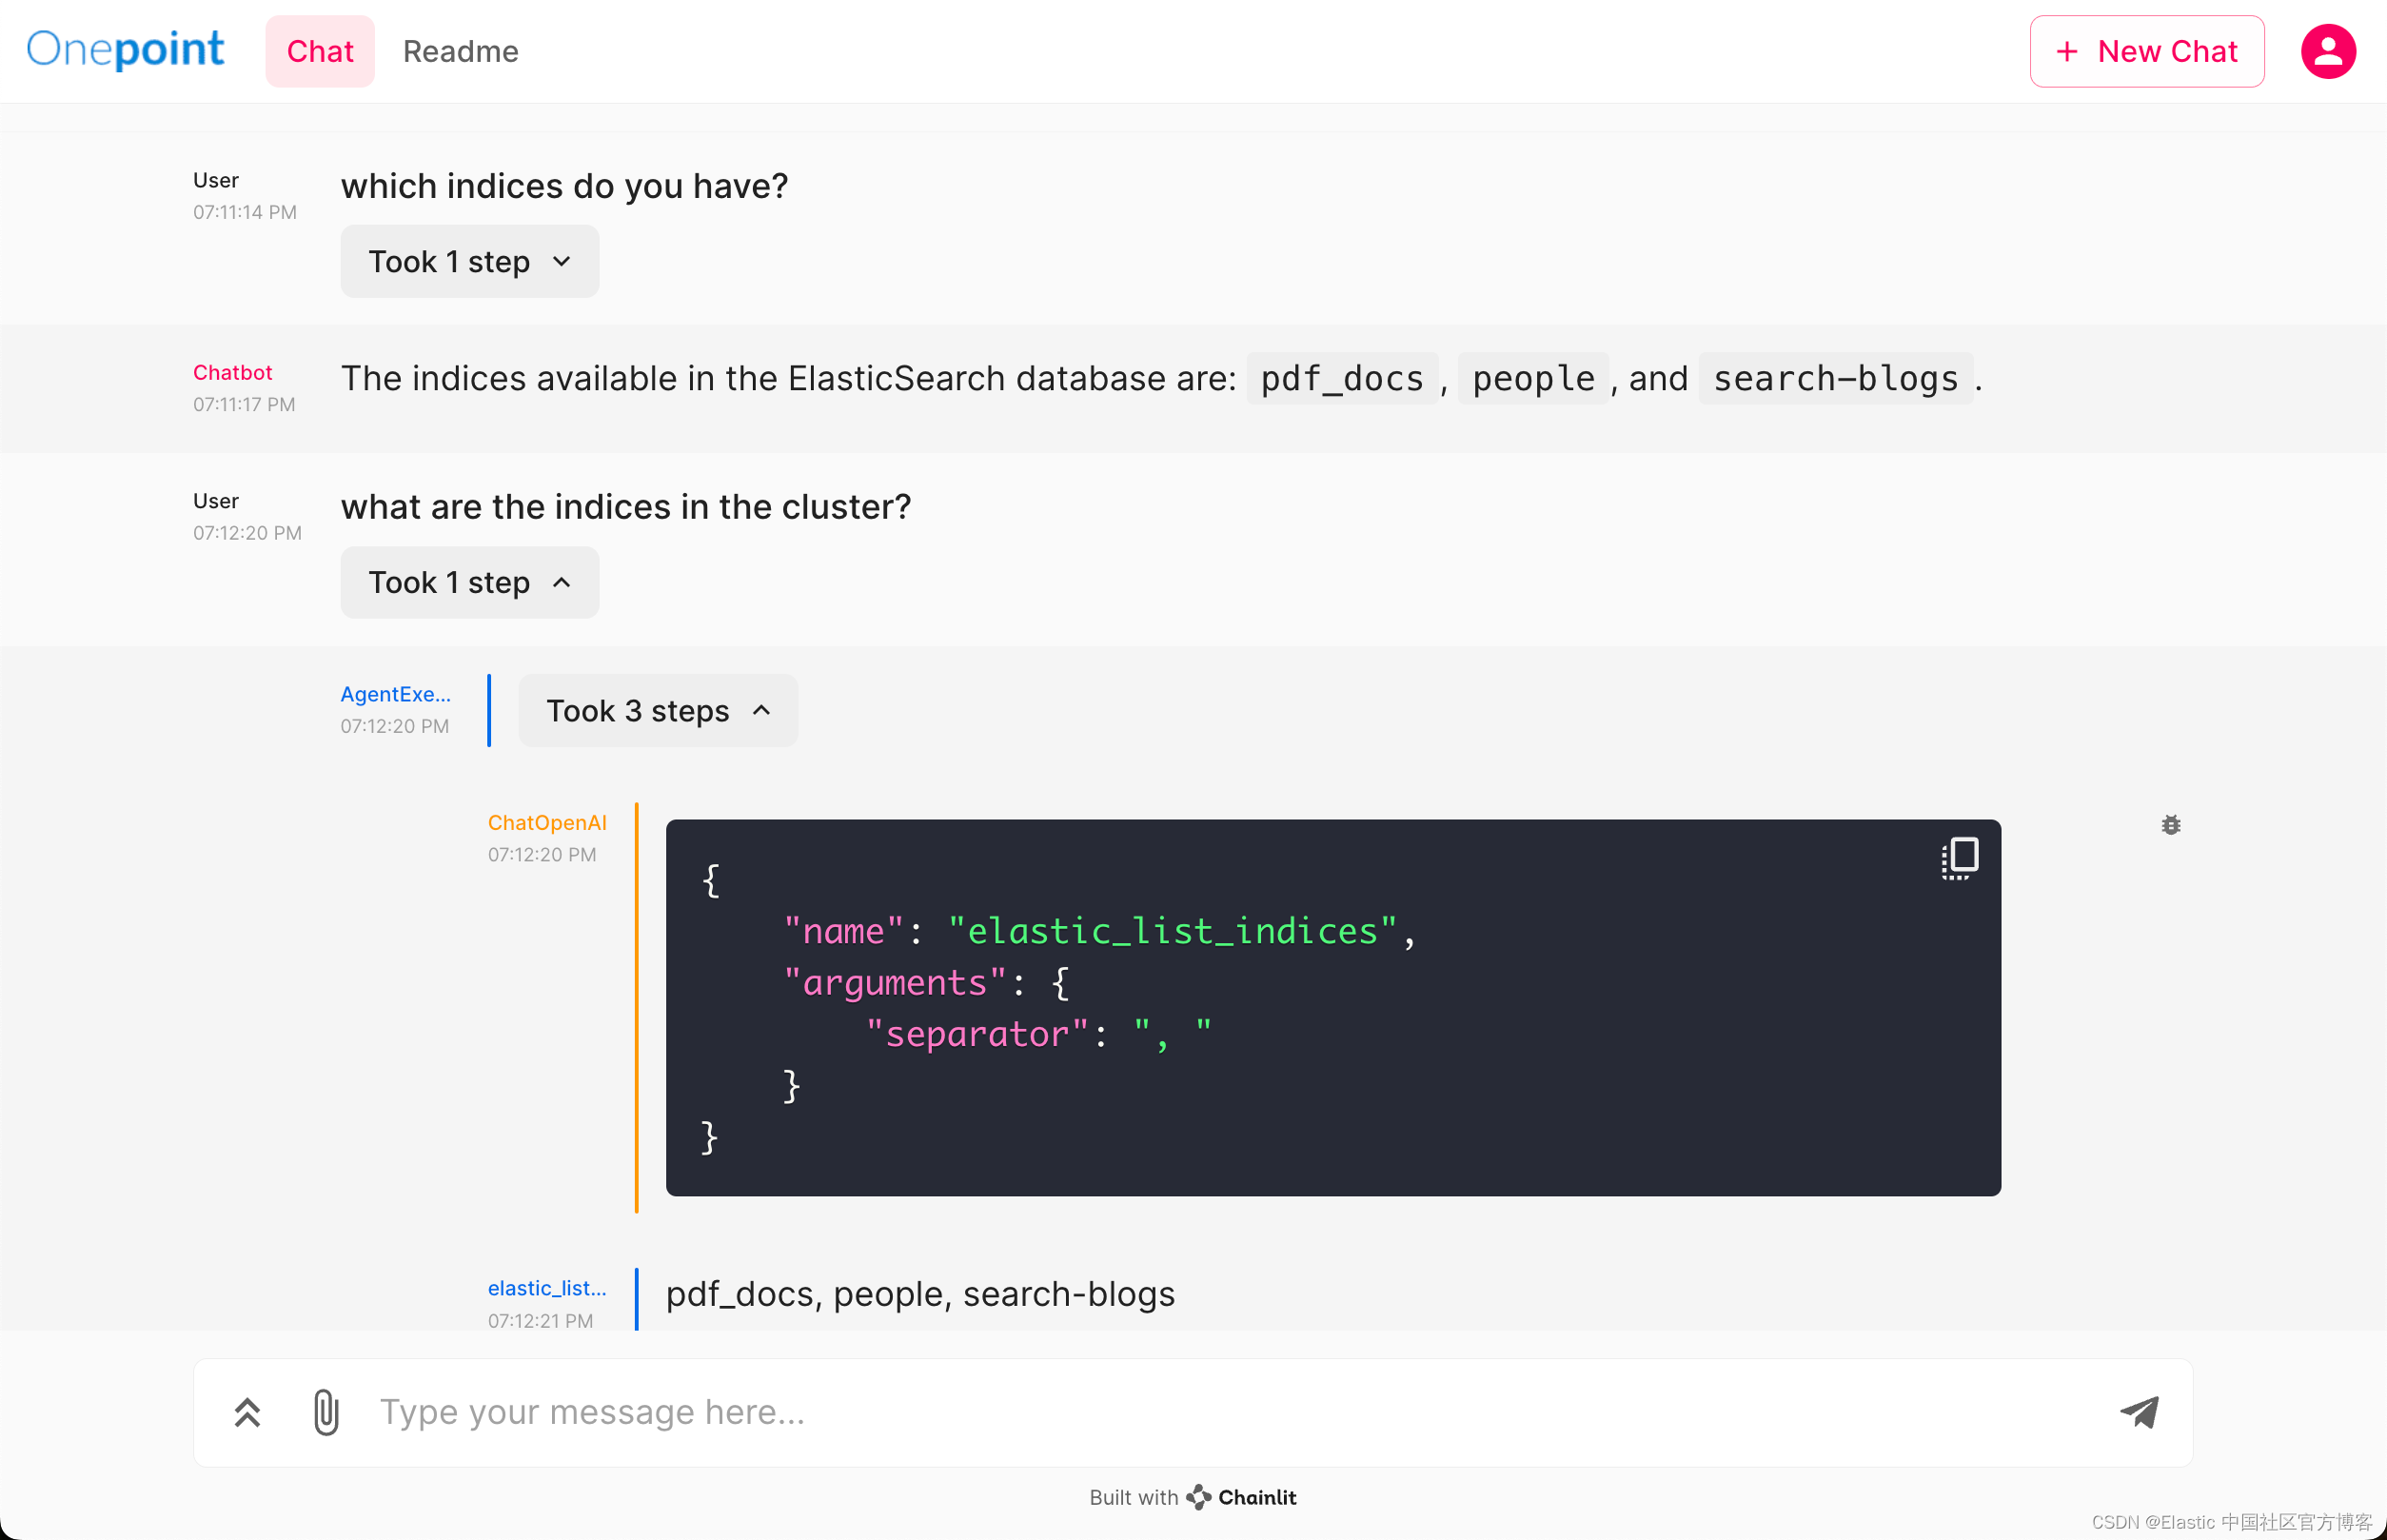
What is the mapping for people? 
How many documents are there in the index people? 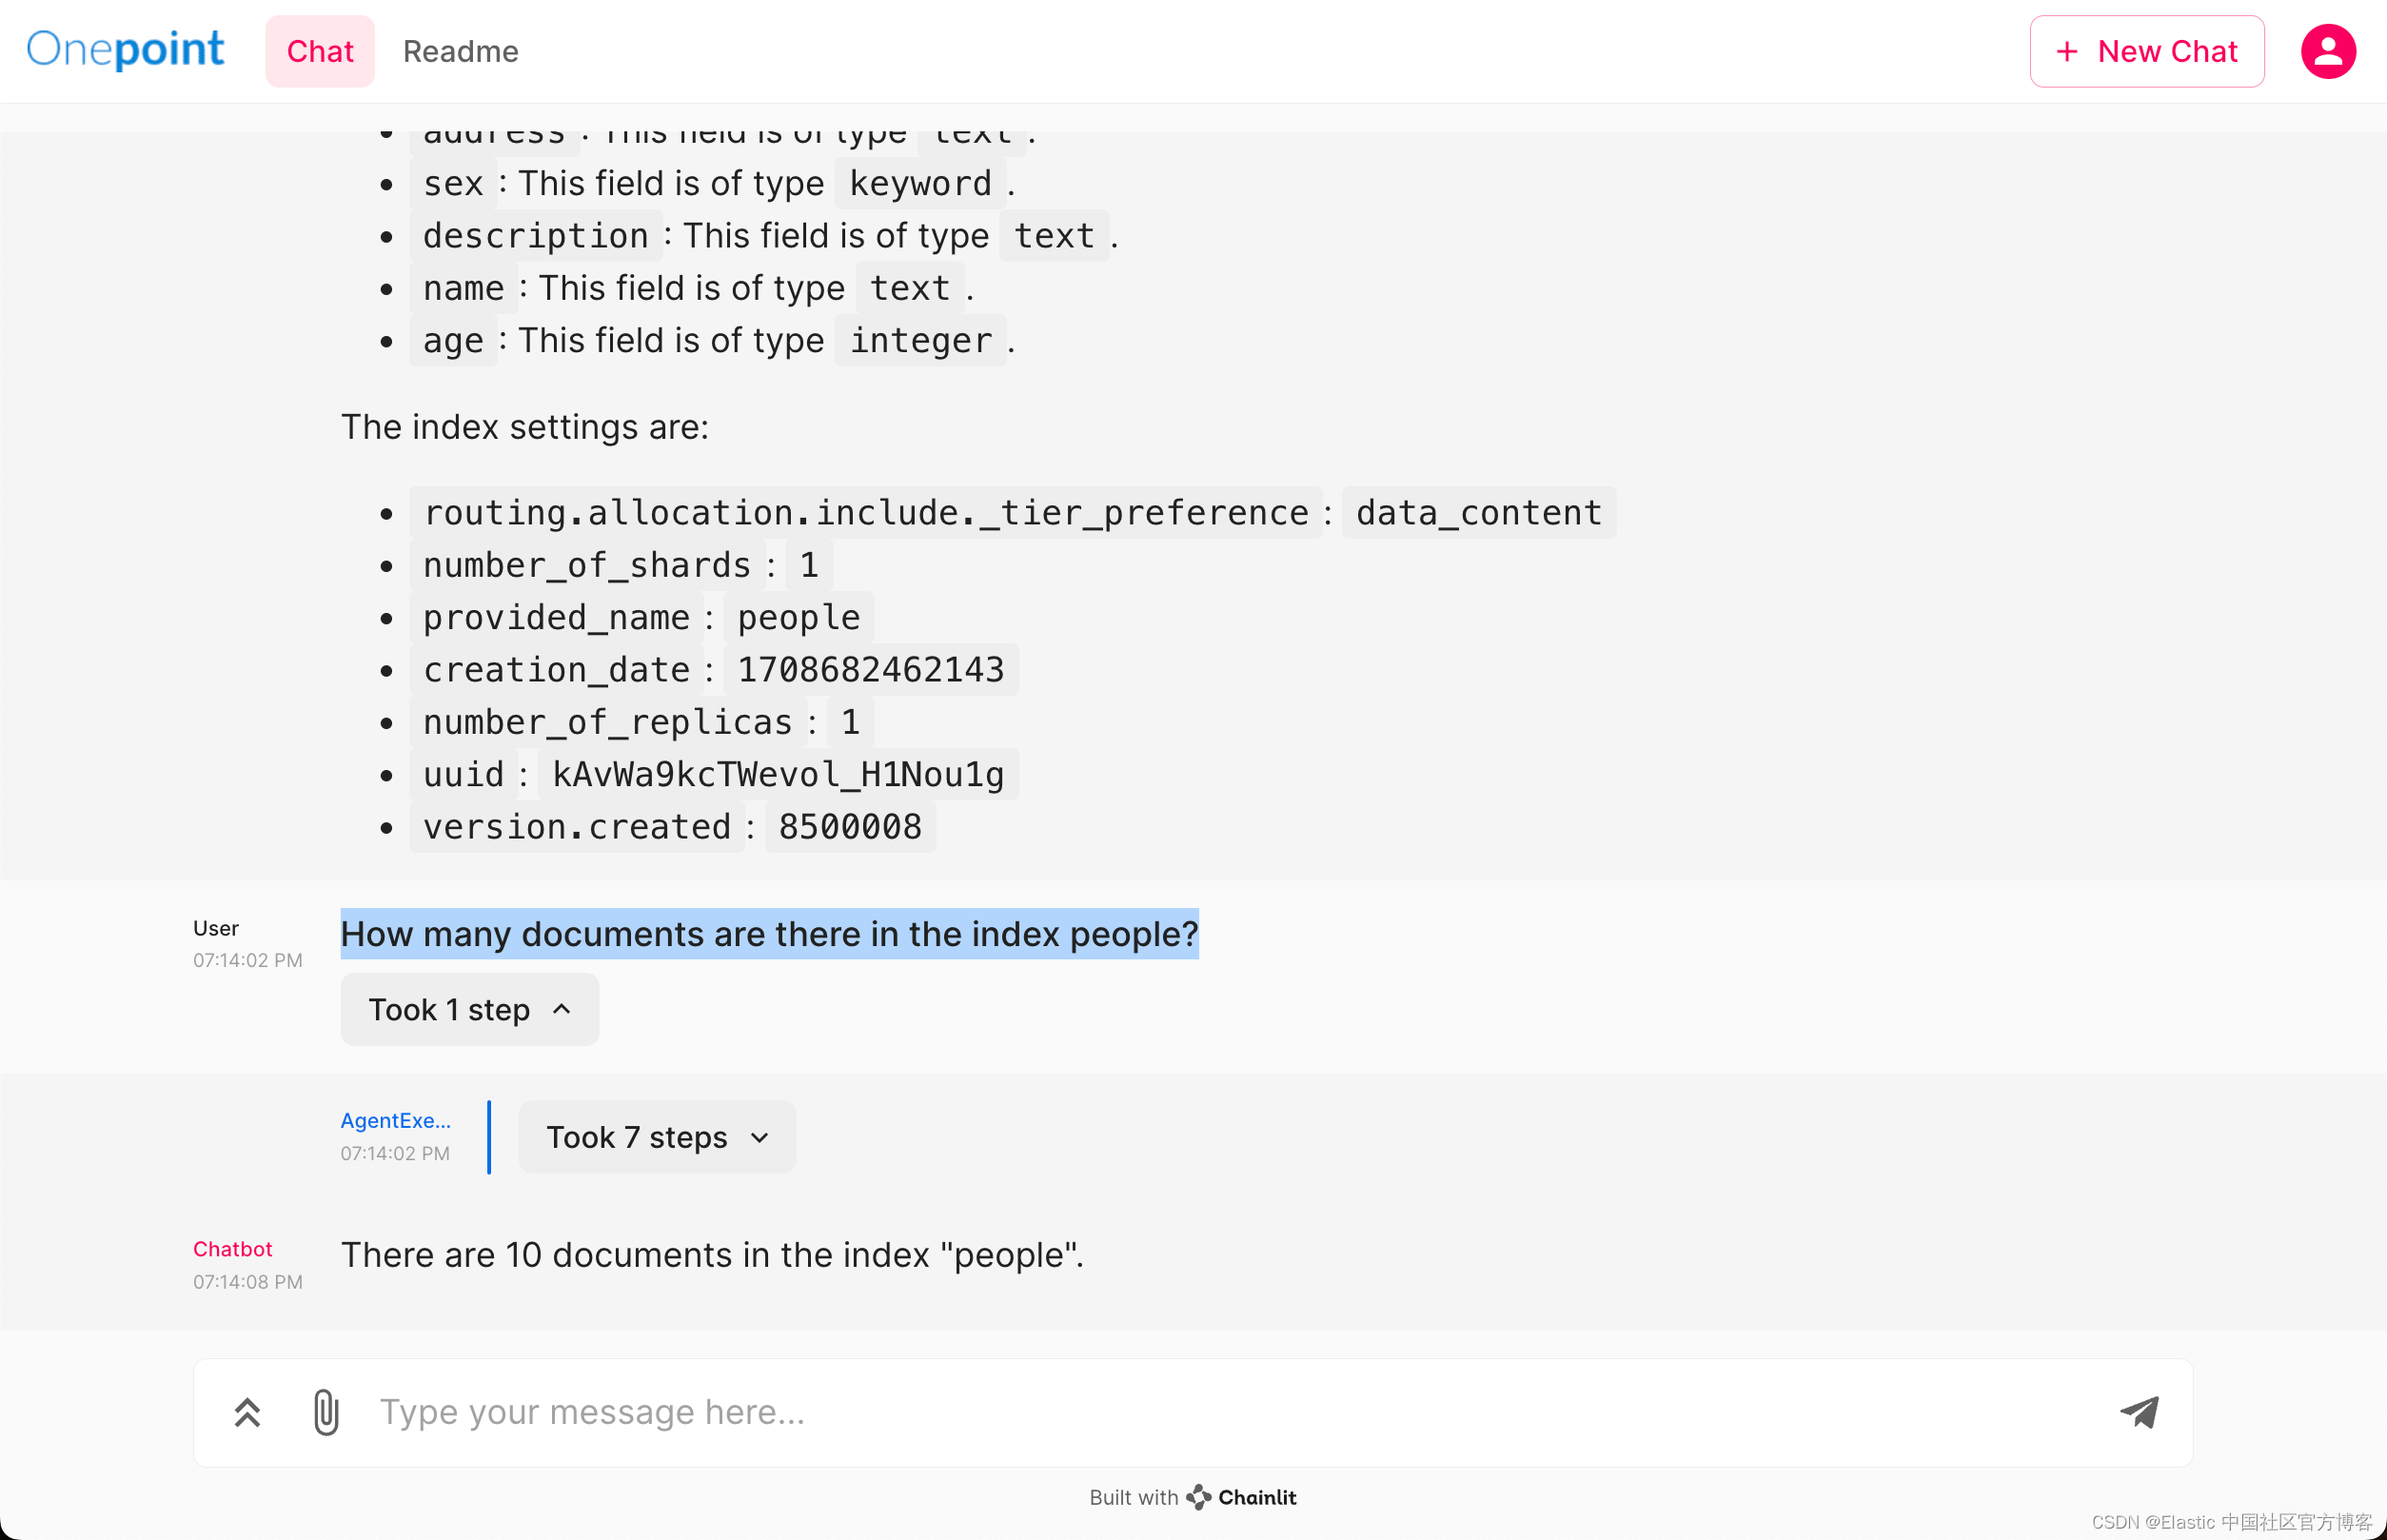
Which document has the biggest age? 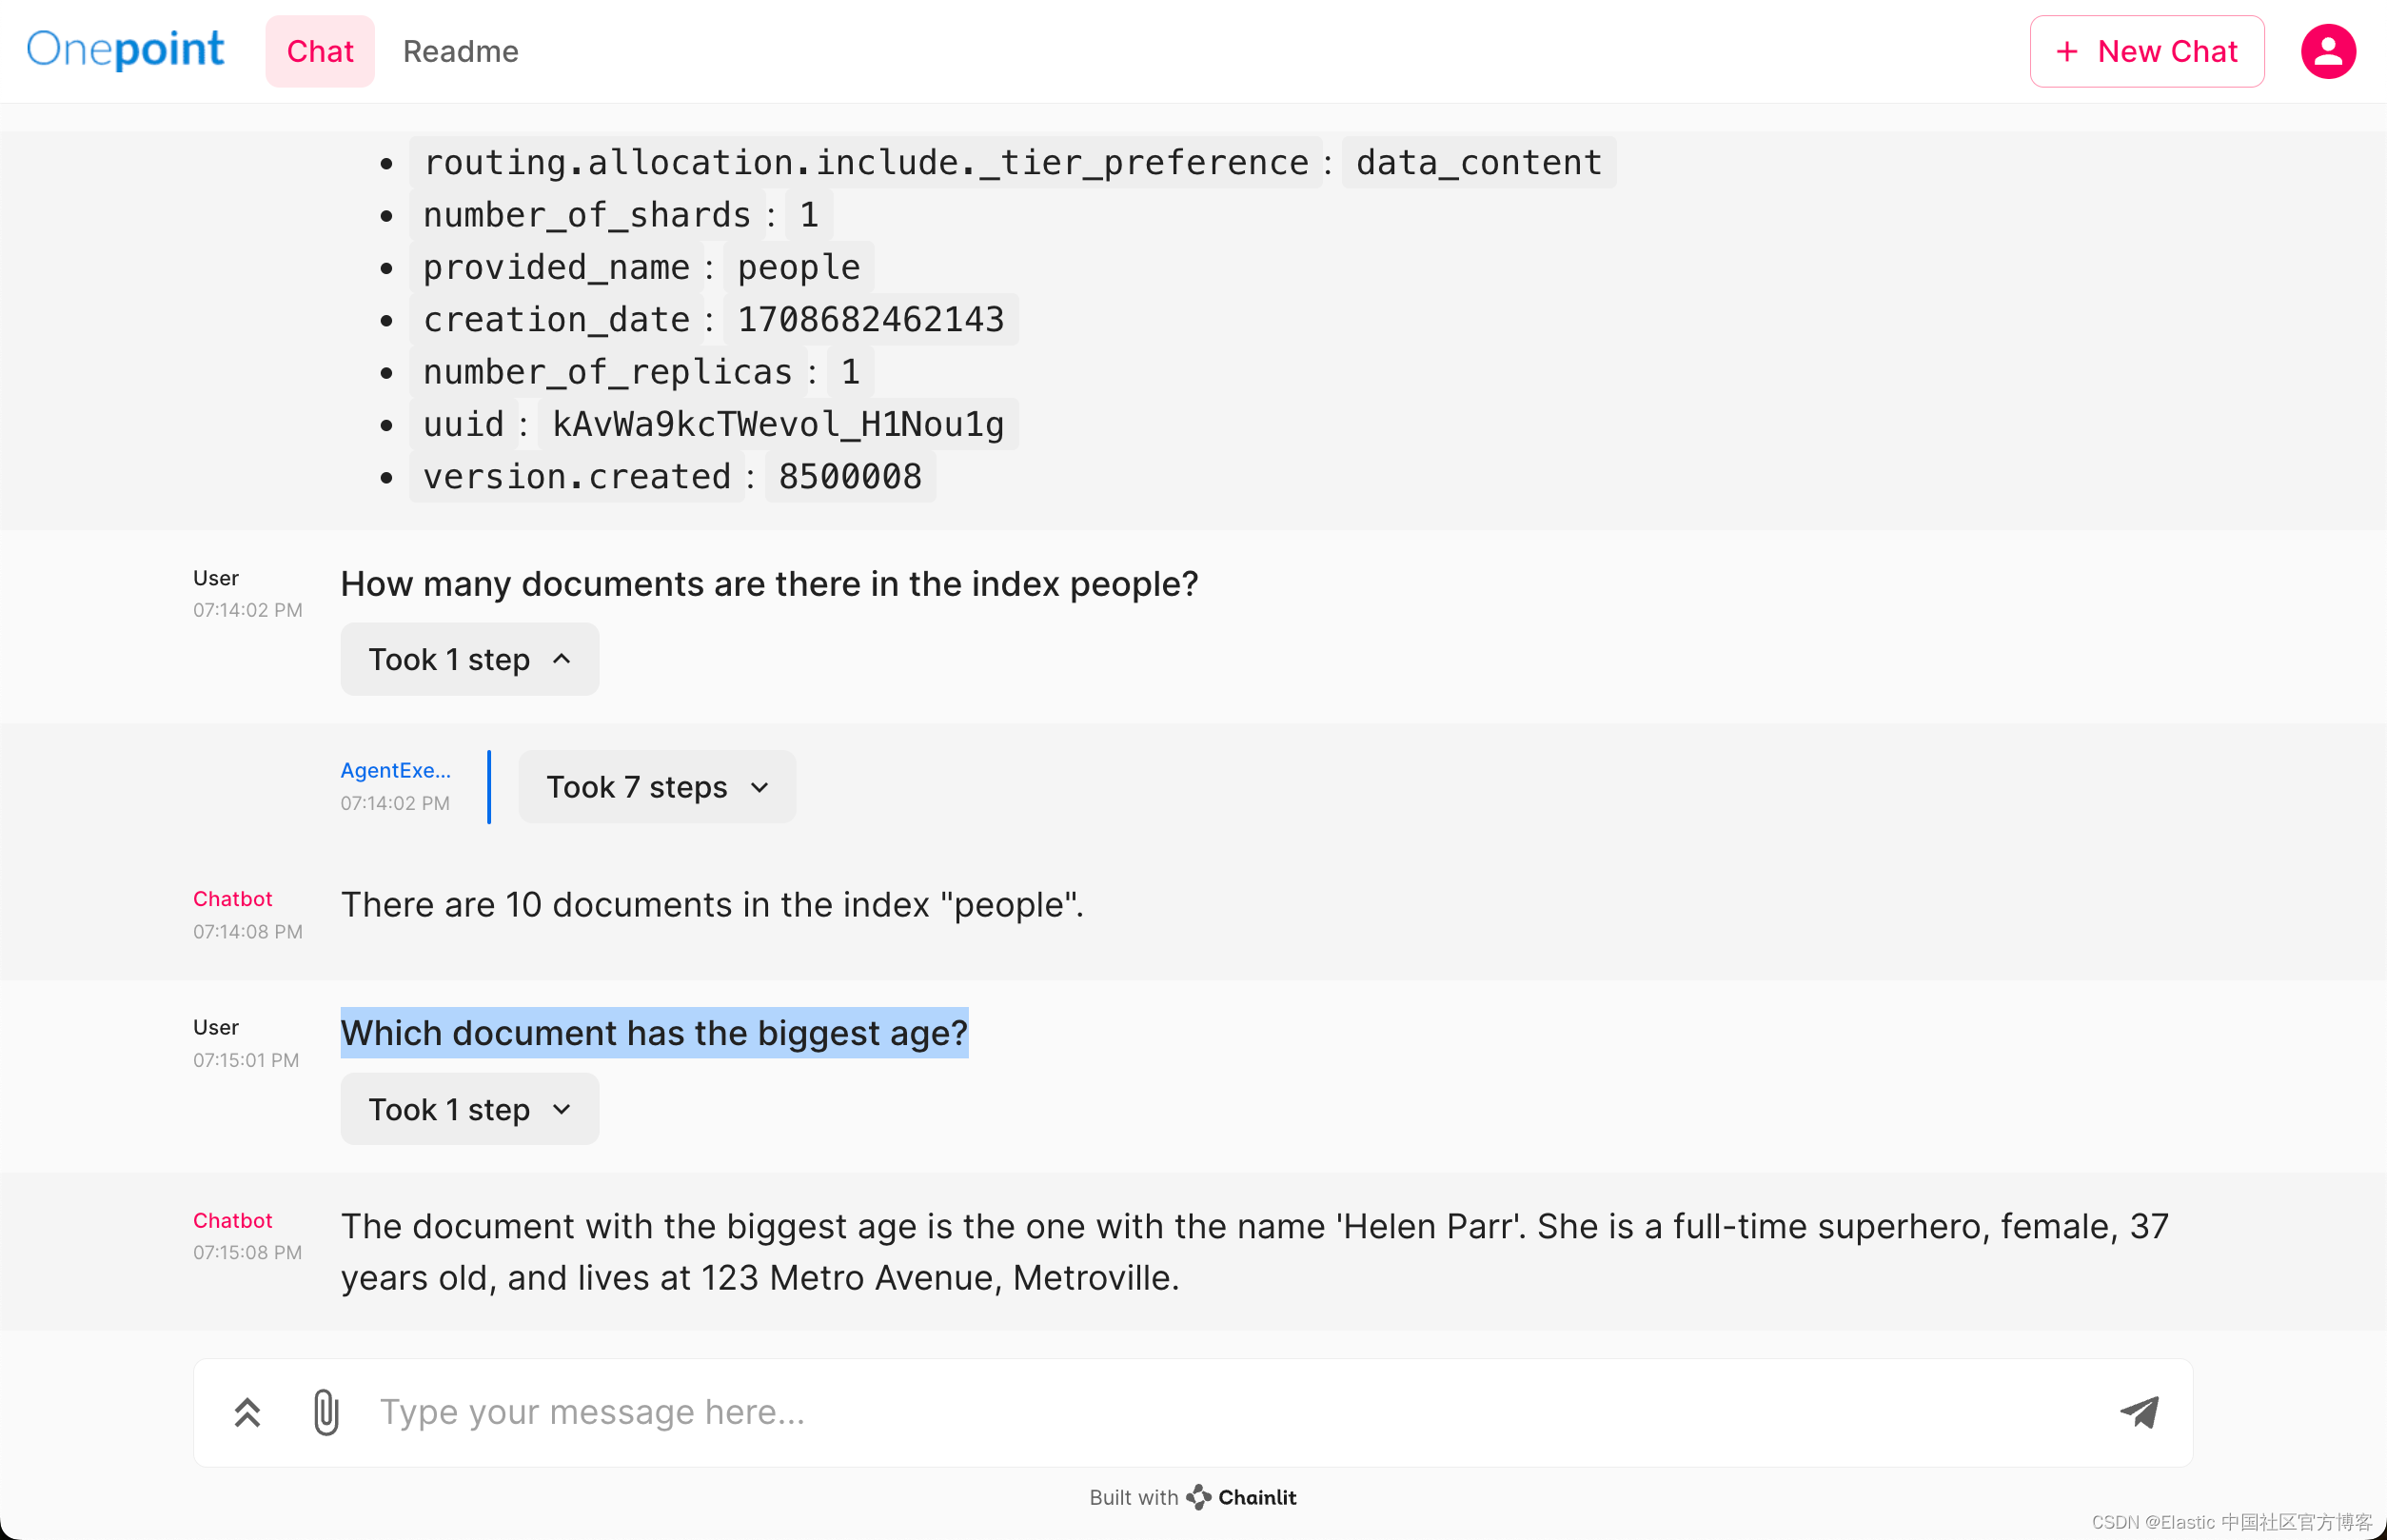
让我们针对索引 people 做一个聚合:
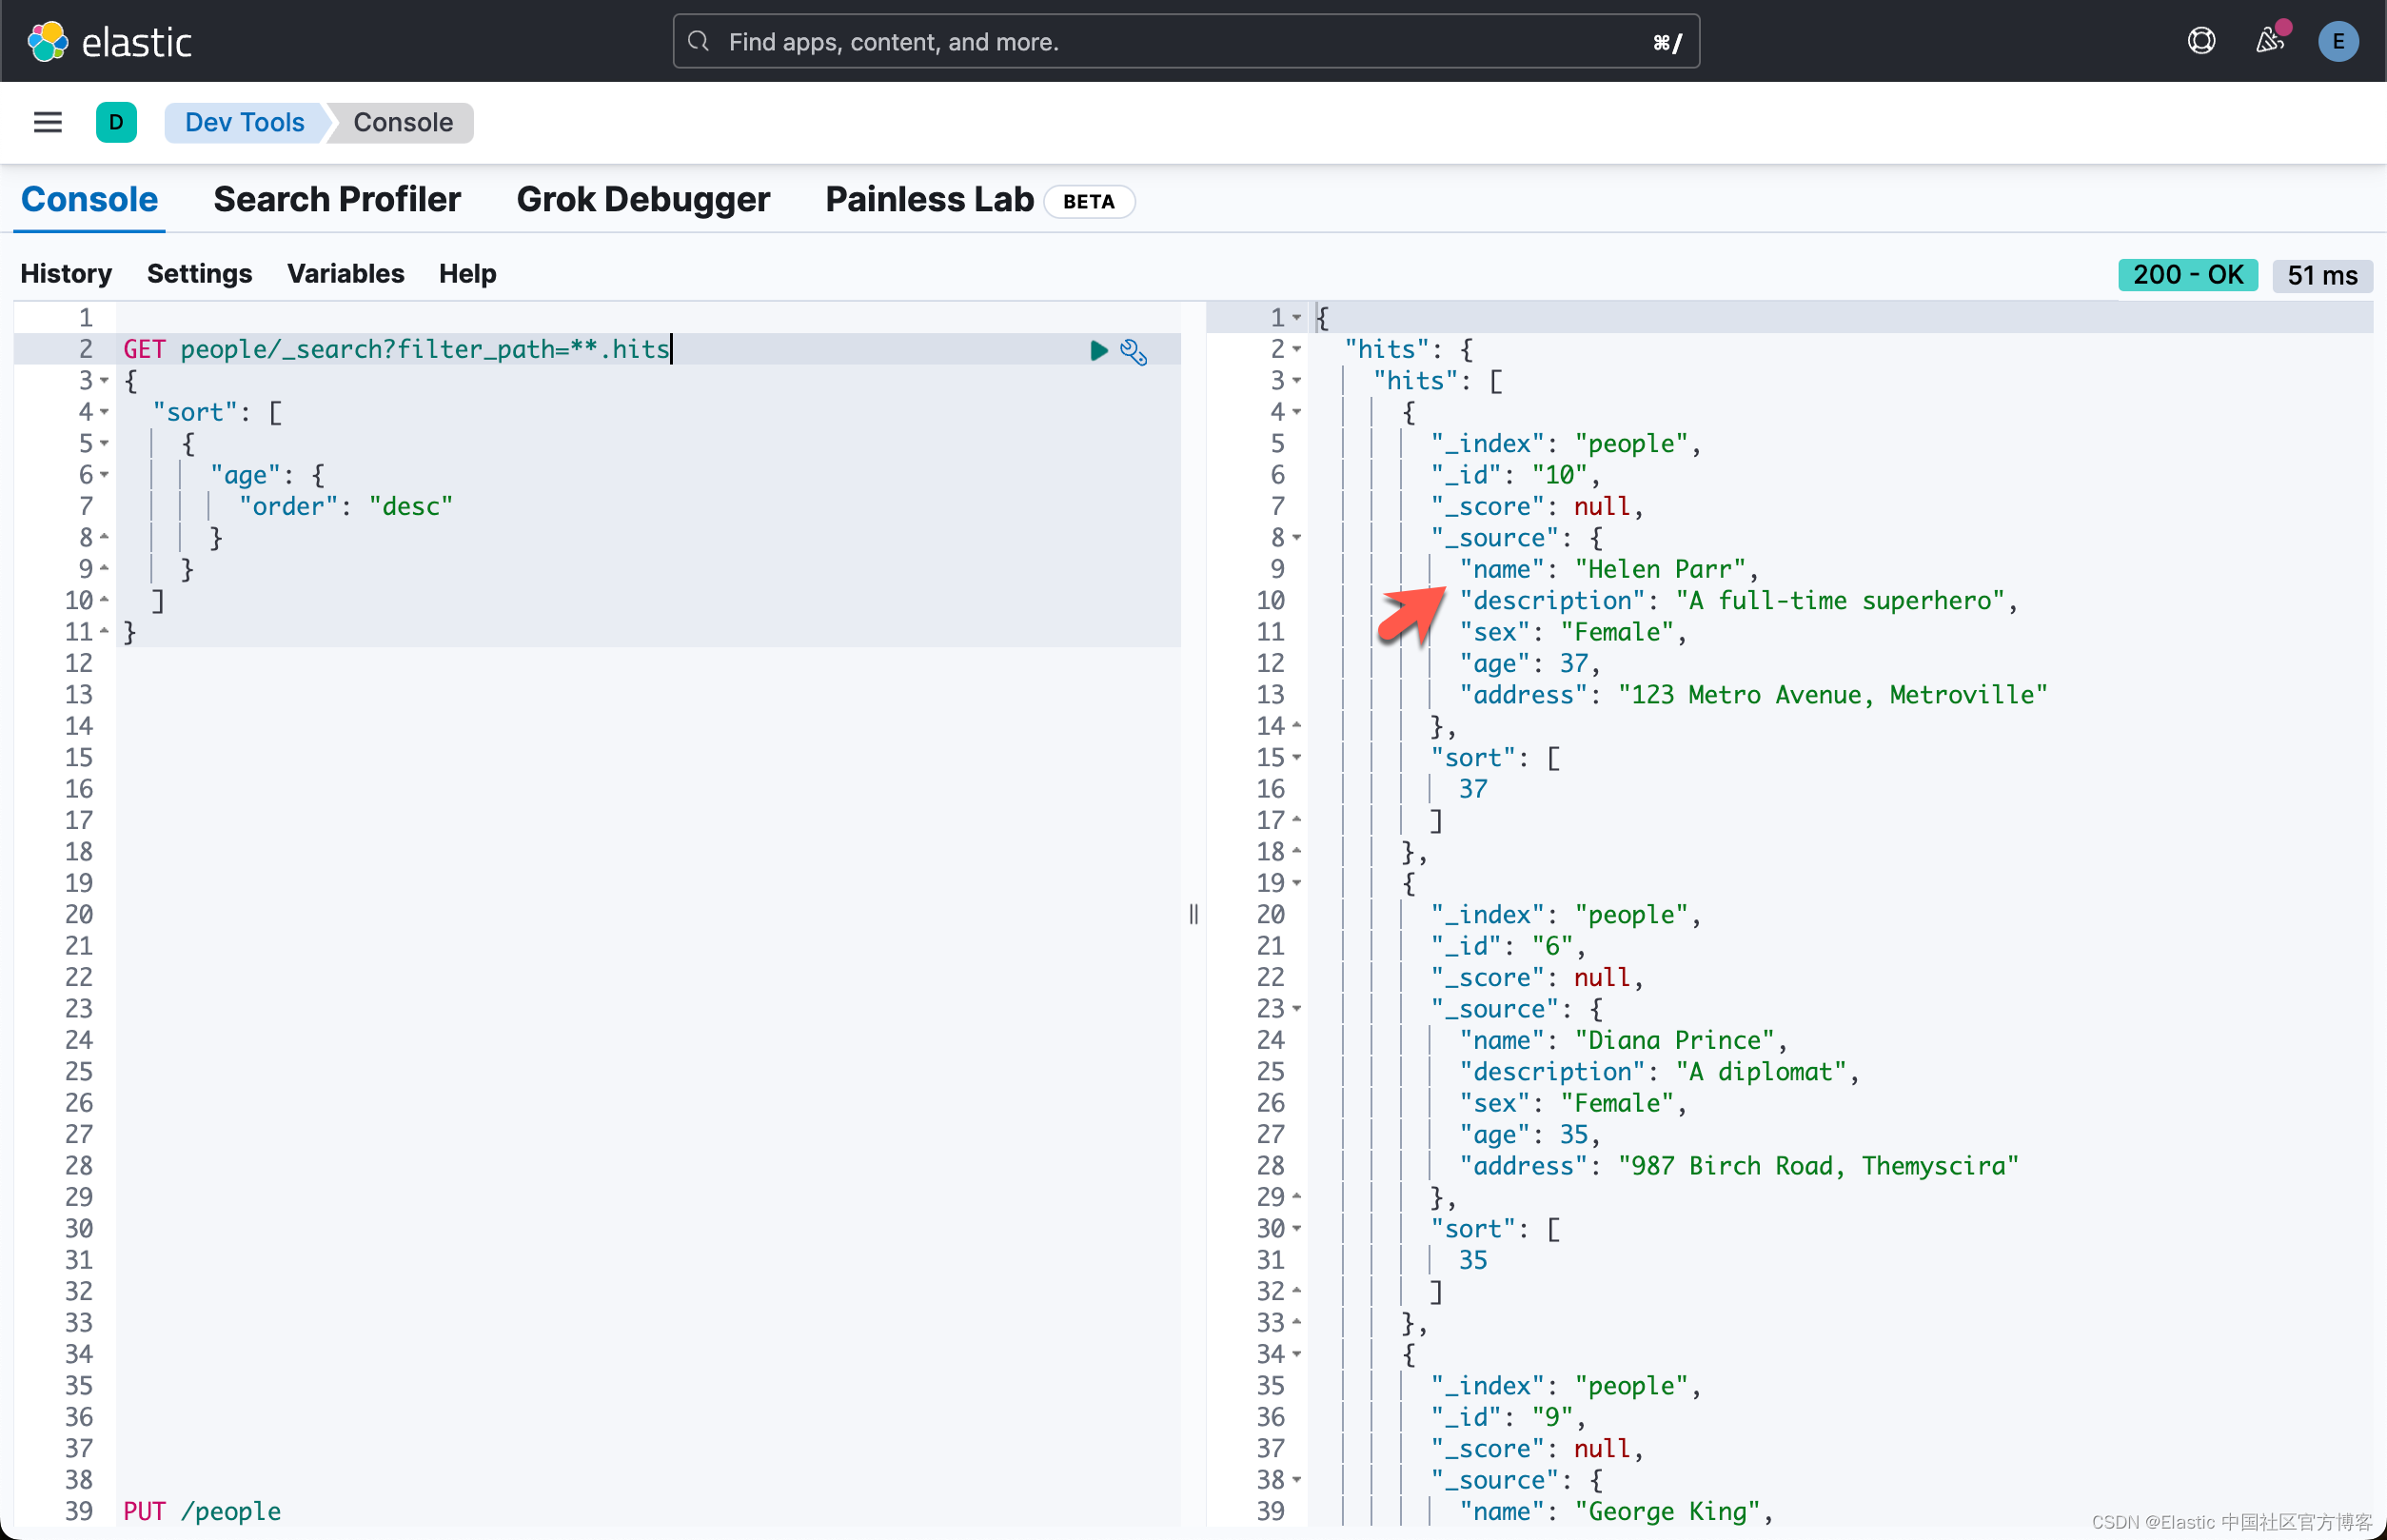
很显然我们的结果是非常正确的。
How many males and females in the index people? 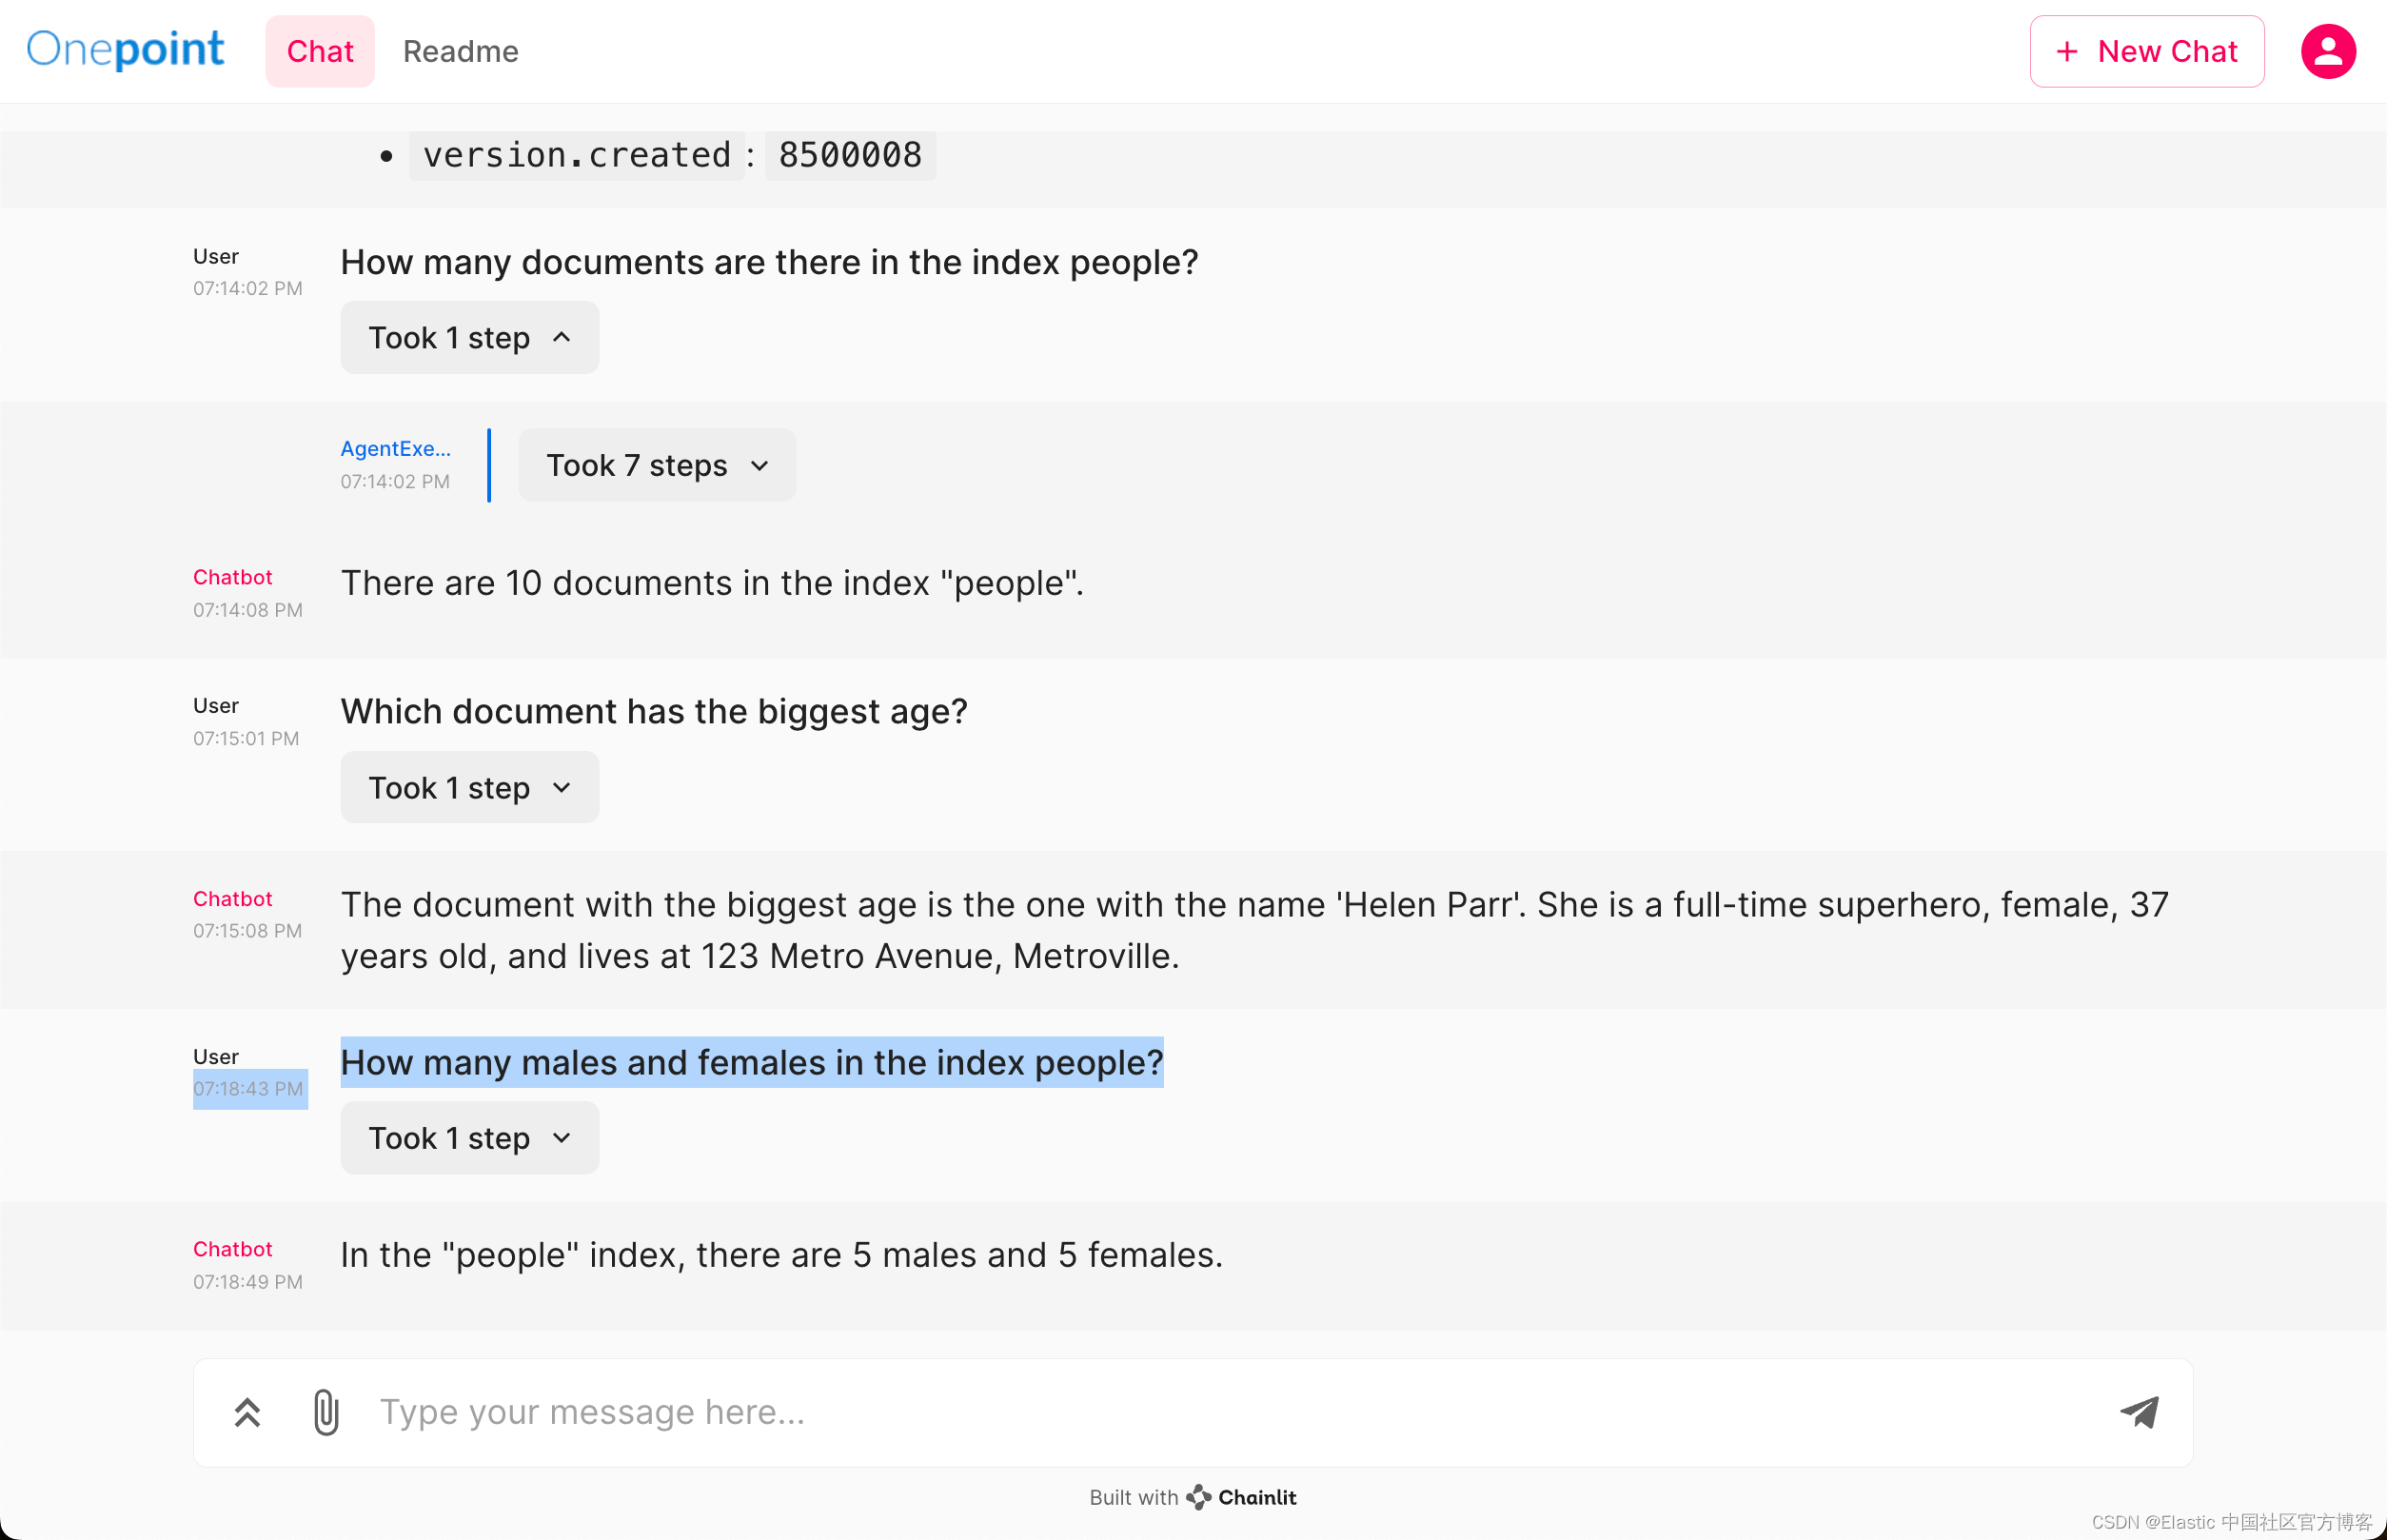

很显然它是对的。
who is a software developer? 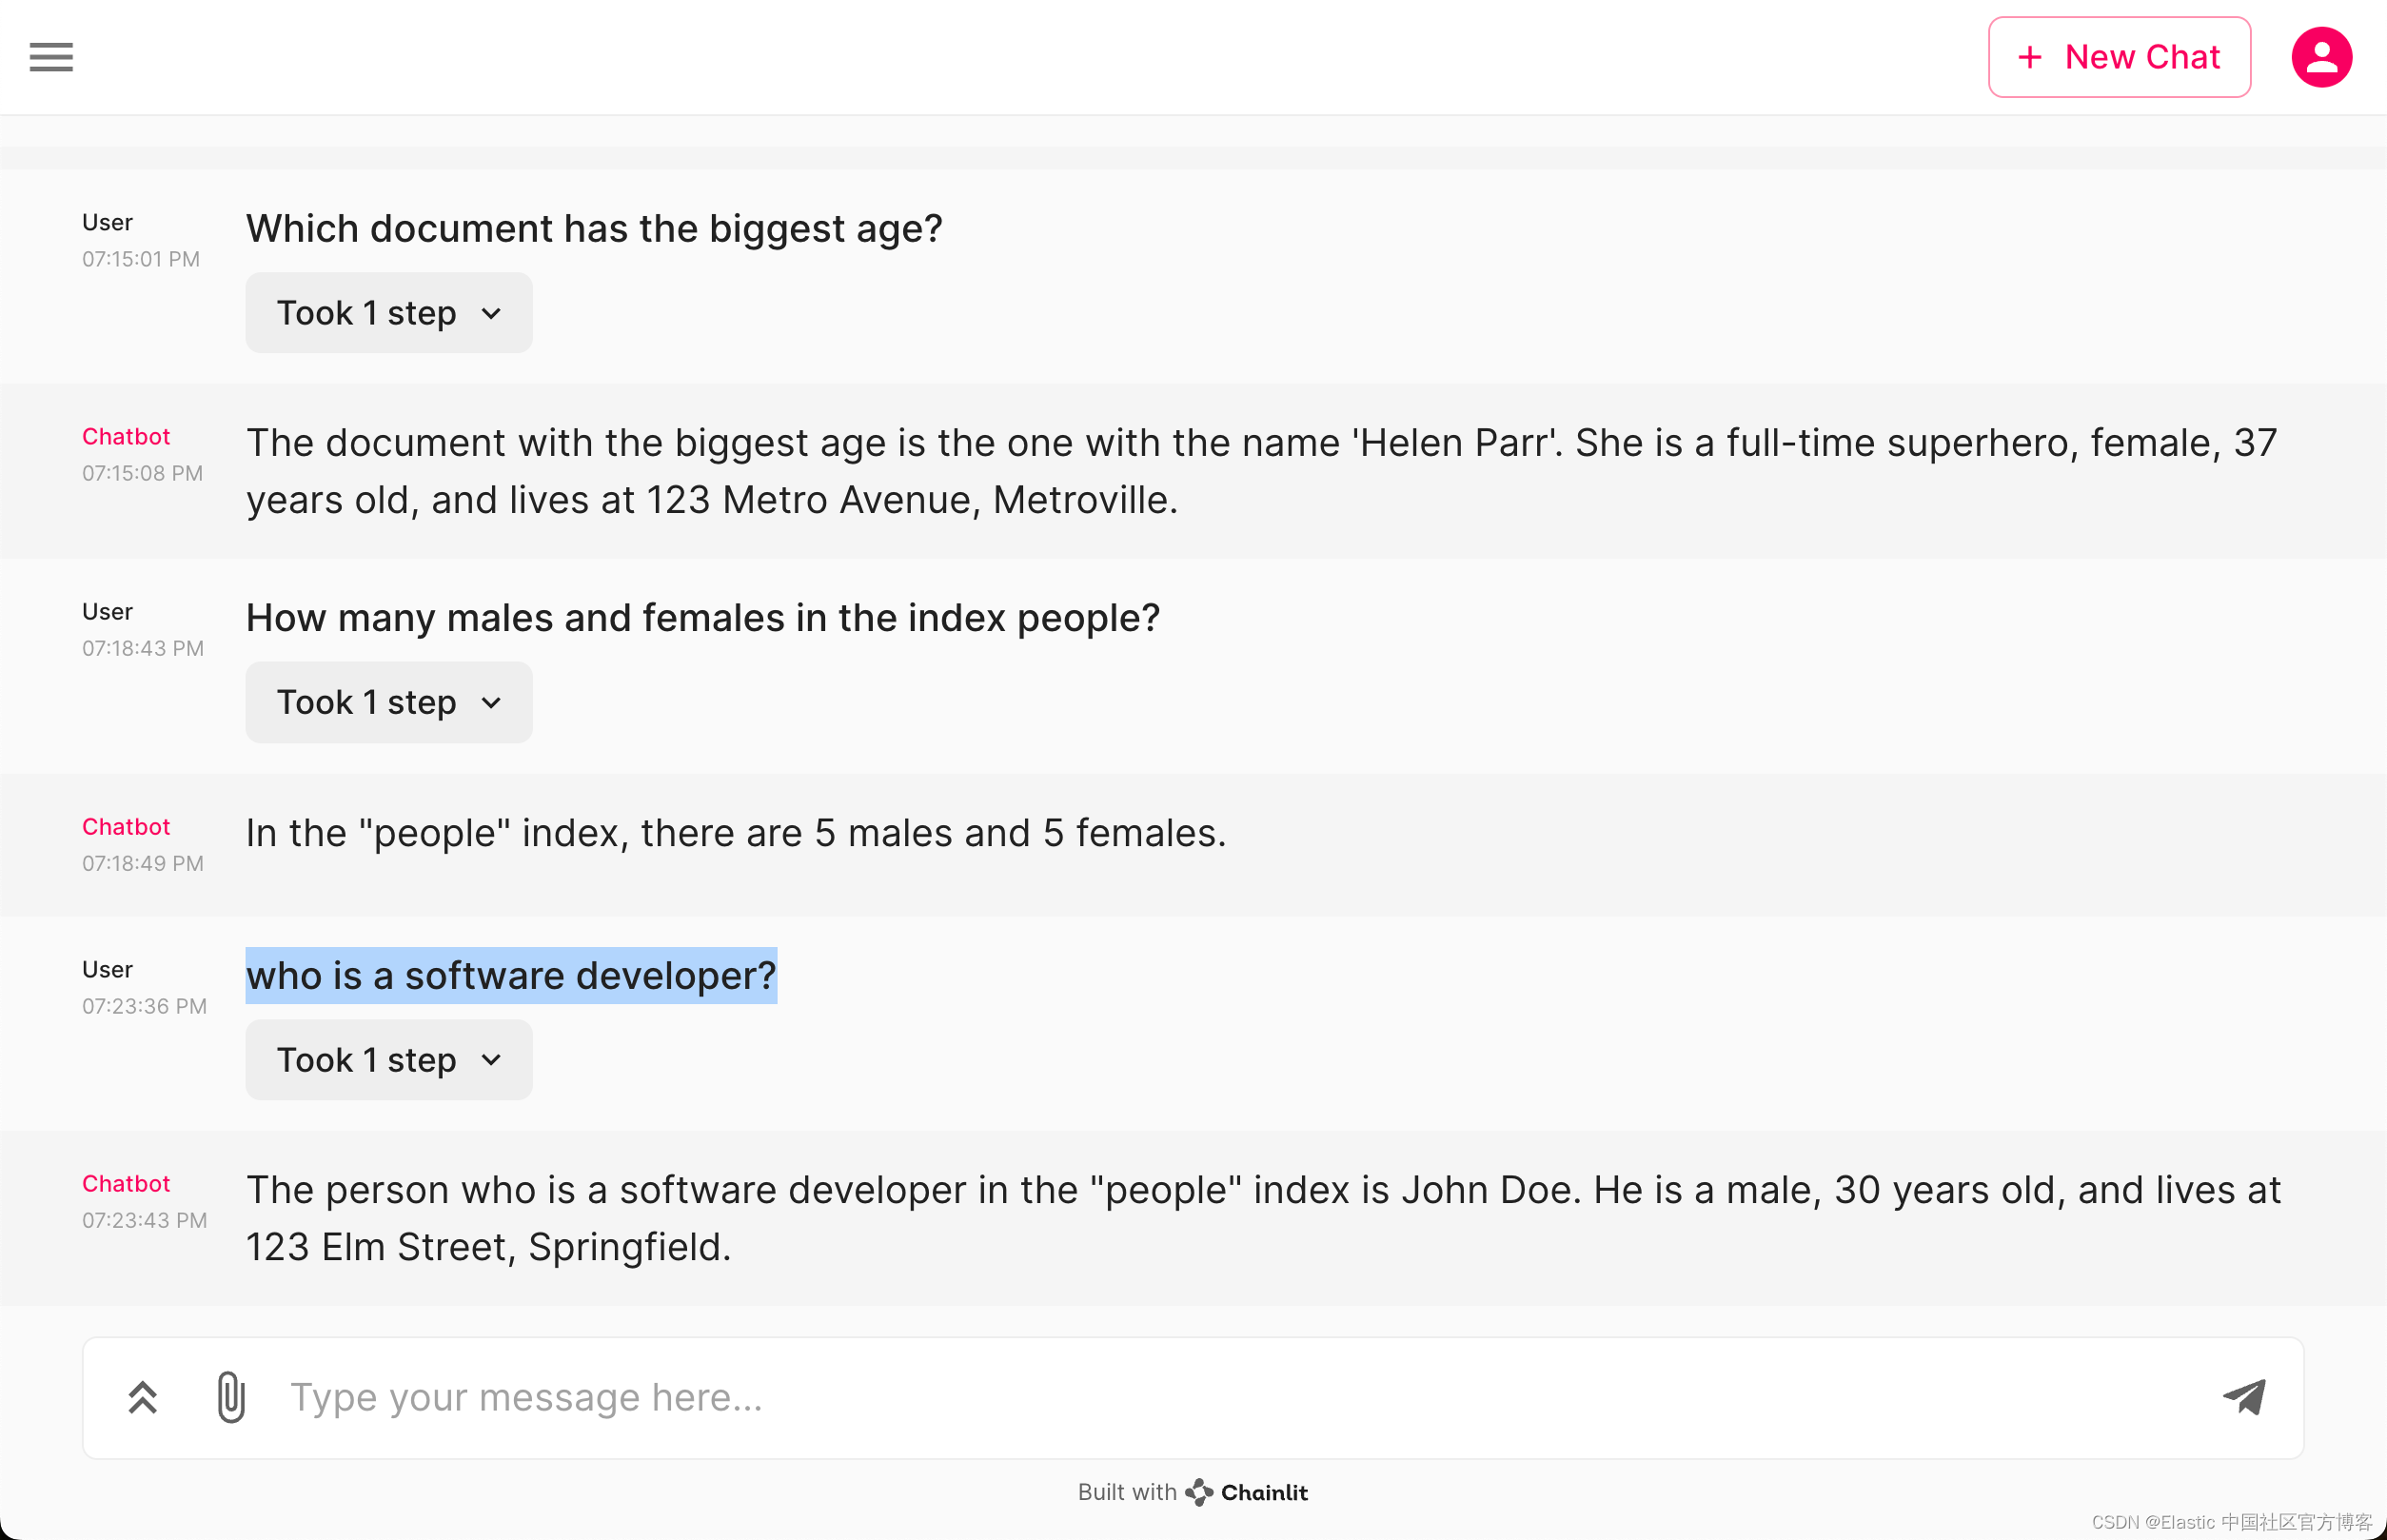

who lives in Metropolis? 
最后,让我们试一下中文的搜索:
哪一个文档的年龄最大? 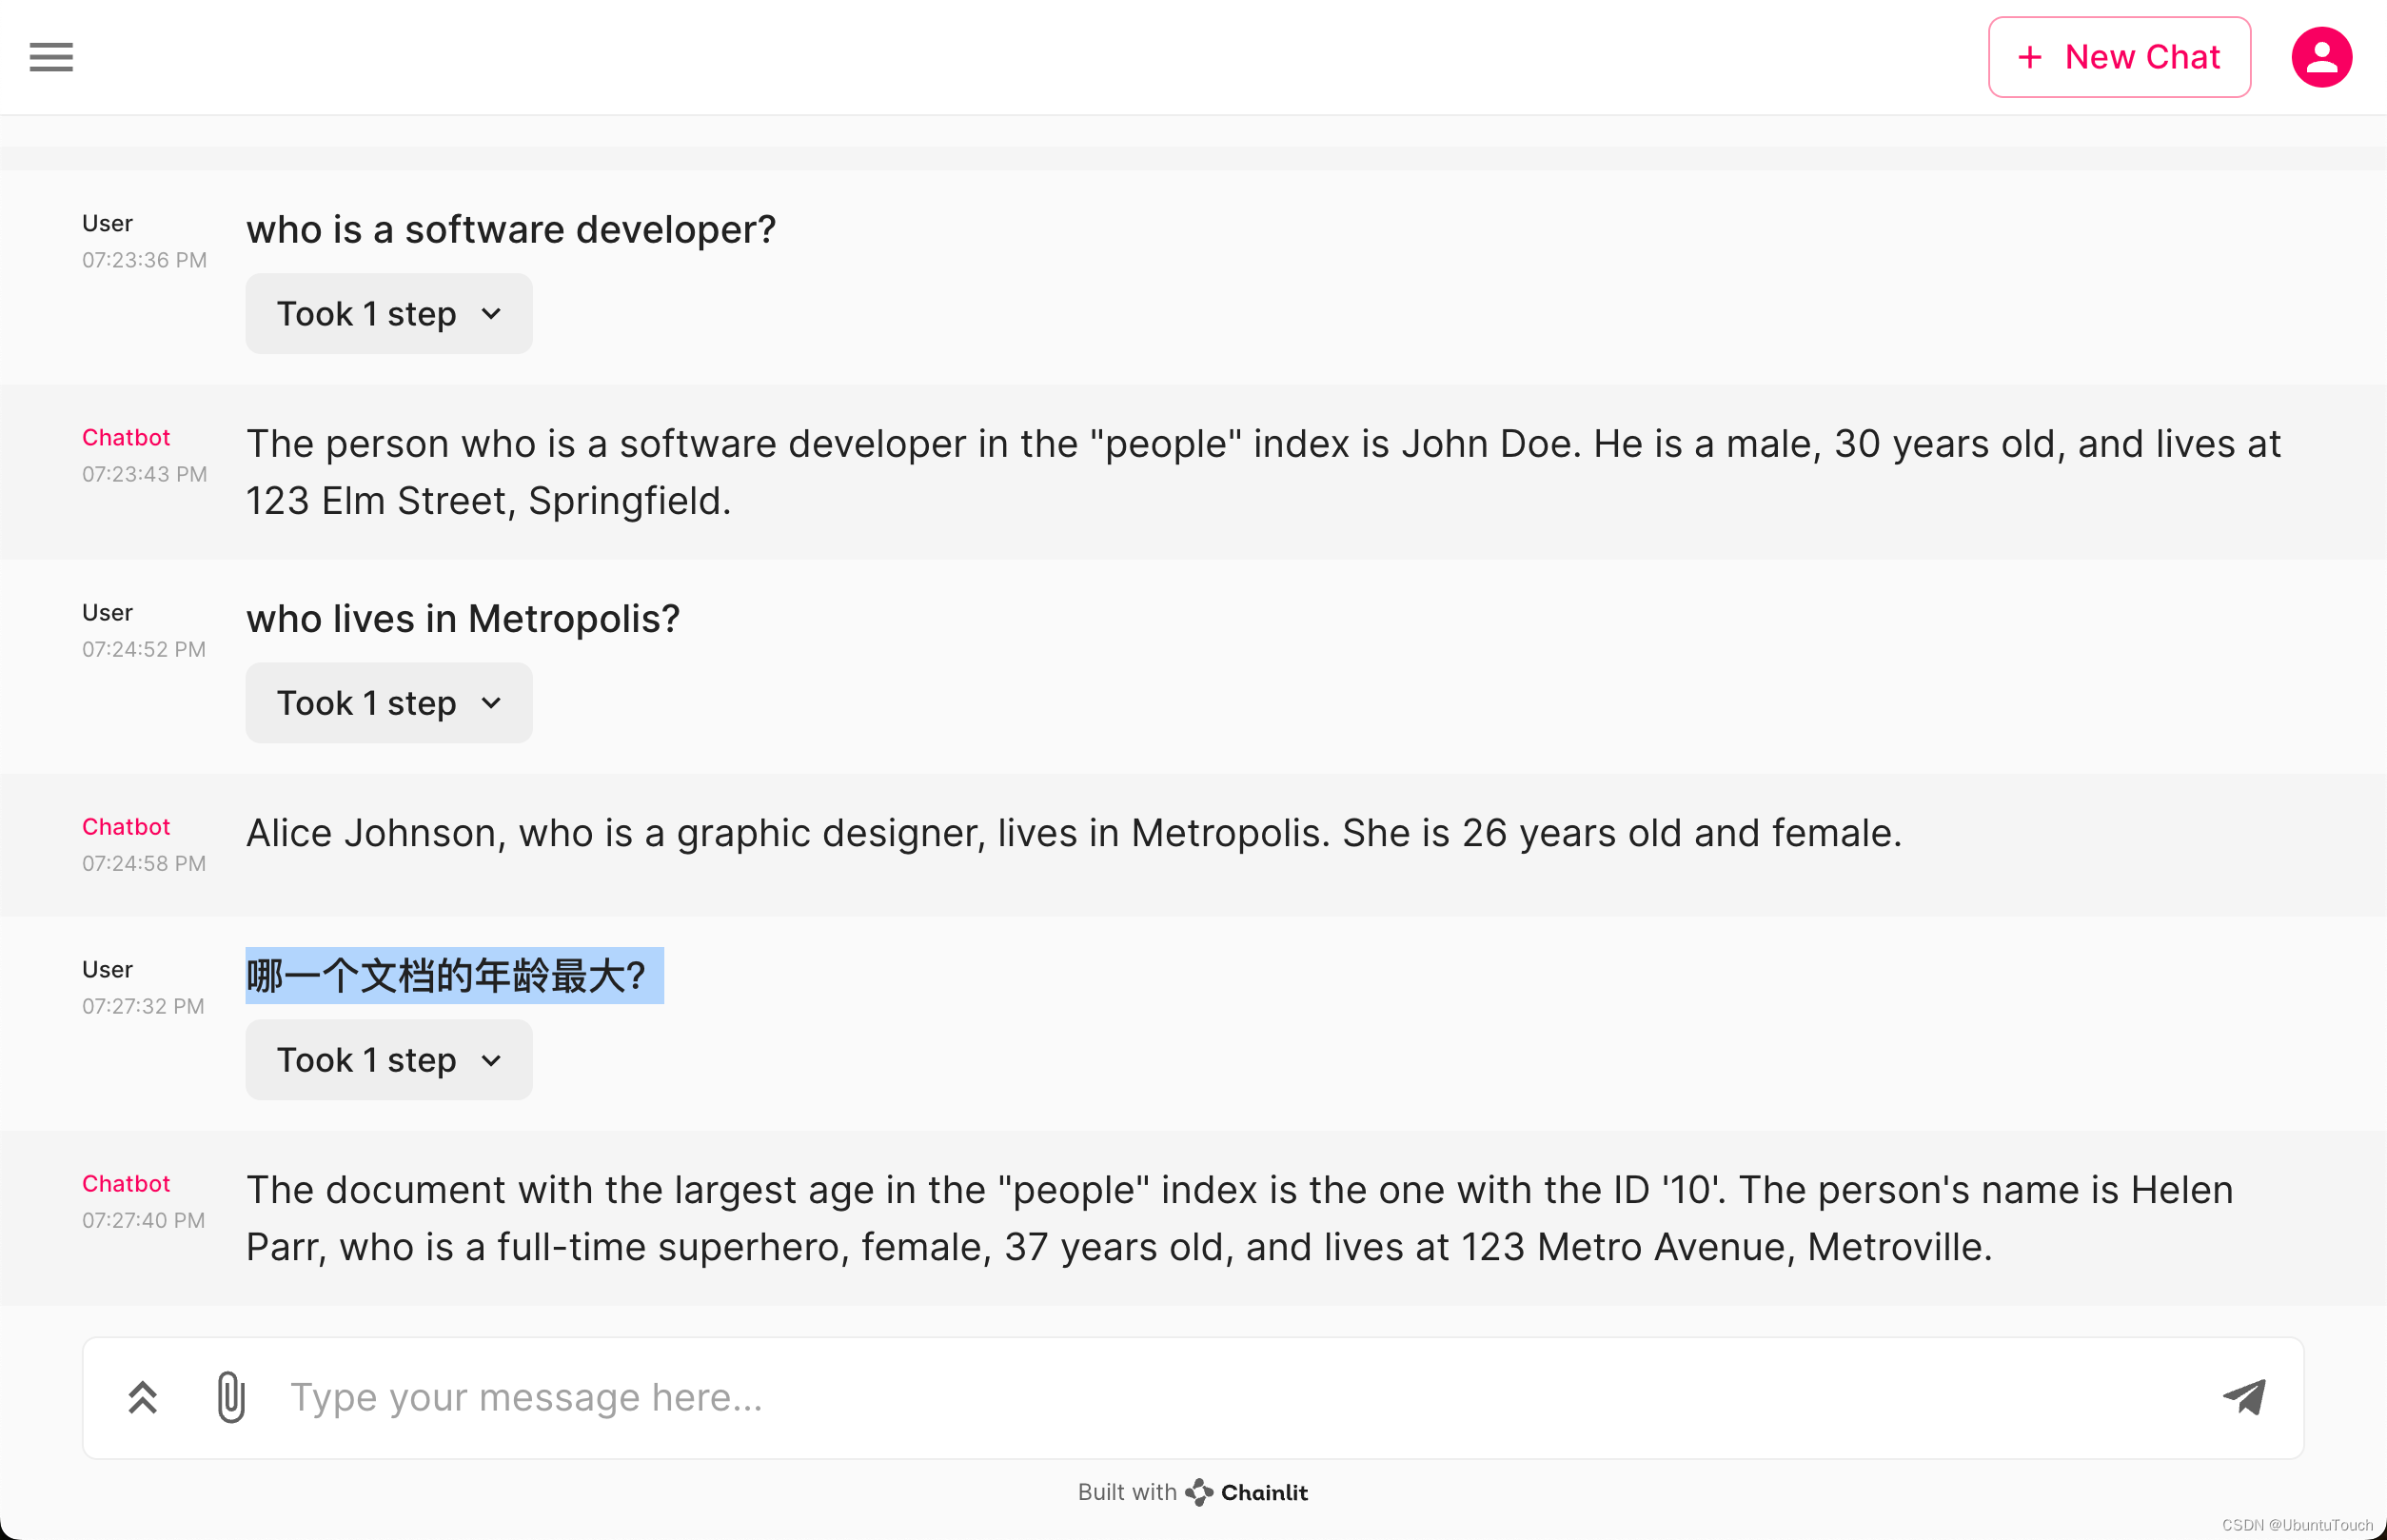
我们还可以做任何其他的尝试。它可以充分了解我的需求,并做出正确的搜索。
Happy exploration :)