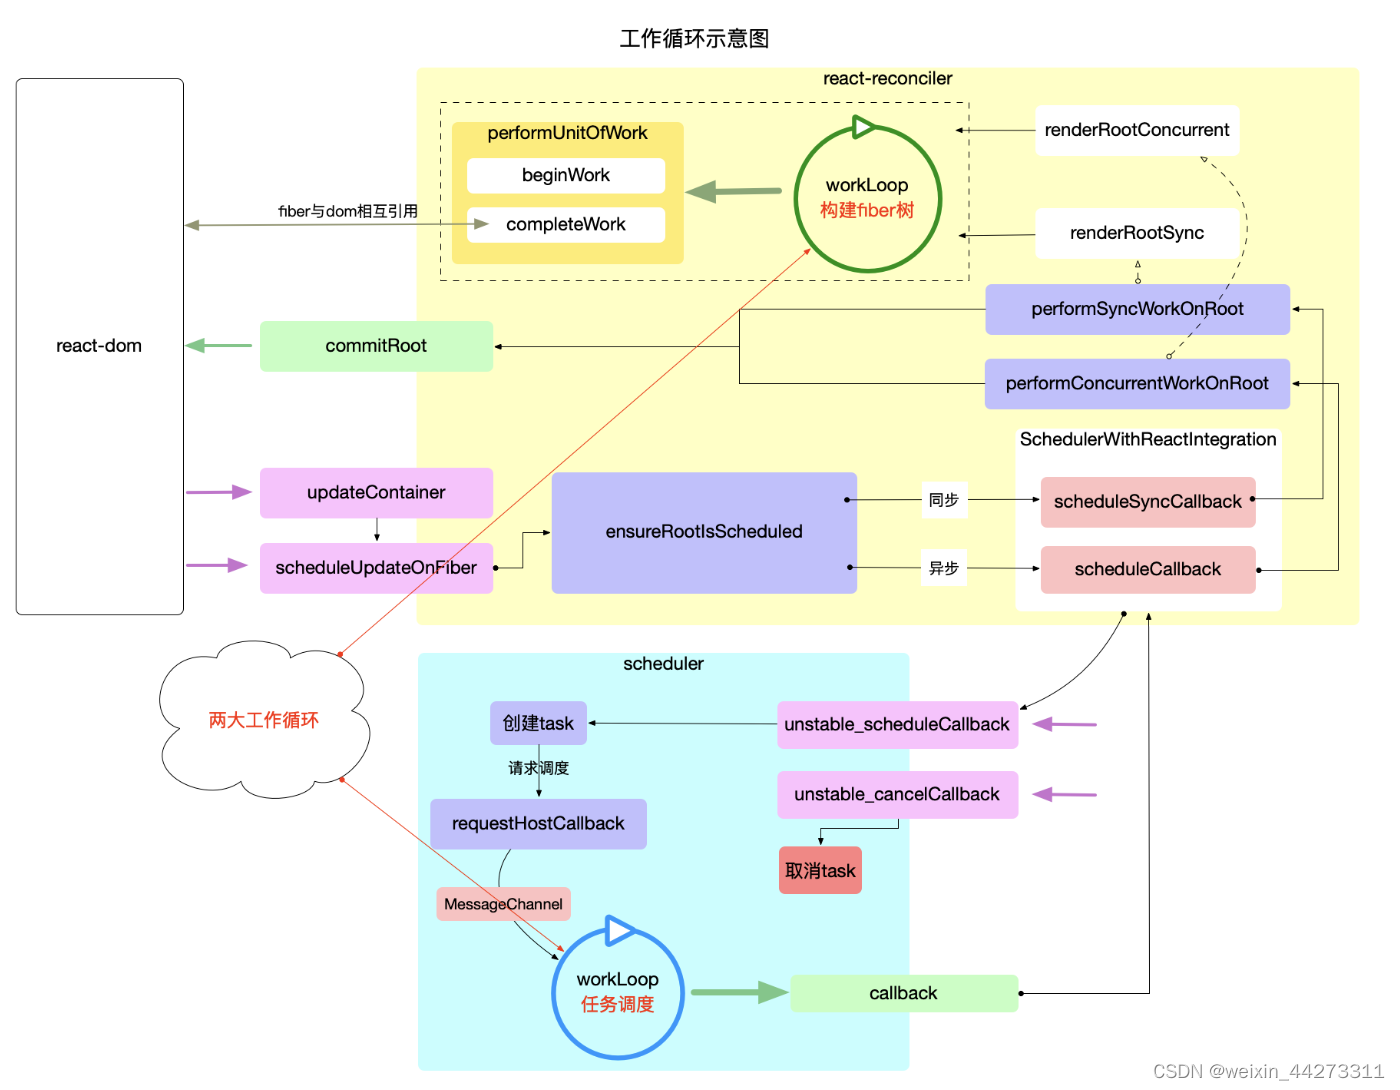
我们知道在React中有4个核心包、2个关键循环。而React正是在这4个核心包中运行,从输入到输出渲染到web端,主要流程可简单分为一下4步:如下图,本文主要是介绍两大循环中的任务调度循环。
4个核心包:
react: 基础包
react-dom:渲染器,连接react和web,通常使用ReactDOM.render(, document.getElementById(‘root’))来挂载组件到指定dom,是入口文件
react-scheduler:调度器,独立的包,主要是任务优先级调度(时间分片、支持可中断渲染)
react-reconciler: 协调器,综合协调react-dom,react,scheduler各包之间的调用与配合),将输入信号转换为输出信号给到渲染器,就是将状态的更新,构建新的fiber树给到react-dom进行渲染到web2个关键循环:
任务调度循环(Event Loop)在Scheduler中实现
fiber构造循环,在Reconciler中实现
其中任务调度循环包含fiber构造、dom渲染、调度检测,fiber构造只是其子集
入口
由上面的图可以看出,从react-dom开始,一旦发生状态更新等输入就会依次触发各个回调进行处理,关键流程如下:schedulerUpdateOnFiber ->ensureRootIsScheduled -> scheduleSyncCallback/scheduleCallback(同步/异步) -> Scheduler(进入react-scheduler中进行任务调度)

重要源码解析
scheduleUpdateOnFiber:两种结果
1、不经过调度, 直接进行fiber构造.
2、注册调度任务, 经过Scheduler包的调度, 间接进行fiber构造.
// 唯一接收输入信号的函数
export function scheduleUpdateOnFiber(fiber: Fiber,lane: Lane,eventTime: number,
) {// ... 省略部分无关代码const root = markUpdateLaneFromFiberToRoot(fiber, lane);if (lane === SyncLane) {if ((executionContext & LegacyUnbatchedContext) !== NoContext &&(executionContext & (RenderContext | CommitContext)) === NoContext) {// 直接进行`fiber构造`performSyncWorkOnRoot(root);} else {// 注册调度任务, 经过`Scheduler`包的调度, 间接进行`fiber构造`ensureRootIsScheduled(root, eventTime);}} else {// 注册调度任务, 经过`Scheduler`包的调度, 间接进行`fiber构造`ensureRootIsScheduled(root, eventTime);}
}
ensureRootIsScheduled: 分为 2 部分:
1、前半部分: 判断是否需要注册新的调度(如果无需新的调度, 会退出函数)
2、后半部分: 注册调度任务performSyncWorkOnRoot或
- performConcurrentWorkOnRoot被封装到了任务回调(scheduleSyncCallback或scheduleCallback)中
- 等待调度中心执行任务, 任务运行其实就是执行performSyncWorkOnRoot或performConcurrentWorkOnRoot
// ... 省略部分无关代码
function ensureRootIsScheduled(root: FiberRoot, currentTime: number) {// 前半部分: 判断是否需要注册新的调度const existingCallbackNode = root.callbackNode;const nextLanes = getNextLanes(root,root === workInProgressRoot ? workInProgressRootRenderLanes : NoLanes,);const newCallbackPriority = returnNextLanesPriority();if (nextLanes === NoLanes) {return;}if (existingCallbackNode !== null) {const existingCallbackPriority = root.callbackPriority;if (existingCallbackPriority === newCallbackPriority) {return;}cancelCallback(existingCallbackNode);}// 后半部分: 注册调度任务let newCallbackNode;if (newCallbackPriority === SyncLanePriority) {newCallbackNode = scheduleSyncCallback(performSyncWorkOnRoot.bind(null, root),);} else if (newCallbackPriority === SyncBatchedLanePriority) {newCallbackNode = scheduleCallback(ImmediateSchedulerPriority,performSyncWorkOnRoot.bind(null, root),);} else {const schedulerPriorityLevel =lanePriorityToSchedulerPriority(newCallbackPriority);newCallbackNode = scheduleCallback(schedulerPriorityLevel,performConcurrentWorkOnRoot.bind(null, root),);}root.callbackPriority = newCallbackPriority;root.callbackNode = newCallbackNode;
}
至此,我们正式进入到Scheduler中来介绍任务调度循环中是如何创建任务并处理时间分片以及至此可终端渲染的。
Scheduler任务调度
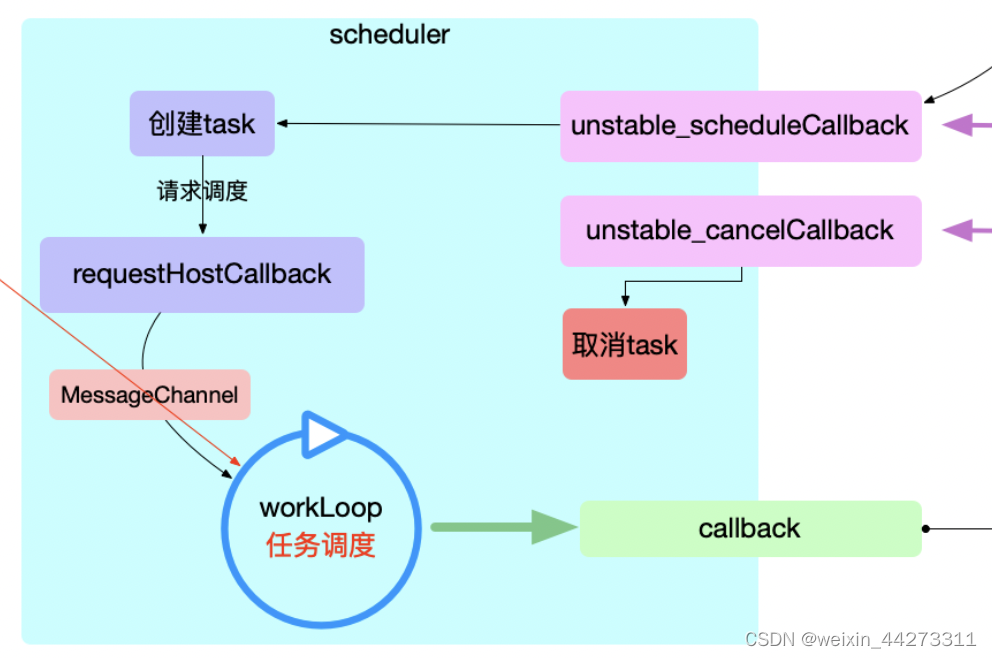
从下面的示意图能看出,在Scheduler中,通过unstable_scheduleCallback来触发创建任务(下面简称task),创建完成之后添加到任务队列(taskQueue)然后调用requestHostCallback来请求调用,通过MessageChannel(EvenLoop)进入任务调度循环等待调用,调用之后会将包含任务的callback传回到Reconciler中调用,执行performSyncWorkOnRoot/performConcurrentWorkOnRoot(异步/同步)进行到fiber构造循环
创建调度任务
通过unstable_scheduleCallback来创建新的任务,主要是根据任务优先级来设置任务过期时间(优先级越高,值越小,过期时间越短,在队列中排序越靠前sortIndex),然后将生成的newTask加入taskQueue,并请求调用,处于等待调用状态。
// 省略部分无关代码
function unstable_scheduleCallback(priorityLevel, callback, options) {// 1. 获取当前时间var currentTime = getCurrentTime();var startTime;if (typeof options === 'object' && options !== null) {// 从函数调用关系来看, 在v17.0.2中,所有调用 unstable_scheduleCallback 都未传入options// 所以省略延时任务相关的代码} else {startTime = currentTime;}// 2. 根据传入的优先级, 设置任务的过期时间 expirationTimevar timeout;switch (priorityLevel) {case ImmediatePriority:timeout = IMMEDIATE_PRIORITY_TIMEOUT;break;case UserBlockingPriority:timeout = USER_BLOCKING_PRIORITY_TIMEOUT;break;case IdlePriority:timeout = IDLE_PRIORITY_TIMEOUT;break;case LowPriority:timeout = LOW_PRIORITY_TIMEOUT;break;case NormalPriority:default:timeout = NORMAL_PRIORITY_TIMEOUT;break;}var expirationTime = startTime + timeout;// 3. 创建新任务var newTask = {id: taskIdCounter++,callback,priorityLevel,startTime,expirationTime,sortIndex: -1,};if (startTime > currentTime) {// 省略无关代码 v17.0.2中不会使用} else {newTask.sortIndex = expirationTime;// 4. 加入任务队列push(taskQueue, newTask);// 5. 请求调度if (!isHostCallbackScheduled && !isPerformingWork) {isHostCallbackScheduled = true;requestHostCallback(flushWork);}}return newTask;
}
任务对象结构:
var newTask = {id: taskIdCounter++, // id: 一个自增编号callback, // callback: 传入的回调函数priorityLevel, // priorityLevel: 优先级等级startTime, // startTime: 创建task时的当前时间expirationTime, // expirationTime: task的过期时间, 优先级越高 expirationTime = startTime + timeout 越小sortIndex: -1,
};
newTask.sortIndex = expirationTime; // sortIndex: 排序索引, 全等于过期时间. 保证过期时间越小, 越紧急的任务排在最前面
Scheduler优先级
由于创建task中提及到优先级,所以在这里也简单介绍一下,在React中主要有三种优先级:
- fiber优先级(LanePriority): 位于react-reconciler包, 也就是Lane(车道模型).
- 调度优先级(SchedulerPriority): 位于scheduler包.
- 优先级等级(ReactPriorityLevel) : 位于react-reconciler包中的SchedulerWithReactIntegration.js, 负责上述 2 套优先级体系的转换.
简单理解就是LanePriority是react-reconciler里面的优先级等级、SchedulerPriority是Scheduler中的优先级等级,两者没有直接联系,是通过彼此和ReactPriorityLevel相互转换,产生间接联系。
优先级等级是由二进制进行表示,值越小等级越高,通过 lane & -lane来获取等级最大值
32位二进制,最高位表示符号位,所以表示值的只有31位
消费任务
由上面可知,创建task之后就会调用requestHostCallback(flushWork)来发起请求调用到调度中心,并等待调用,其中flushWork回调中就是处理workLoop来消费队列的回调,当调度中心调度flushWork时,就会调用workLoop来循环消费任务队列中的队列,即worlLoop中就是消费taskQueue的回调。
flushWork中就是设置全局标志,并调用workLoop
function flushWork(hasTimeRemaining, initialTime) {// 1. 做好全局标记, 表示现在已经进入调度阶段isHostCallbackScheduled = false;isPerformingWork = true;const previousPriorityLevel = currentPriorityLevel;try {// 2. 循环消费队列return workLoop(hasTimeRemaining, initialTime);} finally {// 3. 还原全局标记currentTask = null;currentPriorityLevel = previousPriorityLevel;isPerformingWork = false;}
}
在workLoop中处理消费taskQueue中的任务,其中进行了时间分片和可中断的处理:
// 省略部分无关代码
function workLoop(hasTimeRemaining, initialTime) {let currentTime = initialTime; // 保存当前时间, 用于判断任务是否过期currentTask = peek(taskQueue); // 获取队列中的第一个任务while (currentTask !== null) {if (currentTask.expirationTime > currentTime &&(!hasTimeRemaining || shouldYieldToHost())) {// 虽然currentTask没有过期, 但是执行时间超过了限制(毕竟只有5ms, shouldYieldToHost()返回true). 停止继续执行, 让出主线程break;}const callback = currentTask.callback;if (typeof callback === 'function') {currentTask.callback = null;currentPriorityLevel = currentTask.priorityLevel;const didUserCallbackTimeout = currentTask.expirationTime <= currentTime;// 执行回调const continuationCallback = callback(didUserCallbackTimeout);currentTime = getCurrentTime();// 回调完成, 判断是否还有连续(派生)回调if (typeof continuationCallback === 'function') {// 产生了连续回调(如fiber树太大, 出现了中断渲染), 保留currentTaskcurrentTask.callback = continuationCallback;} else {// 把currentTask移出队列if (currentTask === peek(taskQueue)) {pop(taskQueue);}}} else {// 如果任务被取消(这时currentTask.callback = null), 将其移出队列pop(taskQueue);}// 更新currentTaskcurrentTask = peek(taskQueue);}if (currentTask !== null) {return true; // 如果task队列没有清空, 返回true. 等待调度中心下一次回调} else {return false; // task队列已经清空, 返回false.}
}
在workLoop中会循环taskQueue中的task,每次取出第一个task,然后以task为单位执行,会先判断任务的过期时间(expirationTime)以及是否要移交主线程(shouldYieldToHost),满足条件之后才会处理该task。然后设置task的callback为null(很关键,下面会根据callback来判断这个task是否执行完,保存中断时的task的快照),执行callback,如果这期间产生了中断,则会返回continuationCallback回调会保存currentTask否在会从队列中删除该task,表示该task以及执行完成。workLoop循环消费taskQueue的示意图如下:
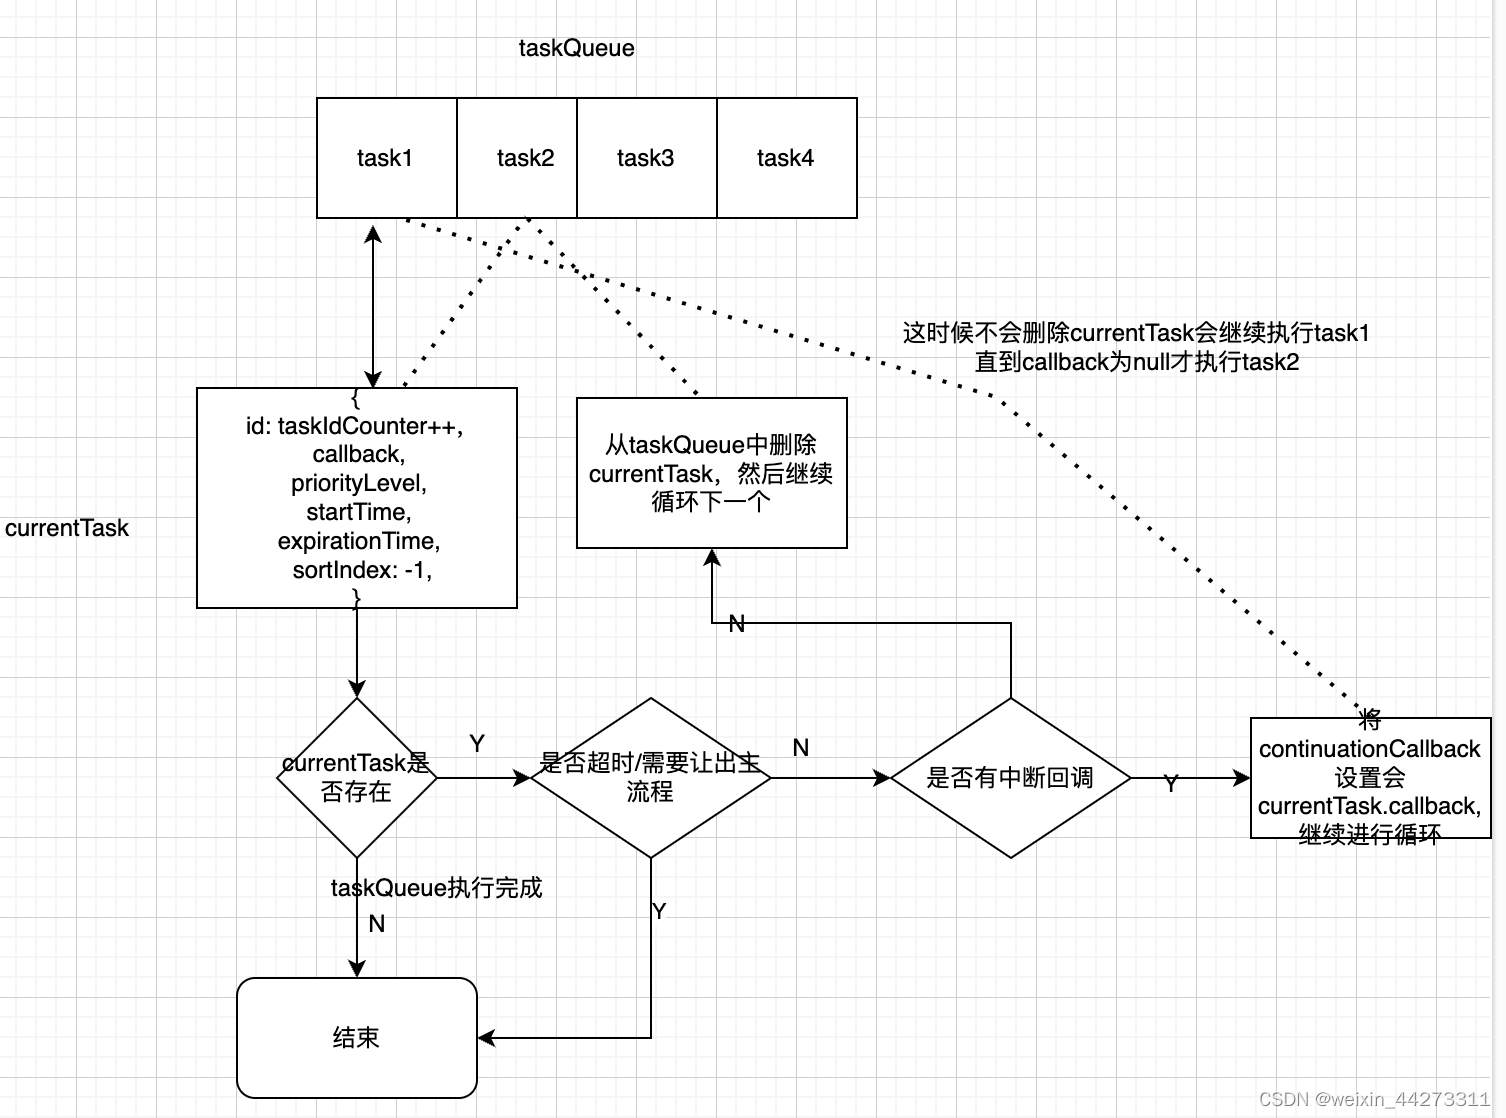
shouldYieldToHost判断是否需要将主流程让给其他任务使用,因为Js是单线程,比如在准备消费task之前有用户IO操作或者当前taskQueue中task较多,占用时间太长(时间分片周期为5ms)就需要让出主线程,等待下一次调度中心的调度,shouldYieldToHost源码下面会介绍。
回到主线,刚说到创建完成之后通过把处理taskQueue的flushWork回调传给requestHostCallback来申请调度。调度示意图如下:
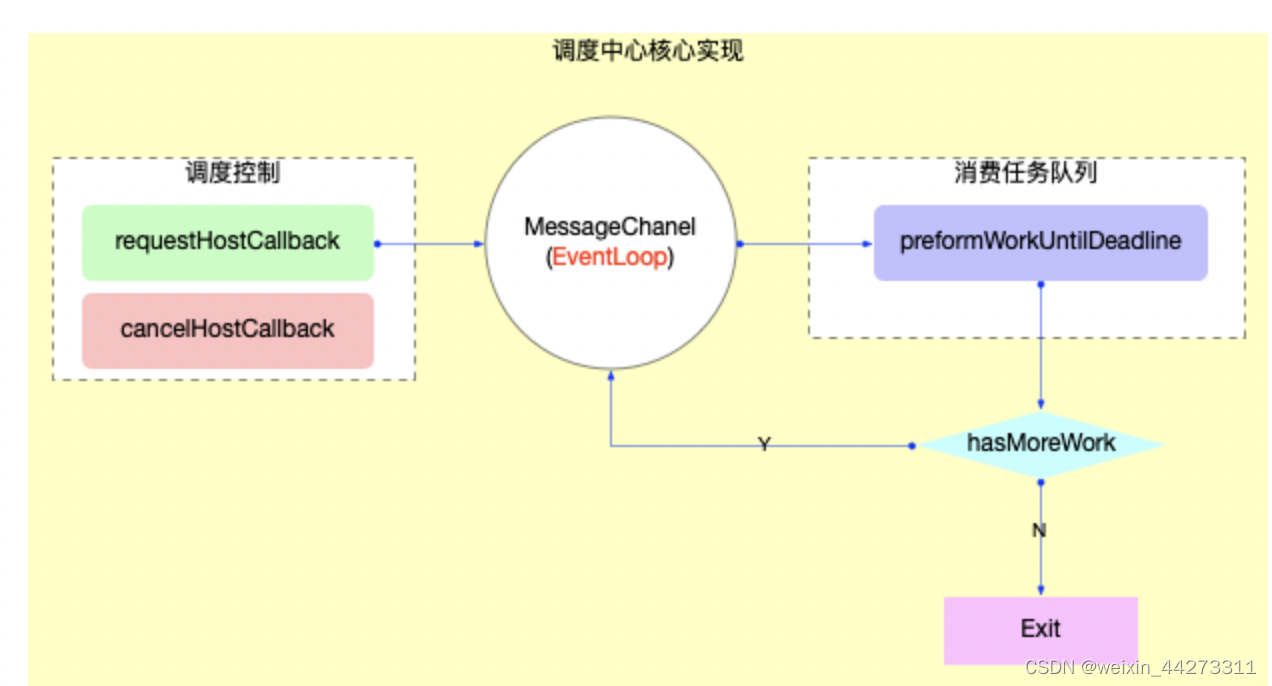
下面我们从代码来看看这个函数中做了什么:
// 请求回调
requestHostCallback = function (callback) {// 1. 保存callbackscheduledHostCallback = callback;if (!isMessageLoopRunning) {isMessageLoopRunning = true;// 2. 通过 MessageChannel 发送消息port.postMessage(null);}
};
在里面通过MessageChannel来发布了一个消息,然后会有performWorkUntilDeadline来接收到该消息
为什么使用messageChannel来进行调度和时间分片,不使用settimeout或浏览器提供的api: requestAnimationFrame、requestIdleCallback呢? 请查看写的这篇文章:【React架构 - Scheduler中的MessageChannel】
// 接收 MessageChannel 消息
const performWorkUntilDeadline = () => {// ...省略无关代码if (scheduledHostCallback !== null) {const currentTime = getCurrentTime();// 更新deadlinedeadline = currentTime + yieldInterval;// 执行callbackscheduledHostCallback(hasTimeRemaining, currentTime);} else {isMessageLoopRunning = false;}
};
从代码里面可以看到,在performWorkUntilDeadline接收到requestHostCallback发送的消息后更新deadline之后就调用了scheduledHostCallback来执行该任务,这里的scheduledHostCallback就是刚才传入的flushWork,来循环处理消费taskQueue。在workLoop中每次消费task之前都会判断shouldYieldToHost,下面来介绍一下该函数主要做了什么
// 获取当前时间
getCurrentTime = () => localPerformance.now();// 时间切片周期, 默认是5ms(如果一个task运行超过该周期, 下一个task执行之前, 会把控制权归还浏览器)
let yieldInterval = 5;
let deadline = 0;
const maxYieldInterval = 300;
let needsPaint = false;
const scheduling = navigator.scheduling;
// 是否让出主线程
shouldYieldToHost = function () {const currentTime = getCurrentTime();if (currentTime >= deadline) {if (needsPaint || scheduling.isInputPending()) {// There is either a pending paint or a pending input.return true;}// There's no pending input. Only yield if we've reached the max// yield interval.return currentTime >= maxYieldInterval; // 在持续运行的react应用中, currentTime肯定大于300ms, 这个判断只在初始化过程中才有可能返回false} else {// There's still time left in the frame.return false;}
};
从代码中能看出来shouldYieldToHost就是判断当前task是否过期以及是否需要马上绘制或者有IO操作。时间分片周期默认为5ms,最大为300ms,返回为true,就需要将控制器教换给浏览器立即退出任务调度循环,每次循环都会判断一次入上面workLoop所见。时间分片周期默认是5ms,当然也可以根据不同设备的fps来进行设定:
// 设置时间切片的周期
forceFrameRate = function (fps) {if (fps < 0 || fps > 125) {// Using console['error'] to evade Babel and ESLintconsole['error']('forceFrameRate takes a positive int between 0 and 125, ' +'forcing frame rates higher than 125 fps is not supported',);return;}if (fps > 0) {yieldInterval = Math.floor(1000 / fps);} else {// reset the framerateyieldInterval = 5;}
};
至此EventLoop中主要的流程已经介绍完了,随后便是将消费task将callback传入到Reconciler中执行performSyncWorkOnRoot/performConcurrentWorkOnRoot来进行Fiber构造,进入React两大循环中的fiber构造循环了。
参考资料
图解React
