现在steam上面有很多下棋类/经营类的游戏都是用六边形的地形,比较美观而且实用,去年在版本末期我也自己尝试做了一个绘制六边体的demo,一年没接触unity竟然都要忘光了,赶紧在这边记录一下。
想cv代码可以直接拉到代码章节
功能
能够动态生成一系列可以“挖空中心”的六边形。指定innerWidth为0也可以生成实心的六边体。
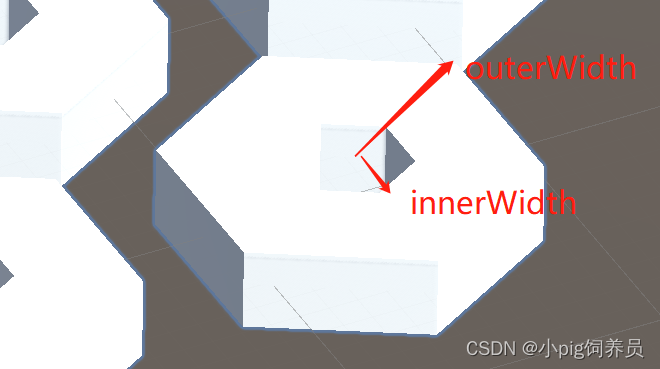
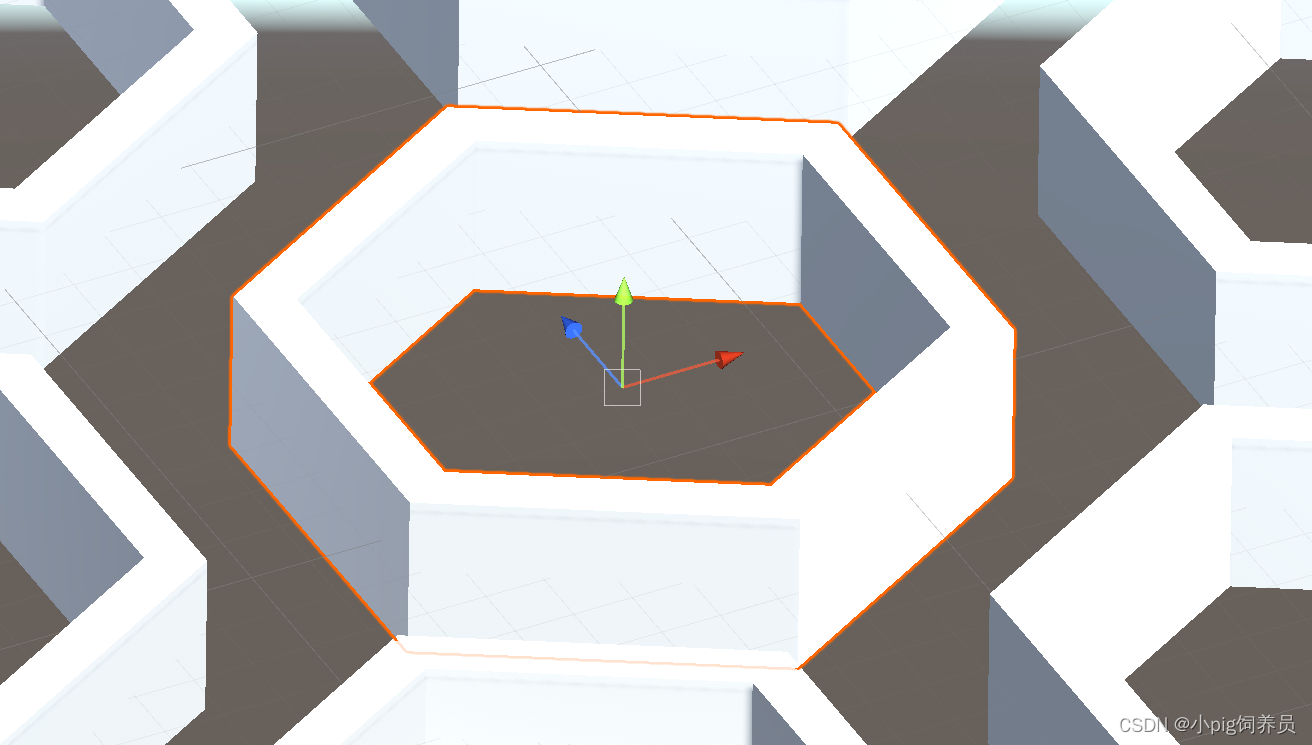
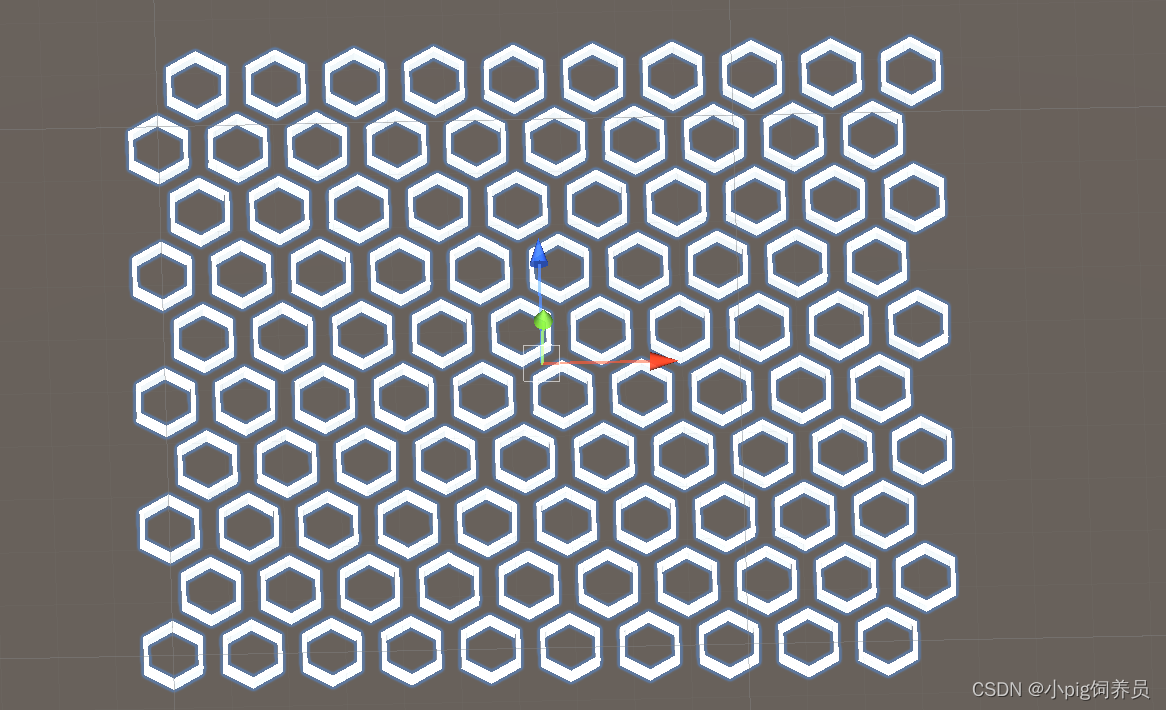
能够生成平铺/直铺的六边形群,调整之间距离


绘制思路
将绘制一个六边形看成六个下面这种等腰体,绕中心旋转60度之后合并成一个。

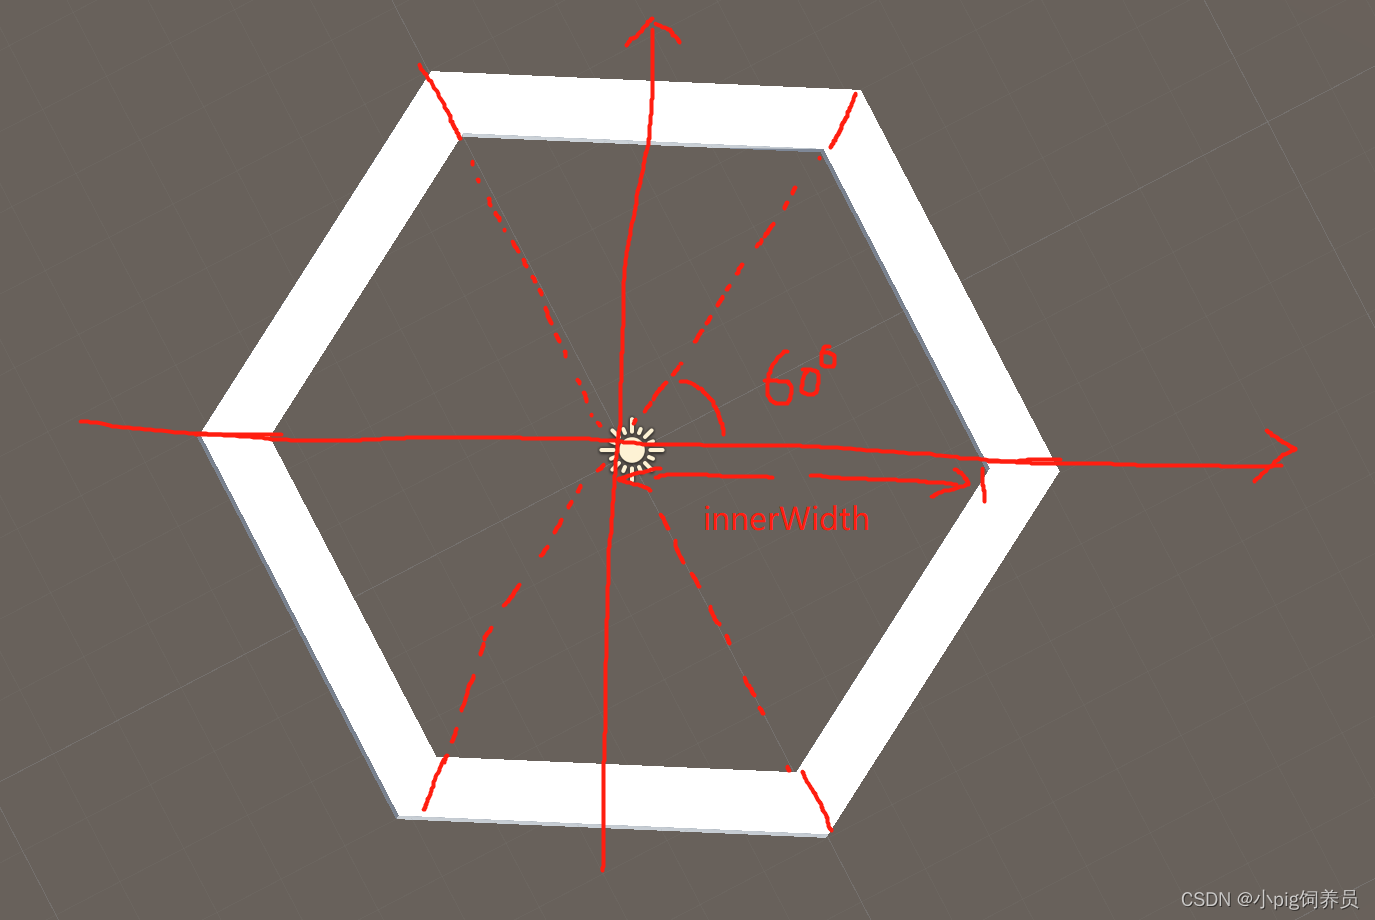
一个这种等腰体又可以看成绘制四个面:上面的等腰梯形,内测的长方形,下面的等腰梯形,外侧的长方形,两边无需绘制,因为合并之后不会显示出来。
所以只需要通过三角函数计算出我们所需的所有点->拼出一个面->合成一个等腰体->合成一个六边体。
组件
我们需要一个MeshFilter来设置mesh,一个MeshRenderer来设置mesh的材质。同时需要对mesh所需的内置成员变量有些了解。

m_meshFilter = GetComponent<MeshFilter>();m_meshRenderer = GetComponent<MeshRenderer>();m_mesh = new Mesh();m_mesh.name = "HexMesh";m_meshFilter.mesh = m_mesh;m_meshRenderer.material = m_material;//最终数据传入m_mesh.vertices = verticles.ToArray();m_mesh.triangles = tris.ToArray();m_mesh.uv = uvs.ToArray();m_mesh.RecalculateNormals();
具体计算
绘制某个点
根据前面需要绘制的等腰梯形,设A是梯形长边的点,B是梯形短边的点,易得平面内某个点的计算方式
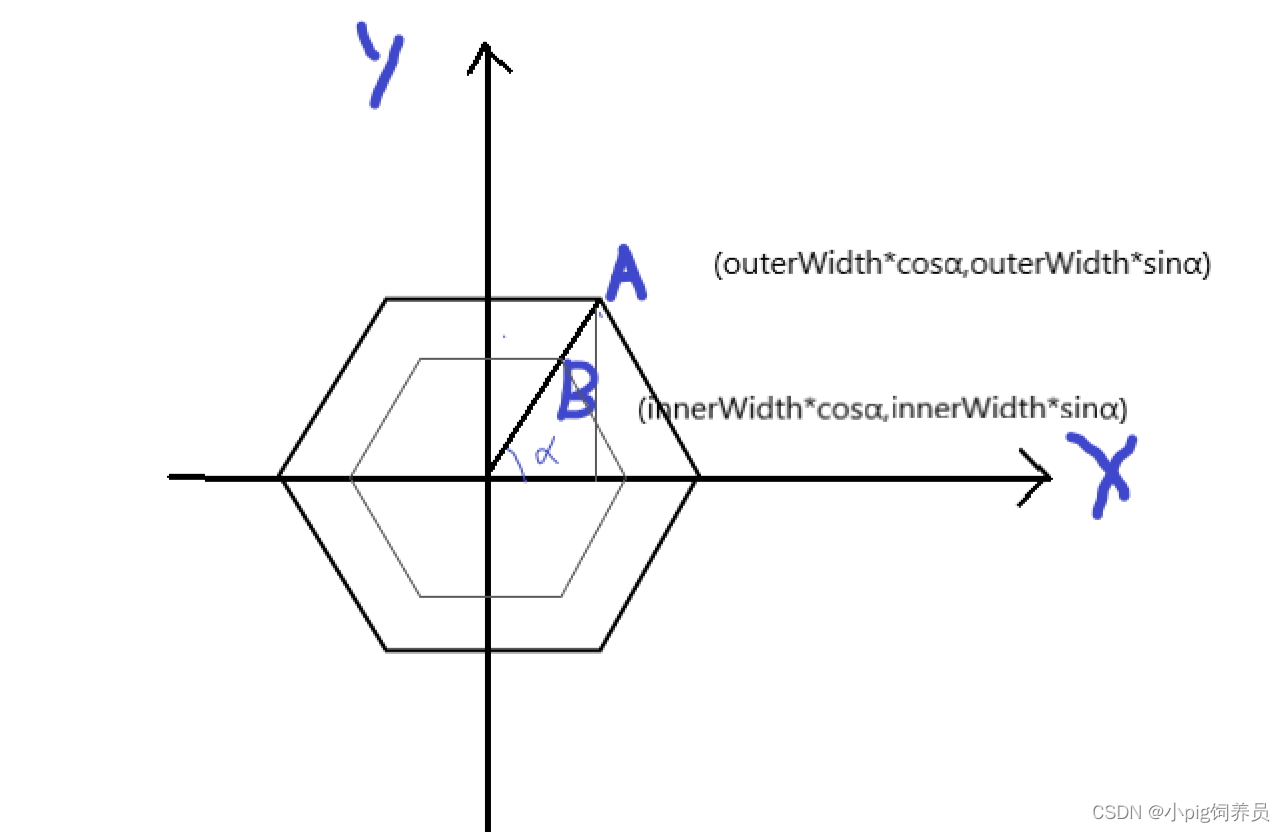
定义一个CreatePoint接口,根据width和y轴高度height来生成某个点的三维向量,(注意unity下生成图中y轴实际上是三维空间的z轴)
private Vector3 CreatePoint(float distance, float height, float angle){float rad = angle * Mathf.Deg2Rad; //Mathf接收的参数需要是弧度制return new Vector3(distance * Mathf.Cos(rad), height, distance * Mathf.Sin(rad));}
生成面所需的数据
上文提到的等腰体四个不同面实际上都是四个顶点组成的,并且都是两个点组成的平行的线段,所以我们可以提供一个接口,只需指定高度和半径,就可以画出这四种不同的面,同时存在上下和内外两侧面的朝向是相反的,所以提供reverse接口来进行反向。
/// <summary>/// 上下底面的单独一个等腰梯形/// </summary>/// <param name="innerRad">内径</param>/// <param name="outerRad">外径</param>/// <param name="heightA">外高</param>/// <param name="heightB">内高</param>/// <param name="point">顺序</param>/// <param name="reverse">连接方向</param>/// <returns></returns>private Face CreateFace(float innerRad, float outerRad, float heightA, float heightB, int point, bool reverse = false){float angle1 = point * 60;float angle2 = angle1 + 60;if (!isFlat){ //竖着排布,初始角度是-30angle1 -= 30;angle2 -= 30;}List<Vector3> verticals = new List<Vector3>();//.......C.//..B.......//..........//...A......Dverticals.Add(CreatePoint(innerRad, heightA, angle1));verticals.Add(CreatePoint(innerRad, heightA, angle2));verticals.Add(CreatePoint(outerRad, heightB, angle2));verticals.Add(CreatePoint(outerRad, heightB, angle1));List<int> tris = new List<int> { 0, 1, 2, 2, 3, 0};List<Vector2> uv = new List<Vector2> { new Vector2(0, 0),new Vector2(1,0),new Vector2(1,1),new Vector2(0,1) };//vertical顺序颠倒,就会按照顺时针绘制。if(reverse){verticals.Reverse();}return new Face(verticals, tris, uv);}
这里有一些关于mesh的基础知识,首先是三个顶点能够组成一个面,从上往下看如果点之间是逆时针顺序的话,就是面向我们的。这里我们添加了四个点。tirs指定其顺序,每三个一组将会连成一个面,uvs代表是渲染的时候的uv坐标,这里如果六边体有规范的话,就需要根据需求设置对应的uv值,这里就不关注这个了。
List<int> tris = new List<int> { 0, 1, 2, 2, 3, 0};List<Vector2> uv = new List<Vector2> { new Vector2(0, 0),new Vector2(1,0),new Vector2(1,1),new Vector2(0,1) };
public struct Face
{//顶点位置数组public List<Vector3> verticles { get; private set; }//三角形顶点索引数组,按给定的顺序连接顶点,为顺时针三个一组的顺序public List<int> triangles { get; private set; }public List<Vector2> uvs { get; private set; }public Face(List<Vector3> verticles, List<int> triangles, List<Vector2> uvs){this.verticles = verticles;this.triangles = triangles;this.uvs = uvs;}
}
这样能够生产出一个面,接下来我们批量生产所需的面,只需要不断让角度偏移60度(忘记了可以去看上面计算A点坐标),重复刚才的步骤,将所有的面的数据都生成
private void DrawFaces(){m_faces = new List<Face>();//上表面for(int point = 0; point < 6; point ++){m_faces.Add(CreateFace(innerWidth, outerWidth, height / 2, height / 2, point));}//下表面for (int point = 0; point < 6; point++){m_faces.Add(CreateFace(innerWidth, outerWidth,- height / 2, -height / 2, point,true));}//侧面for (int point = 0; point < 6; point++){m_faces.Add(CreateFace(outerWidth, outerWidth, height / 2, -height / 2, point));}//里侧面for (int point = 0; point < 6; point++){m_faces.Add(CreateFace(innerWidth, innerWidth, height / 2, -height / 2, point,true));}}
组装
刚才我们将数据填入Face,但是Face是不能直接使用的,我们要将刚才生成的顶点信息,uv信息,三角形信息等一次灌入Mesh中,
Mesh提供了成员变量来接收这些数据。
顶点和uv直接添加就可以,注意三角形数据需要根据顶点数据来加下标。
private void CombineFaces(){List<Vector3> verticles = new List<Vector3>();List<int> tris = new List<int>();List<Vector2> uvs = new List<Vector2>();for(int i = 0; i < m_faces.Count; i++){verticles.AddRange(m_faces[i].verticles); //AddRange方法可以把list中所有数据从头到尾添加到新的listuvs.AddRange(m_faces[i].uvs);//注意:这里需要依次指定指定所有顶点在最终mesh的三角形顺序,由于每个face里面包括四个顶点,每次+4int offset = (4 * i);foreach(int triangle in m_faces[i].triangles){tris.Add(triangle + offset);}}m_mesh.vertices = verticles.ToArray();m_mesh.triangles = tris.ToArray();m_mesh.uv = uvs.ToArray();m_mesh.RecalculateNormals();}
排布
要让游戏能玩,肯定需要一系列整齐布局的六边形,所以我们需要一个动态创建六边形的管理器。
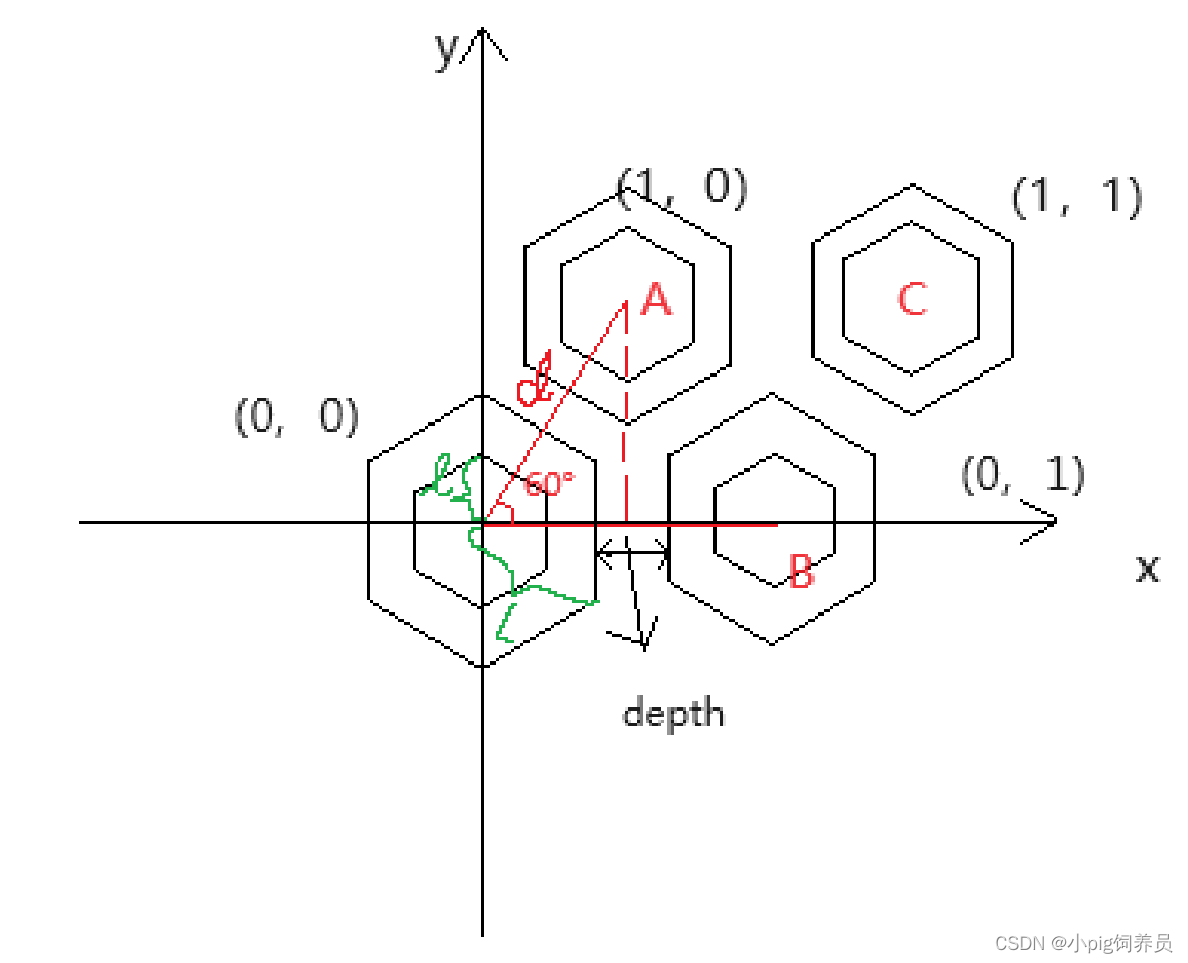
纵向排布

前面我们生成面的时候发现有个isFlat变量,这个变量就是控制了第一个面的生成角度,所以横向的时候能保证六边形是横着的。
private Face CreateFace(float innerRad, float outerRad, float heightA, float heightB, int point, bool reverse = false){float angle1 = point * 60;float angle2 = angle1 + 60;if (!isFlat){ //竖着排布,初始角度是-30angle1 -= 30;angle2 -= 30;}......
问题是如何计算出每个六边形的中心点在哪。这里用三角函数也非常容易看出来
下面是六边体“直立“”情况下,设两个六边形之间间隔为d,六边形中心到外顶点的距离为L
可以发现Y轴方向每个六边形之间距离为(L * cos(30°) * 2 + d)* sin60°
X轴方向每个六边形之间距离为(L*(cos(30°)*2 + d)
同时注意距离偶数行的X轴要添加一个(L * cos(30°) * 2 + d)*sin30°的偏移
具体计算就初中级别的数学,就不一步步画图了
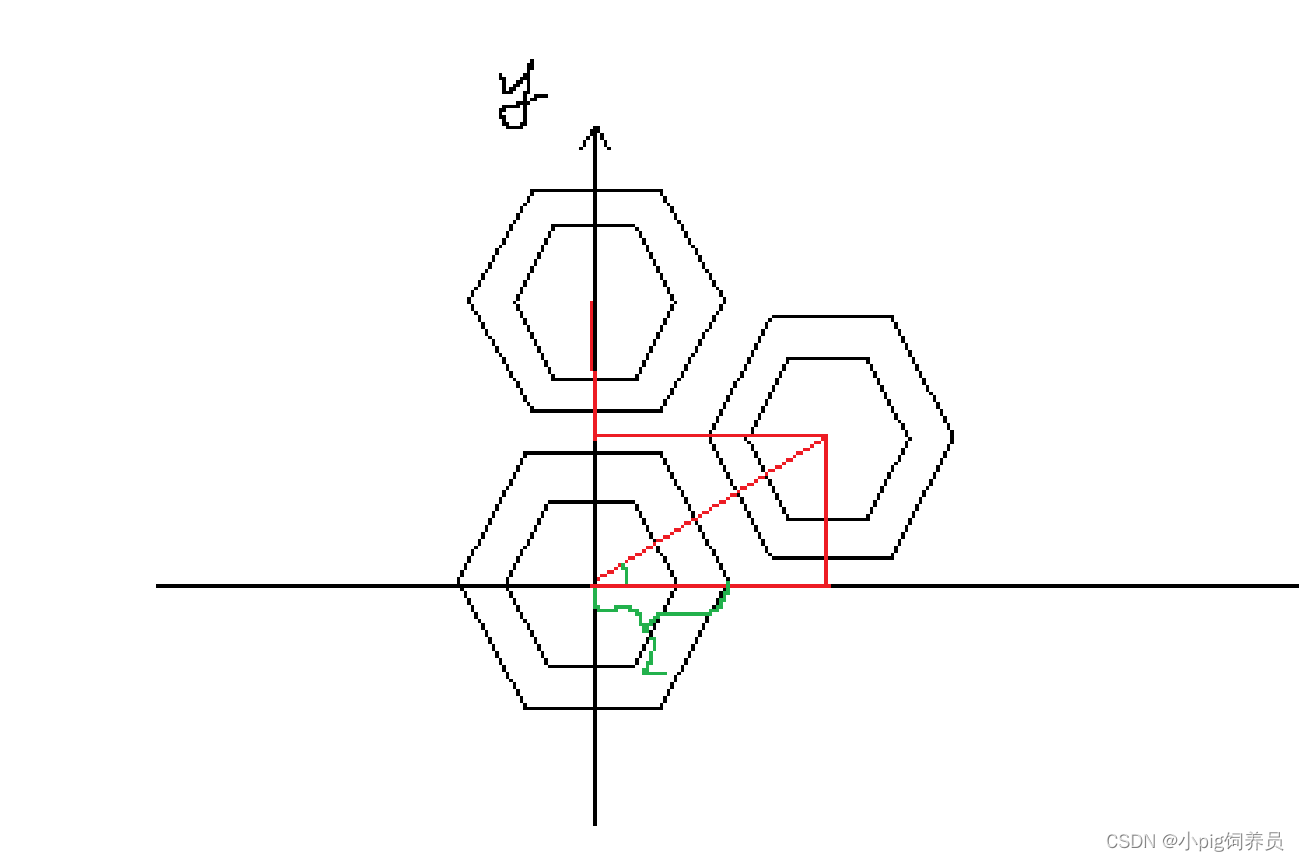
横向排布
同理横向布局也很好计算
可以发现Y轴方向每个六边形之间距离为(L * cos(30°) * 2 + d)
X轴方向每个六边形之间距离为(L*(cos(30°)*2 + d) *sin60°
同时注意距离偶数行的Y轴要添加一个(L * cos(30°) * 2 + d)*sin30°的偏移
万事具备,我们只需要计算每一行每列的点即可生成蜂窝了。
public void SetInterval(){centerDistance = outterWidth * 2 * Mathf.Sin(60 * Mathf.Deg2Rad) + interval;}private void UpdateGrid(GameObject[][] girds){if (girds.Length <= 0) return;bool shouldOffset = false;for (int j = 0; j < heightCount; j++){if (!isFlat){shouldOffset = j % 2 != 0;}for (int i = 0; i < widthCount; i++){if (isFlat){shouldOffset = i % 2 != 0;}HexagonRenderer render = girds[i][j].GetComponent<HexagonRenderer>();//计算六边形位置Vector3 pos = Getpos(i, j, shouldOffset);Debug.Log(pos);render.SetAtrributes(innerWidth, outterWidth, height, pos, matrial, isFlat);render.DrawMesh();}}}private Vector3 Getpos(int i, int j, bool shouldOffset){float angle60 = 60 * Mathf.Deg2Rad;float angle30 = 30 * Mathf.Deg2Rad;if (isFlat){if (shouldOffset){return new Vector3(i * centerDistance * Mathf.Sin(angle60) , transform.position.y, j * centerDistance +centerDistance * Mathf.Sin(angle30));}else{return new Vector3(i * centerDistance * Mathf.Sin(angle60), transform.position.y, j * centerDistance);}}else{if (shouldOffset){return new Vector3(i * centerDistance + centerDistance * Mathf.Sin(angle30), transform.position.y, j * centerDistance * Mathf.Sin(angle60));}else{return new Vector3(i * centerDistance, transform.position.y, j * centerDistance * Mathf.Sin(angle60));}}}
完整代码
在场景中创建一个空物体,将GenerateMap.cs挂载在其身上即可,将会自动生成一系列身上挂载HexagonRenderer.cs的物体
GenerateMap.cs
using System.Collections;
using System.Collections.Generic;
using UnityEngine;public class GenerateMap : MonoBehaviour
{[Header("Grid Settings")]public int widthCount;public int heightCount;[Header("Layout Settings")]public float innerWidth;public float outterWidth;public float height;public bool isFlat;public Material matrial;/// <summary>/// 六边形之间的间隔/// </summary>public float interval;private float centerDistance;/// <summary>/// 存储所有的六边形/// </summary>private GameObject[][] girds;private bool hasGenerate = false;public void Start(){girds = new GameObject[widthCount][];for (int i = 0; i < girds.Length; i++){girds[i] = new GameObject[heightCount];}SetInterval();GenerateGrid();LayoutGrid();}public void SetInterval(){centerDistance = outterWidth * 2 * Mathf.Sin(60 * Mathf.Deg2Rad) + interval;}/// <summary>/// 设置六边形布局,从左下角生成/// </summary>private void LayoutGrid(){UpdateGrid(girds);}private void GenerateGrid(){if (hasGenerate == true) return;for (int j = 0; j < heightCount; j++){for (int i = 0; i < widthCount; i++){GameObject single = new GameObject($"HEX:({i},{j})", typeof(HexagonRenderer)); //$代表string.formatgirds[i][j] = single;single.transform.SetParent(transform, true);}}hasGenerate = true;}private void UpdateGrid(GameObject[][] girds){if (girds.Length <= 0) return;bool shouldOffset = false;for (int j = 0; j < heightCount; j++){if (!isFlat){shouldOffset = j % 2 != 0;}for (int i = 0; i < widthCount; i++){if (isFlat){shouldOffset = i % 2 != 0;}HexagonRenderer render = girds[i][j].GetComponent<HexagonRenderer>();//计算六边形位置Vector3 pos = Getpos(i, j, shouldOffset);Debug.Log(pos);render.SetAtrributes(innerWidth, outterWidth, height, pos, matrial, isFlat);render.DrawMesh();}}}private Vector3 Getpos(int i, int j, bool shouldOffset){float angle60 = 60 * Mathf.Deg2Rad;float angle30 = 30 * Mathf.Deg2Rad;if (isFlat){if (shouldOffset){return new Vector3(i * centerDistance * Mathf.Sin(angle60) , transform.position.y, j * centerDistance +centerDistance * Mathf.Sin(angle30));}else{return new Vector3(i * centerDistance * Mathf.Sin(angle60), transform.position.y, j * centerDistance);}}else{if (shouldOffset){return new Vector3(i * centerDistance + centerDistance * Mathf.Sin(angle30), transform.position.y, j * centerDistance * Mathf.Sin(angle60));}else{return new Vector3(i * centerDistance, transform.position.y, j * centerDistance * Mathf.Sin(angle60));}}}
}
HexagonRenderer.cs
using System.Collections;
using System.Collections.Generic;
using UnityEngine;
public struct Face
{//顶点位置数组public List<Vector3> verticles { get; private set; }//三角形顶点索引数组,按给定的顺序连接顶点,为顺时针三个一组的顺序public List<int> triangles { get; private set; }public List<Vector2> uvs { get; private set; }public Face(List<Vector3> verticles, List<int> triangles, List<Vector2> uvs){this.verticles = verticles;this.triangles = triangles;this.uvs = uvs;}
}
[RequireComponent(typeof(MeshFilter))]
[RequireComponent(typeof(MeshRenderer))]public class HexagonRenderer : MonoBehaviour
{private Mesh m_mesh;private MeshFilter m_meshFilter;private MeshRenderer m_meshRenderer;private List<Face> m_faces;private bool isFlat = true;public Material m_material;public float innerWidth;public float outerWidth;public float height;private void Awake(){m_meshFilter = GetComponent<MeshFilter>();m_meshRenderer = GetComponent<MeshRenderer>();m_mesh = new Mesh();m_mesh.name = "HexMesh";m_meshFilter.mesh = m_mesh;m_meshRenderer.material = m_material;}public void SetAtrributes(float innerWidth, float outerWidth, float height, Vector3 position, Material material, bool isFlat){this.innerWidth = innerWidth;this.outerWidth = outerWidth;this.isFlat = isFlat;this.height = height;transform.position = position;m_material = material;m_meshRenderer.material = m_material;DrawMesh();}private void OnEnable(){DrawMesh();}//渲染整个六边形体public void DrawMesh(){DrawFaces();CombineFaces();}private void OnValidate(){}private void DrawFaces(){m_faces = new List<Face>();//上表面for (int point = 0; point < 6; point++){m_faces.Add(CreateFace(innerWidth, outerWidth, height / 2, height / 2, point));}//下表面for (int point = 0; point < 6; point++){m_faces.Add(CreateFace(innerWidth, outerWidth, -height / 2, -height / 2, point, true));}//侧面for (int point = 0; point < 6; point++){m_faces.Add(CreateFace(outerWidth, outerWidth, height / 2, -height / 2, point));}//里侧面for (int point = 0; point < 6; point++){m_faces.Add(CreateFace(innerWidth, innerWidth, height / 2, -height / 2, point, true));}}private void CombineFaces(){List<Vector3> verticles = new List<Vector3>();List<int> tris = new List<int>();List<Vector2> uvs = new List<Vector2>();for (int i = 0; i < m_faces.Count; i++){verticles.AddRange(m_faces[i].verticles);AddRange方法可以把list中所有数据从头到尾添加到新的listuvs.AddRange(m_faces[i].uvs);//注意:这里需要依次指定指定所有顶点在最终mesh的三角形顺序,由于每个face里面包括四个顶点,每次+4int offset = (4 * i);foreach (int triangle in m_faces[i].triangles){tris.Add(triangle + offset);}}m_mesh.vertices = verticles.ToArray();m_mesh.triangles = tris.ToArray();m_mesh.uv = uvs.ToArray();m_mesh.RecalculateNormals();}/// <summary>/// 上下底面的单独一个等腰梯形/// </summary>/// <param name="innerRad">内径</param>/// <param name="outerRad">外径</param>/// <param name="heightA">外高</param>/// <param name="heightB">内高</param>/// <param name="point">顺序</param>/// <param name="reverse">连接方向</param>/// <returns></returns>private Face CreateFace(float innerRad, float outerRad, float heightA, float heightB, int point, bool reverse = false){float angle1 = point * 60;float angle2 = angle1 + 60;if (!isFlat){angle1 -= 30;angle2 -= 30;}List<Vector3> verticals = new List<Vector3>();//.......C.//..B.......//..........//...A......Dverticals.Add(CreatePoint(innerRad, heightA, angle1));verticals.Add(CreatePoint(innerRad, heightA, angle2));verticals.Add(CreatePoint(outerRad, heightB, angle2));verticals.Add(CreatePoint(outerRad, heightB, angle1));List<int> tris = new List<int> { 0, 1, 2, 2, 3, 0 };List<Vector2> uv = new List<Vector2> { new Vector2(0, 0), new Vector2(1, 0), new Vector2(1, 1), new Vector2(0, 1) };if (reverse){verticals.Reverse();}return new Face(verticals, tris, uv);}/// <summary>/// 创造一个顶点/// </summary>/// <param name="distance">距离坐标原点距离</param>/// <param name="height">y轴高度</param>/// <param name="angle">和坐标轴所成夹角</param>/// <returns></returns>private Vector3 CreatePoint(float distance, float height, float angle){float rad = angle * Mathf.Deg2Rad;return new Vector3(distance * Mathf.Cos(rad), height, distance * Mathf.Sin(rad));}
}

![[AutoSar]BSW_Com09 CAN driver 模块FULL(BASIC)CAN、FIFO选择](https://img-blog.csdnimg.cn/direct/84382a3c560e435da5ef2b99dfe01bc8.png)