前言
上回我们探讨了关于Spring Security,着实复杂。这次咱们聊的认证过滤器就先聊聊认证功能。涉及到多方协同的功能,咱分开聊。也给小伙伴喘口气,嘻嘻。此外也是因为只有登录认证了,才有后续的更多功能集成的可能。
认证过滤器
认证过滤器是Web应用中负责处理用户认证请求的。这意味着他要验证用户的身份,确认你是谁。只有确认用户身份后,才能授予对应的权限,才能在后续访问对应的受保护资源。因此,在我看来,认证过滤器实际上需要完成两个事情:
- 确认用户身份。
- 授权。例如,角色。
SpringSecurity没有“鉴权”这概念?
其实我认为前面说到的AuthorizationFilter应该叫鉴权过滤器,在识别用户身份后甄别用户是否具备访问权限。我刻意找了一下英文,Authentication可以认证、鉴定、身份验证的意思,Authorization可以是授权、批准的意思。第一眼,竟然有点懵逼。。没有上下文的情况下,Authentication可以是认证,也可以是鉴权。而Authorization可以是授权、也可以是鉴权(批准-访问)。
得,我一直以来的疑惑也找到了:为什么Spring Security里面没有“鉴权”相关概念,而只有认证、授权?如果放到Spring Security的语境中,Authentication就是认证的意思,而且还非常准确,因为他还有身份验证的意思。Authorization则是鉴权的含义,授权/批准你访问某个请求。如果非要区分开,则还应使用Identification作为认证这个概念最为合适。
实际上,SpringSecurity在获取用户信息的时候就已经把用户的完整信息包括权限也加载了,所以认证也包括了我们在聊纯概念的“授权”。而SpringSecurity的Authorization是“授权访问”,也就是“鉴权”。因此,可以说在SpringSecurity中只有“认证”和“鉴权”。因为他要求加载的用户信息是包括权限的,跟认证在一块了。别把“授权”概念跟RABC这些“授权方式”混为一谈了,鄙人就懵圈了好久。关于授权和认证不妨再回头看看之前的文章:Spring Security之认证与授权的概念
SpringSecurity支持认证方式
Spring Security支持多种认证方式:
| 认证方式 | 过滤器 | SecurityConfigurer | 描述 |
|---|---|---|---|
| 基于Basic认证 | BasicAuthenticationFilter | HttpBasicConfigurer | 原生支持,开箱即用 |
| 基于Digest认证 | DigestAuthenticationFilter | 无,需要自己引入 | 原生支持,开箱即用 |
| 基于OAuth2认证-资源服务器 | BearerTokenAuthenticationFilter | OAuth2ResourceServerConfigurer | 需要spring-boot-starter-oauth2-resource-server包 |
| 基于OAuth2认证-客户端 | OAuth2LoginAuthenticationFilter | OAuth2LoginConfigurer | 需要spring-boot-starter-oauth2-resource-server包 |
| 基于OAuth2认证-客户端 | OAuth2AuthorizationCodeGrantFilter | OAuth2ClientConfigurer | 需要spring-boot-starter-oauth2-resource-server包 |
| 基于CAS认证 | CasAuthenticationFilter | 本来是有Configurer的,4.0之后被弃用,再之后就移除了 | 需要spring-security-cas包 |
| 基于第三方系统认证 | AbstractPreAuthenticatedProcessingFilter | - | 用户在其他系统已经认证了,在当前系统通过RequestAttribute/Header/Cookie等等方式获取到用户名后直接再当前系统把用户信息读取出来。 |
| 基于用户名和密码认证 | UsernamePasswordAuthenticationFilter | FormLoginConfigurer | 原生支持 |
PS: OAuth2比较复杂,有四种登录方式,还分客户端应用、用户、资源。后面有机会再细聊。
基于第三方系统认证的方式,也有几个原生的实现:
基于J2EE认证:J2eePreAuthenticatedProcessingFilter-JeeConfigurer
基于WebSphere: WebSpherePreAuthenticatedProcessingFilter
基于X509证书认证:X509AuthenticationFilter-X509Configurer
基于Header:RequestHeaderAuthenticationFilter
基于RequestAttribute:RequestAttributeAuthenticationFilter
以上就是Spring Security原生提供的支持、或者通过官方的jar包能够开箱即用的。
基于用户名和密码认证
好了,下面我们来重点关注一下基于用户名和密码的认证方式。首先我们来认识一些必要的核心组件:
| 组件 | 作用 | 备注 |
|---|---|---|
| UserDetails | 提供用户信息,包括权限 | 提供了默认实现:User |
| UserDetailsService | 用于加载装载用户信息 | 在认证之前需要先根据用户名查询用户 |
| AuthenticationManager | 负责完成认证逻辑 | 实现类ProviderManager |
前面两个比较容易理解,无非就是加载用户。而后者,对于ProviderManager而言,相较于我们之前基于方法进行权限配置的方式所使用AuthorizationManager来说,无异于单独开辟了一块新天地。
- ProviderManager
就名字而言,他就是基于AuthenticationProvider来完成。额,没错,他就是一个新的接口,也就是一个新的组件。而ProviderManager主要的作用就是,根据Authentication的类型,寻找匹配的AuthenticationProvider,然后调用匹配的AuthenticationProvider来完成认证。
核心代码:
public class ProviderManager implements AuthenticationManager, MessageSourceAware, InitializingBean {@Overridepublic Authentication authenticate(Authentication authentication) throws AuthenticationException {Class<? extends Authentication> toTest = authentication.getClass();Authentication result = null;Authentication parentResult = null;int size = this.providers.size();// 遍历所有的AuthenticationProvider for (AuthenticationProvider provider : getProviders()) {if (!provider.supports(toTest)) {continue;}// 找到第一个能处理的AuthenticationProvider就执行authenticateresult = provider.authenticate(authentication);if (result != null) {copyDetails(authentication, result);break;}}// 如果认证失败就尝试由父AuthenticationManager认证,这部代码省略了// 认证成功则返回结果// 处理异常-省略代码}
}
关于这个AuthenticationProvider,我们来感受一下他的实现:
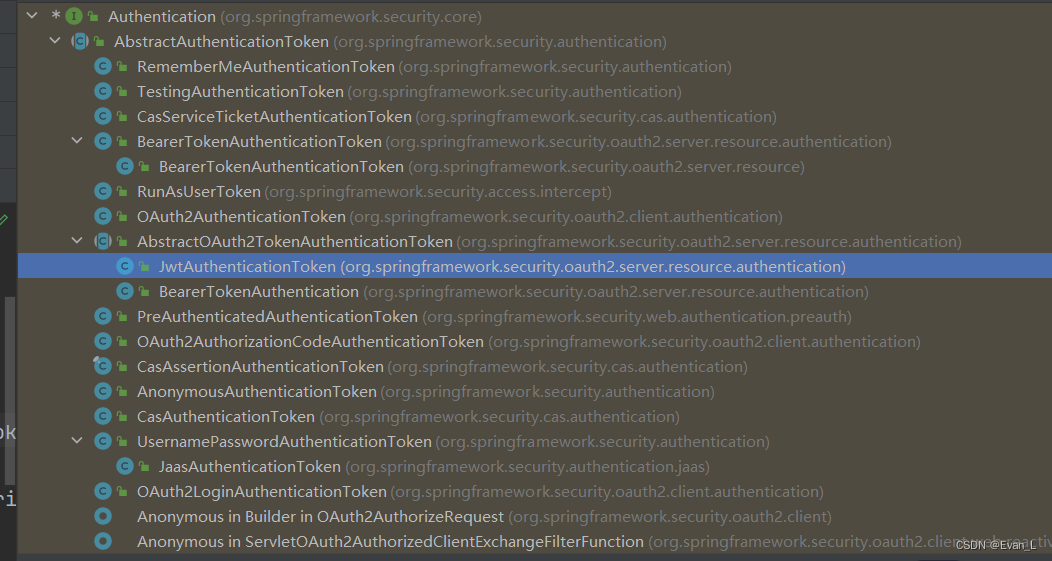
之所以会有这么多,是因为Authentication有很多,每个用来表示凭证的都需要不同的处理,然后才能进行认证。例如:JwtAuthenticationToken需要将jwtToken解析后就能得到当前用户已经认证的用户信息了(OAuth2)。这些实现有不少是这种类似于token的。不过我们的用户名和密码方式,则是更为复杂。
public abstract class AbstractUserDetailsAuthenticationProviderimplements AuthenticationProvider, InitializingBean, MessageSourceAware {@Overridepublic Authentication authenticate(Authentication authentication) throws AuthenticationException {// 1. 获取用户名String username = determineUsername(authentication);// 2. 尝试从缓存中获取用户信息boolean cacheWasUsed = true;UserDetails user = this.userCache.getUserFromCache(username);if (user == null) {// 缓存中不存在,则加载用户:使用UserDetailsServiceuser = retrieveUser(username, (UsernamePasswordAuthenticationToken) authentication);}// 3. 进行认证:验证用户状态、验证用户凭证(密码)try {// 验证用户状态this.preAuthenticationChecks.check(user);// 验证用户凭证(密码)additionalAuthenticationChecks(user, (UsernamePasswordAuthenticationToken) authentication);}catch (AuthenticationException ex) {// 重试}// 验证成功后,检查凭证有效期this.postAuthenticationChecks.check(user);if (!cacheWasUsed) {// 缓存用户this.userCache.putUserInCache(user);}Object principalToReturn = user;if (this.forcePrincipalAsString) {principalToReturn = user.getUsername();}// 创建UsernamePasswordAuthenticationTokenreturn createSuccessAuthentication(principalToReturn, authentication, user);}	protected Authentication createSuccessAuthentication(Object principal, Authentication authentication,UserDetails user) {// 构建认证信息(已验证凭证),里面包含当前用户信息和权限UsernamePasswordAuthenticationToken result = UsernamePasswordAuthenticationToken.authenticated(principal,authentication.getCredentials(), this.authoritiesMapper.mapAuthorities(user.getAuthorities()));result.setDetails(authentication.getDetails());return result;}
}public class DaoAuthenticationProvider extends AbstractUserDetailsAuthenticationProvider {@Override@SuppressWarnings("deprecation")protected void additionalAuthenticationChecks(UserDetails userDetails,UsernamePasswordAuthenticationToken authentication) throws AuthenticationException {if (authentication.getCredentials() == null) {// 没有凭证throw new BadCredentialsException(this.messages.getMessage("AbstractUserDetailsAuthenticationProvider.badCredentials", "Bad credentials"));}String presentedPassword = authentication.getCredentials().toString();// 校验密码if (!this.passwordEncoder.matches(presentedPassword, userDetails.getPassword())) {throw new BadCredentialsException(this.messages.getMessage("AbstractUserDetailsAuthenticationProvider.badCredentials", "Bad credentials"));}}
}
现在我们知道用户是怎么完成认证的,还有很重要的一环:认证成功之后,用户信息怎么保存?我们都知道一般保存在Session中。
UsernamePasswordAuthenticationFilter
其核心实现在父类:
public abstract class AbstractAuthenticationProcessingFilter extends GenericFilterBeanimplements ApplicationEventPublisherAware, MessageSourceAware {private void doFilter(HttpServletRequest request, HttpServletResponse response, FilterChain chain)throws IOException, ServletException {// 当前请求是否为认证请求if (!requiresAuthentication(request, response)) {chain.doFilter(request, response);return;}try {// 执行验证。这是个抽象方法,由子类实现。Authentication authenticationResult = attemptAuthentication(request, response);if (authenticationResult == null) {// 没有返回结果,表示子类还没有完成。正常情况走不到这里return;}// 执行session策略this.sessionStrategy.onAuthentication(authenticationResult, request, response);// 认证成功,执行后续处理successfulAuthentication(request, response, chain, authenticationResult);}catch (InternalAuthenticationServiceException failed) {unsuccessfulAuthentication(request, response, failed);}catch (AuthenticationException ex) {unsuccessfulAuthentication(request, response, ex);}}protected void successfulAuthentication(HttpServletRequest request, HttpServletResponse response, FilterChain chain,Authentication authResult) throws IOException, ServletException {// 1. 将当前认证信息保存到SecurityContextHolder中,一般是ThreadLocal,以便后续处理直接使用。SecurityContext context = this.securityContextHolderStrategy.createEmptyContext();context.setAuthentication(authResult);this.securityContextHolderStrategy.setContext(context);// 2. 将SecurityContext保存起来,一般是session中。这样后续的每个请求都能从中恢复当前用户信息,实现可连续交互式会话。this.securityContextRepository.saveContext(context, request, response);// 记住我功能this.rememberMeServices.loginSuccess(request, response, authResult);// 发布认证成功事件if (this.eventPublisher != null) {this.eventPublisher.publishEvent(new InteractiveAuthenticationSuccessEvent(authResult, this.getClass()));}// 认证成功后的处理。与认证成功后需要重定向跳转有关。this.successHandler.onAuthenticationSuccess(request, response, authResult);}
}public class UsernamePasswordAuthenticationFilter extends AbstractAuthenticationProcessingFilter {@Overridepublic Authentication attemptAuthentication(HttpServletRequest request, HttpServletResponse response)throws AuthenticationException {// 是否为POST请求if (this.postOnly && !request.getMethod().equals("POST")) {throw new AuthenticationServiceException("Authentication method not supported: " + request.getMethod());}// 获取用户名String username = obtainUsername(request);username = (username != null) ? username.trim() : "";// 获取密码String password = obtainPassword(request);password = (password != null) ? password : "";// 构建尚未认证的token,此时没有权限UsernamePasswordAuthenticationToken authRequest = UsernamePasswordAuthenticationToken.unauthenticated(username,password);// Allow subclasses to set the "details" propertysetDetails(request, authRequest);// 通过ProviderManager认证成功后,也就能获取到数据库中保存的权限了。return this.getAuthenticationManager().authenticate(authRequest);}
}
认证成功涉及的组件
| 组件 | 作用 | 描述 |
|---|---|---|
| SessionAuthenticationStrategy | Session认证(成功)策略 | 在用户认证成功后,调整session;修改sessionId或者重建session |
| SecurityContextHolderStrategy | 为处理当前请求的线程提供SecurityContext | 一般是保存在ThreadLocal中 |
| SecurityContextRepository | 为不同请求持久化SecurityContext | 用户认证成功后,主要是为了完成后续请求。因此需要将SecurityContext持久化。而恢复ThreadLocal中的SecurityContext,也需要从这里获取 |
| RememberMeServices | 记住我Service | 在认证成功后,若开启记住我功能,需要生成RemenberMeToken。后面才能使用该Token进行认证而无需用户输入密码 |
| AuthenticationSuccessHandler | 认证成功后的处理器 | 这是对于用户而言的,认证成功后需要给用户呈现什么内容/页面 |
由于这些都与session管理有着不可分割的关系,因此,我们留待后续聊session管理的时候再说。
小结
- 核心认证流程
- 从HttpServletRequest中获取到用户名和密码
- 交给ProviderManager进行认证。
DaoAuthenticationProvider会通过UserDetailsService从数据库获取用户信息,然后验证入参的密码。 - 认证成功后,创建SecurityContext并保存到ThreadLocal中,同时将其保存到Session中。当然还有其他扩展功能,后面再细聊。
后记
本文中,我们探讨了Spring Security的认证过滤器,并从源码层面分析了UsernamePasswordAuthenticationFilter的原理和处理流程。但是我们并没有仔细探索认证成功之后的操作。因为这些涉及到Session管理,这就与另一个过滤器SessionManagementFilter有着密不可分的关系了。所以下次,我们就聊SessionManagementFilter。届时会仔细说说。
参照
01 认证、授权、鉴权和权限控制
Authentication
JAAS 认证
【揭秘SAML协议 — Java安全认证框架的核心基石】 从初识到精通,带你领略Saml协议的奥秘,告别SSO的迷茫与困惑