1. 准备环境
这里准备三台Linux虚拟机,用于配置Elasticsearch集群和部署可视化工具Kibana。
| 角色 | IP | 域名 | 集群名称 | 节点名称 | 版本 | 操作系统 |
| ES | 192.168.243.100 | linux100 | cluster-es | es-node-100 | 7.12.0 | CentOS 7 |
| 192.168.243.101 | linux101 | cluster-es | es-node-101 | |||
| 192.168.243.102 | linux102 | cluster-es | es-node-102 | |||
| kibana | 192.168.243.100 | linux100 |
扩展:
(1)查看Elasticsearch对应的常用的jdk版本如下:(详情可看官网的支持一览表)
(2)JDK1.8在Linux服务器上的安装步骤如下: JDK部署(Linux)https://blog.csdn.net/qq_39512532/article/details/135133353
Elasticsearch and JVM
Oracle/OpenJDK**/AdoptOpenJDK 1.8.0 Oracle/OpenJDK**
11Oracle/OpenJDK**/Temurin
17Elasticsearch 5.0.x-6.8.x √ Elasticsearch 7.0.x-7.17.x √ √ Elasticsearch 8.0.x-8.13.x √
2. Elasticsearch软件安装
2.1 软件下载
Elasticsearch软件官网下载地址:https://www.elastic.co/cn/downloads/past-releases#elasticsearch

2.2 上传服务器并解压缩
(1)将 elasticsearch-7.12.0-linux-x86_64.tar.gz压缩包上传到Linux服务器的自定义路径 /opt/software 下
(2)解压缩Elasticsearch压缩包到 自定义路径 /opt/module下:
[root@linux100 software]# tar -zxvf elasticsearch-7.12.0-linux-x86_64.tar.gz -C /opt/module解压后的Elasticsearch的目录结构如下:
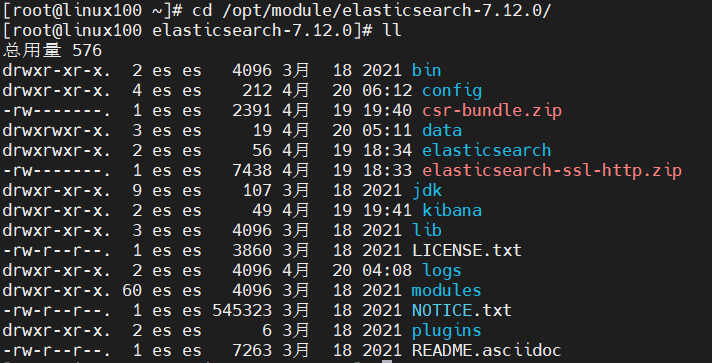
| 目录 | 含义 |
| bin | 可执行脚本目录 |
| config | 配置目录 |
| jdk | 内置JDK目录 |
| lib | 类库 |
| logs | 日志目录 |
| modules | 模块目录 |
| plugins | 插入目录 |
(3)把解压的elasticsearch-7.8.0文件分发到其他服务器Linux101、linux102:
这里有两种分发方式:
1)通过scp命令安全拷贝
[root@linux100 software]# scp -r /opt/module/elasticsearch-7.12.0 root@192.168.243.101:/opt/module
elasticsearch-7.12.0                                   100%  312MB  40.8MB/s   00:07
[root@linux100 software]# scp -r /opt/module/elasticsearch-7.12.0 root@192.168.243.102:/opt/module
elasticsearch-7.12.0                                   100%  312MB  40.8MB/s   00:07
2)通过个人的集群分发脚本操作,具体可参考如下链接:
https://blog.csdn.net/qq_39512532/article/details/135138861![]() http://xn--kbrp7bz27a27wrub8w2d
http://xn--kbrp7bz27a27wrub8w2d
[root@linux100 software]# xsync /opt/module/elasticsearch-7.12.0 注意:本文后面分发都用第二种xsync命令分发方式!!!!
2.3 创建用户
在每个节点中都创建新用户ES,并修改Elasticsearch文件拥有者。
# 新增es用户
[root@linux100 ~]# useradd es # 设置es用户密码
[root@linux100 ~]# passwd es
更改用户 es 的密码 。
新的 密码:
重新输入新的 密码:
passwd:所有的身份验证令牌已经成功更新。#修改文件夹所有者
[root@linux100 ~]# chown -R es:es /opt/module/elasticsearch-7.12.0
[root@linux100 ~]# ll
总用量 4
drwxr-xr-x.  9  es     es      155 3月  18 2021 elasticsearch-7.12.0
drwxr-xr-x. 13 hadoop hadoop  218 12月  4 19:53 hadoop-3.1.3
drwxrwxr-x. 8 hadoop hadoop 4096 11月 21 16:11 jdk1.8.0_391扩展:如果设置用户有问题时,可通过userdel命令删除用户
[root@linux100 ~]# userdel -r es2.4 生成安全认证证书
(1)在第一台服务器节点es-node-100设置集群多节点通信密钥
[es@linux100 ~]# cd /opt/module/elasticsearch-7.12.0/# 签发ca证书,过程中需按两次回车键
[es@linux100 elasticsearch-7.12.0]# bin/elasticsearch-certutil ca # 用ca证书签发节点证书,过程中需按三次回车键
[es@linux100 elasticsearch-7.12.0]# bin/elasticsearch-certutil cert --ca elastic-stack-ca.p12 # 将生成的两个证书文件移动到config/certs目录中
[es@linux100 elasticsearch-7.12.0]# mv elastic-stack-ca.p12 elastic-certificates.p12 config/certs
(2)在第一台服务器节点es-node-100设置集群多节点HTTP证书
[es@linux100 ~]# cd /opt/module/elasticsearch-7.12.0/# 签发Https证书
[es@linux100 elasticsearch-7.12.0]# bin/elasticsearch-certutil http
以下是执行签发Https证书时的操作:
......
If you choose not to generate a CSR, this tool will generate a new certificate
for you. That certificate will be signed by a CA under your control. This is a
quick and easy way to secure your cluster with TLS, but you will need to
configure all your clients to trust that custom CA.Generate a CSR? [y/N]n
......If you do not have an existing CA, one will be generated for you.
Use an existing CA? [y/N]y
......# 指定证书路径
Please enter the full pathname to the Certificate Authority that you wish to
use for signing your new http certificate. This can be in PKCS#12 (.p12), JKS
(.jks) or PEM (.crt, .key, .pem) format.
CA Path: certs/elastic-stack-ca.p12......
# 无需输入密码,直接回车
Reading a PKCS12 keystore requires a password.
It is possible for the keystore's password to be blank,
in which case you can simply press <ENTER> at the prompt
Password for elastic-stack-ca.p12:
......# 设置证书失效时间
You may enter the validity period in years (e.g. 3Y), months (e.g. 18M), or days (e.g. 90D)
For how long should your certificate be valid? [5y] 30y
......# 无需每个节点配置证书
However, if you do not have a common domain name, and you expect to add
additional nodes to your cluster in the future, then you should generate a
certificate per node so that you can more easily generate new certificates when
you provision new nodes.Generate a certificate per node? [y/N]n
......# 输出连接到第一个节点的所有主机名称
Enter all the hostnames that you need, one per line.
When you are done, press <ENTER> once more to move on to the next step.linux100
linux101
linux102You entered the following hostnames.
- linux100
- linux101
- linux102
Is this correct [Y/n]y......
# 输出连接到第一个节点的所有主机IP地址
If you do not have fixed IP addresses, or not wish to support direct IP access
to your cluster then you can just press <ENTER> to skip this step.Enter all the IP addresses that you need, one per line.
When you are done, press <ENTER> once more to move on to the next step.192.168.243.100
192.168.243.101
192.168.243.102You entered the following IP addresses.
- 192.168.243.100
- 192.168.243.101
- 192.168.243.102Is this correct [Y/n]y
......
# 不改变证书选项配置
The generated certificate will have the following additional configuration
values. These values have been selected based on a combination of the
information you have provided above and secure defaults. You should not need to
change these values unless you have specific requirements.Key Name: linux100
Subject DN: CN=linux100
Key Size: 2048Do you wish to change any of these options? [y/N]n
......
# 不给证书加密,按键输入两次回车
Your private key(s) will be stored in a PKCS#12 keystore file named "http.p12".
This type of keystore is always password protected, but it is possible to use a
blank password.If you wish to use a blank password, simply press <enter> at the prompt below.
Provide a password for the "http.p12" file: [<ENTER> for none]## Where should we save the generated files?
A number of files will be generated including your private key(s),
public certificate(s), and sample configuration options for Elastic Stack products.These files will be included in a single zip archive.
What filename should be used for the output zip file? [/opt/module/elasticsearch-7.12.0/elasticsearch-ssl-http.zip]
Zip file written to /opt/module/elasticsearch-7.12.0/elasticsearch-ssl-http.zip
由上可知生成的https证书压缩包具体路径为 /opt/module/elasticsearch-7.12.0/elasticsearch-ssl-http.zip。
(3)解压刚刚生成的zip包
[es@linux100 elasticsearch-7.12.0]# unzip elasticsearch-ssl-http.zip (4)将解压后的证书文件移动到config/certs目录中
[es@linux100 elasticsearch-7.12.0]# mv elasticsearch/http.p12 kibana/elasticsearch-ca.pem config/certs(5)由于elasticsearch.yml配置文件中用到/opt/module/elasticsearch-7.12.0/config/certs/路径下的证书,则需要分发文件到linux101、linux102
[es@linux100 elasticsearch-7.12.0]# xsync /opt/module/elasticsearch-7.12.0/config/certs/2.5 修改配置文件
(1)修改主配置文件elasticsearch.yml,并分发文件到linux101、linux102
[root@linux100 ~]# vim /opt/module/elasticsearch-7.12.0/config/elasticsearch.yml在配置文件中加入以下内容:
# 集群名称,一个 Elasticsearch 集群有一个唯一的名字标识,默认就是elasticsearch
cluster.name: cluster-es
# 节点名称,每个节点名称不能重复
node.name: es-node-100# 数据和日志文件存储路径
path.data: /opt/module/elasticsearch-7.12.0/data
path.logs: /opt/module/elasticsearch-7.12.0/logs
# 网络绑定地址,监听的IP地址 / 域名,每个节点地址不能重复
network.host: linux100# HTTP接口端口,默认为9200
http.port: 9200# 通信端口,节点间的沟通端口,默认为9300
transport.tcp.port: 9300
#是否有资格作为主节点
node.master: true
#是否是存储节点
node.data: true
# 节点发现,es7.x 之后新增的配置,数组放置集群中的所有节点
discovery.seed_hosts: ["linux100:9300", "linux101:9300", "linux102:9300"]# 用于指定在多少个节点启动后,Elasticsearch 才会开始恢复已存储数据的过程,默认为1
gateway.recover_after_nodes: 2# 是否启用 TCP 连接的保活机制,默认为true
network.tcp.keep_alive: true#用于控制 Elasticsearch 节点之间的 TCP 连接是否启用了 Nagle 算法
network.tcp.no_delay: true#用于指定是否启用传输层的 TCP 压缩,默认为false
transport.tcp.compress: true#用于限制每个节点上本地存储的最大索引数量。当索引数量超过此限制时,Elasticsearch 将不再允许新的索引创建在该节点上.(默认值:1)
node.max_local_storage_nodes: 1
#es7.x 之后新增的配置,初始化一个新的集群时需要此配置来选举 master
cluster.initial_master_nodes: ["es-node-100", "es-node-101", "es-node-102"]# head 插件需要这打开这两个配置
# 启用跨域资源共享 (CORS)
http.cors.enabled: true
# 指定允许跨域请求的所有来源
http.cors.allow-origin: "*"
http.max_content_length: 200mb
#集群内同时启动的数据任务个数,默认是 2 个
cluster.routing.allocation.cluster_concurrent_rebalance: 16
#添加或删除节点及负载均衡时并发恢复的线程个数,默认 4 个
cluster.routing.allocation.node_concurrent_recoveries: 16
#初始化数据恢复时,并发恢复线程的个数,默认 4 个
cluster.routing.allocation.node_initial_primaries_recoveries: 16# ------------------------------------开启账号密码登录认证---------------------------------------------
# 启动X-Pack 安全功能
xpack.security.enabled: true#启用HTTP层的安全性 (TLS),启用 HTTPS 支持
xpack.security.http.ssl.enabled: true#设置密钥和证书路径
xpack.security.http.ssl.keystore.path: /opt/module/elasticsearch-7.12.0/config/certs/http.p12
xpack.security.http.ssl.truststore.path: /opt/module/elasticsearch-7.12.0/config/certs/http.p12# 启用节点间传输层安全性 (TLS)
xpack.security.transport.ssl.enabled: true
xpack.security.transport.ssl.verification_mode: certificate
xpack.security.transport.ssl.keystore.path: /opt/module/elasticsearch-7.12.0/config/certs/elastic-certificates.p12
xpack.security.transport.ssl.truststore.path: /opt/module/elasticsearch-7.12.0/config/certs/elastic-certificates.p12
# 此处需注意,es-node-1为上面配置的节点名称
xpack.security.http.ssl.client_authentication: none
注意:
1)一旦你修改xpack.security.http.ssl.enabled为true并重新启动 Elasticsearch,你可以使用
https://your-elasticsearch-host:your-https-port这样的 URL 来访问 Elasticsearch。2)network.tcp.no_delay:用于控制 Elasticsearch 节点之间的 TCP 连接是否启用了 Nagle 算法。Nagle 算法是一种用于减少小数据包传输的延迟的算法。它会在发送数据时等待一小段时间,以便将多个小数据包合并成一个大的数据包,然后一起发送。这样做可以减少网络上的流量,但会增加一定的延迟,特别是在低带宽、高延迟的网络环境中。
3)network.tcp.keep_alive,用于控制节点之间 TCP 连接的保活机制。保活机制是一种网络协议特性,用于检测空闲连接是否仍然处于活动状态,以及在发现连接断开时尝试重新建立连接。
4)gateway.recover_after_nodes,在一个 Elasticsearch 集群中,当集群的某个节点启动时,它可能需要一些时间来加入集群,并与其他节点建立连接。在这个过程中,如果集群中的节点数量达到了
gateway.recover_after_nodes所指定的数量,Elasticsearch 就会开始执行恢复过程,以确保集群中的数据副本能够达到所需的副本数量。设置这个值时,需要权衡节点启动速度和数据恢复的需求,以确保集群在启动和恢复过程中能够维持良好的性能和可用性。
(2)修改配置文件/etc/security/limits.conf
[root@linux100 config]# vim /etc/security/limits.conf在配置文件中加入以下内容:
# 每个进程可以打开的文件数的限制
es soft nofile 65536
es hard nofile 65536
(3)修改配置文件/etc/security/limits.d/20-nproc.conf,并分发文件到linux101、linux102
[root@linux100 config]# vim /etc/security/limits.d/20-nproc.conf在配置文件中加入以下内容:
# 每个进程可以打开的文件数的限制
es soft nofile 65536
es hard nofile 65536# 操作系统级别对每个用户创建的进程数的限制
* hard nproc 4096
# 注:* 带表 Linux 所有用户名称
(4)修改配置文件/etc/sysctl.conf,并分发文件到linux101、linux102
[root@linux100 config]# vim /etc/sysctl.conf在配置文件中加入以下内容:
# 一个进程可以拥有的 VMA(虚拟内存区域)的数量,默认值为 65536
vm.max_map_count=655360
重新加载
[root@linux100 config]# sysctl -p2.5 启动软件
分别在不同节点使用es用户启动软件:
[root@linux100 ~]# su es
[es@linux100 ~]$ cd /opt/module/elasticsearch-7.12.0/
[es@linux100 elasticsearch-7.12.0]$ bin/elasticsearch
注意:如果仅后台启动的话,加上-d
[es@linux100 elasticsearch-7.12.0]$ bin/elasticsearch -d2.6 关闭防火墙
查看防火墙状态:systemctl status firewalld
暂时关闭防火墙:systemctl stop firewalld
永久打开防火墙:systemctl enable firewalld.service
永久关闭防火墙:systemctl disable firewalld.service
防火墙的详细操作可参考下文:
Centos7 防火墙详细操作(Linux)
https://blog.csdn.net/qq_39512532/article/details/131229204
2.7 设置密码
前提条件:必须保证集群状态启动正常,才能进行密码设置
在其中一个节点设置密码即可:
[es@linux100 elasticsearch-7.12.0]$ bin/elasticsearch-setup-passwords interactiveInitiating the setup of passwords for reserved users elastic,apm_system,kibana,logstash_system,beats_system,remote_monitoring_user.You will be prompted to enter passwords as the process progresses.Please confirm that you would like to continue [y/N]yEnter password for [elastic]:Reenter password for [elastic]:Enter password for [apm_system]:Reenter password for [apm_system]:Enter password for [kibana]:Reenter password for [kibana]:Enter password for [logstash_system]:Reenter password for [logstash_system]:Enter password for [beats_system]:Reenter password for [beats_system]:Enter password for [remote_monitoring_user]:Reenter password for [remote_monitoring_user]:Changed password for user [apm_system]Changed password for user [kibana]Changed password for user [logstash_system]Changed password for user [beats_system]Changed password for user [remote_monitoring_user]Changed password for user [elastic]
2.8 测试集群
(1)查看ES集群节点信息
在浏览器中输入地址:http://192.168.243.100:9200/_cat/nodes

以第二行参数为例的相关信息:
| 参数 | 值 | 说明 |
| ip | 192.168.243.100 | 节点的IP地址 |
| heap.percent | 12 | 节点的堆内存使用百分比 |
| ram.percent | 93 | 节点的系统内存使用百分比 |
| cpu | 0 | 节点的CPU使用率 |
| load_1m | 0.09 | 1分钟负载平均值 |
| load_5m | 0.04 | 5分钟负载平均值 |
| load_15m | 0.05 | 15分钟负载平均值 |
| node.role | cdfhilmrstw | 节点的角色 |
| master | * | 指示该节点是否是主节点 |
| name | es-node-100 | 节点的名称 |
(2)查看ES集群服务健康状态
在浏览器中输入地址:http://192.168.243.100:9200/_cat/health

结果显示了一个名为 cluster-es 的集群,它的健康状态是 green(健康),总共有 3 个节点,其中 3 个是数据节点,有 18 个分片,其中 9 个是主分片,没有正在重新分配或初始化的分片,也没有未分配的分片。
相关参数说明:
| 参数 | 值 | 说明 |
| epoch | 1713732933 | 表示当前时间的毫秒数,通常用于计算时间间隔 |
| timestamp | 20:55:33 | 表示当前时间的 ISO 8601 格式时间戳 |
| cluster | cluster-es | 集群的名称 |
| status | green | 集群的健康状态,可能的值包括 green、yellow 和 red,分别表示健康、一般健康和不健康 |
| node.total | 3 | 集群中的总节点数 |
| node.data | 3 | 集群中的数据节点数 |
| shards | 18 | 分片总数 |
| pri | 9 | 主分片总数 |
| relo | 0 | 正在进行重新分配的分片数 |
| init | 0 | 正在初始化的分片数 |
| unassign | 0 | 未分配的分片数 |
| pending_tasks | 0 | 挂起的任务数 |
| max_task_wait_time | - | 最大任务等待时间,这里是没有具体数值 |
| active_shards_percent | 100.0% | 活动分片的百分比 |
3. Kibana软件安装
kibana详细安装如下:
Kibana安装部署(Linux)![]() https://blog.csdn.net/qq_39512532/article/details/138139138
https://blog.csdn.net/qq_39512532/article/details/138139138
4. 问题处置
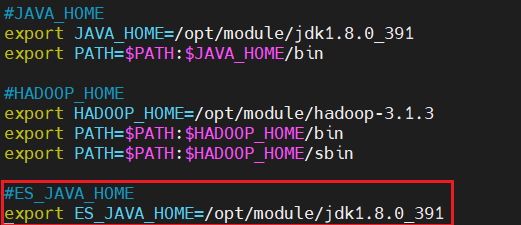
(1) 启动预警提示:usage of JAVA_HOME is deprecated, use ES_JAVA_HOME
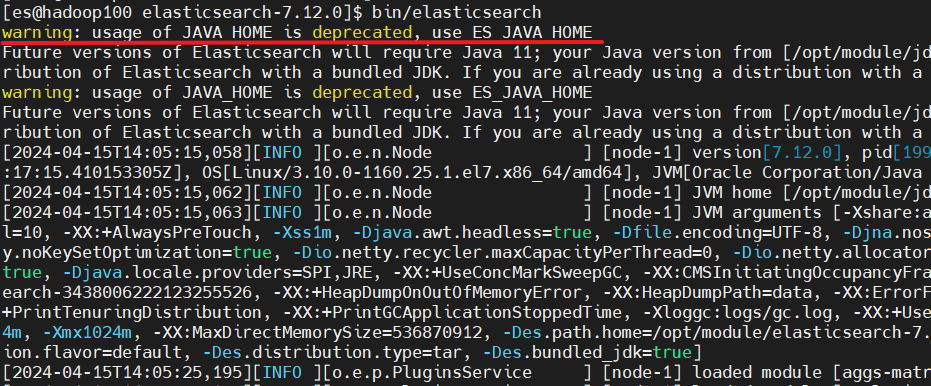
解决方案:在配置环境变量的地方加上ES_JAVA_HOME配置就不会再预警了。
有些人在/etc/profile中配置,有些人在/etc/profile.d/路径下创建自定义文件配置环境变量。这里采用的是在/etc/profile.d/路径下创建自定义文件my_env.sh配置环境变量:
1[root@hadoop100 ~]$ vim /etc/profile.d/my_env.sh 添加如下红框内容:
(2)启动报错:
java.lang.IllegalStateException: failed to obtain node locks, tried [[/opt/module/elasticsearch-7.12.0/data]] with lock id [0]; maybe these locations are not writable or multiple nodes were started without increasing [node.max_local_storage_nodes] (was [1])?
at org.elasticsearch.env.NodeEnvironment.<init>(NodeEnvironment.java:292)
at org.elasticsearch.node.Node.<init>(Node.java:352)
at org.elasticsearch.node.Node.<init>(Node.java:278)
at org.elasticsearch.bootstrap.Bootstrap$5.<init>(Bootstrap.java:217)
at org.elasticsearch.bootstrap.Bootstrap.setup(Bootstrap.java:217)
at org.elasticsearch.bootstrap.Bootstrap.init(Bootstrap.java:397)
at org.elasticsearch.bootstrap.Elasticsearch.init(Elasticsearch.java:159)
at org.elasticsearch.bootstrap.Elasticsearch.execute(Elasticsearch.java:150)
at org.elasticsearch.cli.EnvironmentAwareCommand.execute(EnvironmentAwareCommand.java:75)
at org.elasticsearch.cli.Command.mainWithoutErrorHandling(Command.java:116)
at org.elasticsearch.cli.Command.main(Command.java:79)
at org.elasticsearch.bootstrap.Elasticsearch.main(Elasticsearch.java:115)
at org.elasticsearch.bootstrap.Elasticsearch.main(Elasticsearch.java:81)
解决方案:由于在服务器中已经启动了Elasticsearch程序,关闭掉,重启就不会有该问题了。
# 查看正在启动的程序
[es@linux100 data]$ jps
12341 Jps
12118 Elasticsearch# 结束程序:kill -9 进程ID
[es@linux100 data]$ kill -9 12118