文章目录
- 前言
- 一、pcd转bin
- 二、labelCloud 工具安装与使用
- 三、训练
- 仿写代码
- 对pcdet/datasets/custom/custom_dataset.py进行改写
- 新建tools/cfgs/dataset_configs/custom_dataset.yaml并修改
- 新建tools/cfgs/custom_models/pointrcnn.yaml并修改
- 其他调整事项
- 数据集预处理
- 数据集训练
- 可视化测试
- 获取尺寸
- 四、总结
前言
这些天一直在尝试通过OpenPCDet平台训练自己的数据集(非kitti格式),好在最后终于跑通了,特此记录一下训练过程。
一、pcd转bin
笔者自己的点云数据是pcd格式的,参照kitti训练过程是需要转成bin格式的。
下面给出转换代码:
# -*- coding: utf-8 -*-
# @Time : 2022/7/25 11:30
# @Author : JulyLi
# @File : pcd2bin.pyimport numpy as np
import os
import argparse
from pypcd import pypcd
import csv
from tqdm import tqdmdef main():## Add parserparser = argparse.ArgumentParser(description="Convert .pcd to .bin")parser.add_argument("--pcd_path",help=".pcd file path.",type=str,default="pcd_raw1")parser.add_argument("--bin_path",help=".bin file path.",type=str,default="bin")parser.add_argument("--file_name",help="File name.",type=str,default="file_name")args = parser.parse_args()## Find all pcd filespcd_files = []for (path, dir, files) in os.walk(args.pcd_path):for filename in files:# print(filename)ext = os.path.splitext(filename)[-1]if ext == '.pcd':pcd_files.append(path + "/" + filename)## Sort pcd files by file namepcd_files.sort()print("Finish to load point clouds!")## Make bin_path directorytry:if not (os.path.isdir(args.bin_path)):os.makedirs(os.path.join(args.bin_path))except OSError as e:# if e.errno != errno.EEXIST:#     print("Failed to create directory!!!!!")raise## Generate csv meta filecsv_file_path = os.path.join(args.bin_path, "meta.csv")csv_file = open(csv_file_path, "w")meta_file = csv.writer(csv_file, delimiter=",", quotechar="|", quoting=csv.QUOTE_MINIMAL)## Write csv meta file headermeta_file.writerow(["pcd file name","bin file name",])print("Finish to generate csv meta file")## Converting Processprint("Converting Start!")seq = 0for pcd_file in tqdm(pcd_files):## Get pcd filepc = pypcd.PointCloud.from_path(pcd_file)## Generate bin file name# bin_file_name = "{}_{:05d}.bin".format(args.file_name, seq)bin_file_name = "{:05d}.bin".format(seq)bin_file_path = os.path.join(args.bin_path, bin_file_name)## Get data from pcd (x, y, z, intensity, ring, time)np_x = (np.array(pc.pc_data['x'], dtype=np.float32)).astype(np.float32)np_y = (np.array(pc.pc_data['y'], dtype=np.float32)).astype(np.float32)np_z = (np.array(pc.pc_data['z'], dtype=np.float32)).astype(np.float32)np_i = (np.array(pc.pc_data['intensity'], dtype=np.float32)).astype(np.float32) / 256# np_r = (np.array(pc.pc_data['ring'], dtype=np.float32)).astype(np.float32)# np_t = (np.array(pc.pc_data['time'], dtype=np.float32)).astype(np.float32)## Stack all datapoints_32 = np.transpose(np.vstack((np_x, np_y, np_z, np_i)))## Save bin filepoints_32.tofile(bin_file_path)## Write csv meta filemeta_file.writerow([os.path.split(pcd_file)[-1], bin_file_name])seq = seq + 1if __name__ == "__main__":main()
二、labelCloud 工具安装与使用
拉取源码
git clone https://github.com/ch-sa/labelCloud.git
安装依赖
pip install -r requirements.txt
启动程序
python labelCloud.py
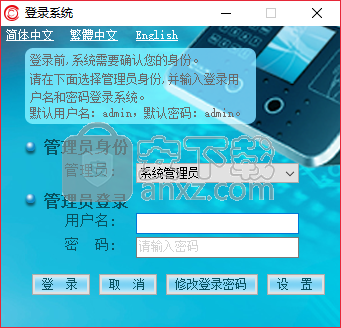
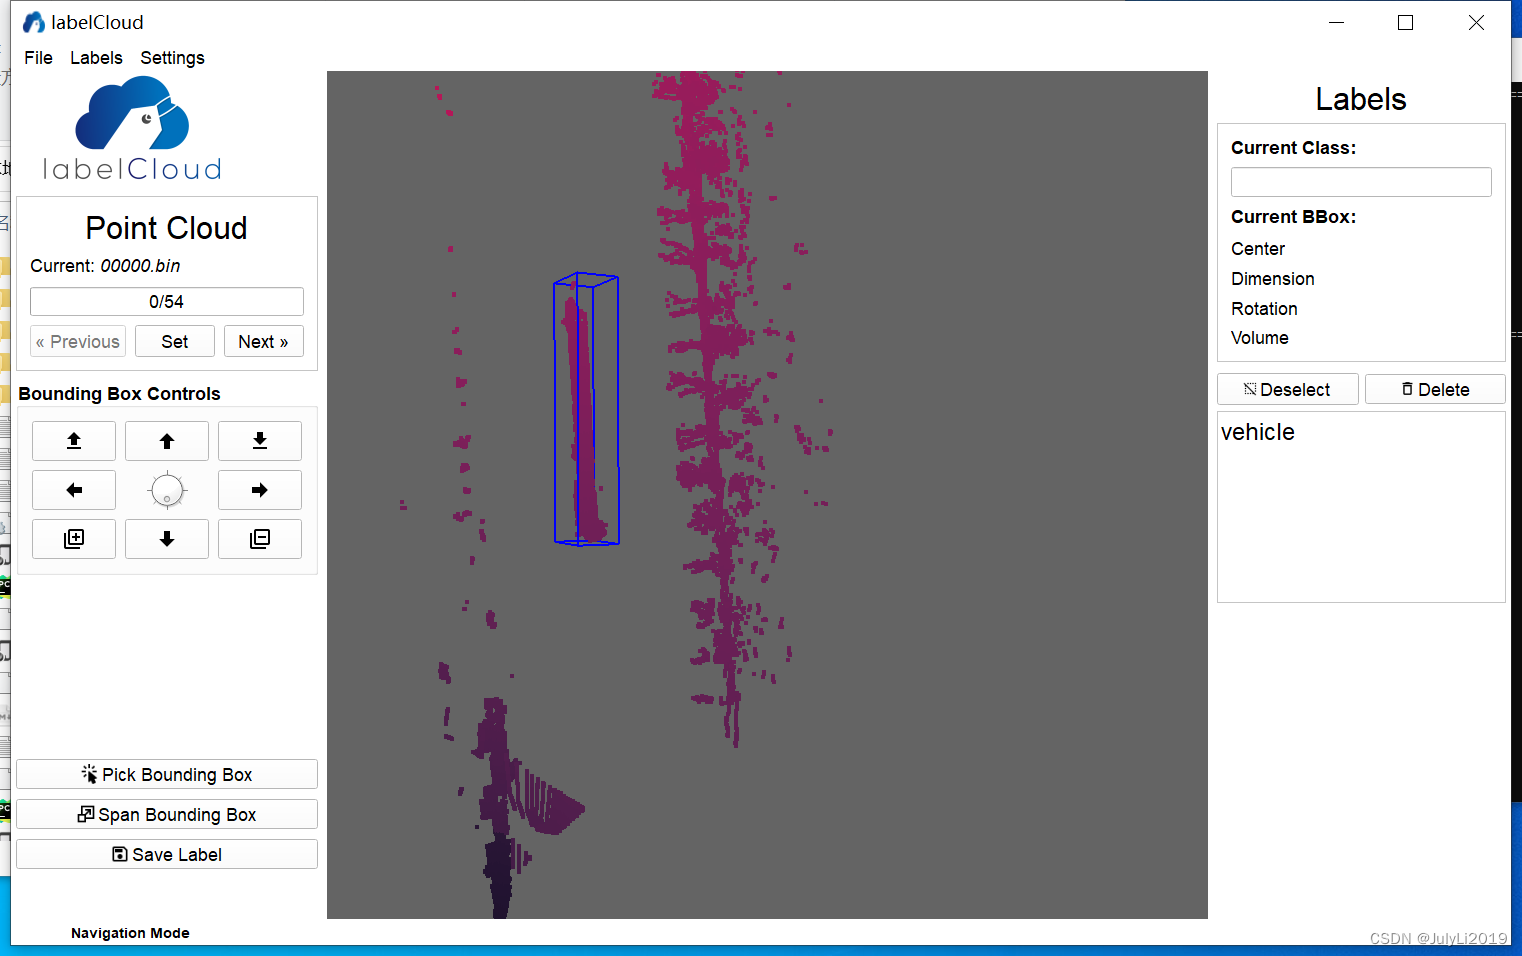
启动后出现如下界面:
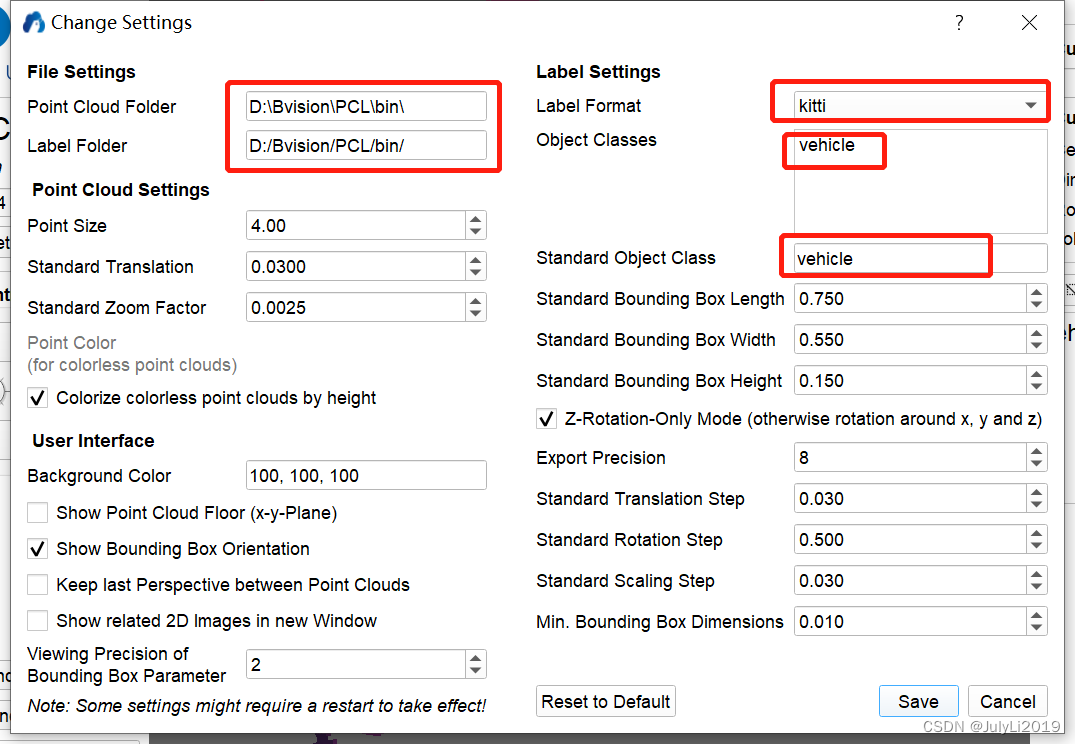
在setting界面按需设置,笔者这里按kitti格式生成label数据:
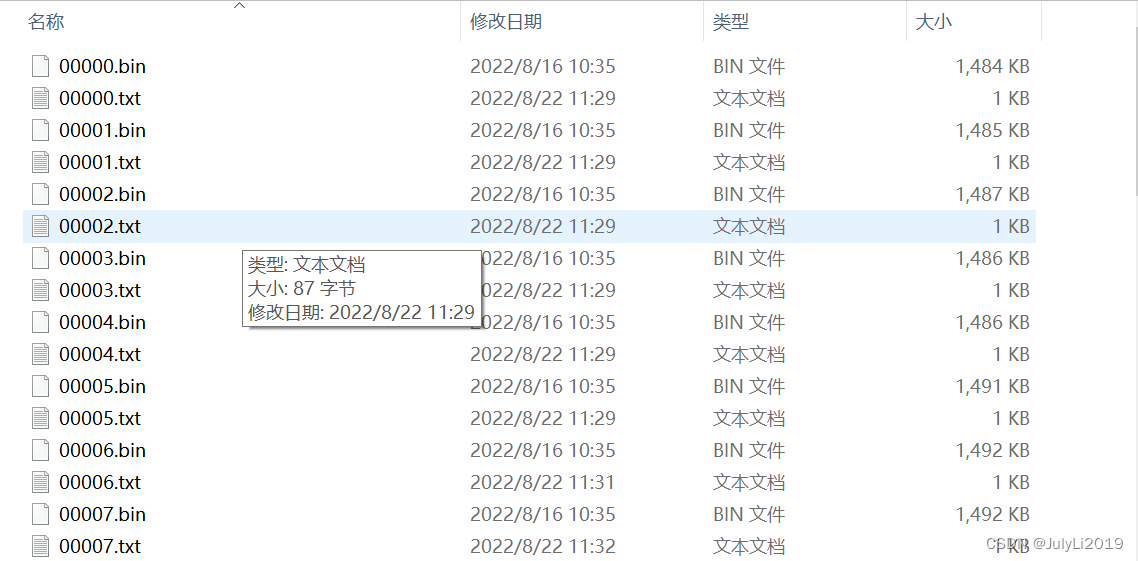
标注完成后会在对应目录下生成标签:
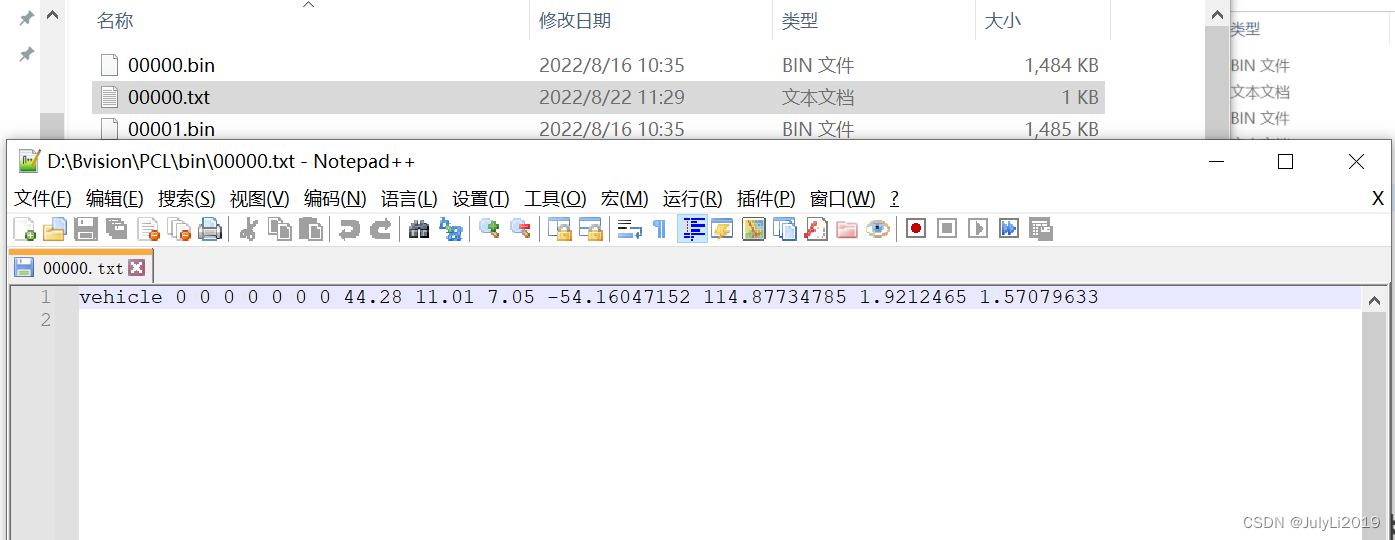
标签内容大致如下:
三、训练
仿写代码
把pcdet/datasets/kitti文件夹复制并改名为pcdet/datasets/custom,然后把pcdet/utils/object3d_kitti.py复制为pcdet/utils/object3d_custom.py
把data/kitti文件夹复制并改名为data/custom,然后修改训练信息,结构如下:
custom
├── ImageSets
│   ├── test.txt
│   ├── train.txt
├── testing
│   ├── velodyne
├── training
│   ├── label_2
│   ├── velodyne
对pcdet/datasets/custom/custom_dataset.py进行改写
import copy
import pickle
import osimport numpy as np
from skimage import iofrom . import custom_utils
from ...ops.roiaware_pool3d import roiaware_pool3d_utils
from ...utils import box_utils, common_utils, object3d_custom
from ..dataset import DatasetTemplateclass CustomDataset(DatasetTemplate):def __init__(self, dataset_cfg, class_names, training=True, root_path=None, logger=None, ext='.bin'):"""Args:root_path:dataset_cfg:class_names:training:logger:"""super().__init__(dataset_cfg=dataset_cfg, class_names=class_names, training=training, root_path=root_path, logger=logger)self.split = self.dataset_cfg.DATA_SPLIT[self.mode]self.root_split_path = os.path.join(self.root_path, ('training' if self.split != 'test' else 'testing'))split_dir = os.path.join(self.root_path, 'ImageSets',(self.split + '.txt'))self.sample_id_list = [x.strip() for x in open(split_dir).readlines()] if os.path.exists(split_dir) else Noneself.custom_infos = []self.include_custom_data(self.mode)self.ext = extdef include_custom_data(self, mode):if self.logger is not None:self.logger.info('Loading Custom dataset.')custom_infos = []for info_path in self.dataset_cfg.INFO_PATH[mode]:info_path = self.root_path / info_pathif not info_path.exists():continuewith open(info_path, 'rb') as f:infos = pickle.load(f)custom_infos.extend(infos)self.custom_infos.extend(custom_infos)if self.logger is not None:self.logger.info('Total samples for CUSTOM dataset: %d' % (len(custom_infos)))def get_infos(self, num_workers=16, has_label=True, count_inside_pts=True, sample_id_list=None):import concurrent.futures as futures# Process single scenedef process_single_scene(sample_idx):print('%s sample_idx: %s' % (self.split, sample_idx))# define an empty dictinfo = {}# pts infos: dimention and idxpc_info = {'num_features': 4, 'lidar_idx': sample_idx}# add to pts infosinfo['point_cloud'] = pc_info# no images, calibs are need to transform the labelstype_to_id = {'Car': 1, 'Pedestrian': 2, 'Cyclist': 3}if has_label:# read labels to build object list according to idxobj_list = self.get_label(sample_idx)# build an empty annotations dictannotations = {}# add to annotations ==> refer to 'object3d_custom' (no truncated,occluded,alpha,bbox)annotations['name'] = np.array([obj.cls_type for obj in obj_list]) # 1-dimension# hwl(camera) format 2-dimension: The kitti-labels are in camera-coord# h,w,l -> 0.21,0.22,0.33 (see object3d_custom.py h=label[8], w=label[9], l=label[10])annotations['dimensions'] = np.array([[obj.l, obj.h, obj.w] for obj in obj_list])             annotations['location'] = np.concatenate([obj.loc.reshape(1,3) for obj in obj_list])annotations['rotation_y'] = np.array([obj.ry for obj in obj_list]) # 1-dimensionnum_objects = len([obj.cls_type for obj in obj_list if obj.cls_type != 'DontCare'])num_gt = len(annotations['name'])index = list(range(num_objects)) + [-1] * (num_gt - num_objects)annotations['index'] = np.array(index, dtype=np.int32)loc = annotations['location'][:num_objects]dims = annotations['dimensions'][:num_objects]rots = annotations['rotation_y'][:num_objects]# camera -> lidar: The points of custom_dataset are already in lidar-coord# But the labels are in camera-coord and need to transformloc_lidar = self.get_calib(loc)l, h, w = dims[:, 0:1], dims[:, 1:2], dims[:, 2:3]# bottom center -> object center: no need for loc_lidar[:, 2] += h[:, 0] / 2# print("sample_idx: ", sample_idx, "loc: ", loc, "loc_lidar: " , sample_idx, loc_lidar)# get gt_boxes_lidar see https://zhuanlan.zhihu.com/p/152120636gt_boxes_lidar = np.concatenate([loc_lidar, l, w, h, (np.pi / 2 - rots[..., np.newaxis])], axis=1) # 2-dimension arrayannotations['gt_boxes_lidar'] = gt_boxes_lidar# add annotation infoinfo['annos'] = annotationsreturn infosample_id_list = sample_id_list if sample_id_list is not None else self.sample_id_list# create a thread pool to improve the velocitywith futures.ThreadPoolExecutor(num_workers) as executor:infos = executor.map(process_single_scene, sample_id_list)# infos is a list that each element represents per framereturn list(infos)def get_calib(self, loc):"""This calibration is different from the kitti dataset.The transform formual of labelCloud: ROOT/labelCloud/io/labels/kitti.py: import labelsif self.transformed:centroid = centroid[2], -centroid[0], centroid[1] - 2.3dimensions = [float(v) for v in line_elements[8:11]]if self.transformed:dimensions = dimensions[2], dimensions[1], dimensions[0]bbox = BBox(*centroid, *dimensions)"""loc_lidar = np.concatenate([np.array((float(loc_obj[2]), float(-loc_obj[0]), float(loc_obj[1]-2.3)), dtype=np.float32).reshape(1,3) for loc_obj in loc])return loc_lidardef get_label(self, idx):# get labelslabel_file = self.root_split_path / 'label_2' / ('%s.txt' % idx)assert label_file.exists()return object3d_custom.get_objects_from_label(label_file)def get_lidar(self, idx, getitem):"""Loads point clouds for a sampleArgs:index (int): Index of the point cloud file to get.Returns:np.array(N, 4): point cloud."""# get lidar statisticsif getitem == True:lidar_file = self.root_split_path + '/velodyne/' + ('%s.bin' % idx)else:lidar_file = self.root_split_path / 'velodyne' / ('%s.bin' % idx)return np.fromfile(str(lidar_file), dtype=np.float32).reshape(-1, 4)def set_split(self, split):super().__init__(dataset_cfg=self.dataset_cfg, class_names=self.class_names, training=self.training, root_path=self.root_path, logger=self.logger)self.split = splitself.root_split_path = self.root_path / ('training' if self.split != 'test' else 'testing')split_dir = self.root_path / 'ImageSets' / (self.split + '.txt')self.sample_id_list = [x.strip() for x in open(split_dir).readlines()] if split_dir.exists() else None# Create gt database for data augmentationdef create_groundtruth_database(self, info_path=None, used_classes=None, split='train'):import torch# Specify the directiondatabase_save_path = Path(self.root_path) / ('gt_database' if split == 'train' else ('gt_database_%s' % split))db_info_save_path = Path(self.root_path) / ('custom_dbinfos_%s.pkl' % split)database_save_path.mkdir(parents=True, exist_ok=True)all_db_infos = {}# Open 'custom_train_info.pkl'with open(info_path, 'rb') as f:infos = pickle.load(f)# For each .bin filefor k in range(len(infos)):print('gt_database sample: %d/%d' % (k + 1, len(infos)))# Get current scene infoinfo = infos[k]sample_idx = info['point_cloud']['lidar_idx']points = self.get_lidar(sample_idx, False)annos = info['annos']names = annos['name']gt_boxes = annos['gt_boxes_lidar']num_obj = gt_boxes.shape[0]point_indices = roiaware_pool3d_utils.points_in_boxes_cpu(torch.from_numpy(points[:, 0:3]), torch.from_numpy(gt_boxes)).numpy()  # (nboxes, npoints)for i in range(num_obj):filename = '%s_%s_%d.bin' % (sample_idx, names[i], i)filepath = database_save_path / filenamegt_points = points[point_indices[i] > 0]gt_points[:, :3] -= gt_boxes[i, :3]with open(filepath, 'w') as f:gt_points.tofile(f)if (used_classes is None) or names[i] in used_classes:db_path = str(filepath.relative_to(self.root_path))  # gt_database/xxxxx.bindb_info = {'name': names[i], 'path': db_path, 'gt_idx': i,'box3d_lidar': gt_boxes[i], 'num_points_in_gt': gt_points.shape[0]}if names[i] in all_db_infos:all_db_infos[names[i]].append(db_info)else:all_db_infos[names[i]] = [db_info]# Output the num of all classes in databasefor k, v in all_db_infos.items():print('Database %s: %d' % (k, len(v)))with open(db_info_save_path, 'wb') as f:pickle.dump(all_db_infos, f)@staticmethoddef generate_prediction_dicts(batch_dict, pred_dicts, class_names, output_path=None):"""Args:batch_dict:frame_id:pred_dicts: list of pred_dictspred_boxes: (N,7), Tensorpred_scores: (N), Tensorpred_lables: (N), Tensorclass_names:output_path:Returns:"""def get_template_prediction(num_smaples):ret_dict = {'name': np.zeros(num_smaples), 'alpha' : np.zeros(num_smaples),'dimensions': np.zeros([num_smaples, 3]), 'location': np.zeros([num_smaples, 3]),'rotation_y': np.zero(num_smaples), 'score': np.zeros(num_smaples),'boxes_lidar': np.zeros([num_smaples, 7])}return ret_dictdef generate_single_sample_dict(batch_index, box_dict):pred_scores = box_dict['pred_scores'].cpu().numpy()pred_boxes = box_dict['pred_boxes'].cpu().numpy()pred_labels = box_dict['pred_labels'].cpu().numpy()# Define an empty template dict to store the prediction information, 'pred_scores.shape[0]' means 'num_samples'pred_dict = get_template_prediction(pred_scores.shape[0])# If num_samples equals zero then return the empty dictif pred_scores.shape[0] == 0:return pred_dict# No calibration filespred_boxes_camera = box_utils.boxes3d_lidar_to_kitti_camera[pred_boxes]pred_dict['name'] = np.array(class_names)[pred_labels - 1]pred_dict['alpha'] = -np.arctan2(-pred_boxes[:, 1], pred_boxes[:, 0]) + pred_boxes_camera[:, 6]pred_dict['dimensions'] = pred_boxes_camera[:, 3:6]pred_dict['location'] = pred_boxes_camera[:, 0:3]pred_dict['rotation_y'] = pred_boxes_camera[:, 6]pred_dict['score'] = pred_scorespred_dict['boxes_lidar'] = pred_boxesreturn pred_dictannos = []for index, box_dict in enumerate(pred_dicts):frame_id = batch_dict['frame_id'][index]single_pred_dict = generate_single_sample_dict(index, box_dict)single_pred_dict['frame_id'] = frame_idannos.append(single_pred_dict)# Output pred results to Output-path in .txt file if output_path is not None:cur_det_file = output_path / ('%s.txt' % frame_id)with open(cur_det_file, 'w') as f:bbox = single_pred_dict['bbox']loc = single_pred_dict['location']dims = single_pred_dict['dimensions']  # lhw -> hwl: lidar -> camerafor idx in range(len(bbox)):print('%s -1 -1 %.4f %.4f %.4f %.4f %.4f %.4f %.4f %.4f %.4f %.4f %.4f %.4f %.4f'% (single_pred_dict['name'][idx], single_pred_dict['alpha'][idx],bbox[idx][0], bbox[idx][1], bbox[idx][2], bbox[idx][3],dims[idx][1], dims[idx][2], dims[idx][0], loc[idx][0],loc[idx][1], loc[idx][2], single_pred_dict['rotation_y'][idx],single_pred_dict['score'][idx]), file=f)return annosdef __len__(self):if self._merge_all_iters_to_one_epoch:return len(self.sample_id_list) * self.total_epochsreturn len(self.custom_infos)def __getitem__(self, index):"""Function:Read 'velodyne' folder as pointcloudsRead 'label_2' folder as labelsReturn type 'dict'"""if self._merge_all_iters_to_one_epoch:index = index % len(self.custom_infos)info = copy.deepcopy(self.custom_infos[index])sample_idx = info['point_cloud']['lidar_idx']get_item_list = self.dataset_cfg.get('GET_ITEM_LIST', ['points'])input_dict = {'frame_id': self.sample_id_list[index],}"""Here infos was generated by get_infos"""if 'annos' in info:annos = info['annos']annos = common_utils.drop_info_with_name(annos, name='DontCare')loc, dims, rots = annos['location'], annos['dimensions'], annos['rotation_y']gt_names = annos['name']gt_boxes_lidar = annos['gt_boxes_lidar']if 'points' in get_item_list:points = self.get_lidar(sample_idx, True)# import time# print(points.shape)# if points.shape[0] == 0:#     print("**********************************")#     print("sample_idx: ", sample_idx)#     time.sleep(999999)#     print("**********************************")# 000099, 000009input_dict['points'] = pointsinput_dict.update({'gt_names': gt_names,'gt_boxes': gt_boxes_lidar})data_dict = self.prepare_data(data_dict=input_dict)return data_dictdef create_custom_infos(dataset_cfg, class_names, data_path, save_path, workers=4):dataset = CustomDataset(dataset_cfg=dataset_cfg, class_names=class_names, root_path=data_path, training=False)train_split, val_split = 'train', 'val'# No evaluationtrain_filename = save_path / ('custom_infos_%s.pkl' % train_split)val_filenmae = save_path / ('custom_infos%s.pkl' % val_split)trainval_filename = save_path / 'custom_infos_trainval.pkl'test_filename = save_path / 'custom_infos_test.pkl'print('------------------------Start to generate data infos------------------------')dataset.set_split(train_split)custom_infos_train = dataset.get_infos(num_workers=workers, has_label=True, count_inside_pts=True)with open(train_filename, 'wb') as f:pickle.dump(custom_infos_train, f)print('Custom info train file is save to %s' % train_filename)dataset.set_split('test')custom_infos_test = dataset.get_infos(num_workers=workers, has_label=False, count_inside_pts=False)with open(test_filename, 'wb') as f:pickle.dump(custom_infos_test, f)print('Custom info test file is saved to %s' % test_filename)print('------------------------Start create groundtruth database for data augmentation------------------------')dataset.set_split(train_split)# Input the 'custom_train_info.pkl' to generate gt_databasedataset.create_groundtruth_database(train_filename, split=train_split)print('------------------------Data preparation done------------------------')if __name__=='__main__':import sysif sys.argv.__len__() > 1 and sys.argv[1] == 'create_custom_infos':import yamlfrom pathlib import Pathfrom easydict import EasyDictdataset_cfg = EasyDict(yaml.safe_load(open(sys.argv[2])))ROOT_DIR = (Path(__file__).resolve().parent / '../../../').resolve()create_custom_infos(dataset_cfg=dataset_cfg,class_names=['Car', 'Pedestrian', 'Cyclist'],data_path=ROOT_DIR / 'data' / 'custom',save_path=ROOT_DIR / 'data' / 'custom')
新建tools/cfgs/dataset_configs/custom_dataset.yaml并修改
DATASET: 'CustomDataset'
DATA_PATH: '../data/custom'# If this config file is modified then pcdet/models/detectors/detector3d_template.py:
# Detector3DTemplate::build_networks:model_info_dict needs to be modified.
POINT_CLOUD_RANGE: [-70.4, -40, -3, 70.4, 40, 1] # x=[-70.4, 70.4], y=[-40,40], z=[-3,1]DATA_SPLIT: {'train': train,'test': val
}INFO_PATH: {'train': [custom_infos_train.pkl],'test': [custom_infos_val.pkl],
}GET_ITEM_LIST: ["points"]
FOV_POINTS_ONLY: TruePOINT_FEATURE_ENCODING: {encoding_type: absolute_coordinates_encoding,used_feature_list: ['x', 'y', 'z', 'intensity'],src_feature_list: ['x', 'y', 'z', 'intensity'],
}# Same to pv_rcnn[DATA_AUGMENTOR]
DATA_AUGMENTOR:DISABLE_AUG_LIST: ['placeholder']AUG_CONFIG_LIST:- NAME: gt_sampling# Notice that 'USE_ROAD_PLANE'USE_ROAD_PLANE: FalseDB_INFO_PATH:- custom_dbinfos_train.pkl # pcdet/datasets/augmentor/database_ampler.py:line 26PREPARE: {filter_by_min_points: ['Car:5', 'Pedestrian:5', 'Cyclist:5'],filter_by_difficulty: [-1],}SAMPLE_GROUPS: ['Car:20','Pedestrian:15', 'Cyclist:15']NUM_POINT_FEATURES: 4DATABASE_WITH_FAKELIDAR: FalseREMOVE_EXTRA_WIDTH: [0.0, 0.0, 0.0]LIMIT_WHOLE_SCENE: True- NAME: random_world_flipALONG_AXIS_LIST: ['x']- NAME: random_world_rotationWORLD_ROT_ANGLE: [-0.78539816, 0.78539816]- NAME: random_world_scalingWORLD_SCALE_RANGE: [0.95, 1.05]DATA_PROCESSOR:- NAME: mask_points_and_boxes_outside_rangeREMOVE_OUTSIDE_BOXES: True- NAME: shuffle_pointsSHUFFLE_ENABLED: {'train': True,'test': False}- NAME: transform_points_to_voxelsVOXEL_SIZE: [0.05, 0.05, 0.1]MAX_POINTS_PER_VOXEL: 5MAX_NUMBER_OF_VOXELS: {'train': 16000,'test': 40000}
新建tools/cfgs/custom_models/pointrcnn.yaml并修改
CLASS_NAMES: ['Car']
# CLASS_NAMES: ['Car', 'Pedestrian', 'Cyclist']DATA_CONFIG:_BASE_CONFIG_: /home/zonlin/CRLFnet/src/site_model/src/LidCamFusion/OpenPCDet/tools/cfgs/dataset_configs/custom_dataset.yaml_BASE_CONFIG_RT_: /home/zonlin/CRLFnet/src/site_model/src/LidCamFusion/OpenPCDet/tools/cfgs/dataset_configs/custom_dataset.yamlDATA_PROCESSOR:-   NAME: mask_points_and_boxes_outside_rangeREMOVE_OUTSIDE_BOXES: True-   NAME: sample_pointsNUM_POINTS: {'train': 16384,'test': 16384}-   NAME: shuffle_pointsSHUFFLE_ENABLED: {'train': True,'test': False}MODEL:NAME: PointRCNNBACKBONE_3D:NAME: PointNet2MSGSA_CONFIG:NPOINTS: [4096, 1024, 256, 64]RADIUS: [[0.1, 0.5], [0.5, 1.0], [1.0, 2.0], [2.0, 4.0]]NSAMPLE: [[16, 32], [16, 32], [16, 32], [16, 32]]MLPS: [[[16, 16, 32], [32, 32, 64]],[[64, 64, 128], [64, 96, 128]],[[128, 196, 256], [128, 196, 256]],[[256, 256, 512], [256, 384, 512]]]FP_MLPS: [[128, 128], [256, 256], [512, 512], [512, 512]]POINT_HEAD:NAME: PointHeadBoxCLS_FC: [256, 256]REG_FC: [256, 256]CLASS_AGNOSTIC: FalseUSE_POINT_FEATURES_BEFORE_FUSION: FalseTARGET_CONFIG:GT_EXTRA_WIDTH: [0.2, 0.2, 0.2]BOX_CODER: PointResidualCoderBOX_CODER_CONFIG: {'use_mean_size': True,'mean_size': [[3.9, 1.6, 1.56],[0.8, 0.6, 1.73],[1.76, 0.6, 1.73]]}LOSS_CONFIG:LOSS_REG: WeightedSmoothL1LossLOSS_WEIGHTS: {'point_cls_weight': 1.0,'point_box_weight': 1.0,'code_weights': [1.0, 1.0, 1.0, 1.0, 1.0, 1.0, 1.0, 1.0]}ROI_HEAD:NAME: PointRCNNHeadCLASS_AGNOSTIC: TrueROI_POINT_POOL:POOL_EXTRA_WIDTH: [0.0, 0.0, 0.0]NUM_SAMPLED_POINTS: 512DEPTH_NORMALIZER: 70.0XYZ_UP_LAYER: [128, 128]CLS_FC: [256, 256]REG_FC: [256, 256]DP_RATIO: 0.0USE_BN: FalseSA_CONFIG:NPOINTS: [128, 32, -1]RADIUS: [0.2, 0.4, 100]NSAMPLE: [16, 16, 16]MLPS: [[128, 128, 128],[128, 128, 256],[256, 256, 512]]NMS_CONFIG:TRAIN:NMS_TYPE: nms_gpuMULTI_CLASSES_NMS: FalseNMS_PRE_MAXSIZE: 9000NMS_POST_MAXSIZE: 512NMS_THRESH: 0.8TEST:NMS_TYPE: nms_gpuMULTI_CLASSES_NMS: FalseNMS_PRE_MAXSIZE: 9000NMS_POST_MAXSIZE: 100NMS_THRESH: 0.85TARGET_CONFIG:BOX_CODER: ResidualCoderROI_PER_IMAGE: 128FG_RATIO: 0.5SAMPLE_ROI_BY_EACH_CLASS: TrueCLS_SCORE_TYPE: clsCLS_FG_THRESH: 0.6CLS_BG_THRESH: 0.45CLS_BG_THRESH_LO: 0.1HARD_BG_RATIO: 0.8REG_FG_THRESH: 0.55LOSS_CONFIG:CLS_LOSS: BinaryCrossEntropyREG_LOSS: smooth-l1CORNER_LOSS_REGULARIZATION: TrueLOSS_WEIGHTS: {'rcnn_cls_weight': 1.0,'rcnn_reg_weight': 1.0,'rcnn_corner_weight': 1.0,'code_weights': [1.0, 1.0, 1.0, 1.0, 1.0, 1.0, 1.0]}POST_PROCESSING:RECALL_THRESH_LIST: [0.3, 0.5, 0.7]SCORE_THRESH: 0.1OUTPUT_RAW_SCORE: FalseEVAL_METRIC: kittiNMS_CONFIG:MULTI_CLASSES_NMS: FalseNMS_TYPE: nms_gpuNMS_THRESH: 0.1NMS_PRE_MAXSIZE: 4096NMS_POST_MAXSIZE: 500OPTIMIZATION:BATCH_SIZE_PER_GPU: 2NUM_EPOCHS: 80OPTIMIZER: adam_onecycleLR: 0.01WEIGHT_DECAY: 0.01MOMENTUM: 0.9MOMS: [0.95, 0.85]PCT_START: 0.4DIV_FACTOR: 10DECAY_STEP_LIST: [35, 45]LR_DECAY: 0.1LR_CLIP: 0.0000001LR_WARMUP: FalseWARMUP_EPOCH: 1GRAD_NORM_CLIP: 10
其他调整事项
需要对以上文件中的类别信息,数据集路径,点云范围POINT_CLOUD_RANGE进行更改
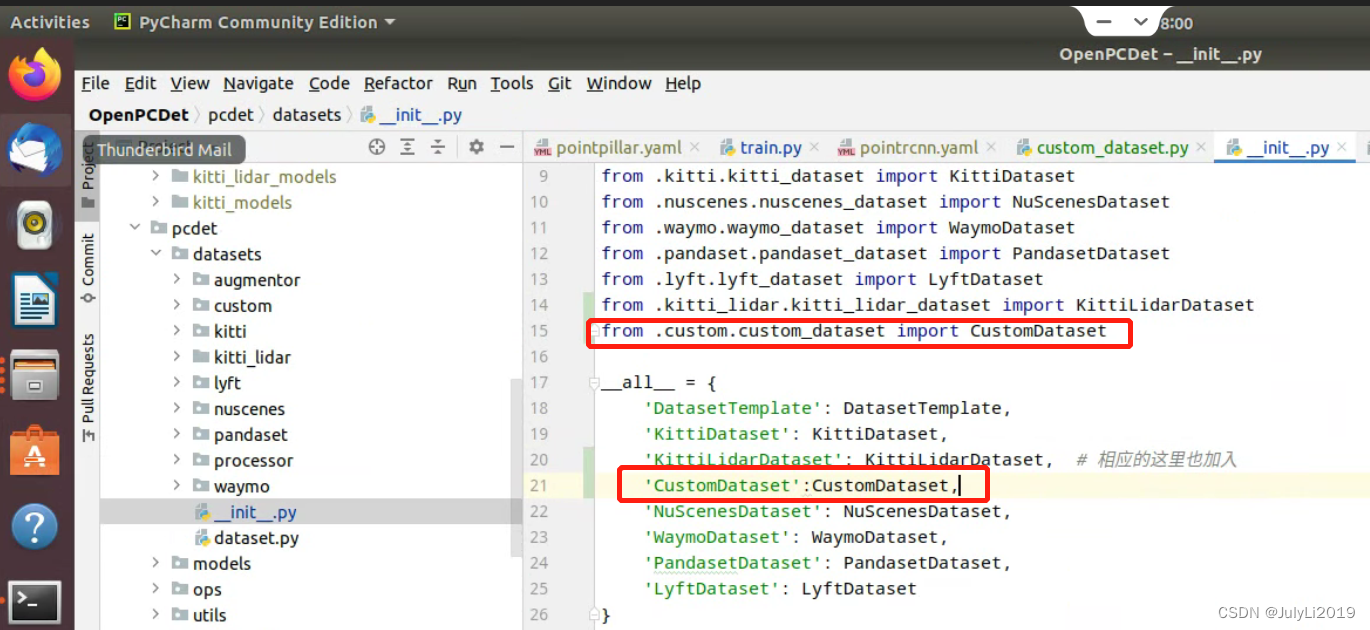
在 pcdet/datasets/init.py文件,增加以下代码
from .custom.custom_dataset import CustomDataset
# 在__all__ = 中增加
'CustomDataset': CustomDataset
完成以上就可以开始对数据集进行预处理和训练了
数据集预处理
python -m pcdet.datasets.custom.custom_dataset create_custom_infos tools/cfgs/dataset_configs/custom_dataset.yaml
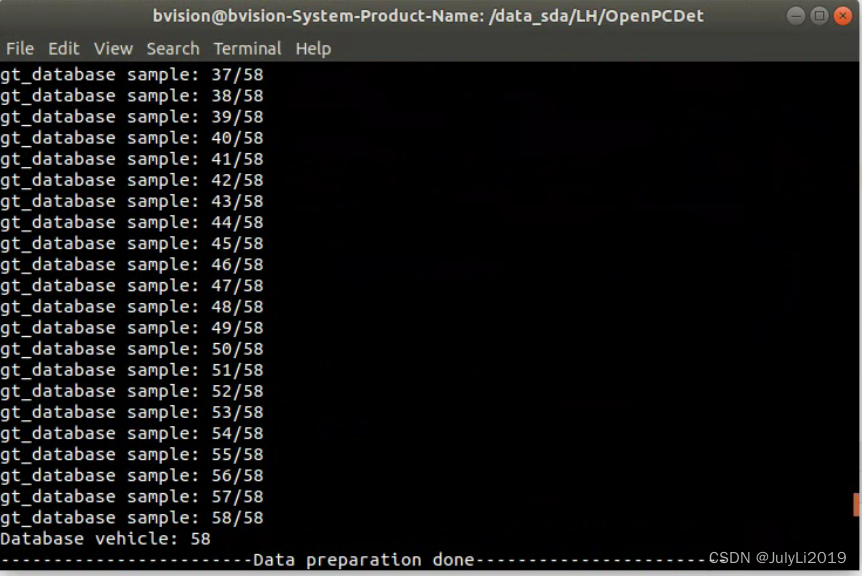
同时在gt_database文件夹下生成的.bin文件,data/custom文件夹结构变为如下:
custom
├── ImageSets
│   ├── test.txt
│   ├── train.txt
├── testing
│   ├── velodyne
├── training
│   ├── label_2
│   ├── velodyne
├── gt_database
│   ├── xxxxx.bin
├── custom_infos_train.pkl
├── custom_infos_val.pkl
├── custom_dbinfos_train.pkl
数据集训练
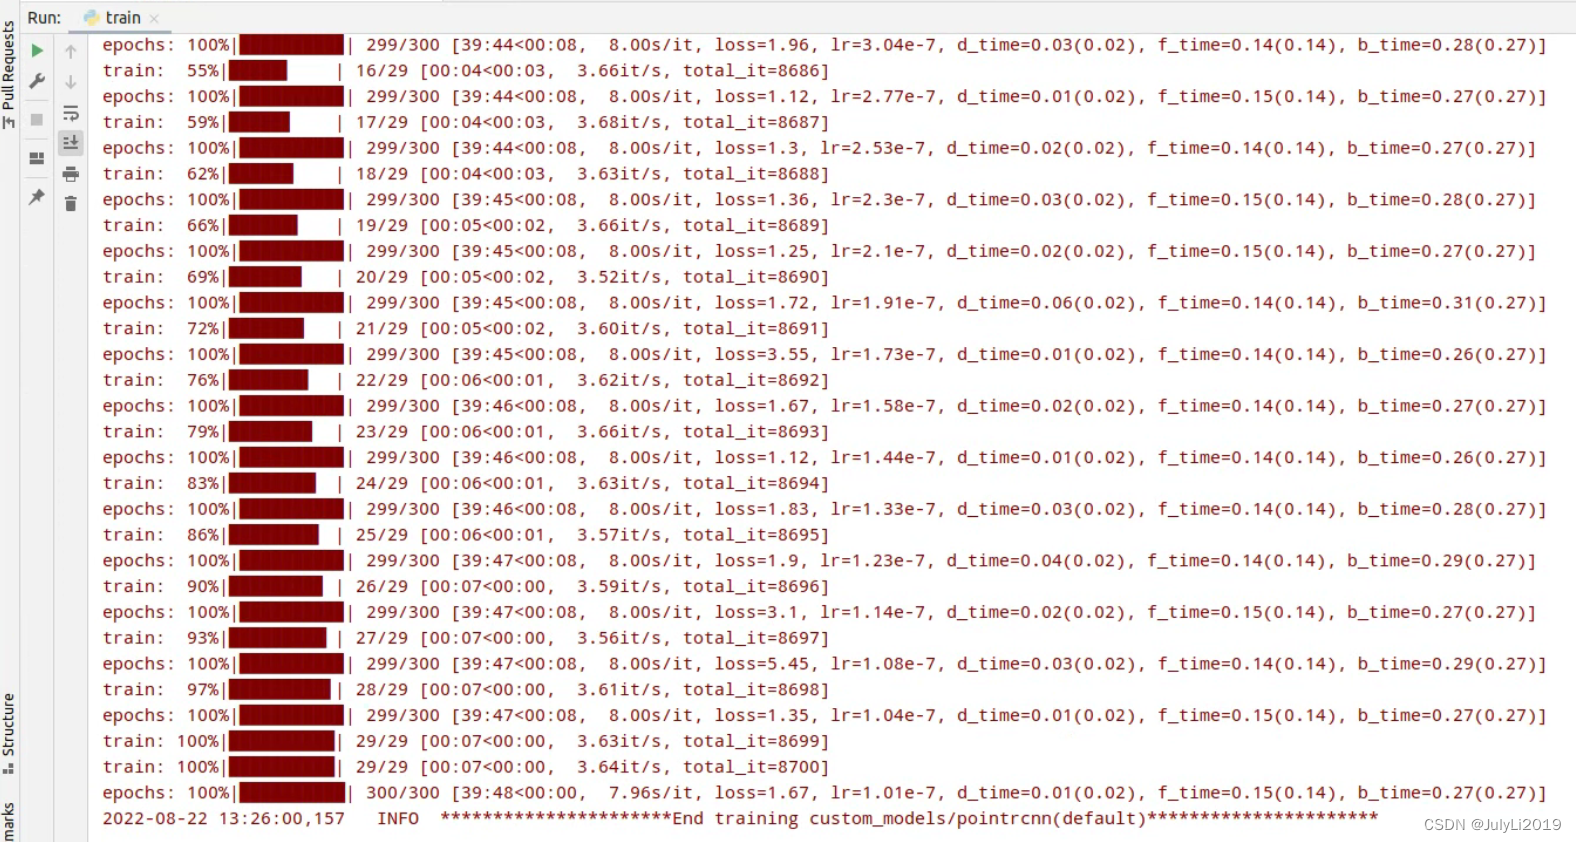
python tools/train.py --cfg_file tools/cfgs/custom_models/pointrcnn.yaml --batch_size=2 --epochs=300
可视化测试
cd到tools文件夹下,运行:
python demo.py --cfg_file cfgs/custom_models/pointrcnn.yaml --data_path ../data/custom/testinging/velodyne/ --ckpt ../output/custom_models/pointrcnn/default/ckpt/checkpoint_epoch_300.pth
此处根据自己的文件路径进行修改,推理效果如下(笔者标注50多张闸口船舶的点云数据):
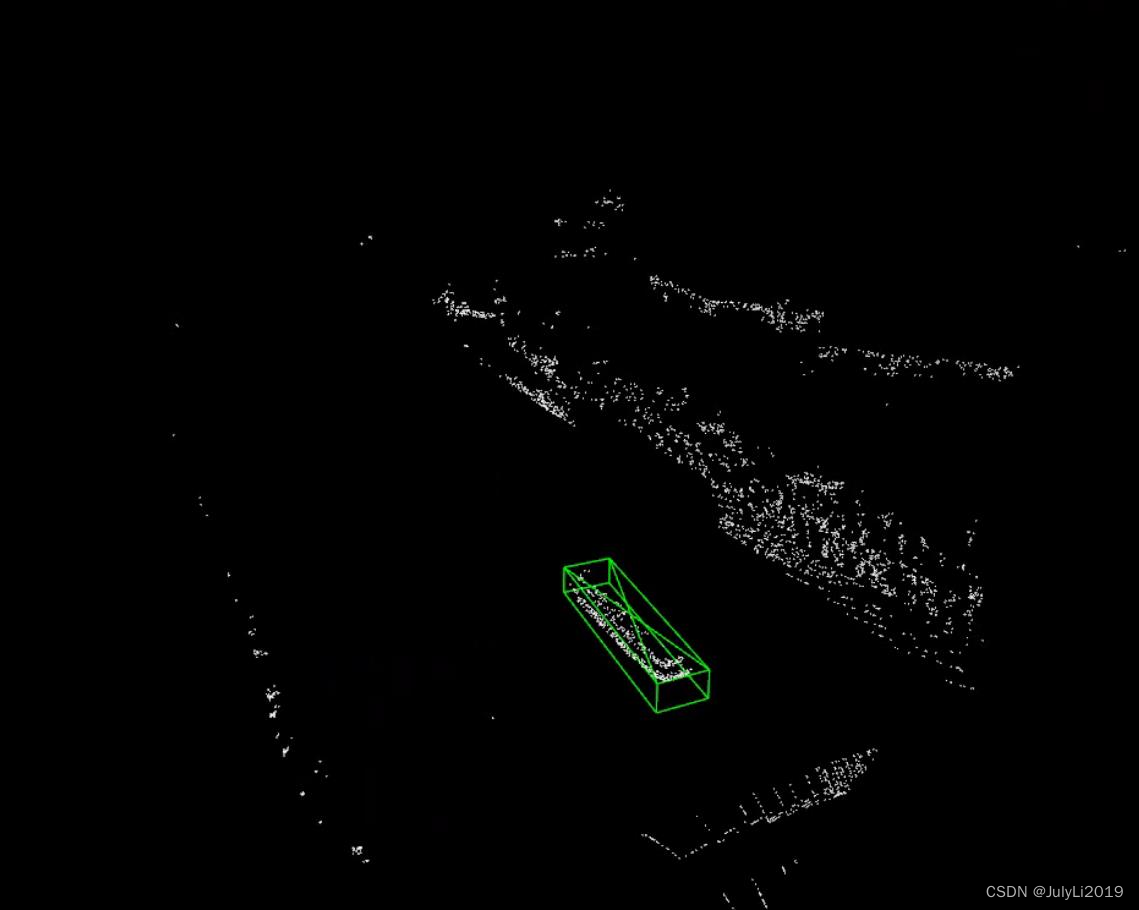
看起来效果还是挺不错。
获取尺寸
OpenPCDet平台下根据kitti格式推理得到的bbox的dx、dy、dz就是约等于实际的物体的尺寸。
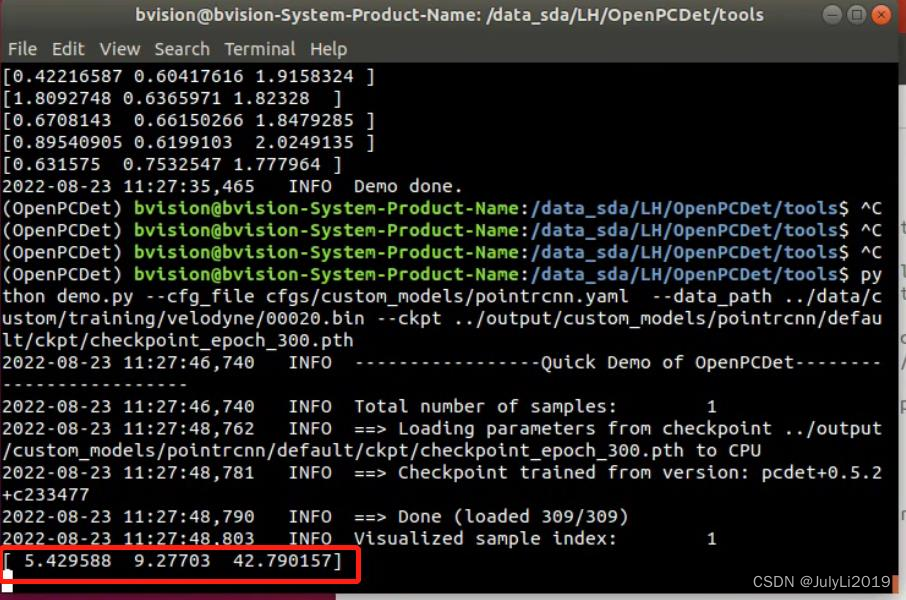
对于我们的点云数据而言,上述数据对应船的高宽长。(这里不理解的可以去看下OpenPCDet的坐标定义)
四、总结
至此,基于OpenPCDet平台的自定义数据集的训练基本完成了,这里要特别感谢下树和猫,对于自定义数据集的训练我们交流了很多,之前他是通过我写的yolov5系列文章关注的我,现在我通过OpenPCDet 训练自己的数据集系列关注了他,着实让我感觉到了技术分享是一个圈。
参考文档:
https://blog.csdn.net/m0_68312479/article/details/126201450
https://blog.csdn.net/jin15203846657/article/details/122949271
https://blog.csdn.net/hihui1231/article/details/124903276
https://github.com/OrangeSodahub/CRLFnet/tree/master/src/site_model/src/LidCamFusion/OpenPCDet
https://blog.csdn.net/weixin_43464623/article/details/116718451
如果阅读本文对你有用,欢迎一键三连呀!!!
2022年10月24日11:12:53


