1.背景
缓存,就是让数据更接近使用者,让访问速度加快,从而提升系统性能。工作机制大概是先从缓存中加载数据,如果没有,再从慢速设备(eg:数据库)中加载数据并同步到缓存中。
所谓多级缓存,是指在整个系统架构的不同系统层面进行数据缓存,以提升访问速度。主要分为三层缓存:网关nginx缓存、分布式缓存、本地缓存。这里的多级缓存就是用redis分布式缓存+caffeine本地缓存整合而来。
平时我们在开发过程中,一般都是使用redis实现分布式缓存、caffeine操作本地缓存,但是发现只使用redis或者是caffeine实现缓存都有一些问题:
- 一级缓存:Caffeine是一个一个高性能的 Java 缓存库;使用 Window TinyLfu 回收策略,提供了一个近乎最佳的命中率。优点数据就在应用内存所以速度快。缺点受应用内存的限制,所以容量有限;没有持久化,重启服务后缓存数据会丢失;在分布式环境下缓存数据数据无法同步;
- 二级缓存:redis是一高性能、高可用的key-value数据库,支持多种数据类型,支持集群,和应用服务器分开部署易于横向扩展。优点支持多种数据类型,扩容方便;有持久化,重启应用服务器缓存数据不会丢失;他是一个集中式缓存,不存在在应用服务器之间同步数据的问题。缺点每次都需要访问redis存在IO浪费的情况。
综上所述,我们可以通过整合redis和caffeine实现多级缓存,解决上面单一缓存的痛点,从而做到相互补足。
项目推荐:基于SpringBoot2.x、SpringCloud和SpringCloudAlibaba企业级系统架构底层框架封装,解决业务开发时常见的非功能性需求,防止重复造轮子,方便业务快速开发和企业技术栈框架统一管理。引入组件化的思想实现高内聚低耦合并且高度可配置化,做到可插拔。严格控制包依赖和统一版本管理,做到最少化依赖。注重代码规范和注释,非常适合个人学习和企业使用
Github地址:https://github.com/plasticene/plasticene-boot-starter-parent
Gitee地址:https://gitee.com/plasticene3/plasticene-boot-starter-parent
微信公众号:Shepherd进阶笔记
交流探讨qun:Shepherd_126
2.整合实现
2.1思路
Spring 本来就提供了Cache的支持,最核心的就是实现Cache和CacheManager接口。但是Spring Cache存在以下问题:
- Spring Cache 仅支持单一的缓存来源,即:只能选择 Redis 实现或者 Caffeine 实现,并不能同时使用。
- 数据一致性:各层缓存之间的数据一致性问题,如应用层缓存和分布式缓存之前的数据一致性问题。
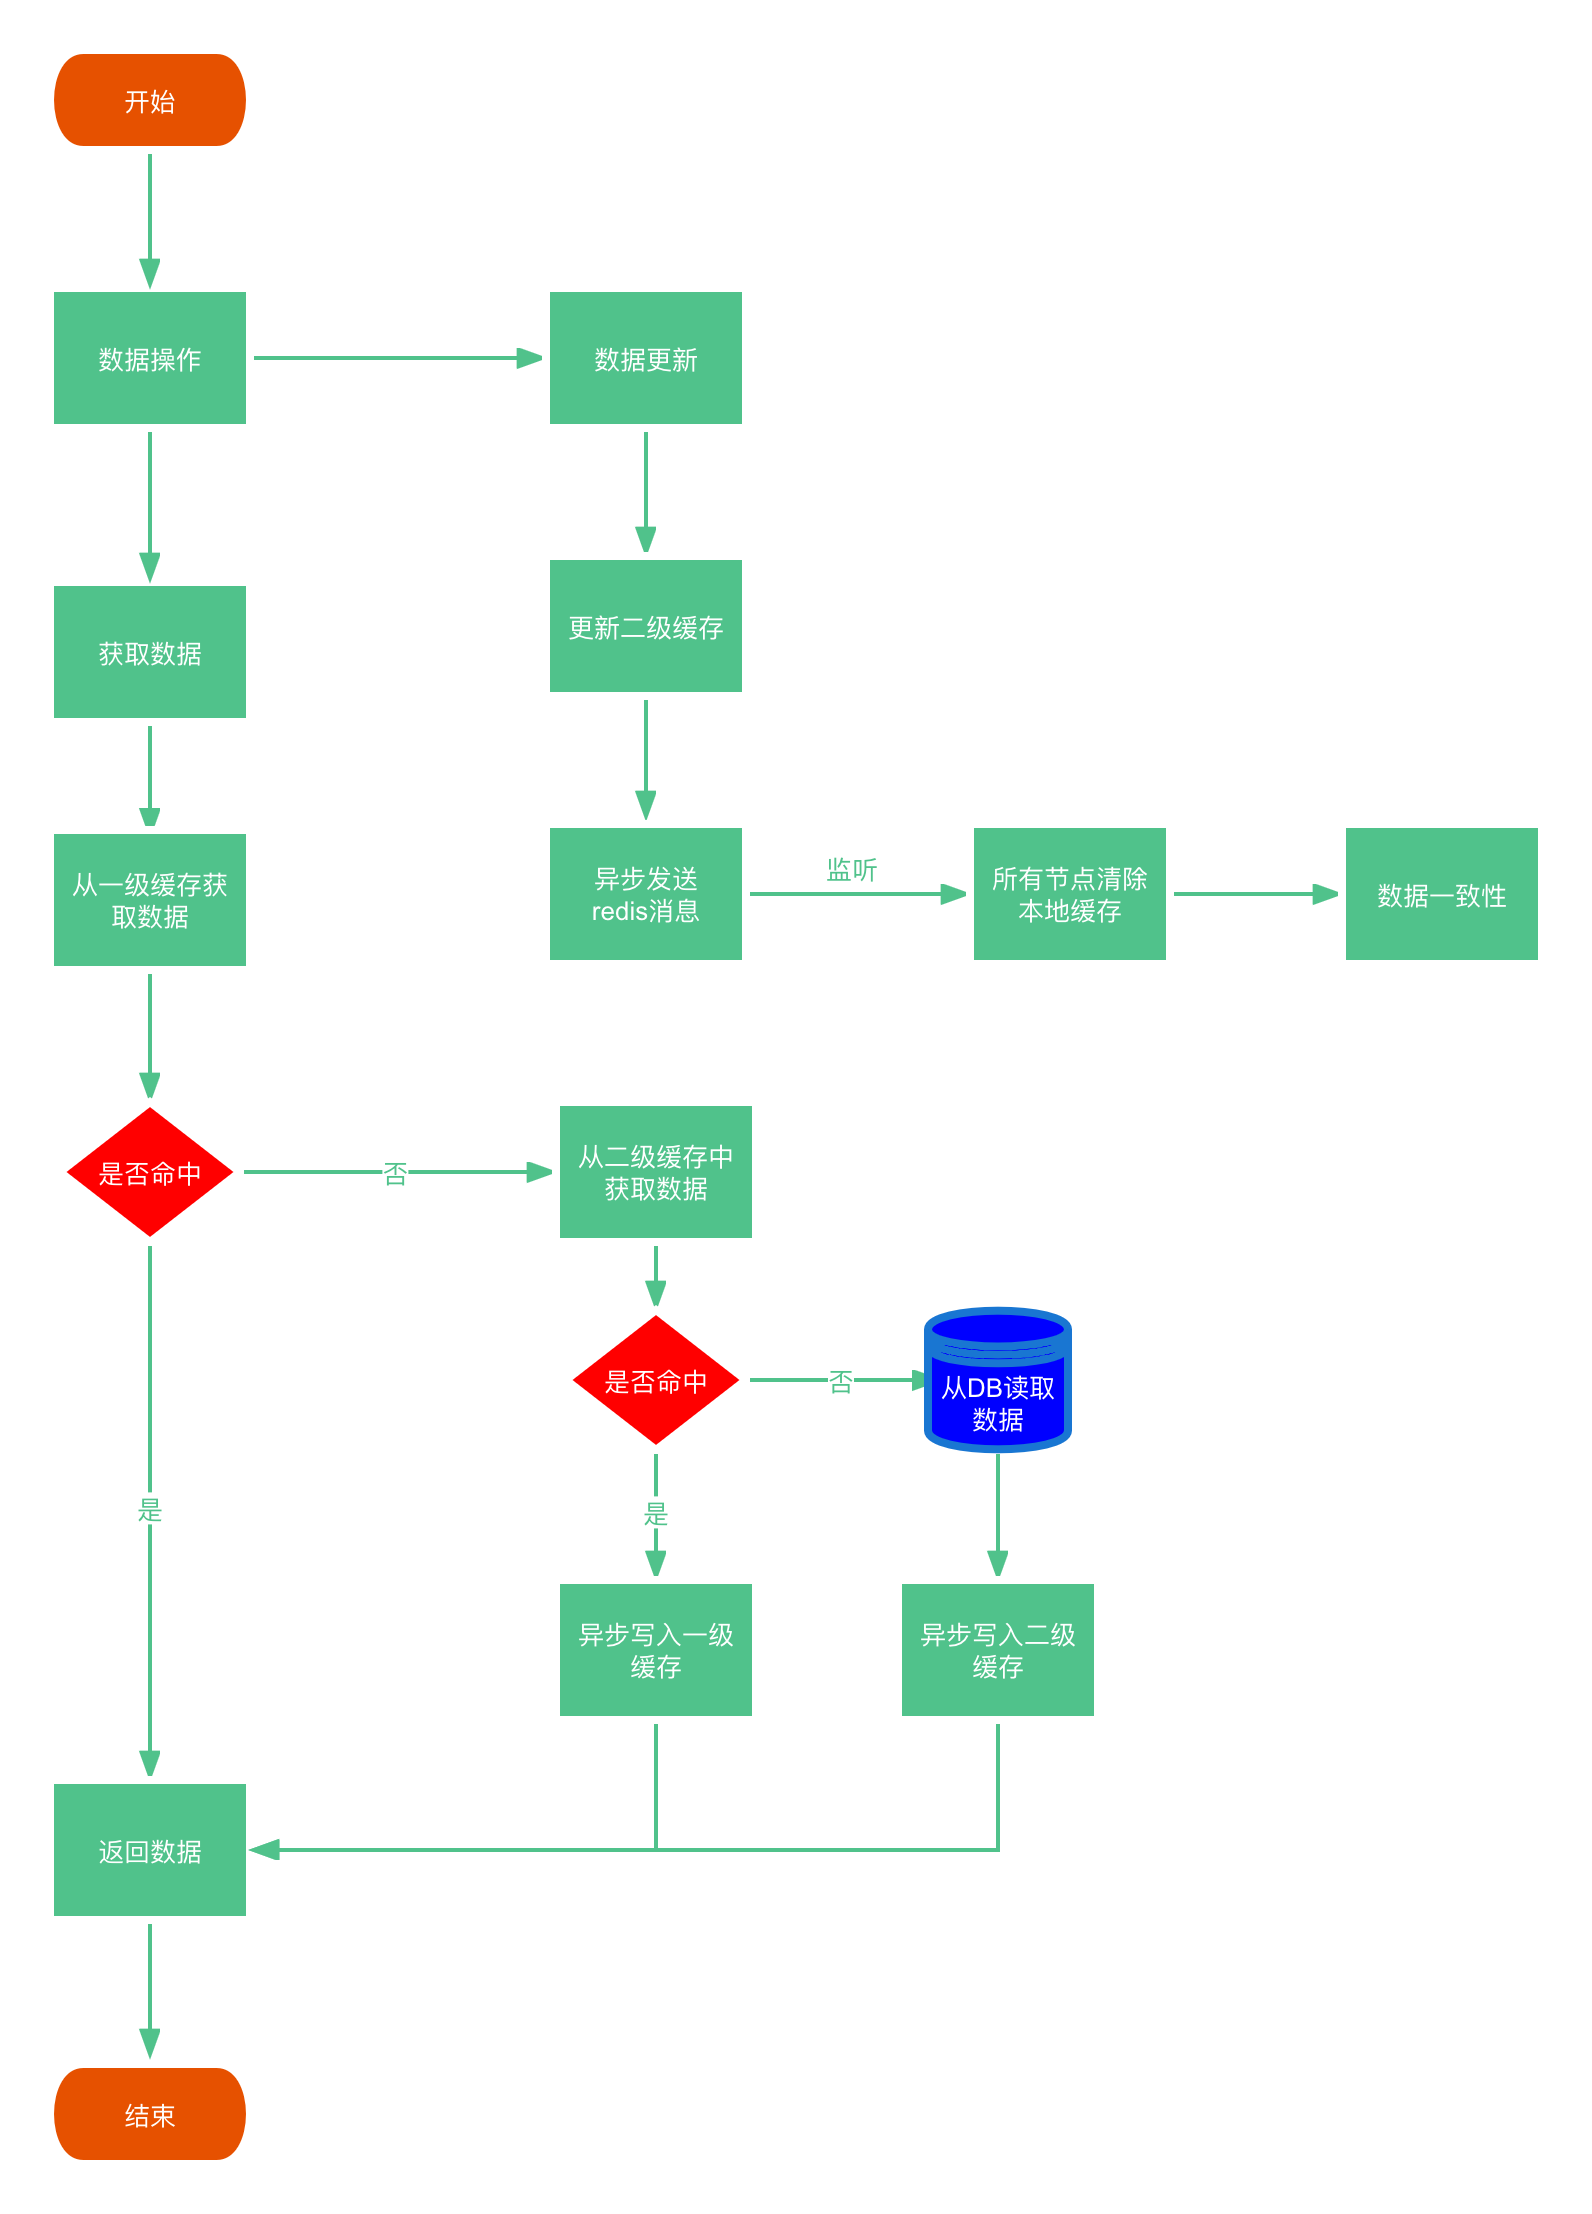
由此我们可以通过重新实现Cache和CacheManager接口,整合redis和caffeine,从而实现多级缓存。在讲实现原理之前先看看多级缓存调用逻辑图:
2.2实现
首先,我们需要一个多级缓存配置类,方便对缓存属性的动态配置,通过开关做到可插拔。
@ConfigurationProperties(prefix = "multilevel.cache")
@Data
public class MultilevelCacheProperties {/*** 一级本地缓存最大比例*/private Double maxCapacityRate = 0.2;/*** 一级本地缓存与最大缓存初始化大小比例*/private Double initRate = 0.5;/*** 消息主题*/private String topic = "multilevel-cache-topic";/*** 缓存名称*/private String name = "multilevel-cache";/*** 一级本地缓存名称*/private String caffeineName = "multilevel-caffeine-cache";/*** 二级缓存名称*/private String redisName = "multilevel-redis-cache";/*** 一级本地缓存过期时间*/private Integer caffeineExpireTime = 300;/*** 二级缓存过期时间*/private Integer redisExpireTime = 600;/*** 一级缓存开关*/private Boolean caffeineSwitch = true;}
在自动配置类使用@EnableConfigurationProperties(MultilevelCacheProperties.class)注入即可使用。
接下来就是重新实现spring的Cache接口,整合caffeine本地缓存和redis分布式缓存实现多级缓存
package com.plasticene.boot.cache.core.manager;import com.plasticene.boot.cache.core.listener.CacheMessage;
import com.plasticene.boot.cache.core.prop.MultilevelCacheProperties;
import com.plasticene.boot.common.executor.plasticeneThreadExecutor;
import lombok.extern.slf4j.Slf4j;
import org.springframework.cache.caffeine.CaffeineCache;
import org.springframework.cache.support.AbstractValueAdaptingCache;
import org.springframework.data.redis.cache.RedisCache;
import org.springframework.data.redis.core.RedisTemplate;
import org.springframework.lang.NonNull;
import org.springframework.util.Assert;import javax.annotation.Resource;
import java.util.Objects;
import java.util.concurrent.*;/*** @author fjzheng* @version 1.0* @date 2022/7/20 17:03*/
@Slf4j
public class MultilevelCache extends AbstractValueAdaptingCache {@Resourceprivate MultilevelCacheProperties multilevelCacheProperties;@Resourceprivate RedisTemplate redisTemplate;ExecutorService cacheExecutor = new plasticeneThreadExecutor(Runtime.getRuntime().availableProcessors() * 2,Runtime.getRuntime().availableProcessors() * 20,Runtime.getRuntime().availableProcessors() * 200,"cache-pool");private RedisCache redisCache;private CaffeineCache caffeineCache;public MultilevelCache(boolean allowNullValues,RedisCache redisCache, CaffeineCache caffeineCache) {super(allowNullValues);this.redisCache = redisCache;this.caffeineCache = caffeineCache;}@Overridepublic String getName() {return multilevelCacheProperties.getName();}@Overridepublic Object getNativeCache() {return null;}@Overridepublic <T> T get(Object key, Callable<T> valueLoader) {Object value = lookup(key);return (T) value;}/***  注意:redis缓存的对象object必须序列化 implements Serializable, 不然缓存对象不成功。*  注意:这里asyncPublish()方法是异步发布消息,然后让分布式其他节点清除本地缓存,防止当前节点因更新覆盖数据而其他节点本地缓存保存是脏数据*  这样本地缓存数据才能成功存入* @param key* @param value*/@Overridepublic void put(@NonNull Object key, Object value) {redisCache.put(key, value);// 异步清除本地缓存if (multilevelCacheProperties.getCaffeineSwitch()) {asyncPublish(key, value);}}/*** key不存在时,再保存,存在返回当前值不覆盖* @param key* @param value* @return*/@Overridepublic ValueWrapper putIfAbsent(@NonNull Object key, Object value) {ValueWrapper valueWrapper = redisCache.putIfAbsent(key, value);// 异步清除本地缓存if (multilevelCacheProperties.getCaffeineSwitch()) {asyncPublish(key, value);}return valueWrapper;}@Overridepublic void evict(Object key) {// 先清除redis中缓存数据,然后通过消息推送清除所有节点caffeine中的缓存,// 避免短时间内如果先清除caffeine缓存后其他请求会再从redis里加载到caffeine中redisCache.evict(key);// 异步清除本地缓存if (multilevelCacheProperties.getCaffeineSwitch()) {asyncPublish(key, null);}}@Overridepublic boolean evictIfPresent(Object key) {return false;}@Overridepublic void clear() {redisCache.clear();// 异步清除本地缓存if (multilevelCacheProperties.getCaffeineSwitch()) {asyncPublish(null, null);}}@Overrideprotected Object lookup(Object key) {Assert.notNull(key, "key不可为空");ValueWrapper value;if (multilevelCacheProperties.getCaffeineSwitch()) {// 开启一级缓存,先从一级缓存缓存数据value = caffeineCache.get(key);if (Objects.nonNull(value)) {log.info("查询caffeine 一级缓存 key:{}, 返回值是:{}", key, value.get());return value.get();}}value = redisCache.get(key);if (Objects.nonNull(value)) {log.info("查询redis 二级缓存 key:{}, 返回值是:{}", key, value.get());// 异步将二级缓存redis写到一级缓存caffeineif (multilevelCacheProperties.getCaffeineSwitch()) {ValueWrapper finalValue = value;cacheExecutor.execute(()->{caffeineCache.put(key, finalValue.get());});}return value.get();}return null;}/*** 缓存变更时通知其他节点清理本地缓存* 异步通过发布订阅主题消息,其他节点监听到之后进行相关本地缓存操作,防止本地缓存脏数据*/void asyncPublish(Object key, Object value) {cacheExecutor.execute(()->{CacheMessage cacheMessage = new CacheMessage();cacheMessage.setCacheName(multilevelCacheProperties.getName());cacheMessage.setKey(key);cacheMessage.setValue(value);redisTemplate.convertAndSend(multilevelCacheProperties.getTopic(), cacheMessage);});}}
缓存消息监听:我们通监听caffeine键值的移除、打印日志方便排查问题,通过监听redis发布的消息,实现分布式集群多节点本地缓存清除从而达到数据一致性。
消息体
@Data
public class CacheMessage implements Serializable {private String cacheName;private Object key;private Object value;private Integer type;
}
caffeine移除监听:
@Slf4j
public class CaffeineCacheRemovalListener implements RemovalListener<Object, Object> {@Overridepublic void onRemoval(@Nullable Object k, @Nullable Object v, @NonNull RemovalCause cause) {log.info("[移除缓存] key:{} reason:{}", k, cause.name());// 超出最大缓存if (cause == RemovalCause.SIZE) {}// 超出过期时间if (cause == RemovalCause.EXPIRED) {// do something}// 显式移除if (cause == RemovalCause.EXPLICIT) {// do something}// 旧数据被更新if (cause == RemovalCause.REPLACED) {// do something}}
}
redis消息监听:
@Slf4j
@Data
public class RedisCacheMessageListener implements MessageListener {private CaffeineCache caffeineCache;@Overridepublic void onMessage(Message message, byte[] pattern) {log.info("监听的redis message: {}" + message.toString());CacheMessage cacheMessage = JsonUtils.parseObject(message.toString(), CacheMessage.class);if (Objects.isNull(cacheMessage.getKey())) {caffeineCache.invalidate();} else {caffeineCache.evict(cacheMessage.getKey());}}
}
最后,通过自动配置类,注入相关bean:
*** @author fjzheng* @version 1.0* @date 2022/7/20 17:24*/
@Configuration
@EnableConfigurationProperties(MultilevelCacheProperties.class)
public class MultilevelCacheAutoConfiguration {@Resourceprivate MultilevelCacheProperties multilevelCacheProperties;ExecutorService cacheExecutor = new plasticeneThreadExecutor(Runtime.getRuntime().availableProcessors() * 2,Runtime.getRuntime().availableProcessors() * 20,Runtime.getRuntime().availableProcessors() * 200,"cache-pool");@Bean@ConditionalOnMissingBean({RedisTemplate.class})public  RedisTemplate<Object, Object> redisTemplate(RedisConnectionFactory factory) {RedisTemplate<Object, Object> template = new RedisTemplate<Object, Object>();template.setConnectionFactory(factory);template.setKeySerializer(new StringRedisSerializer());template.setHashKeySerializer(new StringRedisSerializer());template.setDefaultSerializer(new Jackson2JsonRedisSerializer<>(Object.class));template.setHashValueSerializer(new Jackson2JsonRedisSerializer<>(Object.class));return template;}@Beanpublic RedisCache redisCache (RedisConnectionFactory redisConnectionFactory) {RedisCacheWriter redisCacheWriter = RedisCacheWriter.nonLockingRedisCacheWriter(redisConnectionFactory);RedisCacheConfiguration redisCacheConfiguration = defaultCacheConfig();redisCacheConfiguration = redisCacheConfiguration.entryTtl(Duration.of(multilevelCacheProperties.getRedisExpireTime(), ChronoUnit.SECONDS));redisCacheConfiguration = redisCacheConfiguration.serializeKeysWith(RedisSerializationContext.SerializationPair.fromSerializer(new StringRedisSerializer()));redisCacheConfiguration = redisCacheConfiguration.serializeValuesWith(RedisSerializationContext.SerializationPair.fromSerializer(new GenericJackson2JsonRedisSerializer()));RedisCache redisCache = new CustomRedisCache(multilevelCacheProperties.getRedisName(), redisCacheWriter, redisCacheConfiguration);return redisCache;}/*** 由于Caffeine 不会再值过期后立即执行清除,而是在写入或者读取操作之后执行少量维护工作,或者在写入读取很少的情况下,偶尔执行清除操作。* 如果我们项目写入或者读取频率很高,那么不用担心。如果想入写入和读取操作频率较低,那么我们可以通过Cache.cleanUp()或者加scheduler去定时执行清除操作。* Scheduler可以迅速删除过期的元素,***Java 9 +***后的版本,可以通过Scheduler.systemScheduler(), 调用系统线程,达到定期清除的目的* @return*/@Bean@ConditionalOnClass(CaffeineCache.class)@ConditionalOnProperty(name = "multilevel.cache.caffeineSwitch", havingValue = "true", matchIfMissing = true)public CaffeineCache caffeineCache() {int maxCapacity = (int) (Runtime.getRuntime().totalMemory() * multilevelCacheProperties.getMaxCapacityRate());int initCapacity = (int) (maxCapacity * multilevelCacheProperties.getInitRate());CaffeineCache caffeineCache = new CaffeineCache(multilevelCacheProperties.getCaffeineName(), Caffeine.newBuilder()// 设置初始缓存大小.initialCapacity(initCapacity)// 设置最大缓存.maximumSize(maxCapacity)// 设置缓存线程池.executor(cacheExecutor)// 设置定时任务执行过期清除操作
//                .scheduler(Scheduler.systemScheduler())// 监听器(超出最大缓存).removalListener(new CaffeineCacheRemovalListener())// 设置缓存读时间的过期时间.expireAfterAccess(Duration.of(multilevelCacheProperties.getCaffeineExpireTime(), ChronoUnit.SECONDS))// 开启metrics监控.recordStats().build());return caffeineCache;}@Bean@ConditionalOnBean({CaffeineCache.class, RedisCache.class})public MultilevelCache multilevelCache(RedisCache redisCache, CaffeineCache caffeineCache) {MultilevelCache multilevelCache = new MultilevelCache(true, redisCache, caffeineCache);return multilevelCache;}@Beanpublic RedisCacheMessageListener redisCacheMessageListener(@Autowired CaffeineCache caffeineCache) {RedisCacheMessageListener redisCacheMessageListener = new RedisCacheMessageListener();redisCacheMessageListener.setCaffeineCache(caffeineCache);return redisCacheMessageListener;}@Beanpublic RedisMessageListenerContainer redisMessageListenerContainer(@Autowired RedisConnectionFactory redisConnectionFactory,@Autowired RedisCacheMessageListener redisCacheMessageListener) {RedisMessageListenerContainer redisMessageListenerContainer = new RedisMessageListenerContainer();redisMessageListenerContainer.setConnectionFactory(redisConnectionFactory);redisMessageListenerContainer.addMessageListener(redisCacheMessageListener, new ChannelTopic(multilevelCacheProperties.getTopic()));return redisMessageListenerContainer;}}
3.使用
使用非常简单,只需要通过multilevelCache操作即可:
@RestController
@RequestMapping("/api/data")
@Api(tags = "api数据")
@Slf4j
public class ApiDataController {@Resourceprivate MultilevelCache multilevelCache;@GetMapping("/put/cache")public void put() {DataSource ds = new DataSource();ds.setName("多级缓存");ds.setType(1);ds.setCreateTime(new Date());ds.setHost("127.0.0.1");multilevelCache.put("test-key", ds);}@GetMapping("/get/cache")public DataSource get() {DataSource dataSource = multilevelCache.get("test-key", DataSource.class);return dataSource;}}
4.总结
以上全部就是关于多级缓存的实现方案总结,多级缓存就是为了解决项目服务中单一缓存使用不足的缺点。应用场景有:接口权限校验,每次请求接口都需要根据当前登录人有哪些角色,角色有哪些权限,如果每次都去查数据库性能开销比较严重,再加上权限一般不怎么会频繁变更,所以使用多级缓存是最合适不过了;还有就是很多管理系统列表界面都有组织架构信息(所属部门、小组等),这些信息同样可以使用多级缓存来完美提升性能。