参考文档:
https://element.eleme.cn/#/zh-CN/component/table
demo效果图如下(在表格的类型列中添加一个对应类型的svg图标):
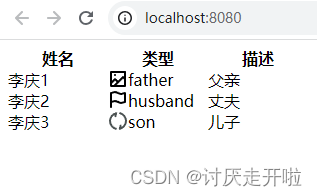
本文主要关注以下两点:
- elementUI的表格(table)的自定义列模版;
- 在vue工程中动态引入svg图片。
demo源码
MyTable.vue(上述两个主要关注点均包含在此文件)代码如下:
<!--* @Author: liqing* @Date: 2023-08-08 14:35:39* @LastEditors: liqing* @LastEditTime: 2023-08-09 10:11:46* @Description: description
-->
<template><el-table :data="tableData"><el-table-columnprop="name"label="姓名"width="100"></el-table-column><el-table-columnprop="type"label="类型"width="100"><template slot-scope="scope"><div style="display: flex; flex-direction: row;"><svg style="width: 20px; height: 20px;"><use :xlink:href="`#${scope.row['type']}`"></use></svg><span>{{scope.row['type']}}</span></div></template></el-table-column><el-table-columnprop="detail"label="描述"width="100"></el-table-column></el-table>
</template><script>
import father from '../assets/svg/father.svg';
import husband from '../assets/svg/husband.svg';
import son from '../assets/svg/son.svg';export default {name: "my-table",data() {return {tableData: [{name: '李庆1',type: 'father',detail: '父亲'}, {name: '李庆2',type: 'husband',detail: '丈夫'}, {name: '李庆3',type: 'son',detail: '儿子'}]}},mounted() {}
}
</script><style lang="less" scoped></style>
如果想要在本地运行这个demo,请继续参考以下信息:
demo目录结构如下:
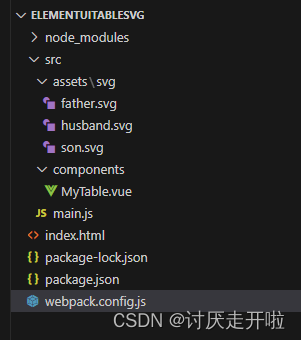
package.json(注意依赖项的版本,不配套的版本可能导致工程无法正常运行):
{"name": "elementuitableicon","version": "1.0.0","description": "","main": "index.js","scripts": {"dev": "webpack-dev-server --open --hot","build": "webpack --progress --hide-modules"},"author": "liqing","license": "ISC","dependencies": {"element-ui": "^2.15.7","html-webpack-plugin": "^3.2.0","svg-sprite-loader": "^6.0.7","vue": "^2.6.14","vue-loader": "^15.7.0","vue-template-compiler": "^2.6.14","webpack": "^4.34.0","webpack-cli": "^3.3.4","webpack-dev-server": "^3.7.1"}
}
webpack.config.js代码如下:
/** @Author: liqing* @Date: 2023-08-08 14:19:05* @LastEditors: liqing* @LastEditTime: 2023-08-09 09:58:24* @Description: description*/
'use strict';
const path = require("path");
const HtmlWebpackPlugin = require('html-webpack-plugin');
const VueLoaderPlugin = require('vue-loader/lib/plugin');module.exports = {entry: {"main": "./src/main.js"},output: {path: path.resolve(__dirname, "build"),filename: "[name].js"},devServer: {historyApiFallback: true,overlay: true},resolve: {alias: {'vue$': 'vue/dist/vue.esm.js','@': path.resolve(__dirname, 'src'),}},module: {rules: [{test: /\.vue$/,loader: 'vue-loader'},{test: /\.svg$/,loader: 'svg-sprite-loader',exclude: /node_modules/,include: [path.resolve(__dirname, './src/assets/svg')],},]},plugins: [new HtmlWebpackPlugin({template: 'index.html',inject: 'body'}),new VueLoaderPlugin()]
};
要处理svg文件必须依赖svg-sprite-loader,否则会有如下错误提示(解析svg文件失败的报错):
ERROR in ./src/assets/svg/father.svg 1:0
Module parse failed: Unexpected token (1:0)
You may need an appropriate loader to handle this file type, currently no loaders are configured to process this file. See https://webpack.js.org/concepts#loaders
index.html代码如下:
<!--* @Author: liqing* @Date: 2023-08-08 14:16:58* @LastEditors: liqing* @LastEditTime: 2023-08-08 14:17:10* @Description: description
-->
<!DOCTYPE html>
<html lang="en">
<head><meta charset="UTF-8"><title>Title</title>
</head>
<body>
<div id="app">
</div>
</body>
</html>
main.js代码如下:
import Vue from 'vue'
import { Table, TableColumn } from 'element-ui';
Vue.use(Table);
Vue.use(TableColumn);import MyTable from './components/MyTable.vue'new Vue({el: '#app',components: { MyTable },template: '<my-table></my-table>'
});
father.svg:
<svg xmlns="http://www.w3.org/2000/svg" width="20" height="20" data-name="icon/20/图片合成"><path fill="none" stroke="currentColor" stroke-linecap="round" stroke-linejoin="round" stroke-width="2" d="M3 3h14v14H3Z" data-name="路径 15901"/><path fill="none" stroke="currentColor" stroke-linecap="round" stroke-linejoin="round" stroke-width="2" d="m3.287 13.813 3.712-3.712 2.81 2.81" data-name="路径 15902"/><path fill="none" stroke="currentColor" stroke-linecap="round" stroke-linejoin="round" stroke-width="2" d="m6.594 16.504 8.403-8.403 1.627 1.626" data-name="路径 15903"/><circle cx="1" cy="1" r="1" fill="currentColor" data-name="椭圆 604" transform="translate(6 5)"/></svg>
husband.svg:
<svg xmlns="http://www.w3.org/2000/svg" width="20" height="20" data-name="icon/20/标记"><path fill="none" stroke="currentColor" stroke-linecap="round" stroke-linejoin="round" stroke-width="2" d="M3 3a12.328 12.328 0 0 1 3.875-1c1.6 0 4.879 2 6.347 2A12.625 12.625 0 0 0 17 3v9a9.666 9.666 0 0 1-3.594 1c-1.719.031-4.687-2-6.531-2A10.4 10.4 0 0 0 3 12Z" data-name="路径 15762"/><path fill="none" stroke="currentColor" stroke-linecap="round" stroke-linejoin="round" stroke-width="2" d="M2.998 17V4" data-name="路径 15763"/></svg>
son.svg:
<svg xmlns="http://www.w3.org/2000/svg" width="20" height="20" fill="none"><path stroke="#4B5252" stroke-linecap="round" stroke-linejoin="round" stroke-width="2" d="M7.915 17.764a7.592 7.592 0 0 1-4.186-2.738 8.147 8.147 0 0 1-1.729-5 7.79 7.79 0 0 1 1.7-4.892 8.52 8.52 0 0 1 4.461-2.9c-.58 2.432-.748 3.014-.755 3.038M12.084 2.236a7.593 7.593 0 0 1 4.187 2.739A8.148 8.148 0 0 1 18 9.977a7.789 7.789 0 0 1-1.7 4.888 8.519 8.519 0 0 1-4.461 2.9c.58-2.432.748-3.014.755-3.037"/></svg>
demo运行
按之前给出的demo目录结构把上述文件放到对应的路径下,执行npm install下载依赖项后,再执行npm run dev即可运行demo(如果发现无法运行,检查一下本地的依赖项版本是否和package.json中保持一致)。

