run方法核心流程
在分析和学习整个run方法之前,我们可以通过以下流程图来看下SpringApplication调用的run方法处理的核心操作包含哪些。
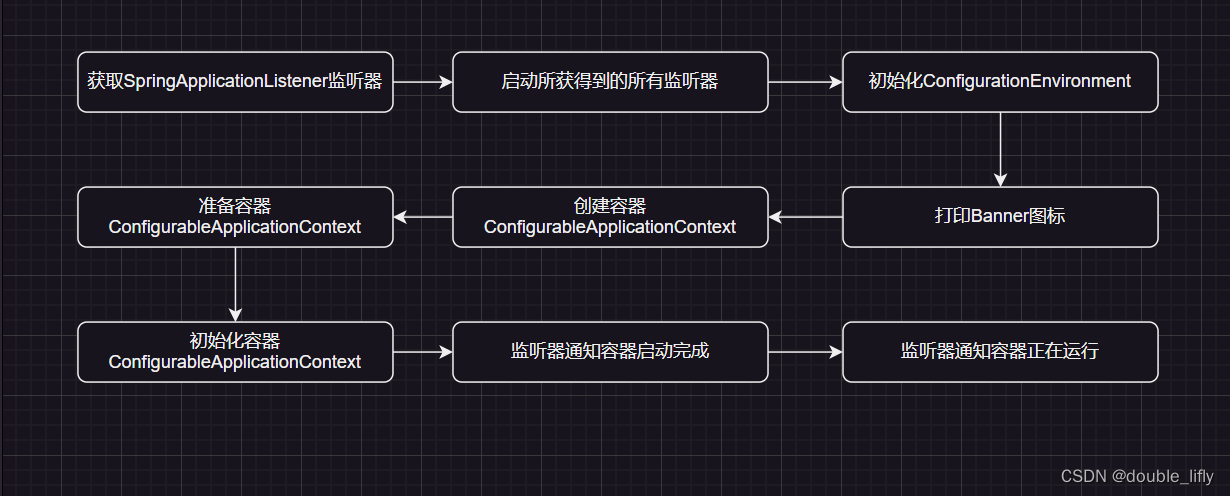
从上面的流程图中可以看出,SpringApplication在run方法中重点做了以下几步操作
- 获取监听器和参数配置
- 打印banner信息
- 创建并初始化容器
- 监听器发送通知
除了以上核心操作,run方法运行过程中还设计启动时长统计,异常报告,启动日志,异常处理等辅助操作。
对照流程图,我们再来整体看下入口run方法的源代码,核心部分的功能已通过注释的形式进行说明。
/*** Run the Spring application, creating and refreshing a new* {@link ApplicationContext}.* @param args the application arguments (usually passed from a Java main method)* @return a running {@link ApplicationContext}*/public ConfigurableApplicationContext run(String... args) {//创建stopWatch对象,用于统计run方法启动时长StopWatch stopWatch = new StopWatch();//启动统计stopWatch.start();ConfigurableApplicationContext context = null;Collection<SpringBootExceptionReporter> exceptionReporters = new ArrayList<>();//配置headless属性configureHeadlessProperty();//获得SpringApplicationListener数组//该数组封装于SpringApplicationRunListeners对象的listeners中SpringApplicationRunListeners listeners = getRunListeners(args);//启动监听,遍历SpringApplicationRunListener数组每个元素,并执行listeners.starting();try {//创建ApplicationArguments对象ApplicationArguments applicationArguments = new DefaultApplicationArguments(args);//加载属性配置,包括所有的配置属性(如application.properties中和外部的属性配置)ConfigurableEnvironment environment = prepareEnvironment(listeners, applicationArguments);configureIgnoreBeanInfo(environment);//打印bannerBanner printedBanner = printBanner(environment);//创建容器context = createApplicationContext();//获取异常报告exceptionReporters = getSpringFactoriesInstances(SpringBootExceptionReporter.class,new Class[] { ConfigurableApplicationContext.class }, context);//准备容器,组件对象之间进行关联prepareContext(context, environment, listeners, applicationArguments, printedBanner);//初始化容器refreshContext(context);//初始化之后执行,默认实现为空afterRefresh(context, applicationArguments);//停止时长统计stopWatch.stop();//打印日东日志if (this.logStartupInfo) {new StartupInfoLogger(this.mainApplicationClass).logStarted(getApplicationLog(), stopWatch);}//通知监听器,容器启动完成listeners.started(context);//调用ApplicationRunner和CommandLineRunner的运行方法callRunners(context, applicationArguments);}catch (Throwable ex) {//异常处理handleRunFailure(context, ex, exceptionReporters, listeners);throw new IllegalStateException(ex);}try {//通知监听器,容器正在运行listeners.running(context);}catch (Throwable ex) {//异常处理handleRunFailure(context, ex, exceptionReporters, null);throw new IllegalStateException(ex);}return context;}
SpringApplicationRunListener监听器
监听器的加载与配置
SpringApplicationRunListeners可以理解为一个SpringApplicationRunListener的容器,它将SpringApplicationRunListener的集合以构造方法传入,并赋值给其listeners成员变量,然后提供了针对listeners成员变量的各种遍历操作方法,比如,遍历集合并调用对应的starting,started,running等方法。
SpringApplicationRunListeners的构造方法很简单,其源码如下:
private SpringApplicationRunListeners getRunListeners(String[] args) {//构造Class数组Class<?>[] types = new Class<?>[] { SpringApplication.class, String[].class };//调用SpringApplicationRunListeners构造方法return new SpringApplicationRunListeners(logger,getSpringFactoriesInstances(SpringApplicationRunListener.class, types, this, args));}
SpringApplicationRunListeners 构造方法的第二个参数便是SpringApplicationRunListener的集合,SpringApplication中调用构造方法时该参数是通过getSpringFactoriesInstances方法1获取的,代码如下:
private <T> Collection<T> getSpringFactoriesInstances(Class<T> type, Class<?>[] parameterTypes, Object... args) {//获得类加载器ClassLoader classLoader = getClassLoader();// Use names and ensure unique to protect against duplicates//加载META-INF/spring.factories中对应监听器的配置,并将结果存于Set中(去重)Set<String> names = new LinkedHashSet<>(SpringFactoriesLoader.loadFactoryNames(type, classLoader));//实例化监听器List<T> instances = createSpringFactoriesInstances(type, parameterTypes, classLoader, args, names);//排序AnnotationAwareOrderComparator.sort(instances);return instances;}
通过方法名可知,getSpringFactoriesInstances是用来获取factories配置文件中的注册类,并进行实例化操作。SpringApplicationRunListener的注册配置位于spring-boot项目中的spring.factories文件内,SringBoot默认仅有一个监听器进行了注册,至于为什么会仅有一个,后面来说哈。
# Run Listeners
org.springframework.boot.SpringApplicationRunListener=\
org.springframework.boot.context.event.EventPublishingRunListener
下面继续看createSpringFactoriesInstances方法的源码:
@SuppressWarnings("unchecked")private <T> List<T> createSpringFactoriesInstances(Class<T> type, Class<?>[] parameterTypes,ClassLoader classLoader, Object[] args, Set<String> names) {List<T> instances = new ArrayList<>(names.size());for (String name : names) {try {Class<?> instanceClass = ClassUtils.forName(name, classLoader);Assert.isAssignable(type, instanceClass);//获取有参构造器Constructor<?> constructor = instanceClass.getDeclaredConstructor(parameterTypes);T instance = (T) BeanUtils.instantiateClass(constructor, args);instances.add(instance);}catch (Throwable ex) {throw new IllegalArgumentException("Cannot instantiate " + type + " : " + name, ex);}}return instances;}
在上面的代码中,实例化监听器需要有一个默认的构造方法,且构造方法的参数为Class<?>[] parameterTypes。向上追踪该参数的来源,会发现该参数的1值为Class数组,数组的内容依次为SpringApplication.class和String[].class。也就是,SpringApplicationRunListener的实现类必须有默认的构造方法,且构造方法的参数必须依次为SpringApplication和String[]类型。
SpringApplicationRunListener源码解析
接口SpringApplicationRunListener是SpringApplication的run方法监听器。SpringApplicationRunListene提供了一系列的方法,用户可以通过回调这些方法,在启动各个流程时加入指定的逻辑处理。下面解释下该接口都定义了那些待实现的方法及功能。
/** Copyright 2012-2019 the original author or authors.** Licensed under the Apache License, Version 2.0 (the "License");* you may not use this file except in compliance with the License.* You may obtain a copy of the License at**      https://www.apache.org/licenses/LICENSE-2.0** Unless required by applicable law or agreed to in writing, software* distributed under the License is distributed on an "AS IS" BASIS,* WITHOUT WARRANTIES OR CONDITIONS OF ANY KIND, either express or implied.* See the License for the specific language governing permissions and* limitations under the License.*/package org.springframework.boot;import org.springframework.context.ApplicationContext;
import org.springframework.context.ConfigurableApplicationContext;
import org.springframework.core.env.ConfigurableEnvironment;
import org.springframework.core.io.support.SpringFactoriesLoader;/*** Listener for the {@link SpringApplication} {@code run} method.* {@link SpringApplicationRunListener}s are loaded via the {@link SpringFactoriesLoader}* and should declare a public constructor that accepts a {@link SpringApplication}* instance and a {@code String[]} of arguments. A new* {@link SpringApplicationRunListener} instance will be created for each run.** @author Phillip Webb* @author Dave Syer* @author Andy Wilkinson* @since 1.0.0*/
public interface SpringApplicationRunListener {//当run方法第一次被执行时,会被立即调用,可用于非常时期的初始化工作default void starting() {}//当environment准备完成,在ApplicationContext创建之前,该方法被调用default void environmentPrepared(ConfigurableEnvironment environment) {}//当ApplicationContext构建完成,资源还未被加载时,该方法被调用default void contextPrepared(ConfigurableApplicationContext context) {}//当ApplicationContext加载完成,未被刷新之前,该方法被调用default void contextLoaded(ConfigurableApplicationContext context) {}//当ApplicationContext刷新并启动之后,CommandLineRunner和ApplicationRunner未被调用之前,该方法被调用default void started(ConfigurableApplicationContext context) {}//当所有准备工作就绪,run方法执行完成之前,该方法被调用default void running(ConfigurableApplicationContext context) {}//当应用程序出现错误时,该方法被调用default void failed(ConfigurableApplicationContext context, Throwable exception) {}
}
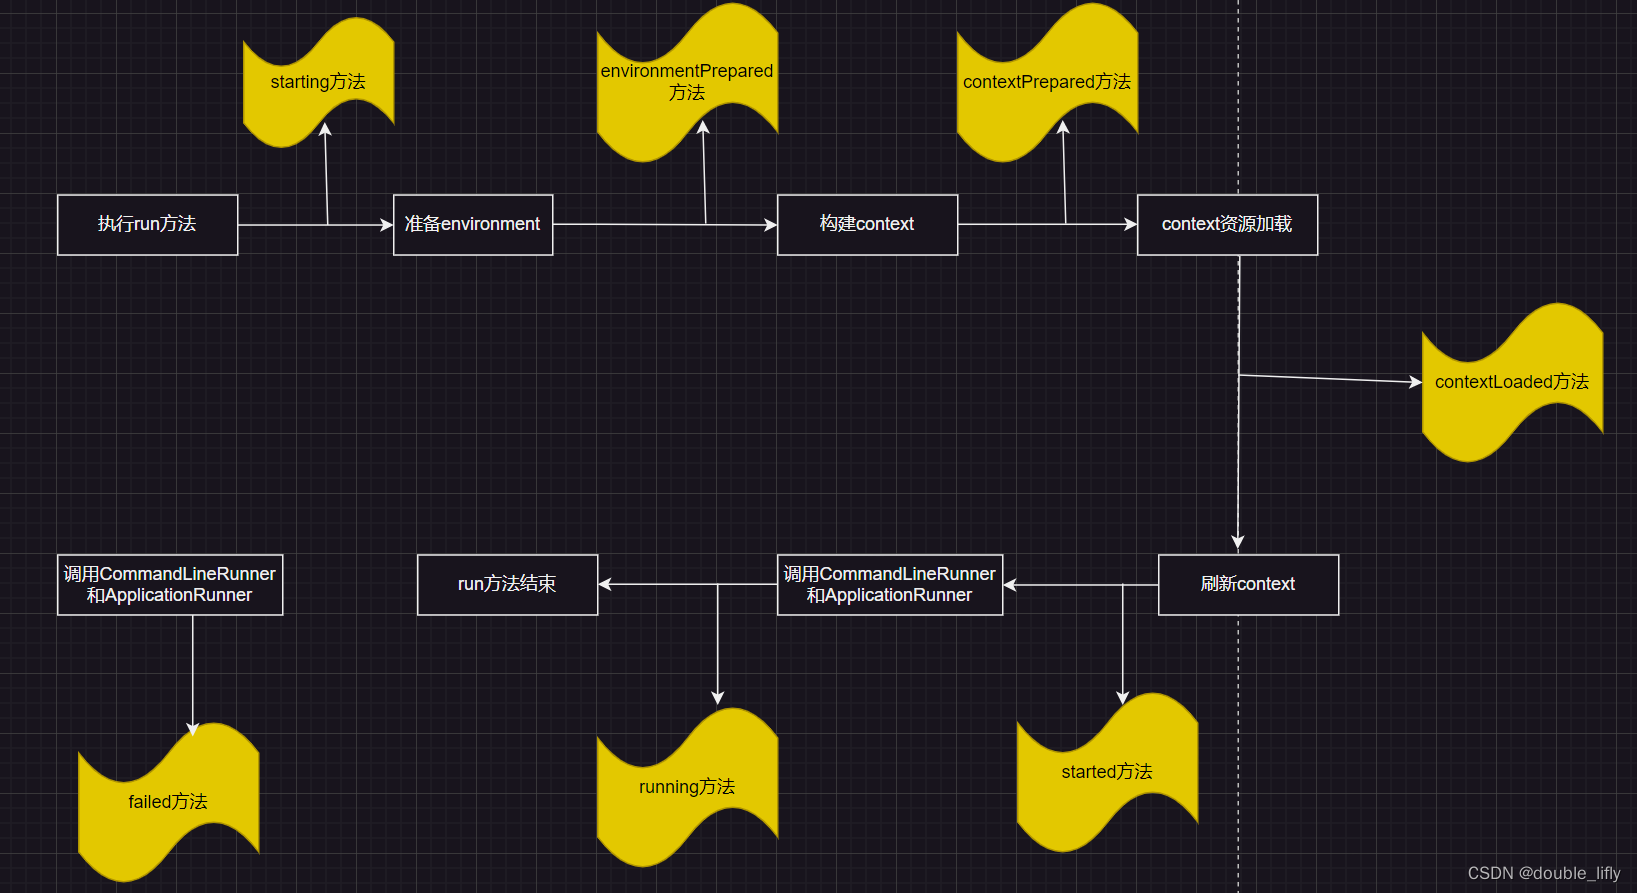
通过以上源码可以看出,SpringApplicationRunListener为run方法提供了各个运行阶段的监听事件处理功能。下图展示了在整个run方法的生命周期中SpringApplicationRunListener的所有方法所处的位置,此图可以帮助我们更好的学习run方法的运行流程。在前面run方法的代码中已经看到相关监听方法被调用。后续的源代码中也将涉及对应方法的调用,我们可以参考此图加深记忆。
实现类EventPublishingRunListener
EventPublishingRunListener是SpringBoot中针对SpringApplicationRunListener接口的唯一内建实现。EventPublishingRunListener使用内置的SimpleApplicationEventMulticaster来广播在上下文刷新之前触发的时间。
默认情况下,SpringBoot在初始化过程中触发的事件也是交由EventPublishingRunListener来代理实现的。EventPublishingRunListener的构造方法如下:
public EventPublishingRunListener(SpringApplication application, String[] args) {this.application = application;this.args = args;//创建SimpleApplicationEventMulticaster广播器this.initialMulticaster = new SimpleApplicationEventMulticaster();//遍历ApplicationListener并关联SimpleApplicationEventMulticasterfor (ApplicationListener<?> listener : application.getListeners()) {this.initialMulticaster.addApplicationListener(listener);}}
通过源码可以看出,该类的构造方法符合SpringApplicationRunListener所需的构造方法要求,该方法传递了SpringApplication和String[]类型。在构造方法中初始化了该类的3个成员变量。
- application:类型为SpringApplication,是当前运行的SpringApplication实例。
- args:启动程序时的命令参数。
- initialMulticaster:类型为SimpleApplicationEventMulticaster,事件广播器。
SpringBoot完成基本的初始化之后,会遍历SpringApplication的所有ApplicationListener实例,并将他们与SimpleApplicationEventMulticaster进行关联,方便SimpleApplicationEventMulticaster后续将事件传递给所有的监听器。
EventPublishingRunListener针对不同的事件提供了不同的处理方法,但它们的处理流程基本相同。
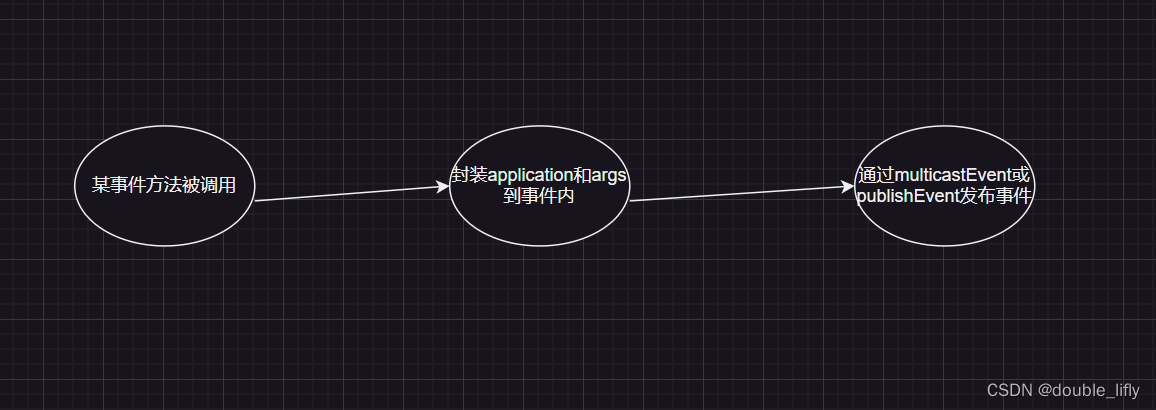
通过上图我们来梳理下整个事件的流程 - 程序启动到某个步骤后,调用EventPublishingRunListener的某个方法
- EventPublishingRunListener的具体方法将application参数和args参数封装到对应的事件中。这里的事件均为SpringApplicationEvent的实现类。
- 通过成员变量initialMulticaster的multicastEvent方法对事件进行广播,或通过该方法的ConfigurableApplicationContext参数的publishEvent方法来对事件进行发布。
- 对应的ApplicationListener被触发,执行相应的业务逻辑。
下面是strarting方法的源代码,可对照上述流程进行理解。该方法其他功能类似,代码不再做展示。
@Overridepublic void starting() {this.initialMulticaster.multicastEvent(new ApplicationStartingEvent(this.application, this.args));}
在上述代码中你是否发现了一个问题,某些方法是通过initialMulticaster的multicastEvent进行事件的广播,某些方法是通过context参数的publishEvent方法进行发布的。这是为什么呢?在解决这个疑问之前,我们先看一个比较特殊的方法contextLoaded的源代码。
@Overridepublic void contextLoaded(ConfigurableApplicationContext context) {//遍历application中的所有监听器实现类for (ApplicationListener<?> listener : this.application.getListeners()) {//如果为ApplicationContextAware,则将上下文信息设置到该监听器内if (listener instanceof ApplicationContextAware) {((ApplicationContextAware) listener).setApplicationContext(context);}//将application中的监听器实现类全部添加到上下文中。context.addApplicationListener(listener);}//广播事件applicationPreparedEventthis.initialMulticaster.multicastEvent(new ApplicationPreparedEvent(this.application, this.args, context));}
contextLoaded方法在发布事件之前做了两件事:第一,遍历application的所有监听器实现类,如果该实现类还实现了ApplicationContextAware接口,则将上下文信息设置到该监听器内;第二,将application中的监听器实现类全部添加到上下文中。最后一步才是调用事件广播。
也正是这个方法形成了不同事件广播形式的分水岭,再此方法之前执行的事件广播都是通过muliticasEvent来进行的,而该方法之后的方法则均采用publishEvent来执行。这是因为只有到了contextLoaded方法之后,上下文才算初始化完成,才可通过它的publishEvent方法来进行时间的发布。
初始化ApplicationArguments
监听器启动后,紧接着便是执行ApplicationArgumnetsd对象的初始化,ApplicationArguments是用于提供访问运行SpringApplication时的参数。
ApplicationArguments的初始化过程非常简单,只是调用了它的实现类DefaultApplicationArguments并传入main方法中的args参数。
ApplicationArguments applicationArguments = new DefaultApplicationArguments(args);
在DefaultApplicationArguments中将参数args封装为Source对象,Source对象是基于Spring框架的SimpleCommandLinePropertySource来实现的。
初始化ConfigurableEnvironment
完成ApplicationArguments参数的准备之后,便开始通过prepareEnvironment方法对ConfigurableEnvironment对象进行初始化操作。
ConfigurableEnvironment接口继承自Environment接口和ConfigurablePropertyResolver,最终都继承自接口PropertyResolver。ConfigurableEnvironment接口的主要作用是提供当前运行环境的公开接口,比如配置文件profiles各类系统属性和变量的设置,添加,读取,合并等。
通过ConfigurableEnvironment接口中方法定义,可以更清楚地了解它的功能,代码如下:
public interface ConfigurableEnvironment extends Environment, ConfigurablePropertyResolver {//设置激活的组集合void setActiveProfiles(String... var1);//向当前激活的集合中添加一个profile组void addActiveProfile(String var1);//设置默认激活的组集合。激活的组集合为空时会使用默认的组集合void setDefaultProfiles(String... var1);//设置当前环境对象中的属性源集合,也就是应用环境//属性源集合其实就是一个容纳PropertySource的容器//该方法提供了直接配置属性源的入口。MutablePropertySources getPropertySources();//获取虚拟机环境变量,该方法提供了直接配置虚拟机环境变量的入口Map<String, Object> getSystemProperties();//获取操作系统环境变量//该方法提供了直接配置系统环境变量的入口Map<String, Object> getSystemEnvironment();//合并制定环境中的配置到当前环境中void merge(ConfigurableEnvironment var1);
}
通过接口提供的接口,我们可以看出ConfigurableEnvironment就是围绕这个“环境”来提供相应的功能,这也是为什么我们也将它称作“环境”。
了解了ConfigurableEnvironment的功能及方法,我们回归到SpringApplication的流程中看相关代码。run方法中调用了prepareEnvironment方法相关代码如下:
public ConfigurableApplicationContext run(String... args) {......ConfigurableEnvironment environment = prepareEnvironment(listeners, applicationArguments);......}
prepareEnvironment方法的源代码实现如下:
private ConfigurableEnvironment prepareEnvironment(SpringApplicationRunListeners listeners,ApplicationArguments applicationArguments) {// Create and configure the environment//获取或创建环境ConfigurableEnvironment environment = getOrCreateEnvironment();//配置环境,主要包括PropertySources和activeProfilesconfigureEnvironment(environment, applicationArguments.getSourceArgs());//将ConfigurationPropertySources附加到制定环境中的第一位,并动态跟踪环境的添加或删除ConfigurationPropertySources.attach(environment);//listener环境准备listeners.environmentPrepared(environment);//将环境绑定到SpringApplicationbindToSpringApplication(environment);//判断是否定制的环境,如果不是定制的则将环境转换为StandardEnvironmentif (!this.isCustomEnvironment) {environment = new EnvironmentConverter(getClassLoader()).convertEnvironmentIfNecessary(environment,deduceEnvironmentClass());}//将ConfigurationPropertySources附加到制定环境中的第一位,并动态跟踪环境的添加或删除ConfigurationPropertySources.attach(environment);return environment;}
通过上述代码及注解可知,prepareEnvironment进行了以下的操作:
- 获取或创建环境
- 配置环境
- ConfigurationPropertySources附加到制定环境;将ConfigurationPropertySouces附加到指定环境的第一位,并动态跟踪环境的添加或删除
- 设置listener监听事件
- 转换环境:判断是否是定制的环境,如果不是,则将环境转换为StandardEnvironment。此时判断条件isCustomEnvironment默认为false,在后面的操作会将其设置为true,如果为true则不再会进行此转换操作。
- ConfigurationPropertySources附加到制定环境:将ConfigurationPropertySources附加到指定环境中的第一位,并动态跟踪环境的添加或删除操作。
获取或创建环境
SpringApplication类中通过getOrCreateEnvironment方法来获取或创建环境。在该方法中首先判断环境是否为null,如果不为null则直接返回;如果为null,则根据当前推断出来的WebApplicationType类型来创建指定的环境,代码如下:
private ConfigurableEnvironment getOrCreateEnvironment() {if (this.environment != null) {return this.environment;}//根据不同的应用类型,,创建不同的环境实现switch (this.webApplicationType) {case SERVLET:return new StandardServletEnvironment();case REACTIVE:return new StandardReactiveWebEnvironment();default:return new StandardEnvironment();}}
正如方法中如果environment存在,则直接返回;如果environment不存在,则根据当前步骤中推断获得的WebApplicationType来进行区分创建环境。如果是Servlet项目则创建标准的Servlet环境StandardServletEnvironment;如果是Reactive项目则创建StandardReactiveEnvironment;其他情况则创建标准的非Web的StandardEnvironment。
配置环境
在获得环境变量之后,开始对环境变量和参数进行相应的设置,主要包括转换服务器的设置,PropertySorces的设置和activeProfiles的设置。SpringApplication类中相关configurationEnvironment方法代码如下:
protected void configureEnvironment(ConfigurableEnvironment environment, String[] args) {//如果为true获取并设置转换服务if (this.addConversionService) {ConversionService conversionService = ApplicationConversionService.getSharedInstance();environment.setConversionService((ConfigurableConversionService) conversionService);}//配置propertySourcesconfigurePropertySources(environment, args);//配置profilesconfigureProfiles(environment, args);}
在上述代码中,首先判断addConversionService变量是否为true,也就是判断是否需要添加转换服务,如果需要,则获取转换服务实例,并对环境设置转换服务。随后进行propertySources和profiles的配置。
其中configurationPropertySources方法对PropertySources进行配置,代码如下:
protected void configurePropertySources(ConfigurableEnvironment environment, String[] args) {//获得环境变量中的属性资源信息MutablePropertySources sources = environment.getPropertySources();//如果默认属性配置存在则将其放置于属性资源的最后位置if (this.defaultProperties != null && !this.defaultProperties.isEmpty()) {sources.addLast(new MapPropertySource("defaultProperties", this.defaultProperties));}//如果命令行属性存在if (this.addCommandLineProperties && args.length > 0) {String name = CommandLinePropertySource.COMMAND_LINE_PROPERTY_SOURCE_NAME;//如果默认属性资源中不包含该命令,则将命令行属性放置在第一位,如果包含,则通过compositePropertySource进行处理if (sources.contains(name)) {PropertySource<?> source = sources.get(name);CompositePropertySource composite = new CompositePropertySource(name);composite.addPropertySource(new SimpleCommandLinePropertySource("springApplicationCommandLineArgs", args));composite.addPropertySource(source);sources.replace(name, composite);}else {//放置在第一位sources.addFirst(new SimpleCommandLinePropertySource(args));}}}
这段代码需要重点看一下参数的优先级处理和默认参数与命令参数之间的关系。首先,如果存在默认属性配置,则将默认属性配置放置在最后,也就是说优先级最低。然后,如果命令参数存在则会出现两种情况:如果命令的参数已经存在于属性配置中,则使用CompositePropertySource类进行相同name的参数处理;如果命令的参数并不存在于属性配置中,则直接将其设置为优先级最高。
ComfigurePropertySources方法的官方注释也很好地解释了它的功能:增加,移除或重新排序应用环境中的任何PropertySources。
完成了PropertySources配置,随后通过configureProfiles方法来完成Profiles的配置,代码如下:
protected void configureProfiles(ConfigurableEnvironment environment, String[] args) {Set<String> profiles = new LinkedHashSet<>(this.additionalProfiles);profiles.addAll(Arrays.asList(environment.getActiveProfiles()));environment.setActiveProfiles(StringUtils.toStringArray(profiles));}
上面的代码主要用来处理应用环境中那些配置文件处于激活状态或默认激活状态。对应的配置正是我们经常使用的用来区分不同环境的spring.profiles.active参数的指定的值。
忽略信息配置
经过上述步骤,ConfigurableEnvironment的初始化和准备工作已经完成。之后程序又对环境中的忽略信息配置“spring.beaninfo.ignore”的值进行获取判断,进而配置为系统参数中的忽略项。
private void configureIgnoreBeanInfo(ConfigurableEnvironment environment) {//如果系统参数中spring.beaninfo.ignore为nullif (System.getProperty(CachedIntrospectionResults.IGNORE_BEANINFO_PROPERTY_NAME) == null) {//获取环境中spring.beaninfo.ignore的配置Boolean ignore = environment.getProperty("spring.beaninfo.ignore", Boolean.class, Boolean.TRUE);//设置对应的系统参数System.setProperty(CachedIntrospectionResults.IGNORE_BEANINFO_PROPERTY_NAME, ignore.toString());}}
spring.beaninfo.ignore的配置用来决定是否效果BeanInfo类的扫描,如果设置为true则跳过。
打印Banner
完成了环境的基本处理后,接下来就是Banner的打印了。SpringBoot的Banner打印是一个比较炫酷的功能,但又显得有些华而不实,特别是打印图片是启动速度回变慢,以下简单了解一下它的底层代码实现。
private Banner printBanner(ConfigurableEnvironment environment) {//如果处于关闭状态,则返回nullif (this.bannerMode == Banner.Mode.OFF) {return null;}//如果resourceLoader不存在则创建一个默认的ResourceLoaderResourceLoader resourceLoader = (this.resourceLoader != null) ? this.resourceLoader: new DefaultResourceLoader(getClassLoader());//创建springApplicationBannerPrinterSpringApplicationBannerPrinter bannerPrinter = new SpringApplicationBannerPrinter(resourceLoader, this.banner);//打印到日志里if (this.bannerMode == Mode.LOG) {return bannerPrinter.print(environment, this.mainApplicationClass, logger);}//打印到控制台return bannerPrinter.print(environment, this.mainApplicationClass, System.out);}
上面的代码中展示了Banner的开启及打印位置的设置。程序通过Banner.Mode枚举值来判断是否开启Banner打印,此项参数可以在SpringBoot入口main方法通过setBannerMode方法来设置,也可以通过application.properties中的spring.main-mode进行设置。
SpringApplicationBannerPrinter类继承了Banner初始化及打印的核心功能,比如默认如何获取Banner信息,如何根据约定优于配置来默认获得Banner的内容,Banner支持的文件格式等。
而具体打印的信息是由Banner接口的实现类来完成的,比如默认情况下使用SpringBootBanner来打印SpringBoot的版本信息及简单的图形。当然还有通过资源文件打印的ResourceBanner,通过图片打印的ImageBanner等方法。
Spring应用上下文的创建
在上面的章节中已多次涉及WebApplicationType枚举类,无论是推断Web应用类型,还是创建不同的配置环境都与枚举类有关。SpringBoot创建spring的应用上下文时,如果未指定要创建的类,则会根据之前推断的类型来进行默认上下文类的创建。在SpringBoot中通过SpringApplication类中的createApplicationContext来进行应用上下文的创建,代码如下:
public static final String DEFAULT_CONTEXT_CLASS = "org.springframework.context."+ "annotation.AnnotationConfigApplicationContext";public static final String DEFAULT_SERVLET_WEB_CONTEXT_CLASS = "org.springframework.boot."+ "web.servlet.context.AnnotationConfigServletWebServerApplicationContext";public static final String DEFAULT_REACTIVE_WEB_CONTEXT_CLASS = "org.springframework."+ "boot.web.reactive.context.AnnotationConfigReactiveWebServerApplicationContext";protected ConfigurableApplicationContext createApplicationContext() {// 获取容器的类变量Class<?> contextClass = this.applicationContextClass;// 如果为null,则根据web应用类型按照默认类进行创建if (contextClass == null) {try {switch (this.webApplicationType) {case SERVLET:contextClass = Class.forName(DEFAULT_SERVLET_WEB_CONTEXT_CLASS);break;case REACTIVE:contextClass = Class.forName(DEFAULT_REACTIVE_WEB_CONTEXT_CLASS);break;default:contextClass = Class.forName(DEFAULT_CONTEXT_CLASS);}}catch (ClassNotFoundException ex) {throw new IllegalStateException("Unable create a default ApplicationContext, please specify an ApplicationContextClass", ex);}}// 如果存在对应的class配置,则通过spring提供的BeanUtils来进行实例化return (ConfigurableApplicationContext) BeanUtils.instantiateClass(contextClass);}
Spring应用上下文的准备
SpringApplication通过prepareContext方法来进行应用上下文的准备工作。下面来了解下prepareContext的核心功能及流程。
配合流程图,看下SpringApplication中的prepareContext方法及源码及功能注解。
private void prepareContext(ConfigurableApplicationContext context, ConfigurableEnvironment environment,SpringApplicationRunListeners listeners, ApplicationArguments applicationArguments, Banner printedBanner) {//设置上下文的配置环境context.setEnvironment(environment);//应用上下文后置处理postProcessApplicationContext(context);//在context刷新之前,ApplicationContextInitializer初始化contextapplyInitializers(context);//通知监听器context准备工作完成,该方法以上为上下文准备阶段,以下为上下文加载阶段listeners.contextPrepared(context);//打印日志,启动profileif (this.logStartupInfo) {logStartupInfo(context.getParent() == null);logStartupProfileInfo(context);}// Add boot specific singleton beans// 获得ConfigurableListableBeanFactory并注册单例对象ConfigurableListableBeanFactory beanFactory = context.getBeanFactory();beanFactory.registerSingleton("springApplicationArguments", applicationArguments);if (printedBanner != null) {//注册打印日志对象beanFactory.registerSingleton("springBootBanner", printedBanner);}if (beanFactory instanceof DefaultListableBeanFactory) {//设置是否允许覆盖注册((DefaultListableBeanFactory) beanFactory).setAllowBeanDefinitionOverriding(this.allowBeanDefinitionOverriding);}if (this.lazyInitialization) {//将惰性初始化添加到context中context.addBeanFactoryPostProcessor(new LazyInitializationBeanFactoryPostProcessor());}// Load the sources//获取全部资源配置,其中包括primarySource和sourcesSet<Object> sources = getAllSources();Assert.notEmpty(sources, "Sources must not be empty");//将sources中的Bean加载到context中load(context, sources.toArray(new Object[0]));//通知监听器context加载完成listeners.contextLoaded(context);}
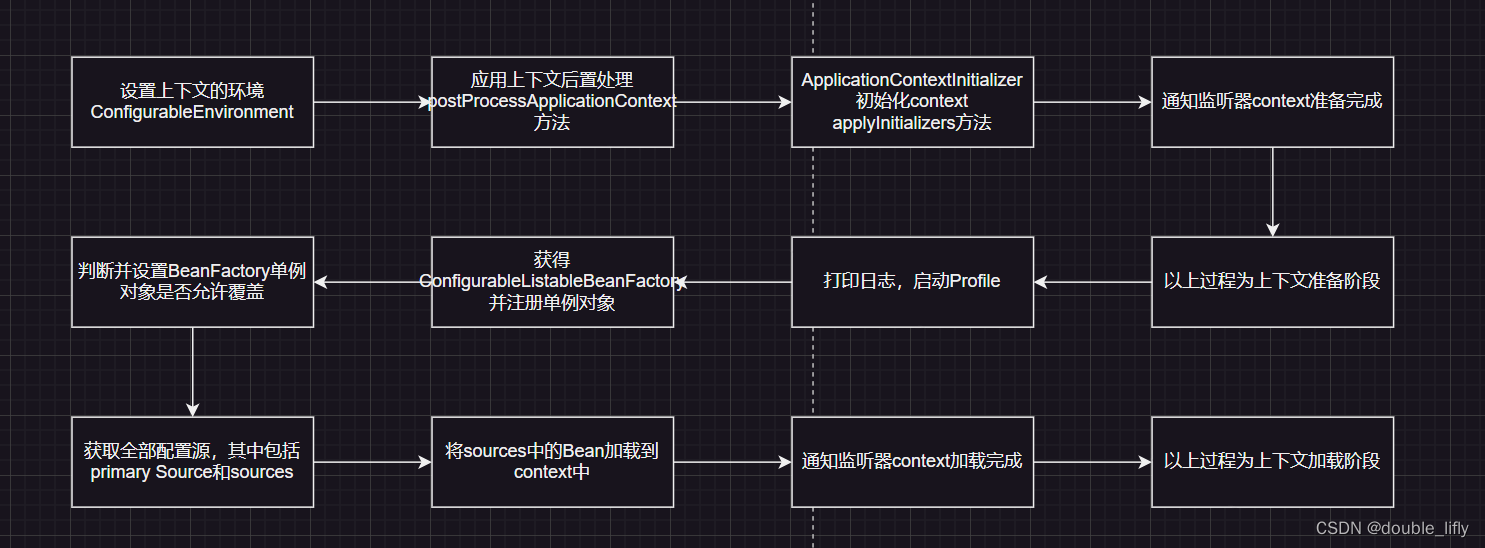
通过上述流程图和代码可以看出,在该方法内完成了两步操作:应用上下文的准备和加载。下面针对具体的源代码进行分析。
应用上下文准备阶段
在上下文准备阶段,主要完成了三步操作:对context设置environment,应用上下文后置处理和ApplicationContextInitializer初始化context操作。
首先对context设置environment,代码如下:
public void setEnvironment(ConfigurableEnvironment environment) {//设置context的environmentsuper.setEnvironment(environment);//设置context的reader属性的conditionEvaluator属性this.reader.setEnvironment(environment);//设置context的scanner属性的environment属性this.scanner.setEnvironment(environment);}
随后就是对spring应用上下文的后置处理,主要通过postProcessApplicationContext方法来完成的。
protected void postProcessApplicationContext(ConfigurableApplicationContext context) {if (this.beanNameGenerator != null) {//如果beanNameGenerator为null,则将当前的beanNameGenerator按照默认名字进行注册context.getBeanFactory().registerSingleton(AnnotationConfigUtils.CONFIGURATION_BEAN_NAME_GENERATOR,this.beanNameGenerator);}//当resourceLoader为null时,则根据context的类型分别进行ResourceLoader和ClassLoader的设置if (this.resourceLoader != null) {if (context instanceof GenericApplicationContext) {((GenericApplicationContext) context).setResourceLoader(this.resourceLoader);}if (context instanceof DefaultResourceLoader) {((DefaultResourceLoader) context).setClassLoader(this.resourceLoader.getClassLoader());}}//如果true则获得并设置转换服务if (this.addConversionService) {context.getBeanFactory().setConversionService(ApplicationConversionService.getSharedInstance());}}
postProcessApplicationContext方法主要完成上下文的后置操作,默认包含beanNameGenerator,ResourceLoader,ClassLoader和ConversionService的设置。该方法可由子类覆盖实现,以添加更多的操作。而在此阶段,beanNameGenerator和resourceLoader都为null,因此只操作了最后一步的设置转换服务。
最后,在通知监听器context准备完成之前,通过applyInitializers方法对上下文进行初始化。所使用的ApplicationContextInitializer正是我们在SpringApplication初始化阶段设置在initializers变量中的值,只不过在通过getInitializers方法获取时进行了去重和排序。
protected void applyInitializers(ConfigurableApplicationContext context) {//获取ApplicationContextInitializer集合并遍历for (ApplicationContextInitializer initializer : getInitializers()) {//解析当前initializer实现的ApplicationContextInitializer的泛型参数Class<?> requiredType = GenericTypeResolver.resolveTypeArgument(initializer.getClass(),ApplicationContextInitializer.class);//断言判断所需类似是否与context类型匹配Assert.isInstanceOf(requiredType, context, "Unable to call initializer.");//初始化contextinitializer.initialize(context);}}
完成上述操作之后,程序便调用SpringApplicationRunListeners的contextPrepared方法通知监听器,到此第一阶段的准备操作完成。
应用上下文加载阶段
应用上下文加载阶段包含以下步骤:打印日志和profile的设置,设置是否允许覆盖注册,获取全部配置源,将配置源加载入上下文,通知监控器context加载完成。
首先进入应用上下文加载阶段的操作为打印日志和profile的设置,上面已经介绍过啦,就不展开讲了。随后,便是获得ConfigurableListableBeanFactory并注册单例对象,注册的单例对象包含:ApplicationArguments和banner。当BeanFactory为DefaultListableBeanFactory时,进入设置是否允许覆盖注册的处理逻辑。
测出需要的是,当进行了ApplicationArguments类单例对象的注册之后,也意味着我们在此使用Spring应用上下文的过程中可以通过依赖注入来使用该对象。
@Resource
private ApplicationArguments applicationArguments
完成上述操作之后,便进入配置源信息的处理阶段,这一步通过getAllSources方法来对配置源信息进行合并操作。
public Set<Object> getAllSources() {Set<Object> allSources = new LinkedHashSet<>();if (!CollectionUtils.isEmpty(this.primarySources)) {allSources.addAll(this.primarySources);}if (!CollectionUtils.isEmpty(this.sources)) {allSources.addAll(this.sources);}return Collections.unmodifiableSet(allSources);}
上述代码大致为如果Set集合中不存在primarySources配置源或sources配置源,将其添加入Set中,同事将Set设置为不可修改,并返回。
上面讲过primarySources的值来自SpringApplication的构造参数,变量sources的值来自于setResources方法。
当获得所有的配置源信息后,通过load方法将配置源信息加载到上下文中,代码如下:
protected void load(ApplicationContext context, Object[] sources) {if (logger.isDebugEnabled()) {logger.debug("Loading source " + StringUtils.arrayToCommaDelimitedString(sources));}BeanDefinitionLoader loader = createBeanDefinitionLoader(getBeanDefinitionRegistry(context), sources);if (this.beanNameGenerator != null) {loader.setBeanNameGenerator(this.beanNameGenerator);}if (this.resourceLoader != null) {loader.setResourceLoader(this.resourceLoader);}if (this.environment != null) {loader.setEnvironment(this.environment);}loader.load();}
该方法主要通过BeanDefinitionLoader来完成配置资源的加载操作。进入createBeanDefinitionLoader方法中:
protected BeanDefinitionLoader createBeanDefinitionLoader(BeanDefinitionRegistry registry, Object[] sources) {return new BeanDefinitionLoader(registry, sources);}//BeanDefinitionLoader(BeanDefinitionRegistry registry, Object... sources) {Assert.notNull(registry, "Registry must not be null");Assert.notEmpty(sources, "Sources must not be empty");this.sources = sources;this.annotatedReader = new AnnotatedBeanDefinitionReader(registry);this.xmlReader = new XmlBeanDefinitionReader(registry);if (isGroovyPresent()) {this.groovyReader = new GroovyBeanDefinitionReader(registry);}this.scanner = new ClassPathBeanDefinitionScanner(registry);this.scanner.addExcludeFilter(new ClassExcludeFilter(sources));}
通过BeanDefinitionLoader的构造方法我们可以看到BeanDefinitionLoader支持基于AnnotatedBeanDefinitionReader,XmlBeanDefinitionReader,GroovyBeanDefinitionReader等多种类型的加载操作。
在执行BeanDefinitionLoader的创建及基本设置之后,调用其load方法,该方法最终执行以下代码:
private int load(Object source) {Assert.notNull(source, "Source must not be null");if (source instanceof Class<?>) {return load((Class<?>) source);}if (source instanceof Resource) {return load((Resource) source);}if (source instanceof Package) {return load((Package) source);}if (source instanceof CharSequence) {return load((CharSequence) source);}throw new IllegalArgumentException("Invalid source type " + source.getClass());}
从上述代码中可以看出,BeanDefinitionLoader加载支持的范围包括:Class,Resource,Package和CharSequence四种。前面已经提到过变量sources的来源有primarySources配置源和sources配置源。变量primarySources在初始化时接受的类型为Class,而变量sources通过set(Set<'String>)方法接收的参数为String集合。因此,在实际使用的过程中,Resource和package的判断分支始终无法进入执行阶段。
完成上述操作后,接下来执行SpringAllicationRunListeners的contextLoaded方法通知监听器上下文加载完成,至此整个Spring应用上下文的准备阶段完成。
Spring应用上下文的刷新
Spring应用上下文的刷新,是通过调用SpringApplication中的refreshContext方法来完成的。SpringApplication中refreshContext方法相关代码如下:
private void refreshContext(ConfigurableApplicationContext context) {//调用refresh方法refresh(context);if (this.registerShutdownHook) {try {//注册shutdownHook线程,实现销毁时的回调context.registerShutdownHook();}catch (AccessControlException ex) {//在某些环境中不允许使用,会报出次异常,但此处并无处理操作// Not allowed in some environments.}}}
protected void refresh(ApplicationContext applicationContext) {Assert.isInstanceOf(AbstractApplicationContext.class, applicationContext);((AbstractApplicationContext) applicationContext).refresh();}
其中refresh方法调用的是AbstractApplicationContext中的refresh方法,该方法属于spring-context包。AbstractApplicationContext的refresh方法更多的是spring相关的内容。在这里我们可以通过refresh方法的底层代码了解该方法都做了些什么。
public void refresh() throws BeansException, IllegalStateException {//同步处理整个过程synchronized(this.startupShutdownMonitor) {//准备刷新工作this.prepareRefresh();//通知子类刷新内部bean工厂ConfigurableListableBeanFactory beanFactory = this.obtainFreshBeanFactory();//为当前context准备内部bean工厂this.prepareBeanFactory(beanFactory);try {//允许context的子类对bean工厂进行后置处理this.postProcessBeanFactory(beanFactory);//调用context中注册为bean的工厂处理器this.invokeBeanFactoryPostProcessors(beanFactory);//注册bean处理器this.registerBeanPostProcessors(beanFactory);//初始化context的信息源,和国际化有关this.initMessageSource();//初始化context的事件传播器this.initApplicationEventMulticaster();//初始化其他子类特殊的beanthis.onRefresh();//检查并注册时间监听器this.registerListeners();//实例化所有非懒加载单例this.finishBeanFactoryInitialization(beanFactory);//发布对应事件this.finishRefresh();} catch (BeansException var9) {if (this.logger.isWarnEnabled()) {this.logger.warn("Exception encountered during context initialization - cancelling refresh attempt: " + var9);}this.destroyBeans();this.cancelRefresh(var9);throw var9;} finally {this.resetCommonCaches();}}}
在上面的代码中调用refresh方法初始化容器的生命周期处理器并发布容器的生命周期之后,spring应用上下文正式开启,Spring Boot核心特性也随之启动。
完成refreshContext方法操作之后,调用afterRefresh方法。完成以上操作之后,调用SpringApplicationRunListeners的started方法,通知监听器容器启动完成,并调用ApplicationRunner的CommandLineRunner的运行方法。
调用ApplicationRunner和CommandLineRunner
ApplicationRunner和CommandLineRunner是通过SpringApplication类的callRunners方法来完成的,具体代码如下:
private void callRunners(ApplicationContext context, ApplicationArguments args) {List<Object> runners = new ArrayList<>();runners.addAll(context.getBeansOfType(ApplicationRunner.class).values());runners.addAll(context.getBeansOfType(CommandLineRunner.class).values());AnnotationAwareOrderComparator.sort(runners);for (Object runner : new LinkedHashSet<>(runners)) {if (runner instanceof ApplicationRunner) {callRunner((ApplicationRunner) runner, args);}if (runner instanceof CommandLineRunner) {callRunner((CommandLineRunner) runner, args);}}}private void callRunner(CommandLineRunner runner, ApplicationArguments args) {try {(runner).run(args.getSourceArgs());}catch (Exception ex) {throw new IllegalStateException("Failed to execute CommandLineRunner", ex);}}
以上代码,首先从context中获得类型为ApplicationRunner和CommandLineRunner的Bean,将他们放入list列表中并进行排序。然后再遍历调用其run方法,并将ApplicationArguments参数传入。
Spring Boot提供这两个接口的目的,是为了我们在开发的过程中,通过他们来实现在容器启动时执行一些操作,如果有多个实现类,可通过@Order注解或实现Ordered接口来控制执行顺序。
这两个接口都提供了run方法,但不同之处在于:ApplicationRunner中run方法的参数为ApplicationArguments,而CommandLineRunner接口中run方法的参数为String数组。
以上方法执行完成之后,会通过SpringApplicationRunListeners的running方法通知监听器:容器此刻处于运行状态。至此,SpringApplication的run方法执行完毕。