手势识别系列文章目录
手势识别是一种人机交互技术,通过识别人的手势动作,从而实现对计算机、智能手机、智能电视等设备的操作和控制。
1. opencv实现手部追踪(定位手部关键点)
2.opencv实战项目 实现手势跟踪并返回位置信息(封装调用)
3.手势识别-手势音量控制(opencv)
4.opencv实战项目 手势识别-手势控制鼠标
5.opencv实战项目 手势识别-手部距离测量
未完待续
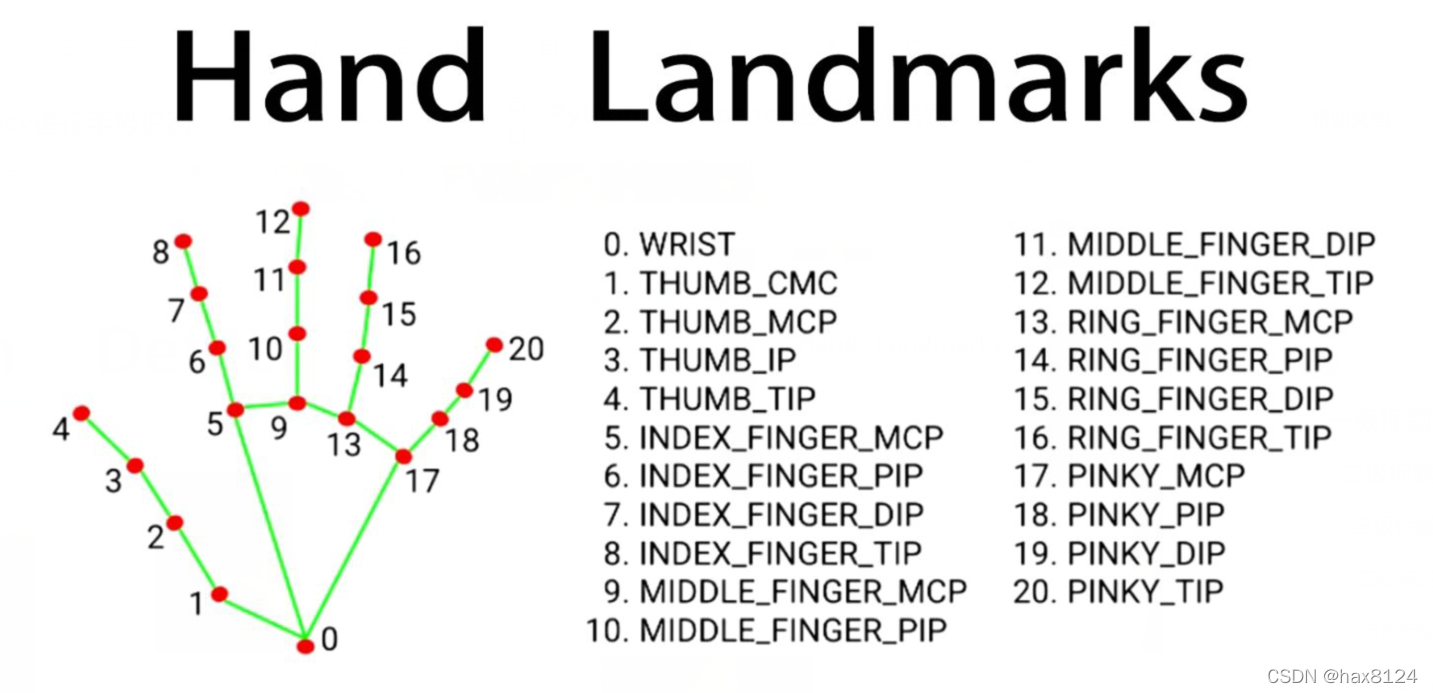
本项目是使用了谷歌开源的框架mediapipe,里面有非常多的模型提供给我们使用,例如面部检测,身体检测,手部检测等
代码需要用到opencv HandTraqckModule模块 mediapipe模块
一、HandTraqckModule模块
这次我们给HandTraqckModule模块继续增加新的内容 已经会的可以直接跳过,复制粘贴调用即可。
import cv2
import mediapipe as mp
import math
定义 HandDetector 类:
class HandDetector:def __init__(self, mode=False, maxHands=2, detectionCon=0.5, minTrackCon=0.5):# 初始化参数self.mode = modeself.maxHands = maxHandsself.detectionCon = detectionConself.minTrackCon = minTrackCon# 初始化 Mediapipe 的手部检测模块和绘制工具self.mpHands = mp.solutions.handsself.hands = self.mpHands.Hands(static_image_mode=self.mode, max_num_hands=self.maxHands,min_detection_confidence=self.detectionCon, min_tracking_confidence=self.minTrackCon)self.mpDraw = mp.solutions.drawing_utilsself.tipIds = [4, 8, 12, 16, 20]self.fingers = []self.lmList = []
定义 findHands 方法,用于在图像中检测手部:
def findHands(self, img, draw=True, flipType=True):# 将图像从 BGR 转换为 RGB 格式imgRGB = cv2.cvtColor(img, cv2.COLOR_BGR2RGB)# 使用 Mediapipe 进行手部检测self.results = self.hands.process(imgRGB)allHands = []h, w, c = img.shapeif self.results.multi_hand_landmarks:for handType, handLms in zip(self.results.multi_handedness, self.results.multi_hand_landmarks):myHand = {}# 提取关键点的像素坐标并存储在 mylmList 中mylmList = []xList = []yList = []for id, lm in enumerate(handLms.landmark):px, py = int(lm.x * w), int(lm.y * h)mylmList.append([px, py])xList.append(px)yList.append(py)# 计算边界框信息xmin, xmax = min(xList), max(xList)ymin, ymax = min(yList), max(yList)boxW, boxH = xmax - xmin, ymax - yminbbox = xmin, ymin, boxW, boxHcx, cy = bbox[0] + (bbox[2] // 2), bbox[1] + (bbox[3] // 2)myHand["lmList"] = mylmListmyHand["bbox"] = bboxmyHand["center"] = (cx, cy)if flipType:if handType.classification[0].label == "Right":myHand["type"] = "Left"else:myHand["type"] = "Right"else:myHand["type"] = handType.classification[0].labelallHands.append(myHand)# 在图像上绘制手部信息if draw:self.mpDraw.draw_landmarks(img, handLms, self.mpHands.HAND_CONNECTIONS)cv2.rectangle(img, (bbox[0] - 20, bbox[1] - 20),(bbox[0] + bbox[2] + 20, bbox[1] + bbox[3] + 20),(255, 0, 255), 2)cv2.putText(img, myHand["type"], (bbox[0] - 30, bbox[1] - 30), cv2.FONT_HERSHEY_PLAIN,2, (255, 0, 255), 2)if draw:return allHands, img # 返回检测到的手部信息和绘制后的图像else:return allHands # 只返回检测到的手部信息,不进行绘制
定义 fingersUp 方法,用于检测有多少个手指张开:
def fingersUp(self, myHand):# 获取手部信息myHandType = myHand["type"]myLmList = myHand["lmList"]if self.results.multi_hand_landmarks:fingers = []# 检测拇指if myHandType == "Right":if myLmList[self.tipIds[0]][0] > myLmList[self.tipIds[0] - 1][0]:fingers.append(1)else:fingers.append(0)else:if myLmList[self.tipIds[0]][0] < myLmList[self.tipIds[0] - 1][0]:fingers.append(1)else:fingers.append(0)# 检测其他手指for id in range(1, 5):if myLmList[self.tipIds[id]][1] < myLmList[self.tipIds[id] - 2][1]:fingers.append(1)else:fingers.append(0)return fingers
最后,main 函数使用 HandDetector 类来检测手部,并在图像中绘制检测结果:
def main():cap = cv2.VideoCapture(0)detector = HandDetector(detectionCon=0.8, maxHands=2)while True:# 获取图像帧success, img = cap.read()# 检测手部并获取手部信息和绘制后的图像hands, img = detector.findHands(img)if hands:# 处理检测到的手部信息,如关键点、边界框、手型等# ...# 显示图像cv2.imshow("Image", img)cv2.waitKey(1)if __name__ == "__main__":main()
在这个循环中,程序从摄像头捕获图像帧,然后使用 HandDetector 类来检测手部并绘制检测结果。你可以根据需要添加代码以获取手部信息并进行处理。
全部代码
"""
Hand Tracking Module
By: Computer Vision Zone
Website: https://www.computervision.zone/
"""import cv2
import mediapipe as mp
import mathclass HandDetector:"""Finds Hands using the mediapipe library. Exports the landmarksin pixel format. Adds extra functionalities like finding howmany fingers are up or the distance between two fingers. Alsoprovides bounding box info of the hand found."""def __init__(self, mode=False, maxHands=2, detectionCon=0.5, minTrackCon=0.5):""":param mode: In static mode, detection is done on each image: slower:param maxHands: Maximum number of hands to detect:param detectionCon: Minimum Detection Confidence Threshold:param minTrackCon: Minimum Tracking Confidence Threshold"""self.mode = modeself.maxHands = maxHandsself.detectionCon = detectionConself.minTrackCon = minTrackConself.mpHands = mp.solutions.handsself.hands = self.mpHands.Hands(static_image_mode=self.mode, max_num_hands=self.maxHands,min_detection_confidence=self.detectionCon, min_tracking_confidence = self.minTrackCon)self.mpDraw = mp.solutions.drawing_utilsself.tipIds = [4, 8, 12, 16, 20]self.fingers = []self.lmList = []def findHands(self, img, draw=True, flipType=True):"""Finds hands in a BGR image.:param img: Image to find the hands in.:param draw: Flag to draw the output on the image.:return: Image with or without drawings"""imgRGB = cv2.cvtColor(img, cv2.COLOR_BGR2RGB)self.results = self.hands.process(imgRGB)allHands = []h, w, c = img.shapeif  self.results.multi_hand_landmarks:for handType,handLms in zip(self.results.multi_handedness,self.results.multi_hand_landmarks):myHand={}## lmListmylmList = []xList = []yList = []for id, lm in enumerate(handLms.landmark):px, py = int(lm.x * w), int(lm.y * h)mylmList.append([px, py])xList.append(px)yList.append(py)## bboxxmin, xmax = min(xList), max(xList)ymin, ymax = min(yList), max(yList)boxW, boxH = xmax - xmin, ymax - yminbbox = xmin, ymin, boxW, boxHcx, cy = bbox[0] + (bbox[2] // 2), \bbox[1] + (bbox[3] // 2)myHand["lmList"] = mylmListmyHand["bbox"] = bboxmyHand["center"] =  (cx, cy)if flipType:if handType.classification[0].label =="Right":myHand["type"] = "Left"else:myHand["type"] = "Right"else:myHand["type"] = handType.classification[0].labelallHands.append(myHand)## drawif draw:self.mpDraw.draw_landmarks(img, handLms,self.mpHands.HAND_CONNECTIONS)cv2.rectangle(img, (bbox[0] - 20, bbox[1] - 20),(bbox[0] + bbox[2] + 20, bbox[1] + bbox[3] + 20),(255, 0, 255), 2)cv2.putText(img,myHand["type"],(bbox[0] - 30, bbox[1] - 30),cv2.FONT_HERSHEY_PLAIN,2,(255, 0, 255),2)if draw:return allHands,imgelse:return allHandsdef fingersUp(self,myHand):"""Finds how many fingers are open and returns in a list.Considers left and right hands separately:return: List of which fingers are up"""myHandType =myHand["type"]myLmList = myHand["lmList"]if self.results.multi_hand_landmarks:fingers = []# Thumbif myHandType == "Right":if myLmList[self.tipIds[0]][0] > myLmList[self.tipIds[0] - 1][0]:fingers.append(1)else:fingers.append(0)else:if myLmList[self.tipIds[0]][0] < myLmList[self.tipIds[0] - 1][0]:fingers.append(1)else:fingers.append(0)# 4 Fingersfor id in range(1, 5):if myLmList[self.tipIds[id]][1] < myLmList[self.tipIds[id] - 2][1]:fingers.append(1)else:fingers.append(0)return fingersdef main():cap = cv2.VideoCapture(0)detector = HandDetector(detectionCon=0.8, maxHands=2)while True:# Get image framesuccess, img = cap.read()# Find the hand and its landmarkshands, img = detector.findHands(img)  # with draw# hands = detector.findHands(img, draw=False)  # without drawif hands:# Hand 1hand1 = hands[0]lmList1 = hand1["lmList"]  # List of 21 Landmark pointsbbox1 = hand1["bbox"]  # Bounding box info x,y,w,hcenterPoint1 = hand1['center']  # center of the hand cx,cyhandType1 = hand1["type"]  # Handtype Left or Rightfingers1 = detector.fingersUp(hand1)if len(hands) == 2:# Hand 2hand2 = hands[1]lmList2 = hand2["lmList"]  # List of 21 Landmark pointsbbox2 = hand2["bbox"]  # Bounding box info x,y,w,hcenterPoint2 = hand2['center']  # center of the hand cx,cyhandType2 = hand2["type"]  # Hand Type "Left" or "Right"fingers2 = detector.fingersUp(hand2)# Find Distance between two Landmarks. Could be same hand or different handslength, info, img = detector.findDistance(lmList1[8], lmList2[8], img)  # with draw# length, info = detector.findDistance(lmList1[8], lmList2[8])  # with draw# Displaycv2.imshow("Image", img)cv2.waitKey(1)if __name__ == "__main__":main()
----------------------------------------分割线-----------------------------
本次的手部检测模块,我们优化了位置检测融合到了手部检测中
二、主模块
思路是:计算5和17这两个关键点的位置信息,然后算得到两点的欧几里得距离,这个距离随着手移动在图中所示出来像素距离随之变化,我们按顺序测算部分位置变化信息,以此设计一个函数来匹配这个位置变化关系。 (当然不同人的手掌会有不同,这个只是一个大致距离,误差在3%左右)
接下来是主模块代码
导入必要的库和模块:
import cv2
from HandTrackingModule import HandDetector
import math
import numpy as np
import cvzone
设置摄像头参数和手部检测器:
cap = cv2.VideoCapture(0)
cap.set(3, 1280)  # 设置摄像头宽度
cap.set(4, 720)   # 设置摄像头高度
detector = HandDetector(detectionCon=0.8, maxHands=1)  # 创建 HandDetector 实例
定义用于将手部距离映射到厘米值的函数:
# Find Function
x = [300, 245, 200, 170, 145, 130, 112, 103, 93, 87, 80, 75, 70, 67, 62, 59, 57]
y = [20, 25, 30, 35, 40, 45, 50, 55, 60, 65, 70, 75, 80, 85, 90, 95, 100]
coff = np.polyfit(x, y, 2)  # 使用二次多项式拟合数据,得到系数 A, B, C
进入主循环,处理实时摄像头图像:
while True:success, img = cap.read()hands = detector.findHands(img, draw=False) # 在图像中检测手部,不进行绘制if hands:# 获取手部信息lmList = hands[0]['lmList'] # 关键点列表x, y, w, h = hands[0]['bbox'] # 边界框坐标和尺寸x1, y1 = lmList[5] # 大拇指第一个关键点的坐标x2, y2 = lmList[17] # 小指最后一个关键点的坐标# 计算两点之间的欧几里得距离distance = int(math.sqrt((y2 - y1) ** 2 + (x2 - x1) ** 2))# 将距离映射到厘米值A, B, C = coffdistanceCM = A * distance ** 2 + B * distance + C# 在图像中绘制边界框和距离信息cv2.rectangle(img, (x, y), (x + w, y + h), (255, 0, 255), 3)cvzone.putTextRect(img, f'{int(distanceCM)} cm', (x+5, y-10))cv2.imshow("Image", img)cv2.waitKey(1) # 按下任意按键退出循环
此代码块的主要目的是使用摄像头实时捕获图像,使用 HandDetector 类检测手部,计算两个关键点之间的距离,并将距离映射为厘米值,然后在图像中绘制边界框和距离信息。最后,通过 cv2.imshow 将绘制结果显示在窗口中,使用 cv2.waitKey 来等待并处理键盘输入,从而使程序可以持续运行。
全部代码
import cv2
from HandTrackingModule import HandDetector
import math
import numpy as np
import cvzone# Webcam
cap = cv2.VideoCapture(0)
cap.set(3, 1280)
cap.set(4, 720)# Hand Detector
detector = HandDetector(detectionCon=0.8, maxHands=1)# Find Function
# x is the raw distance y is the value in cm
x = [300, 245, 200, 170, 145, 130, 112, 103, 93, 87, 80, 75, 70, 67, 62, 59, 57]
y = [20, 25, 30, 35, 40, 45, 50, 55, 60, 65, 70, 75, 80, 85, 90, 95, 100]
coff = np.polyfit(x, y, 2)  # y = Ax^2 + Bx + C# Loop
while True:success, img = cap.read()hands = detector.findHands(img, draw=False)if hands:lmList = hands[0]['lmList']x, y, w, h = hands[0]['bbox']x1, y1 = lmList[5]x2, y2 = lmList[17]distance = int(math.sqrt((y2 - y1) ** 2 + (x2 - x1) ** 2))A, B, C = coffdistanceCM = A * distance ** 2 + B * distance + C# print(distanceCM, distance)cv2.rectangle(img, (x, y), (x + w, y + h), (255, 0, 255), 3)cvzone.putTextRect(img, f'{int(distanceCM)} cm', (x+5, y-10))cv2.imshow("Image", img)cv2.waitKey(1)
有遇到的问题欢迎评论区留言


![[HDLBits] Exams/2012 q1g](https://hdlbits.01xz.net/mw/thumb.php?f=Exams_2012q1g.png&width=195)