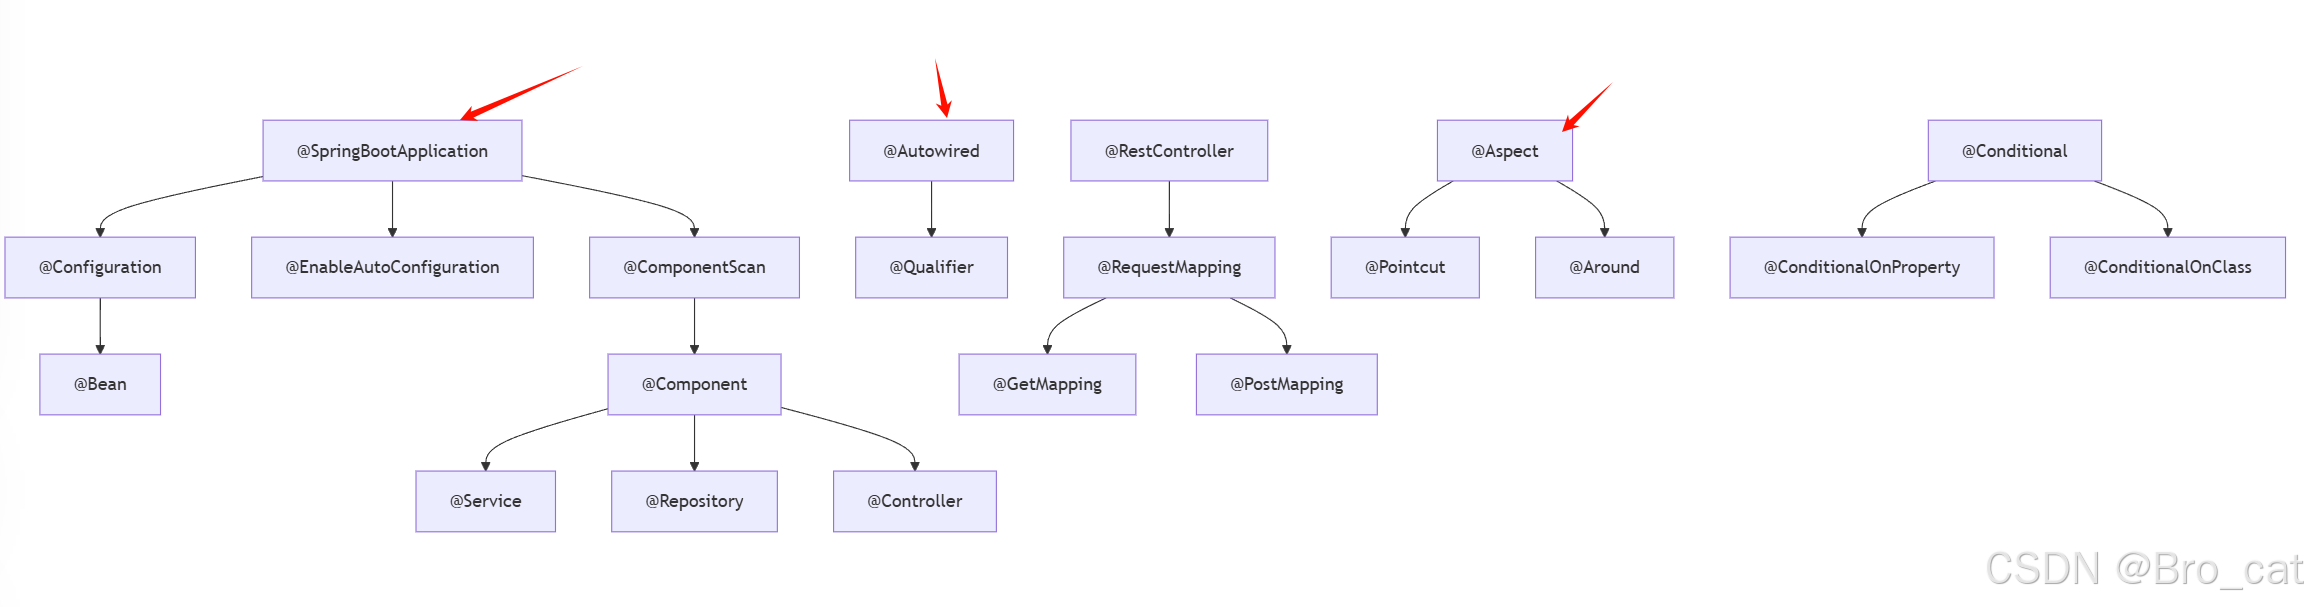
人脸检测之CenterFace

论文:CenterFace: Joint Face Detection and Alignment Using Face as Point

Github:https://github.com/Star-Clouds/CenterFace


论文基于centerNet进行改进,提出了anchor free形式的人脸检测框架,可以同时实现人脸检测+关键点检测。精度和速度都优于主流的MTCNN,Face Box等框架。


主要贡献:

  1. 提出了anchor free的人脸检测设计,将人脸检测问题转化为关键点估计问题。相比之前的检测算法,该方法的的模型输出的下采样率只为4。
  2. 基于多任务学习策略,同时学习人脸检测+关键点定位
  3. 网络结构采用了FPN结构
  4. 大量的实验表明,速度和精度都空前的好


级联检测器的缺点:

  1. 推理速度受图片中人脸数目的影响,当人脸数目增多的时候,推理速度也会大大降低。
  2. 每一个模型都单独训练,训练过程繁琐。非端到端的训练模式,整体精度有限。


网络结构:

网络整体结构采用MobileNetV2结构,MobileNetV2进行了5次下采样,在MobileNetV2的最后一层,增加了3个上采样层。最终输出的大小进行了2次下采样,输出维度为原图的1/4。


Loss函数:

人脸分类loss,

其中,α = 2 ,β = 4


人脸框中心点偏移loss,


人脸框宽,高的loss,

关键点的loss,


整体loss,


实验结果:

推理速度,

FDDB精度,

WIDER FACE 精度,


Onnx推理:

Onnx模型格式,可以方便的使用程序进行op的增删改查操作。包括节点的增加,去除,输入输出维度的修改等。同时,基于onnx runtime的推理可以获得比基于pytorch推理略快的速度。缺点就是整个graph已经固定,不支持动态输入大小。

首先使用change_onnx.py修改作者提供的onnx模型的输入维度,

import onnxmodel = onnx.load("../models/onnx/centerface.onnx")# The model is represented as a protobuf structure and it can be accessed
# using the standard python-for-protobuf methods# iterate through inputs of the graph
for input in model.graph.input:print (input.name, end=": ")# get type of input tensortensor_type = input.type.tensor_type# check if it has a shape:if (tensor_type.HasField("shape")):# iterate through dimensions of the shape:for num,d in enumerate(tensor_type.shape.dim):# the dimension may have a definite (integer) value or a symbolic identifier or neither:if (d.HasField("dim_value")):if num ==0:d.dim_value = 1if num ==2:d.dim_value = 480if num ==3:d.dim_value = 640print (d.dim_value, end=", ")  # known dimensionelif (d.HasField("dim_param")):print (d.dim_param, end=", ")  # unknown dimension with symbolic nameelse:print ("?", end=", ")  # unknown dimension with no nameelse:print ("unknown rank", end="")print()break
onnx.checker.check_model(model)
onnx.save(model, 'out.onnx')"""
model = onnx.load('models/centerface.onnx')
model.graph.input[0].type.tensor_type.shape.dim[0].dim_param = '?'
model.graph.input[0].type.tensor_type.shape.dim[1].dim_param = '3'
model.graph.input[0].type.tensor_type.shape.dim[2].dim_param = '?'
model.graph.input[0].type.tensor_type.shape.dim[3].dim_param = '?'
onnx.save(model, 'dynamic_model.onnx')
"""

模型另存在out.onnx,和原始的centerface.onnx的输入维度进行对比,

推理代码,centerface.py,

import numpy as np
import cv2
import datetime
import torch
import onnxruntime
import onnxclass CenterFace(object):def __init__(self, landmarks=True):self.landmarks = landmarksself.session = onnxruntime.InferenceSession("out.onnx")self.inputs = self.session.get_inputs()[0].nameself.outputs = ["537", "538", "539", '540']self.img_h_new, self.img_w_new, self.scale_h, self.scale_w = 0, 0, 0, 0def __call__(self, img, height, width, threshold=0.5):#self.img_h_new, self.img_w_new, self.scale_h, self.scale_w = self.transform(height, width)self.img_h_new, self.img_w_new, self.scale_h, self.scale_w = 480, 640 , 480/height, 640/widthreturn self.inference_opencv(img, threshold)def inference_opencv(self, img, threshold):begin = datetime.datetime.now()image = cv2.cvtColor(img,cv2.COLOR_BGR2RGB)image =cv2.resize(image,(self.img_w_new, self.img_h_new))input_image = np.expand_dims(np.swapaxes(np.swapaxes(image,0,2),1,2),0).astype(np.float32)heatmap,scale , offset ,lms = self.session.run(None, {self.inputs: input_image})end = datetime.datetime.now()print("cpu times = ", end - begin)return self.postprocess(heatmap, lms, offset, scale, threshold)def transform(self, h, w):img_h_new, img_w_new = int(np.ceil(h / 32) * 32), int(np.ceil(w / 32) * 32)scale_h, scale_w = img_h_new / h, img_w_new / wreturn img_h_new, img_w_new, scale_h, scale_wdef postprocess(self, heatmap, lms, offset, scale, threshold):if self.landmarks:dets, lms = self.decode(heatmap, scale, offset, lms, (self.img_h_new, self.img_w_new), threshold=threshold)else:dets = self.decode(heatmap, scale, offset, None, (self.img_h_new, self.img_w_new), threshold=threshold)if len(dets) > 0:dets[:, 0:4:2], dets[:, 1:4:2] = dets[:, 0:4:2] / self.scale_w, dets[:, 1:4:2] / self.scale_hif self.landmarks:lms[:, 0:10:2], lms[:, 1:10:2] = lms[:, 0:10:2] / self.scale_w, lms[:, 1:10:2] / self.scale_helse:dets = np.empty(shape=[0, 5], dtype=np.float32)if self.landmarks:lms = np.empty(shape=[0, 10], dtype=np.float32)if self.landmarks:return dets, lmselse:return detsdef decode(self, heatmap, scale, offset, landmark, size, threshold=0.1):heatmap = np.squeeze(heatmap)scale0, scale1 = scale[0, 0, :, :], scale[0, 1, :, :]offset0, offset1 = offset[0, 0, :, :], offset[0, 1, :, :]c0, c1 = np.where(heatmap > threshold)if self.landmarks:boxes, lms = [], []else:boxes = []if len(c0) > 0:for i in range(len(c0)):s0, s1 = np.exp(scale0[c0[i], c1[i]]) * 4, np.exp(scale1[c0[i], c1[i]]) * 4o0, o1 = offset0[c0[i], c1[i]], offset1[c0[i], c1[i]]s = heatmap[c0[i], c1[i]]x1, y1 = max(0, (c1[i] + o1 + 0.5) * 4 - s1 / 2), max(0, (c0[i] + o0 + 0.5) * 4 - s0 / 2)x1, y1 = min(x1, size[1]), min(y1, size[0])boxes.append([x1, y1, min(x1 + s1, size[1]), min(y1 + s0, size[0]), s])if self.landmarks:lm = []for j in range(5):lm.append(landmark[0, j * 2 + 1, c0[i], c1[i]] * s1 + x1)lm.append(landmark[0, j * 2, c0[i], c1[i]] * s0 + y1)lms.append(lm)boxes = np.asarray(boxes, dtype=np.float32)keep = self.nms(boxes[:, :4], boxes[:, 4], 0.3)boxes = boxes[keep, :]if self.landmarks:lms = np.asarray(lms, dtype=np.float32)lms = lms[keep, :]if self.landmarks:return boxes, lmselse:return boxesdef nms(self, boxes, scores, nms_thresh):x1 = boxes[:, 0]y1 = boxes[:, 1]x2 = boxes[:, 2]y2 = boxes[:, 3]areas = (x2 - x1 + 1) * (y2 - y1 + 1)order = np.argsort(scores)[::-1]num_detections = boxes.shape[0]suppressed = np.zeros((num_detections,), dtype=np.bool)keep = []for _i in range(num_detections):i = order[_i]if suppressed[i]:continuekeep.append(i)ix1 = x1[i]iy1 = y1[i]ix2 = x2[i]iy2 = y2[i]iarea = areas[i]for _j in range(_i + 1, num_detections):j = order[_j]if suppressed[j]:continuexx1 = max(ix1, x1[j])yy1 = max(iy1, y1[j])xx2 = min(ix2, x2[j])yy2 = min(iy2, y2[j])w = max(0, xx2 - xx1 + 1)h = max(0, yy2 - yy1 + 1)inter = w * hovr = inter / (iarea + areas[j] - inter)if ovr >= nms_thresh:suppressed[j] = Truereturn keep

推理代码,demo.py

import cv2
import scipy.io as sio
import os
from centerface import CenterFacedef camera():cap = cv2.VideoCapture(0)ret, frame = cap.read()h, w = frame.shape[:2]centerface = CenterFace()while True:ret, frame = cap.read()dets, lms = centerface(frame, h, w, threshold=0.35)for det in dets:boxes, score = det[:4], det[4]cv2.rectangle(frame, (int(boxes[0]), int(boxes[1])), (int(boxes[2]), int(boxes[3])), (2, 255, 0), 1)for lm in lms:for i in range(0, 5):cv2.circle(frame, (int(lm[i * 2]), int(lm[i * 2 + 1])), 2, (0, 0, 255), -1)cv2.imshow('out', frame)# Press Q on keyboard to stop recordingif cv2.waitKey(1) & 0xFF == ord('q'):breakcap.release()def test_image():#frame = cv2.imread('000388.jpg')frame = cv2.imread('test.jpg')h, w = frame.shape[:2]landmarks = Truecenterface = CenterFace(landmarks=landmarks)if landmarks:dets, lms = centerface(frame, h, w, threshold=0.35)else:dets = centerface(frame, threshold=0.35)for det in dets:boxes, score = det[:4], det[4]cv2.rectangle(frame, (int(boxes[0]), int(boxes[1])), (int(boxes[2]), int(boxes[3])), (2, 255, 0), 1)if landmarks:for lm in lms:for i in range(0, 5):cv2.circle(frame, (int(lm[i * 2]), int(lm[i * 2 + 1])), 2, (0, 0, 255), -1)#cv2.imshow('out', frame)cv2.imwrite('out.jpg',frame)#cv2.waitKey(0)def test_image_tensorrt():frame = cv2.imread('000388.jpg')h, w = 480, 640  # must be 480* 640landmarks = Truecenterface = CenterFace(landmarks=landmarks, backend="tensorrt")if landmarks:dets, lms = centerface(frame, h, w, threshold=0.35)else:dets = centerface(frame, threshold=0.35)for det in dets:boxes, score = det[:4], det[4]cv2.rectangle(frame, (int(boxes[0]), int(boxes[1])), (int(boxes[2]), int(boxes[3])), (2, 255, 0), 1)if landmarks:for lm in lms:for i in range(0, 5):cv2.circle(frame, (int(lm[i * 2]), int(lm[i * 2 + 1])), 2, (0, 0, 255), -1)cv2.imshow('out', frame)cv2.waitKey(0)def test_widerface():Path = 'widerface/WIDER_val/images/'wider_face_mat = sio.loadmat('widerface/wider_face_split/wider_face_val.mat')event_list = wider_face_mat['event_list']file_list = wider_face_mat['file_list']save_path = 'save_out/'for index, event in enumerate(event_list):file_list_item = file_list[index][0]im_dir = event[0][0]# print(save_path + im_dir)if not os.path.exists(save_path + im_dir):os.makedirs(save_path + im_dir)landmarks = Truecenterface = CenterFace(landmarks=landmarks)for num, file in enumerate(file_list_item):im_name = file[0][0]zip_name = '%s/%s.jpg' % (im_dir, im_name)print(os.path.join(Path, zip_name))img = cv2.imread(os.path.join(Path, zip_name))h, w = img.shape[:2]if landmarks:dets, lms = centerface(img, h, w, threshold=0.05)else:dets = centerface(img, threshold=0.05)f = open(save_path + im_dir + '/' + im_name + '.txt', 'w')f.write('{:s}\n'.format('%s/%s.jpg' % (im_dir, im_name)))f.write('{:d}\n'.format(len(dets)))for b in dets:x1, y1, x2, y2, s = bf.write('{:.1f} {:.1f} {:.1f} {:.1f} {:.3f}\n'.format(x1, y1, (x2 - x1 + 1), (y2 - y1 + 1), s))f.close()print('event:%d num:%d' % (index + 1, num + 1))if __name__ == '__main__':# camera()test_image()# test_widerface()

最终效果,


人脸检测小江湖:

自己的测试,时间包括网络推理+后处理时间,face++为服务接口测试,相比不是很公平。

方法

MTCNN

ultra-face

Retina-Face-mobilenetv1

Retina-Face-resnet50

Centerface-mobileNetv2

face++

模型大小

2.9M

1M

1.8M

105M

7.2M

-

CPU(640*480)

Intel(R) Xeon(R) Silver 4216

600ms

200ms

140ms

2000ms

130ms

10ms

GPU(640*480)

2080TI 

110ms

18ms

38ms

50ms

8ms

CPU(1280*720)

Intel(R) Xeon(R) Silver 4216

1000ms

500ms

350ms

3500ms

300ms

10ms

GPU(1280*720)

2080TI 

200ms

40ms

100ms

120ms

25ms

CPU(1920*1080)

Intel(R) Xeon(R) Silver 4216

1600ms

-

800ms

8000ms

750ms

10ms

GPU(1920*1080)

2080TI 

330ms

-

200ms

250ms

50ms

精度

框略好,5点好

框检出少

框差,5点差

框误检大,5点一般

框好,5点非常差

框好,点好


本文来自互联网用户投稿,该文观点仅代表作者本人,不代表本站立场。本站仅提供信息存储空间服务,不拥有所有权,不承担相关法律责任。如若转载,请注明出处:http://www.rhkb.cn/news/12506.html

如若内容造成侵权/违法违规/事实不符,请联系长河编程网进行投诉反馈email:809451989@qq.com,一经查实,立即删除!

相关文章

chatgpt赋能python:Python人脸识别:从入门到工程实践

Python人脸识别:从入门到工程实践 介绍 近年来,人脸识别技术越来越成熟,广泛应用于各行各业,如社交媒体、安防、金融等领域。Python人脸识别作为一种基于机器学习的技术,可以通过训练模型从图像中自动识别出人脸,并进…

chatgpt赋能python:Python人脸身份识别:提高安全性和效率的先进技术

Python人脸身份识别:提高安全性和效率的先进技术 随着科技的发展,人类对于安全性和效率的需求逐渐增加。而人脸身份识别技术正是一个能够满足这一需求的先进技术。在过去的几年中,这种技术已经逐渐发展成为一种普及的安全措施,这…

人脸识别之特征脸方法(Eigenface)

人脸识别之特征脸方法(Eigenface) zouxy09qq.com http://blog.csdn.net/zouxy09 因为需要,花了一点时间写了下经典的基于特征脸(EigenFace)的人脸识别方法的Matlab代码。这里仅把该代码分享出来。其实,在…

face_recognition 人脸识别

前言 之前实践了下face在线人脸识别版本,这回做一下离线版本。github 上面有关于face_recognition的相关资料,本人只是做个搬运工,对其中的一些内容进行搬运,对其中一些例子进行实现。 官方描述: face_recognition …

chatgpt赋能python:Python人脸追踪:技术介绍与应用

Python人脸追踪:技术介绍与应用 Python作为一门极为流行的编程语言,其在人工智能领域的应用也不断得到拓展和应用,其中Python人脸追踪技术已经成为广泛应用的一个领域。本篇文章将介绍Python人脸追踪技术的原理和应用,以便读者更…

face_recognition结合opencv进行多人脸识别

目录 step1:准备好opencv,numpy和face_recognition三个库 step2:准备好人脸图像 step3:利用opencv读取三张图片 step4:将图片转为特征向量,并将向量和名字添加到列表中,一一对应 step5&#…

chatgpt赋能Python-python人脸识别步骤

简介 Python是一种优秀的编程语言,它广泛应用于人工智能、数据科学、Web应用程序开发等领域。其中,人脸识别是Python应用程序中的重要一环。 本文将介绍Python人脸识别的具体步骤,希望对初学者有所帮助。 Python人脸识别步骤 安装必要的库…

chatgpt赋能Python-python3人脸识别

人脸识别的python3应用:一步步实现高精度的面部识别 Python3作为一种高效的编程语言,具有广泛的应用场景。近年来,人脸识别技术在安防、金融、医疗等领域中逐渐普及,运用Python3进行人脸识别具有巨大的潜力。本文将介绍如何使用P…

万字科普ChatGPT-4为何会颠覆人类社会

来源:图灵人工智能 视频来源:超智能体 视频是关于GPT的底层原理和未来影响。将抛开技术细节,少用专业名词,在整体功能上讲解 ChatGPT 的「工作原理」「制造过程」「涌现的能力」「未来的影响」以及「如何应对」: 1、Ch…

断案三字诀

2019独角兽企业重金招聘Python工程师标准>>> 孟一刀:断案三字诀 2012-11-20 孟黎明,1973年6月生,1992年8月起至今在法院工作,曾任安吉法院调解中心主任、民一庭庭长,现任院党组成员、纪检组长。2010年2月…

科研如断案

最近我又把《神探狄仁杰》第一部看完了,觉得确实很不错。狄仁杰身为一朝宰相,拥有“一人之下,万人之上”的权力。他始终以百姓的安居乐业和天下的兴亡为己任。在电视剧里面,他与坏人斗智斗勇,时时险象环生,…

c语言经典断案程序、杨辉三角程序、跳水概率程序

/* 5位运动员参加了10米台跳水比赛,有人让他们预测比赛结果 A选手说:B第二,我第三; B选手说:我第二,E第四; C选手说:我第一,D第二; D选手说:C最后…

蓝桥杯07 java 断案

题目描述 公安人员审问甲、乙、丙、丁四个嫌疑犯,已确知,这四个人当中仅有一人是偷窃者,还知道这四个人的答话,要么完全诚实,要么完全说谎。在回答公安人员的问话中: 甲说:“乙没有偷&#xf…

试题 算法提高 断案

问题描述   公安人员审问甲、乙、丙、丁四个嫌疑犯,已确知,这四个人当中仅有一人是偷窃者,还知道这四个人的答话,要么完全诚实,要么完全说谎。在回答公安人员的问话中:   甲说:“乙没有偷&a…

论文投稿指南——中国(中文EI)期刊推荐(第6期)

🚀 EI是国际知名三大检索系统之一,在学术界的知名度和认可度仅次于SCI!🎄🎈 【前言】 想发论文怎么办?手把手教你论文如何投稿!那么,首先要搞懂投稿目标——论文期刊。其中&#xf…

关于网页版chatgpt喂投的一些讲解

ChatGPT云炬学长 喂投的定义及使用场景: 这一部分主要是解决这三个问题:啥是喂投。我们为什么要喂投。以及什么场景下面会用到喂投。 从AI专业名词的角度来说,并不存在“喂投”这么一个行为,这是一个不太专业化的俗称&#xff…

老马闲评数字化(4)做数字化会不会被供应商拿捏住

“老马闲评数字化”系列文章正在“深圳行云创新”公众号连载,感兴趣的朋友请关注我们的公众号,不迷路…… 导语 开年过后业务特别的繁忙,出差也比较多,所以有段时间没更新了,对不住大家! 上一集&#xff08…

被遗忘的技术支持岗位

文/明道云创始人任向晖 我发现一个现象。在我们行业,谈论营销获客、销售增长、产品思维等话题的文章很多,但是谈论技术支持(Technical Support)话题的文章几乎没有。似乎我们行业根本没有这个职能一样。在企业内部,技术…

《软件工程导论》期末复习总结

《软件工程导论》期末复习总结 适用教材:《软件工程与实践(第3版》,贾铁军、李学相、王学军主编,清华大学出版社 提示:与教材内容不完全匹配,有所取舍。 写在前面: 这份复习总结是笔者根据老师…

巴比特 | 元宇宙每日必读:传苹果MR头显敲定年内上线,库克认为此时值得进场,预计第一年的销量仅为100万台左右...

摘要:据财联社报道,苹果的MR头显曾多次跳票,最新消息称,苹果CEO蒂姆•库克下场拍板——2023年推出首款MR产品。库克认为此时值得进场,且并不介意初始销量惨淡。据两位熟悉苹果计划的人士透露,苹果预计所述设…