目录
一、部署GlusterFS群集
1. 服务器节点分配
2. 服务器环境(所有node节点上操作)
2.1 关闭防火墙
2.2 磁盘分区,并挂载
2.3 修改主机名,配置/etc/hosts文件
3. 安装、启动GlusterFS(所有node节点上操作)
4. 添加节点到存储信任池(在node1节点上操作)
5. 创建卷
5.1 创建分布式卷
5.2 创建条带卷
5.3 创建复制卷
5.4 创建分布式条带卷
5.5 创建分布式复制卷
二、部署Gluster客户端
1. 安装客户端软件
2. 创建挂载目录
3. 配置/etc/hosts文件
4. 挂载Gluster文件系统
4.1 临时挂载
4.2 永久挂载
三、测试Gluster文件系统
1. 卷中写入文件,客户端操作
2. 查看文件分布
2.1 分布式文件分布
2.1.1 node1
2.1.2 node2
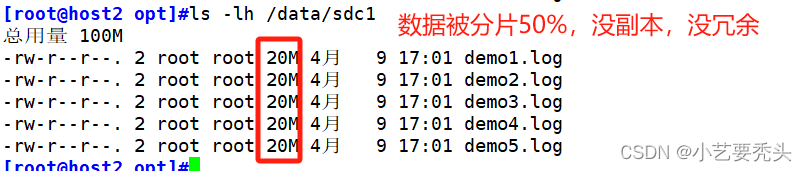
2.2 条带卷文件分布
2.2.1 node1
2.2.2 node2
2.3 复制卷文件分布
2.3.1 node3
2.3.2 node4
2.4 分布式条带卷分布
2.4.1 node1
2.4.2 node2
2.4.3 node3
2.4.4 node4
2.5 分布式复制卷发布
2.5.1 node1
2.5.2 node2
2.5.3 node3
2.5.4 node4
四、破坏性测试
1. 单节点故障
1.1 故障模拟
1.2 查看文件
2. 多节点故障
2.1 故障模拟
2.2 查看文件
2.2.1 复制卷
2.2.2 分布式卷
2.2.3 分布式复制卷
3. 故障总结
一、部署GlusterFS群集
1. 服务器节点分配
| 服务器节点 | ip地址 | 主机名 | 磁盘部署 | 对应挂载点 |
|---|---|---|---|---|
| Node1节点 | 192.168.80.111 | node1 | /dev/sdb1 /dev/sdc1 /dev/sdd1 /dev/sde1 | /data/sdb1 /data/sdc1 /data/sdd1 /data/sde1 |
| Node2节点 | 192.168.80.112 | node2 | /dev/sdb1 /dev/sdc1 /dev/sdd1 /dev/sde1 | /data/sdb1 /data/sdc1 /data/sdd1 /data/sde1 |
| Node3节点 | 192.168.80.113 | node3 | /dev/sdb1 /dev/sdc1 /dev/sdd1 /dev/sde1 | /data/sdb1 /data/sdc1 /data/sdd1 /data/sde1 |
| Node4节点 | 192.168.80.115 | node4 | /dev/sdb1 /dev/sdc1 /dev/sdd1 /dev/sde1 | /data/sdb1 /data/sdc1 /data/sdd1 /data/sde1 |
| 客户端节点 | 192.168.80.114 | client | - | - |
2. 服务器环境(所有node节点上操作)
2.1 关闭防火墙
systemctl stop firewalld
setenforce 0
2.2 磁盘分区,并挂载
以node1为例:
[root@node1 ~]# vim /opt/fdisk.sh#!/bin/bash
NEWDEV=`ls /dev/sd* | grep -o 'sd[b-z]' | uniq`
for VAR in $NEWDEV
doecho -e "n\np\n\n\n\nw\n" | fdisk /dev/$VAR &> /dev/nullmkfs.xfs /dev/${VAR}"1" &> /dev/nullmkdir -p /data/${VAR}"1" &> /dev/nullecho "/dev/${VAR}"1" /data/${VAR}"1" xfs defaults 0 0" >> /etc/fstab
done
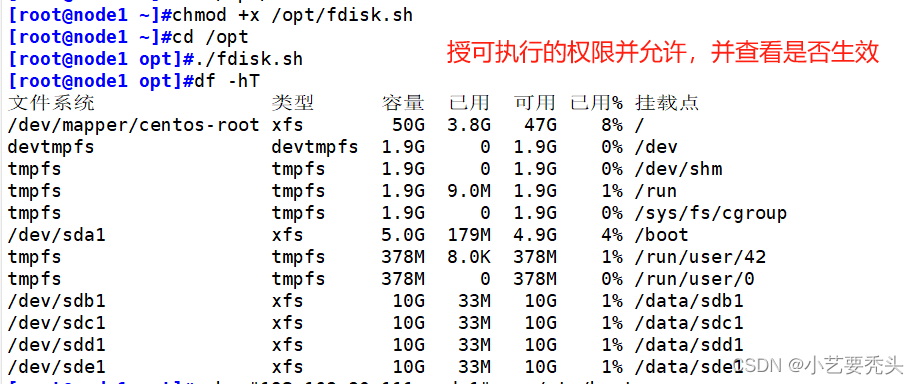
mount -a &> /dev/null[root@node1 ~]# chmod +x /opt/fdisk.sh
[root@node1 ~]# cd /opt/
[root@node1 ~]# ./fdisk.sh
[root@node1 ~]# df -hT
2.3 修改主机名,配置/etc/hosts文件
以Node1节点为例:
[root@node1 ~]# echo "192.168.80.111 node1" >> /etc/hosts
[root@node1 ~]# echo "192.168.80.112 node2" >> /etc/hosts
[root@node1 ~]# echo "192.168.80.113 node3" >> /etc/hosts
[root@node1 ~]# echo "192.168.80.115 node4" >> /etc/hosts
3. 安装、启动GlusterFS(所有node节点上操作)
以Node1为例:
[root@node1 ~]# cd /opt
[root@node1 opt]# rz -E
#将gfsrepo软件上传到/opt目录下
rz waiting to receive.
[root@node1 opt]# cd /etc/yum.repos.d/
[root@node1 yum.repos.d]# mkdir repo.bak
[root@node1 yum.repos.d]# mv *.repo repo.bak
[root@node1 yum.repos.d]# vim glfs.repo[glfs]
name=glfs
baseurl=file:///opt/gfsrepo
gpgcheck=0
enabled=1[root@node1 opt]# yum clean all && yum makecache
[root@node1 opt]# yum -y install glusterfs glusterfs-server glusterfs-fuse glusterfs-rdma
#如采用官方YUM源安装,使用命令“yum -y install centos-release-gluster”可以直接指向互联网仓库
[root@node1 opt]# systemctl start glusterd.service
[root@node1 opt]# systemctl enable glusterd.service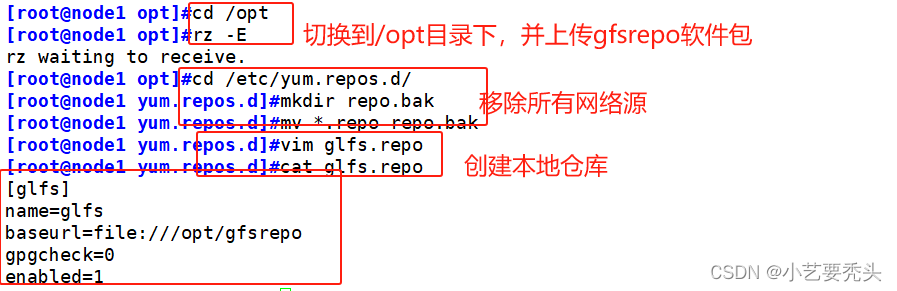
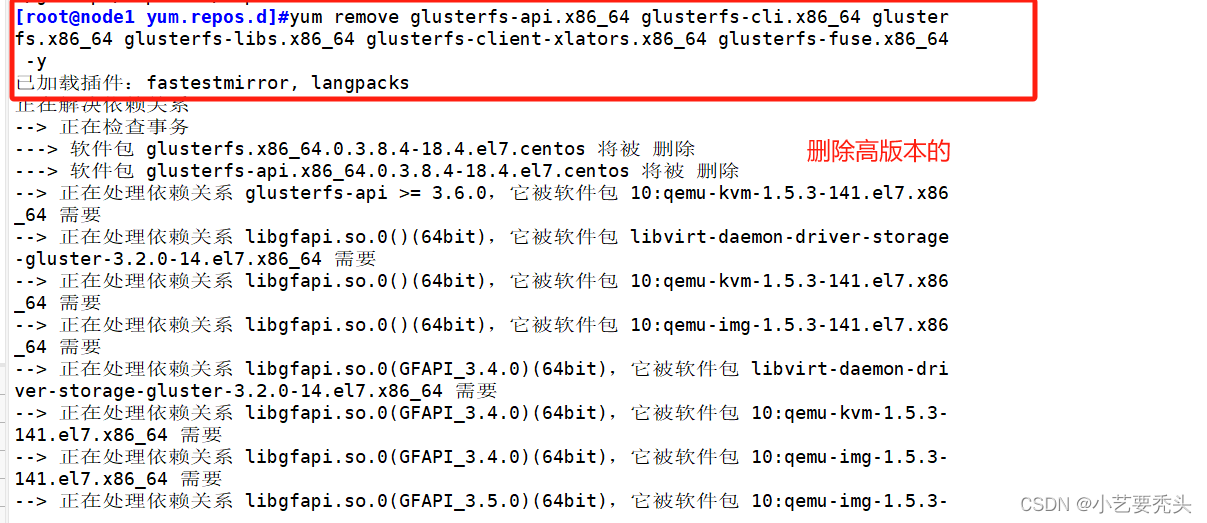
防止版本过高导致故障,删除之前版本的


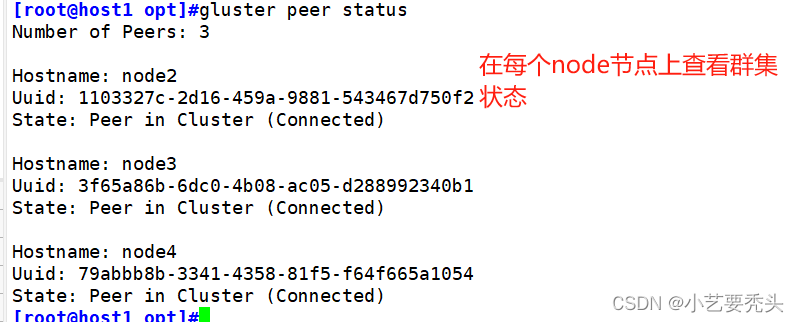
4. 添加节点到存储信任池(在node1节点上操作)
只要在一台node节点上添加其他节点即可
[root@node1 opt]# gluster peer probe node2
[root@node1 opt]# gluster peer probe node3
[root@node1 opt]# gluster peer probe node4
[root@node1 opt]# gluster peer status
5. 创建卷
根据规划创建如下卷:
| 卷名称 | 卷类型 | Brick |
|---|---|---|
| dis-volume | 分布式卷 | node1(/data/sdb1)、node2(/data/sdb1) |
| stripe-volume | 条带卷 | node1(/data/sdc1)、node2(/data/sdc1) |
| rep-volume | 复制卷 | node3(/data/sdb1)、node4(/data/sdb1) |
| dis-stripe | 分布式条带卷 | node1(/data/sdd1)、node2(/data/sdd1)、node3(/data/sdd1)、node4(/data/sdd1) |
| dis-rep | 分布式复制卷 | node1(/data/sde1)、node2(/data/sde1)、node3(/data/sde1)、node4(/data/sde1) |
5.1 创建分布式卷
无需指定类型,默认创建的是分布式卷
[root@node1 opt]# gluster volume create dis-volume node1:/data/sdb1 node2:/data/sdb1 force
#创建分布式卷
[root@node1 opt]# gluster volume list
#查看卷列表
[root@node1 opt]# gluster volume start dis-volume
#启动卷
[root@node1 opt]# gluster volume info dis-volume
#查看卷信息
5.2 创建条带卷
指定类型为stripe,数值为2,且后面跟了2个Brick Server,所以创建的是条带卷
[root@node1 opt]# gluster volume create stripe-volume stripe 2 node1:/data/sdc1 node2:/data/sdc1 force
#创建条带卷
[root@node1 opt]# gluster volume list
#查看卷列表
[root@node1 opt]# gluster volume start stripe-volume
#启动卷
[root@node1 opt]# gluster volume info stripe-volume
#查看卷信息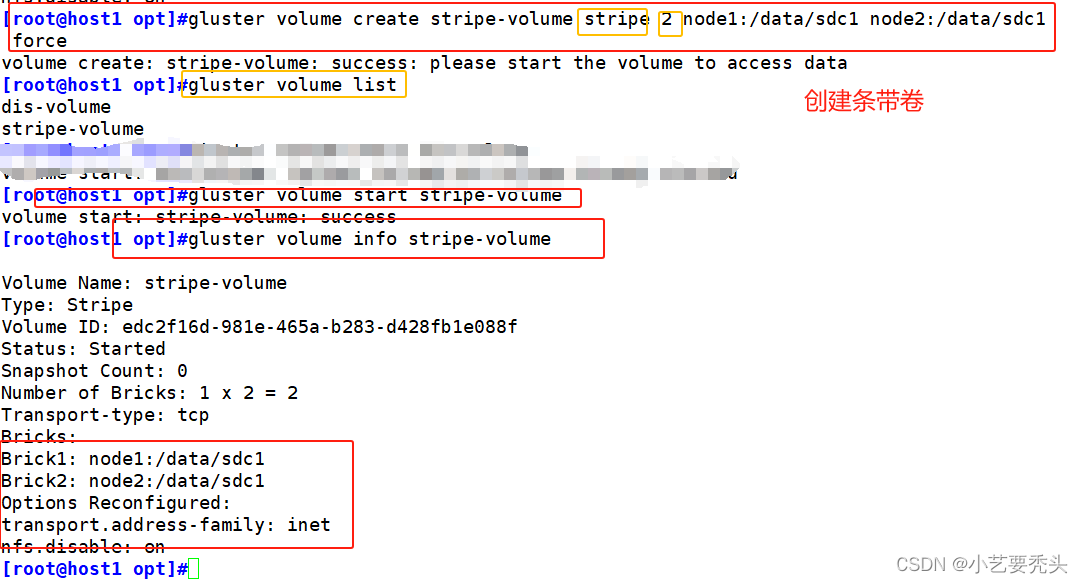
5.3 创建复制卷
指定类型为replica,数值为2,且后面跟了2个Brick Server,所以创建的是复制卷
[root@node1 opt]# gluster volume create rep-volume replica 2 node3:/data/sdb1 node4:/data/sdb1 force
[root@node1 opt]# gluster volume list
[root@node1 opt]# gluster volume start rep-volume
[root@node1 opt]# gluster volume info rep-volume 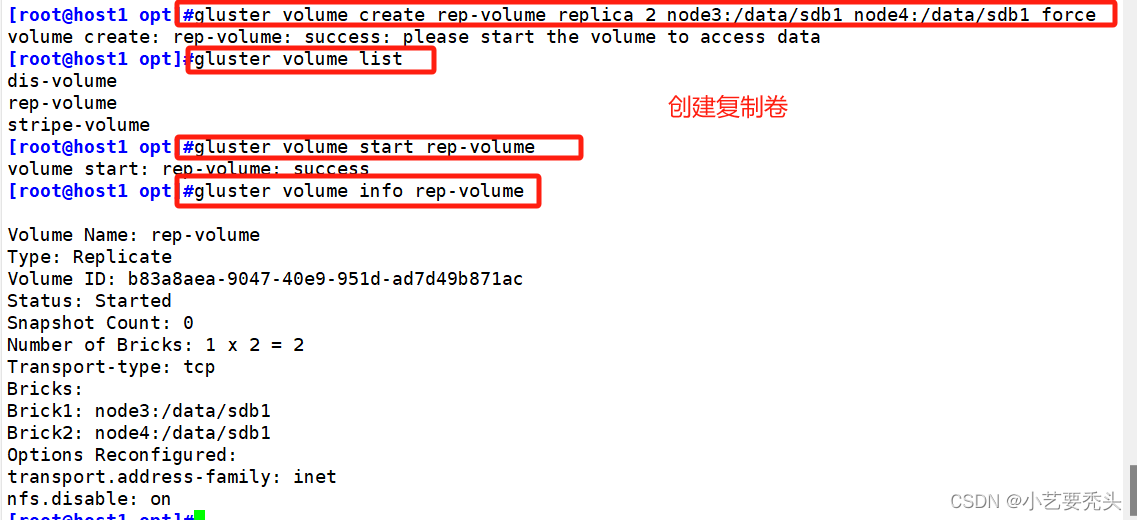
5.4 创建分布式条带卷
指定类型为stripe,数值为2,而且后面跟了4个Brick Server,是2的两倍,所以创建的是分布式条带卷
[root@node1 opt]# gluster volume create dis-stripe stripe 2 node1:/data/sdd1 node2:/data/sdd1 node3:/data/sdd1 node4:/data/sdd1 force
[root@node1 opt]# gluster volume list
[root@node1 opt]# gluster volume start dis-stripe
[root@node1 opt]# gluster volume info dis-stripe 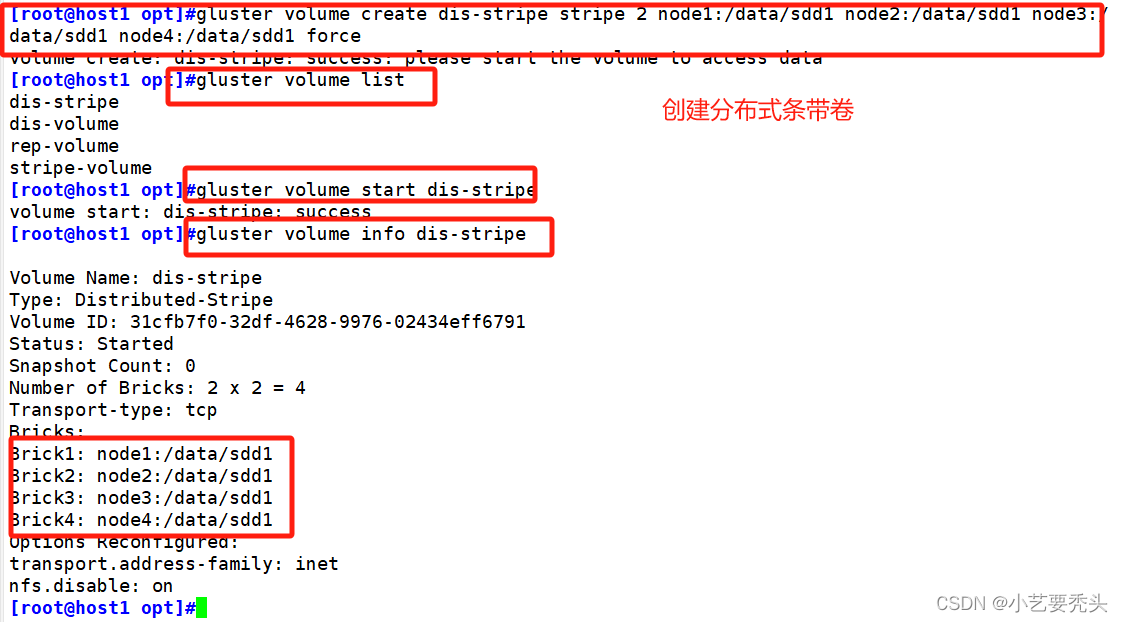
5.5 创建分布式复制卷
指定类型为replica,数值为2,而且后面跟了4个Brick Server,是2的两倍,所以创建的是分布式复制卷
[root@node1 opt]# gluster volume create dis-rep replica 2 node1:/data/sde1 node2:/data/sde1 node3:/data/sde1 node4:/data/sde1 force
[root@node1 opt]# gluster volume list
[root@node1 opt]# gluster volume start dis-rep
[root@node1 opt]# gluster volume info dis-rep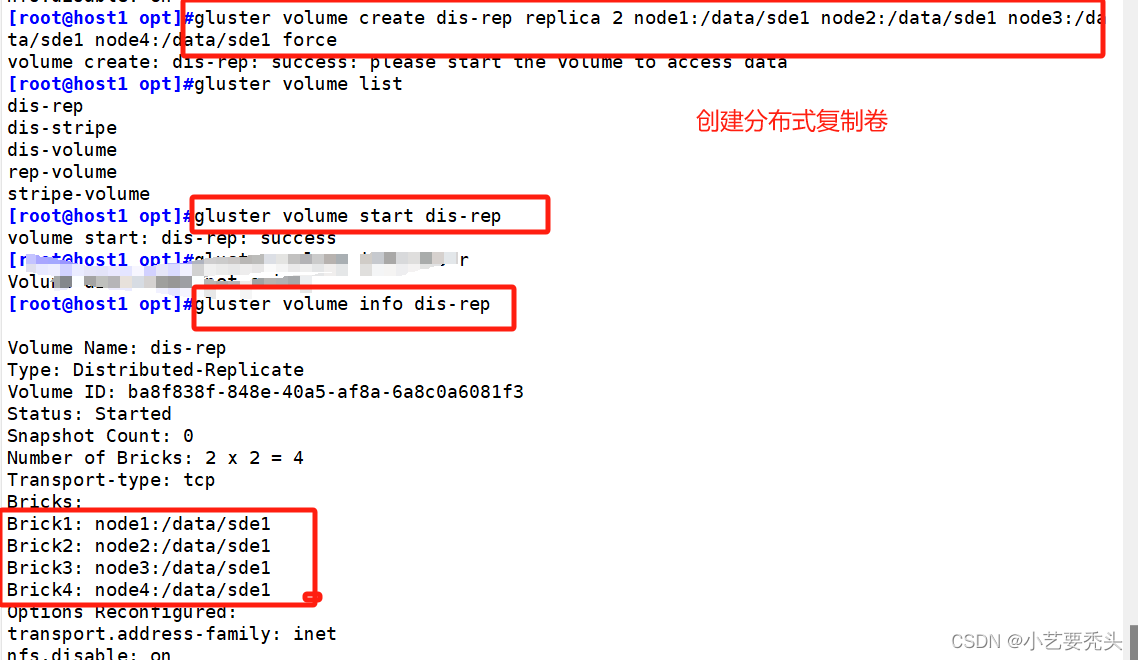
二、部署Gluster客户端
1. 安装客户端软件
将gfsrepo软件上传到/opt目录下
[root@client ~]# cd /etc/yum.repos.d/
[root@client yum.repos.d]# mkdir repo.bak
[root@client yum.repos.d]# mv *.repo repo.bak
[root@client yum.repos.d]# vim glfs.repo[glfs]
name=glfs
baseurl=file:///opt/gfsrepo
gpgcheck=0
enabled=1[root@client yum.repos.d]#yum remove glusterfs-api.x86_64 glusterfs-cli.x86_64 glusterfs.x86_64 glusterfs-libs.x86_64 glusterfs-client-xlators.x86_64 glusterfs-fuse.x86_64 -y[root@client yum.repos.d]# yum clean all && yum makecache
[root@client yum.repos.d]# yum -y install glusterfs glusterfs-server glusterfs-fuse glusterfs-rdma
[root@client yum.repos.d]# systemctl start glusterd.service
[root@client yum.repos.d]# systemctl enable glusterd.service
2. 创建挂载目录
[root@client yum.repos.d]# mkdir -p /test/{dis,stripe,rep,dis_stripe,dis_rep}
[root@client yum.repos.d]# ls /test
dis  dis_rep  dis_stripe  rep  stripe
3. 配置/etc/hosts文件
[root@client yum.repos.d]# echo "192.168.80.111 node1" >> /etc/hosts
[root@client yum.repos.d]# echo "192.168.80.112 node2" >> /etc/hosts
[root@client yum.repos.d]# echo "192.168.80.113 node3" >> /etc/hosts
[root@client yum.repos.d]# echo "192.168.80.115 node4" >> /etc/hosts 
4. 挂载Gluster文件系统
4.1 临时挂载
[root@client yum.repos.d]# mount.glusterfs node1:dis-volume /test/dis
[root@client yum.repos.d]# mount.glusterfs node1:stripe-volume /test/stripe
[root@client yum.repos.d]# mount.glusterfs node1:rep-volume /test/rep
[root@client yum.repos.d]# mount.glusterfs node1:dis-stripe /test/dis_stripe
[root@client yum.repos.d]# mount.glusterfs node1:dis-rep /test/dis_rep
[root@client yum.repos.d]# df -hT
4.2 永久挂载
[root@client yum.repos.d]# vim /etc/fstab##末行写入
node1:dis-volume		/test/dis				glusterfs		defaults,_netdev		0 0
node1:stripe-volume		/test/stripe			glusterfs		defaults,_netdev		0 0
node1:rep-volume		/test/rep				glusterfs		defaults,_netdev		0 0
node1:dis-stripe		/test/dis_stripe		glusterfs		defaults,_netdev		0 0
node1:dis-rep /test/dis_rep glusterfs defaults,_netdev 0 0 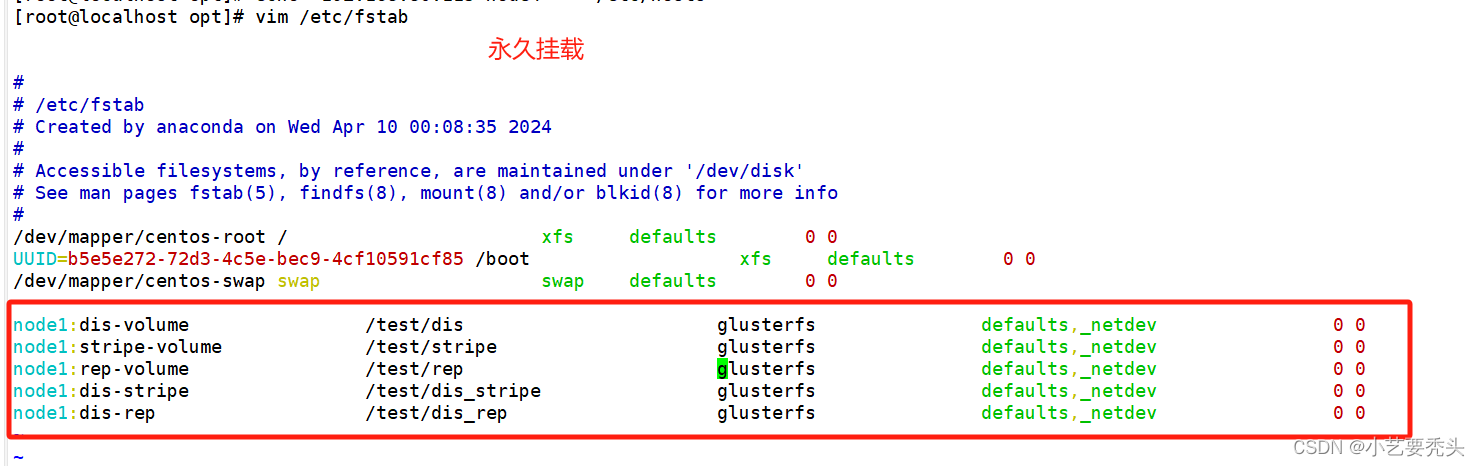

三、测试Gluster文件系统
1. 卷中写入文件,客户端操作
[root@client ~]# cd /opt
[root@client opt]# dd if=/dev/zero of=/opt/demo1.log bs=1M count=40
[root@client opt]# dd if=/dev/zero of=/opt/demo2.log bs=1M count=40
[root@client opt]# dd if=/dev/zero of=/opt/demo3.log bs=1M count=40
[root@client opt]# dd if=/dev/zero of=/opt/demo4.log bs=1M count=40
[root@client opt]# dd if=/dev/zero of=/opt/demo5.log bs=1M count=40
[root@client opt]# ls -lh /opt[root@client opt]# cp /opt/demo* /test/dis/
[root@client opt]# cp /opt/demo* /test/stripe/
[root@client opt]# cp /opt/demo* /test/rep/
[root@client opt]# cp /opt/demo* /test/dis_stripe/
[root@client opt]# cp /opt/demo* /test/dis_rep/

2. 查看文件分布
2.1 分布式文件分布
2.1.1 node1

2.1.2 node2

2.2 条带卷文件分布
2.2.1 node1

2.2.2 node2
2.3 复制卷文件分布
2.3.1 node3

2.3.2 node4

2.4 分布式条带卷分布
2.4.1 node1

2.4.2 node2

2.4.3 node3

2.4.4 node4

2.5 分布式复制卷发布
2.5.1 node1

2.5.2 node2

2.5.3 node3

2.5.4 node4

四、破坏性测试
1. 单节点故障
1.1 故障模拟
挂起node2节点或者关闭glusterd服务来模拟故障
1.2 查看文件
2. 多节点故障
2.1 故障模拟
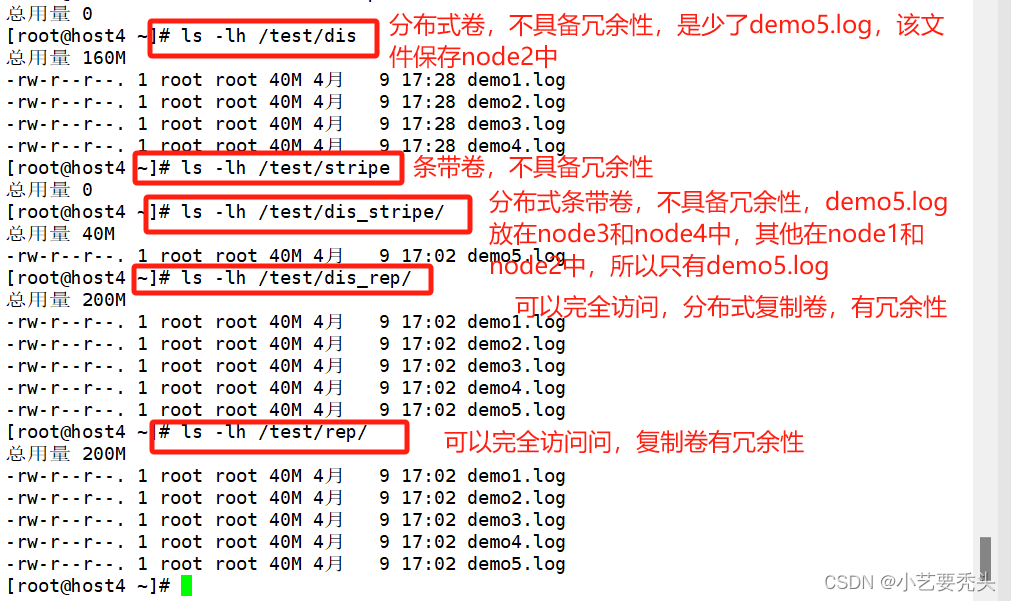
挂起node2和node4节点,在客户端上查看文件是否正常
2.2 查看文件
2.2.1 复制卷
[root@client opt]# ls -lh /test/rep
总用量 200M
-rw-r--r-- 1 root root 40M 4月  9 17:02 demo1.log
-rw-r--r-- 1 root root 40M 4月  9 17:02 demo2.log
-rw-r--r-- 1 root root 40M 4月  9 17:02 demo3.log
-rw-r--r-- 1 root root 40M 4月  9 17:02 demo4.log
-rw-r--r-- 1 root root 40M 4月  9 17:02 demo5.log
2.2.2 分布式卷
[root@client opt]# ls -lh /test/dis_stripe/
总用量 0
2.2.3 分布式复制卷
[root@client opt]# ls -lh /test/dis_rep/
总用量 200M
-rw-r--r-- 1 root root 40M 4月   9 17:02 demo1.log
-rw-r--r-- 1 root root 40M 4月   9 17:02 demo2.log
-rw-r--r-- 1 root root 40M 4月   9 17:02 demo3.log
-rw-r--r-- 1 root root 40M 4月   9 17:02 demo4.log
-rw-r--r-- 1 root root 40M 4月   9 17:02 demo5.log
3. 故障总结
上述实验测试,凡是带复制数据,相比而言,数据比较安全