🔥博客主页: 【小扳_-CSDN博客】
❤感谢大家点赞👍收藏⭐评论✍


文章目录
1.0 Mybatis 的基础操作
2.0 基础操作 - 环境准备
3.0 基础操作 - 删除操作
3.1 SQL 预编译
3.2 SQL 预编译的优势
3.3 参数占位符
4.0 基础操作 - 新增
4.1 主键返回
5.0 基础操作 - 更新
6.0 基础操作 - 查询
6.1 根据 ID 来查询
6.2 数据封装
6.3 根据条件查询
7.0 本篇文章的完整代码
7.1 application.properties 属性文件
7.2 pom.xml 文件
7.3 Mapper 接口
7.4 测试代码
7.5 Emp 类
1.0 Mybatis 的基础操作
Mybatis 是一个基于 Java 的持久层框架,它可以帮助开发者简化数据库操作。
下面是 Mybatis 的基础操作:查询操作、新增操作、更新操作、删除操作。通过以上基础的操作,开发者可以使用 Mybatis 进行数据库操作,实现数据的增删改查功能。
2.0 基础操作 - 环境准备
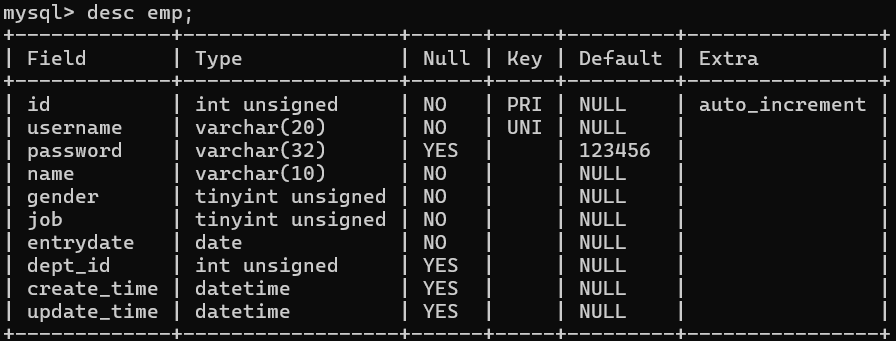
1)准备数据库表 emp
2)创建一个新的 Springboot 工程,选择引入对应的起步依赖(mybatis、mysql 驱动包、lombok 工具包)
<!--mybatis的起步依赖--><dependency><groupId>org.mybatis.spring.boot</groupId><artifactId>mybatis-spring-boot-starter</artifactId><version>2.2.2</version></dependency><!--mysql驱动包--><dependency><groupId>mysql</groupId><artifactId>mysql-connector-java</artifactId><scope>runtime</scope></dependency><dependency><groupId>org.springframework.boot</groupId><artifactId>spring-boot-starter-test</artifactId><scope>test</scope></dependency><!--lombok--><dependency><groupId>org.projectlombok</groupId><artifactId>lombok</artifactId></dependency>
3)application.properties 中引入数据库连接信息
spring.datasource.drive-class-name=com.mysql.cj.jdbc.Driver
spring.datasource.url=jdbc:mysql://localhost:3306/db01?characterEncoding=utf-8&useSSL=true
spring.datasource.username=root
spring.datasource.password=123456
4)创建对应的实体类 Emp
import lombok.AllArgsConstructor;
import lombok.Data;
import lombok.NoArgsConstructor;import java.time.LocalDate;
import java.time.LocalDateTime;@Data
@NoArgsConstructor
@AllArgsConstructor
public class Emp {private int id;private String username;private String password;private String name;private int gender;private int job;private LocalDate entrydate;private int deptId;private LocalDateTime createTime;private LocalDateTime updateTime;}
5)准备 Mapper 接口 EmpMapper
基础操作的抽象方法都写在该接口中,该接口用 @Mapper 注解。
3.0 基础操作 - 删除操作
在 Mapper 接口中定义一个 delete() 的抽象方法,且在该方法上加上 @Delete("删除的 SQL 语句") 注解,只要实现类调用重写的 delete() 方法时,就会自动执行 SQL 语句。
import org.apache.ibatis.annotations.*;import java.time.LocalDate;
import java.util.List;@org.apache.ibatis.annotations.Mapper
public interface Mapper {//删除数据操作@Delete("delete from emp where id = #{id}")public void delete(int id);}
SQL 语句:根据 ID 来删除数据。#{} 是 mybatis 中的占位符,当实体类调用 delete 方法的时候,方法中的参数 id 自动赋值给 #{id} 占位符中的 id 。
测试删除数据操作:
@SpringBootTest
public class AppTest extends TestCase {@AutowiredMapper deleteMapper;@Testpublic void testDelete(){deleteMapper.delete(3);}}
通过 @Autowired 注解根据类型注入到 deleteMapper 变量中,再由 deleteMapper 调用 delete() 方法,就可以自动执行 SQL 语句,且方法参数也会自动赋值给 #{id} 。
测试结果:
初始的 emp:
测试后的 emp:
注意事项:如果 mapper 接口方法形参只有一个普通类型的参数,#{...} 里面的属性名可以随便写,如:#{id}、#{value} 。
3.1 SQL 预编译
SQL 预编译是在执行 SQL 语句之前,将 SQL 语句编译成可执行的硬编码形式,并在执行时直接使用编译好的代码,从而减少了每次执行 SQL 语句时的语法解析和优化等过程,提高了 SQL 语句执行的效率。
预编译 SQL 语句的过程主要包括 SQL 语法解析、语义分析、查询优化和生成可执行代码等步骤。
在执行 SQL 语句之前,先将 SQL 语句传递给数据库驱动程序进行预编译,然后再执行预编译好的 SQL 语句。
3.2 SQL 预编译的优势
在发送给数据库之前,会先进行一次 SQL 预编译,将 #{id} 占位符变为 '?' ,再将方法中的参数 id 一起发送给数据库进行运行操作,而不是直接将拼接好的 SQL 语句发送给数据库。
1)性能更高
采取 SQL 预编译,可以提升性能。
对于 SQL 预编译的方式来说,由于 #{id} 无论 id 为何值都会变为 '?' ,所以相同的 SQL 语句只需要编译一次就够了,因为内存中已经有相同的 SQL 语句了。预编译好的 SQL 连同参数 id 一起发送到数据库中。
对于 SQL 直接拼接参数的方式来说,简单来说,将 SQL “写死”了,每一次的 id 大概率都是不一样的,那么每一条 SQL 语句都要进行SQL 语法解析、语义分析、查询优化和生成可执行代码等步骤。因此采取 SQL 预编译的方式,性能会更好。
2)更安全(防止 SQL 注入)
预编译语句可以将 SQL 查询语句和参数分开,从而避免用户输入的数据直接被拼接到 SQL 语句中。
对于 SQL 语句直接与参数拼接,可能会存在 SQL 注入。举个例子:
SELECT * FROM users WHERE username='admin' AND password='' OR '1'='1';在登录密码的时候,密码写成:' OR '1'='1 ,再将其直接拼接到 SQL 语句中,就会导致以上情况 '1' = '1' 恒成立,因此就可以绕过登录验证,从而直接登录。
上述 SQL 查询语句将返回数据库中的所有用户数据,导致登录成功,即使用户输入的密码是错误的。这就是 SQL 注入攻击,利用用户输入的恶意代码来绕过登录验证。要防止这种情况发生,可以使用预编译语句或参数化查询来避免直接拼接用户输入数据到 SQL 查询语句中。
而对于 SQL 预编译来说:不存在 SQL 注入攻击,因为 SQL 语句和参数分开了,没有直接拼接到 SQL 语句中。
3.3 参数占位符
1)#{...}:执行 SQL 时,会将 #{...} 替换为 ? ,生成预编译 SQL ,会自动设置参数值。使用时机:参数传递,都使用 #{...} 。
在编写 SQL 语句中使用 #{} 这个占位符,就会自动进行 SQL 预编译,将 #{id} 就会被 '?' 替代掉。
2)${...}:拼接 SQL ,直接将参数拼接在 SQL 语句中,存在 SQL 注入问题。使用时机:如果对表名、列表进行动态设置时使用。
4.0 基础操作 - 新增
在 Mapper 接口中定义 insert() 抽象方法,且在该方法加上 @Insert("新增的 SQL 语句")
代码演示:
import org.apache.ibatis.annotations.*;import java.time.LocalDate;
import java.util.List;@org.apache.ibatis.annotations.Mapper
public interface Mapper {//增加数据操作@Insert("insert into emp(username,name,gender,job,entrydate,dept_id,create_time,update_time) " +"values (#{username},#{name},#{gender},#{job},#{entrydate},#{deptId},#{createTime},#{updateTime})")public void insert(Emp emp);}
当实体类调用该重写的 insert() 方法,就会自动执行该 SQL 语句,由于参数比较多,可以用对象进行封装起来,用 emp 作为参数,emp 中的字段都会一一对应的赋值到 SQL 语句中 #{} 占位符中,占位符中的变量名需要与 emp 中的字段保持一致,才能进行正常的赋值操作。
测试新增操作:
@SpringBootTest
public class AppTest extends TestCase {@AutowiredMapper mapper;@Testpublic void testInsert(){Emp emp = new Emp();emp.setUsername("小板");emp.setName("XB");emp.setJob(1);emp.setEntrydate(LocalDate.of(2024,3,4));emp.setCreateTime(LocalDateTime.now());emp.setUpdateTime(LocalDateTime.now());emp.setDeptId(1);mapper.insert(emp);}}
先通过 @Autowire 注解,将新增对象注入给 mapper 变量名。创建一个新的 emp 对象,将其字段进行赋值后,再将 emp 以参数的形式交给 #{} 占位符中的变量。
测试结果:
新增之前的数据库:
新增之后的数据库:
4.1 主键返回
在数据添加成功后,需要获取插入数据库数据的主键。
只需在 @Insert 注解上再添加一个 @Options(useGeneratedKeys = true,keyProperty = "id") 注解,其中 useGeneratedKeys = true 代表:数据添加成之后,需要返回主键。keyProperty = "id" 代表:返回的主键交给 id 变量。
代码演示:
import org.apache.ibatis.annotations.*;import java.time.LocalDate;
import java.util.List;@org.apache.ibatis.annotations.Mapper
public interface Mapper {@Options(useGeneratedKeys = true,keyProperty = "id")//增加数据操作@Insert("insert into emp(username,name,gender,job,entrydate,dept_id,create_time,update_time) " +"values (#{username},#{name},#{gender},#{job},#{entrydate},#{deptId},#{createTime},#{updateTime})")public void insert(Emp emp);}
@SpringBootTest public class AppTest extends TestCase {@AutowiredMapper mapper;@Testpublic void testInsert(){Emp emp = new Emp();emp.setUsername("小童");emp.setName("TT");emp.setJob(0);emp.setEntrydate(LocalDate.of(2024,3,4));emp.setCreateTime(LocalDateTime.now());emp.setUpdateTime(LocalDateTime.now());emp.setDeptId(1);mapper.insert(emp);System.out.println(emp.getId());}}运行结果:
这样就拿到了主键,也称为主键返回。
5.0 基础操作 - 更新
在 Mapper 接口中定义一个 update(参数) 抽象方法,且在该方法加上 @Update("更新 SQL 语句") 注解,当实体类调用重写的 update(参数) 方法时,就会自动执行 SQL 语句,且方法中的参数就会自动赋值给 #{} 占位符。
代码演示:
import org.apache.ibatis.annotations.*;import java.time.LocalDate;
import java.util.List;@org.apache.ibatis.annotations.Mapper
public interface Mapper {//更新数据操作@Update("update emp set username = #{username} , name = #{name} , gender = #{gender} , job = #{job}," +"entrydate = #{entrydate} , dept_id = #{deptId}, create_time = #{createTime}, update_time = #{updateTime} where id = #{id}")public void update(Emp emp);}
需要注意的是, emp 中的字段名必须要跟 #{} 占位符中的变量名保持相同,才能进行正常的赋值操作。
测试更新操作:
@SpringBootTest
public class AppTest extends TestCase {@AutowiredMapper updateMapper;@Testpublic void testUpdate(){Emp emp = new Emp();emp.setId(5);emp.setUsername("小扳手");emp.setName("TT");emp.setJob(3);emp.setEntrydate(LocalDate.of(2022,3,5));emp.setCreateTime(LocalDateTime.now());emp.setUpdateTime(LocalDateTime.now());emp.setDeptId(1);mapper.update(emp);}}
更新之前:
更新之后:
6.0 基础操作 - 查询
在 Mapper 接口中定义一个 select(参数) 抽象方法,且在该抽象方法加上 @Select("查询 SQL 的语句"),实体类调用重写的 select(参数) 方法时,就自动执行 SQL 语句,且查询出来的数据可以用 Emp 实体对象来接收。
6.1 根据 ID 来查询
代码演示:
import org.apache.ibatis.annotations.*;import java.time.LocalDate;
import java.util.List;@org.apache.ibatis.annotations.Mapper
public interface Mapper {//根据ID查询@Select("select * from emp where id = #{id}")public Emp selectID(int id);}
测试根据 ID 查询:
@SpringBootTest
public class AppTest extends TestCase {@AutowiredMapper selectMapper;@Testpublic void testSelect(){Emp emp = selectMapper.selectID(1);System.out.println(emp);}}
首先通过 @Autowired 注解,将 Mapper 类型的对象注入给 selectMapper 对象,再调用 selectID(1) 方法,代表查询 ID 为 1 的数据。接着查询的结果交给 emp 。
运行结果:
6.2 数据封装
实体类属性名和数据库表查询返回的字段名一致,mybatis 会自动封装;如果实体类属性名和数据库查询返回的字段名不一致,不能自动分装。
解决属性名与字段名不一致的方法:
1)给字段起别名,让别名与实体类属性名保持一致。
2)通过 @Results,@Result 注解手动映射封装
代码演示:
import org.apache.ibatis.annotations.*;import java.time.LocalDate;
import java.util.List;@org.apache.ibatis.annotations.Mapper
public interface Mapper {//手动建立映射关系@Results({//column 代表原来的字段名、property 代表替换的字段名@Result(column = "create_time",property = "createTime"),@Result(column = "dept_id",property = "deptId"),@Result(column = "update_time",property = "updateTime")})//根据ID查询@Select("select * from emp where id = #{id}")public Emp selectID(int id);}
3)开启 mybatis 的驼峰命名自动映射开关(create_Time ----> createTime)
在 application.properties 属性文件中配置:
#开启 mybatis 的驼峰命名自动映射开关
mybatis.configuration.map-underscore-to-camel-case=true
6.3 根据条件查询
条件:根据输入的员工姓名、员工性别、入职时间搜索满足条件的员工信息。其中员工姓名,支持模糊匹配;性别进行精确查询;入职时间进行范围查询;并对查询的结果,根据最后修改时间进行倒叙排序。
代码演示:
import org.apache.ibatis.annotations.*;import java.time.LocalDate;
import java.util.List;@org.apache.ibatis.annotations.Mapper
public interface Mapper {//根据条件进行查询@Select("select * from emp where name like concat('%',#{name},'%') and gender = #{gender} and " +"entrydate between #{start} and #{end} order by update_time desc ")public List<Emp> selectCondition(String name, int gender, LocalDate start,LocalDate end);}
这里用到了 concat() 方法用于连接两个或多个字符串的方法。它将指定的字符串与调用字符串连接,并将返回一个新的字符串,而不会更改原始字符串。这个方法可以接受任意数量的参数,然后将它们连接在一起,以创建一个新的字符串。
注意事项:#{} 占位符不能内嵌在 "" 中,而 ${} 占位符可以内嵌在 "" 中。
7.0 本篇文章的完整代码
7.1 application.properties 属性文件
spring.datasource.drive-class-name=com.mysql.cj.jdbc.Driver
spring.datasource.url=jdbc:mysql://localhost:3306/db01?characterEncoding=utf-8&useSSL=true
spring.datasource.username=root
spring.datasource.password=123456#将日志打印到控制台上
mybatis.configuration.log-impl=org.apache.ibatis.logging.stdout.StdOutImpl#开启驼峰命名自动映射开关
mybatis.configuration.map-underscore-to-camel-case=true
7.2 pom.xml 文件
<project xmlns="http://maven.apache.org/POM/4.0.0" xmlns:xsi="http://www.w3.org/2001/XMLSchema-instance"xsi:schemaLocation="http://maven.apache.org/POM/4.0.0 http://maven.apache.org/xsd/maven-4.0.0.xsd"><modelVersion>4.0.0</modelVersion><groupId>org.example</groupId><artifactId>code_24_5_20_2</artifactId><version>1.0-SNAPSHOT</version><packaging>jar</packaging><name>code_24_5_20_2</name><url>http://maven.apache.org</url><!--1、spring-boot-starter-parent自动引入springboot中最基础的组件,所有springboot项目都要依赖它进行构建--><parent><groupId>org.springframework.boot</groupId><artifactId>spring-boot-starter-parent</artifactId><version>2.7.4</version></parent><properties><project.build.sourceEncoding>UTF-8</project.build.sourceEncoding></properties><dependencies><!--2、引入springboot依赖,spring-boot-starter-web表示在项目中增加支持javaweb的功能,版本信息已经在parent中定义--><dependency><groupId>org.springframework.boot</groupId><artifactId>spring-boot-starter-web</artifactId></dependency><dependency><groupId>junit</groupId><artifactId>junit</artifactId><version>3.8.1</version><scope>test</scope></dependency><!--mybatis的起步依赖--><dependency><groupId>org.mybatis.spring.boot</groupId><artifactId>mybatis-spring-boot-starter</artifactId><version>2.2.2</version></dependency><!--mysql驱动包--><dependency><groupId>mysql</groupId><artifactId>mysql-connector-java</artifactId><scope>runtime</scope></dependency><dependency><groupId>org.springframework.boot</groupId><artifactId>spring-boot-starter-test</artifactId><scope>test</scope></dependency><!--lombok--><dependency><groupId>org.projectlombok</groupId><artifactId>lombok</artifactId></dependency><!--Druid依赖--><dependency><groupId>com.alibaba</groupId><artifactId>druid-spring-boot-starter</artifactId><version>1.2.8</version></dependency></dependencies><!--3、定义springboot的打包方式,spring-boot-maven-plugin可以在打包时自动将所有类和资源打包成一个独立可运行的jar包--><build><!--打包指定名称--><finalName>projectName</finalName><plugins><plugin><groupId>org.springframework.boot</groupId><artifactId>spring-boot-maven-plugin</artifactId></plugin></plugins></build></project>
7.3 Mapper 接口
import org.apache.ibatis.annotations.*;import java.time.LocalDate;
import java.util.List;@org.apache.ibatis.annotations.Mapper
public interface Mapper {//根据条件进行查询@Select("select * from emp where name like concat('%',#{name},'%') and gender = #{gender} and " +"entrydate between #{start} and #{end} order by update_time desc ")public List<Emp> selectCondition(String name, int gender, LocalDate start,LocalDate end);//手动建立映射关系@Results({//column 代表原来的字段名、property 代表替换的字段名@Result(column = "create_time",property = "createTime"),@Result(column = "dept_id",property = "deptId"),@Result(column = "update_time",property = "updateTime")})//根据ID查询@Select("select * from emp where id = #{id}")public Emp selectID(int id);//更新数据操作@Update("update emp set username = #{username} , name = #{name} , gender = #{gender} , job = #{job}," +"entrydate = #{entrydate} , dept_id = #{deptId}, create_time = #{createTime}, update_time = #{updateTime} where id = #{id}")public void update(Emp emp);@Options(useGeneratedKeys = true,keyProperty = "id")//增加数据操作@Insert("insert into emp(username,name,gender,job,entrydate,dept_id,create_time,update_time) " +"values (#{username},#{name},#{gender},#{job},#{entrydate},#{deptId},#{createTime},#{updateTime})")public void insert(Emp emp);//删除数据操作@Delete("delete from emp where id = #{id}")public void delete(int id);}
7.4 测试代码
import junit.framework.TestCase;
import junit.framework.TestSuite;
import org.example.CURD.Emp;
import org.example.CURD.Mapper;
import org.example.Project.GetData;
import org.example.Project.User;
import org.junit.jupiter.api.Test;
import org.springframework.beans.factory.annotation.Autowired;
import org.springframework.boot.test.context.SpringBootTest;import java.time.LocalDate;
import java.time.LocalDateTime;
import java.util.List;/*** Unit test for simple App.*/
@SpringBootTest
public class AppTest extends TestCase {@AutowiredMapper selectMapper;@Testpublic void testSelect(){Emp emp = selectMapper.selectID(1);System.out.println(emp);}@AutowiredMapper updateMapper;@Testpublic void testUpdate(){Emp emp = new Emp();emp.setId(5);emp.setUsername("小扳手");emp.setName("TT");emp.setJob(3);emp.setEntrydate(LocalDate.of(2022,3,5));emp.setCreateTime(LocalDateTime.now());emp.setUpdateTime(LocalDateTime.now());emp.setDeptId(1);mapper.update(emp);}@AutowiredMapper mapper;@Testpublic void testInsert(){Emp emp = new Emp();emp.setUsername("小童");emp.setName("TT");emp.setJob(0);emp.setEntrydate(LocalDate.of(2024,3,4));emp.setCreateTime(LocalDateTime.now());emp.setUpdateTime(LocalDateTime.now());emp.setDeptId(1);mapper.insert(emp);System.out.println(emp.getId());}@AutowiredMapper deleteMapper;@Testpublic void testDelete(){deleteMapper.delete(3);}@AutowiredGetData get;@Testpublic void test(){List<User>  list = get.getData();list.forEach(System.out::println);}@AutowiredMapper selectCondition;@Testpublic void testSelectCondition(){List<Emp> list = selectCondition.selectCondition("童",0,LocalDate.of(2022,3,5),LocalDate.of(2025,4,4));System.out.println(list);}
}
7.5 Emp 类
import lombok.AllArgsConstructor;
import lombok.Data;
import lombok.NoArgsConstructor;import java.time.LocalDate;
import java.time.LocalDateTime;@Data
@NoArgsConstructor
@AllArgsConstructor
public class Emp {private int id;private String username;private String password;private String name;private int gender;private int job;private LocalDate entrydate;private int deptId;private LocalDateTime createTime;private LocalDateTime updateTime;}

