首先到官网https://console.xfyun.cn/services/aidoc申请key
一、安装依赖
<?xml version="1.0" encoding="UTF-8"?>
<project xmlns="http://maven.apache.org/POM/4.0.0" xmlns:xsi="http://www.w3.org/2001/XMLSchema-instance"xsi:schemaLocation="http://maven.apache.org/POM/4.0.0 https://maven.apache.org/xsd/maven-4.0.0.xsd"><modelVersion>4.0.0</modelVersion><parent><groupId>org.springframework.boot</groupId><artifactId>spring-boot-starter-parent</artifactId><version>2.6.13</version><relativePath/> <!-- lookup parent from repository --></parent><!-- Generated by https://start.springboot.io --><!-- 优质的 spring/boot/data/security/cloud 框架中文文档尽在 => https://springdoc.cn --><groupId>com.example</groupId><artifactId>xunfeigpt</artifactId><version>0.0.1-SNAPSHOT</version><name>xunfeigpt</name><description>xunfeigpt</description><properties><java.version>1.8</java.version><netty.verson>4.1.45.Final</netty.verson></properties><dependencies><dependency><groupId>org.projectlombok</groupId><artifactId>lombok</artifactId></dependency><dependency><groupId>com.google.code.gson</groupId><artifactId>gson</artifactId><version>2.8.2</version></dependency><dependency><groupId>com.squareup.okhttp3</groupId><artifactId>okhttp</artifactId><version>4.9.0</version></dependency><dependency><groupId>com.alibaba</groupId><artifactId>fastjson</artifactId><version>1.2.47</version></dependency><dependency><groupId>org.springframework.boot</groupId><artifactId>spring-boot-starter</artifactId></dependency><dependency><groupId>org.springframework.boot</groupId><artifactId>spring-boot-starter-web</artifactId></dependency><dependency><groupId>org.springframework</groupId><artifactId>spring-context</artifactId></dependency><dependency><groupId>io.netty</groupId><artifactId>netty-all</artifactId><version>${netty.verson}</version></dependency><dependency><groupId>org.apache.commons</groupId><artifactId>commons-lang3</artifactId><version>3.12.0</version></dependency></dependencies><build><plugins><plugin><groupId>org.springframework.boot</groupId><artifactId>spring-boot-maven-plugin</artifactId><configuration><excludes><exclude><groupId>org.projectlombok</groupId><artifactId>lombok</artifactId></exclude></excludes></configuration></plugin></plugins></build></project>
二、配置文件
在科大讯飞官网申请key
server:port: 1644xf:config:hostUrl: https://spark-api.xf-yun.com/v3.5/chatappId: xxxxxxxapiSecret: xxxxxxxxapiKey: xxxxxxxmaxResponseTime: 30
三、项目结构
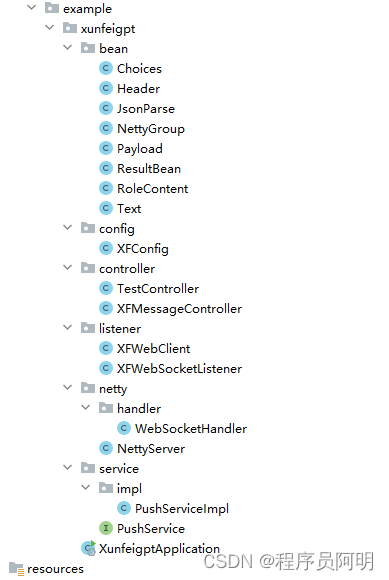
四、各个模块代码
1、在bean目录下
1)Choices类
package com.example.xunfeigpt.bean;import lombok.Data;import java.util.List;@Data
public class Choices {private List<Text> text;
}
2)Header类型
import lombok.Data;@Data
public class Header {private int code;private int status;private String sid;
}
3)JsonParse类型
import lombok.Data;@Data
public class JsonParse {private Header header;private Payload payload;
}
4)NettyGroup类型
package com.example.xunfeigpt.bean;import io.netty.channel.Channel;
import io.netty.channel.group.ChannelGroup;
import io.netty.channel.group.DefaultChannelGroup;
import io.netty.util.concurrent.GlobalEventExecutor;import java.util.concurrent.ConcurrentHashMap;public class NettyGroup {private static ChannelGroup channelGroup = new DefaultChannelGroup(GlobalEventExecutor.INSTANCE);/*** 存放用户与Chanel的对应信息,用于给指定用户发送消息*/private static ConcurrentHashMap<String, Channel> channelMap = new ConcurrentHashMap<>();private NettyGroup() {}/*** 获取channel组*/public static ChannelGroup getChannelGroup() {return channelGroup;}/*** 获取连接channel map*/public static ConcurrentHashMap<String, Channel> getUserChannelMap() {return channelMap;}
}
5)Payload类型
import lombok.Data;@Data
public class Payload {private Choices choices;
}
6)ResultBean类型
package com.example.xunfeigpt.bean;import lombok.*;/*** @Author: ChengLiang* @CreateTime: 2023-05-22  11:04* @Description: TODO* @Version: 1.0*/
@Getter
@Setter
@ToString(callSuper = true)
@AllArgsConstructor
@NoArgsConstructor
public class ResultBean<T> {private String errorCode;private String message;private T data;public ResultBean(T data) {this.errorCode = ErrorMessage.SUCCESS.getErrorCode();this.message = ErrorMessage.SUCCESS.getMessage();this.data = data;}public ResultBean(ErrorMessage errorMessage, T data) {this.errorCode = errorMessage.getErrorCode();this.message = errorMessage.getMessage();this.data = data;}public static <T> ResultBean success(T data) {ResultBean resultBean = new ResultBean(data);return resultBean;}public static <T> ResultBean fail(T data) {ResultBean resultBean = new ResultBean(ErrorMessage.FAIL.getErrorCode(), ErrorMessage.FAIL.getMessage(), data);return resultBean;}public enum ErrorMessage {SUCCESS("0", "success"),FAIL("001", "fail"),NOAUTH("1001", "非法访问");private String errorCode;private String message;ErrorMessage(String errorCode, String message) {this.errorCode = errorCode;this.message = message;}public String getErrorCode() {return errorCode;}public void setErrorCode(String errorCode) {this.errorCode = errorCode;}public String getMessage() {return message;}public void setMessage(String message) {this.message = message;}}
}
7)RoleContent类型
import lombok.AllArgsConstructor;
import lombok.Data;
import lombok.NoArgsConstructor;@Data
@AllArgsConstructor
@NoArgsConstructor
public class RoleContent {public static final String ROLE_USER = "user";public static final String ROLE_ASSISTANT = "assistant";private String role;private String content;public static RoleContent createUserRoleContent(String content) {return new RoleContent(ROLE_USER, content);}public static RoleContent createAssistantRoleContent(String content) {return new RoleContent(ROLE_ASSISTANT, content);}
}
8)Text类型
import lombok.Data;@Data
public class Text {private String role;private String content;
}
2、在config目录下新建XFConfig类
import lombok.Data;
import org.springframework.boot.context.properties.ConfigurationProperties;
import org.springframework.stereotype.Component;@Data
@Component
@ConfigurationProperties("xf.config")
public class XFConfig {private String appId;private String apiSecret;private String apiKey;private String hostUrl;private Integer maxResponseTime;
}
3、在listener目录下
1)新建XFWebClient类
import com.alibaba.fastjson.JSONArray;
import com.alibaba.fastjson.JSONObject;
import com.example.xunfeigpt.bean.RoleContent;import com.example.xunfeigpt.config.XFConfig;
import lombok.extern.slf4j.Slf4j;
import okhttp3.*;
import org.springframework.beans.factory.annotation.Autowired;
import org.springframework.stereotype.Component;import javax.crypto.Mac;
import javax.crypto.spec.SecretKeySpec;
import java.net.URL;
import java.nio.charset.StandardCharsets;
import java.text.SimpleDateFormat;
import java.util.*;@Slf4j
@Component
public class XFWebClient {@Autowiredprivate XFConfig xfConfig;/*** 发送消息** @param uid       每个用户的id,用于区分不同用户* @param questions 发送给大模型的消息,可以包含上下文内容* @return 获取websocket连接,以便于我们在获取完整大模型回复后手动关闭连接*//*** @description: 发送请求至大模型方法* @author: ChengLiang* @date: 2023/10/19 16:27* @param: [用户id, 请求内容, 返回结果监听器listener]* @return: okhttp3.WebSocket**/public WebSocket sendMsg(String uid, List<RoleContent> questions, WebSocketListener listener) {// 获取鉴权urlString authUrl = null;try {authUrl = getAuthUrl(xfConfig.getHostUrl(), xfConfig.getApiKey(), xfConfig.getApiSecret());} catch (Exception e) {log.error("鉴权失败:{}", e);return null;}// 鉴权方法生成失败,直接返回 nullOkHttpClient okHttpClient = new OkHttpClient.Builder().build();// 将 https/http 连接替换为 ws/wss 连接String url = authUrl.replace("http://", "ws://").replace("https://", "wss://");Request request = new Request.Builder().url(url).build();// 建立 wss 连接WebSocket webSocket = okHttpClient.newWebSocket(request, listener);// 组装请求参数JSONObject requestDTO = createRequestParams(uid, questions);// 发送请求webSocket.send(JSONObject.toJSONString(requestDTO));return webSocket;}/*** @description: 鉴权方法* @author: ChengLiang* @date: 2023/10/19 16:25* @param: [讯飞大模型请求地址, apiKey, apiSecret]* @return: java.lang.String**/public static String getAuthUrl(String hostUrl, String apiKey, String apiSecret) throws Exception {URL url = new URL(hostUrl);// 时间SimpleDateFormat format = new SimpleDateFormat("EEE, dd MMM yyyy HH:mm:ss z", Locale.US);format.setTimeZone(TimeZone.getTimeZone("GMT"));String date = format.format(new Date());// 拼接String preStr = "host: " + url.getHost() + "\n" +"date: " + date + "\n" +"GET " + url.getPath() + " HTTP/1.1";// SHA256加密Mac mac = Mac.getInstance("hmacsha256");SecretKeySpec spec = new SecretKeySpec(apiSecret.getBytes(StandardCharsets.UTF_8), "hmacsha256");mac.init(spec);byte[] hexDigits = mac.doFinal(preStr.getBytes(StandardCharsets.UTF_8));// Base64加密String sha = Base64.getEncoder().encodeToString(hexDigits);// 拼接String authorization = String.format("api_key=\"%s\", algorithm=\"%s\", headers=\"%s\", signature=\"%s\"", apiKey, "hmac-sha256", "host date request-line", sha);// 拼接地址HttpUrl httpUrl = Objects.requireNonNull(HttpUrl.parse("https://" + url.getHost() + url.getPath())).newBuilder().//addQueryParameter("authorization", Base64.getEncoder().encodeToString(authorization.getBytes(StandardCharsets.UTF_8))).//addQueryParameter("date", date).//addQueryParameter("host", url.getHost()).//build();return httpUrl.toString();}/*** @description: 请求参数组装方法* @author: ChengLiang* @date: 2023/10/19 16:26* @param: [用户id, 请求内容]* @return: com.alibaba.fastjson.JSONObject**/public JSONObject createRequestParams(String uid, List<RoleContent> questions) {JSONObject requestJson = new JSONObject();// header参数JSONObject header = new JSONObject();header.put("app_id", xfConfig.getAppId());header.put("uid", uid);// parameter参数JSONObject parameter = new JSONObject();JSONObject chat = new JSONObject();chat.put("domain", "generalv2");chat.put("temperature", 0.5);chat.put("max_tokens", 4096);parameter.put("chat", chat);// payload参数JSONObject payload = new JSONObject();JSONObject message = new JSONObject();JSONArray jsonArray = new JSONArray();jsonArray.addAll(questions);message.put("text", jsonArray);payload.put("message", message);requestJson.put("header", header);requestJson.put("parameter", parameter);requestJson.put("payload", payload);return requestJson;}
}
2)新建XFWebSocketListener类
package com.example.xunfeigpt.listener;import com.alibaba.fastjson.JSON;import com.example.xunfeigpt.bean.JsonParse;
import com.example.xunfeigpt.bean.Text;
import lombok.extern.slf4j.Slf4j;
import okhttp3.Response;
import okhttp3.WebSocket;
import okhttp3.WebSocketListener;import java.io.IOException;
import java.util.*;@Slf4j
public class XFWebSocketListener extends WebSocketListener {//断开websocket标志位private boolean wsCloseFlag = false;//语句组装buffer,将大模型返回结果全部接收,在组装成一句话返回private StringBuilder answer = new StringBuilder();public String getAnswer() {return answer.toString();}public boolean isWsCloseFlag() {return wsCloseFlag;}@Overridepublic void onOpen(WebSocket webSocket, Response response) {super.onOpen(webSocket, response);log.info("大模型服务器连接成功!");}@Overridepublic void onMessage(WebSocket webSocket, String text) {super.onMessage(webSocket, text);JsonParse myJsonParse = JSON.parseObject(text, JsonParse.class);log.info("myJsonParse:{}", JSON.toJSONString(myJsonParse));if (myJsonParse.getHeader().getCode() != 0) {log.error("发生错误,错误信息为:{}", JSON.toJSONString(myJsonParse.getHeader()));this.answer.append("大模型响应异常,请联系管理员");// 关闭连接标识wsCloseFlag = true;return;}List<Text> textList = myJsonParse.getPayload().getChoices().getText();for (Text temp : textList) {log.info("返回结果信息为:【{}】", JSON.toJSONString(temp));this.answer.append(temp.getContent());}log.info("result:{}", this.answer.toString());if (myJsonParse.getHeader().getStatus() == 2) {wsCloseFlag = true;//todo 将问答信息入库进行记录,可自行实现}}@Overridepublic void onFailure(WebSocket webSocket, Throwable t, Response response) {super.onFailure(webSocket, t, response);try {if (null != response) {int code = response.code();log.error("onFailure body:{}", response.body().string());if (101 != code) {log.error("讯飞星火大模型连接异常");}}} catch (IOException e) {log.error("IO异常:{}", e);}}
}
4、在netty目录下
1)新建NettyServer类
package com.example.xunfeigpt.netty;import com.example.xunfeigpt.netty.handler.WebSocketHandler;
import io.netty.bootstrap.ServerBootstrap;
import io.netty.channel.ChannelFuture;
import io.netty.channel.ChannelInitializer;
import io.netty.channel.EventLoopGroup;
import io.netty.channel.nio.NioEventLoopGroup;
import io.netty.channel.socket.SocketChannel;
import io.netty.channel.socket.nio.NioServerSocketChannel;
import io.netty.handler.codec.http.HttpObjectAggregator;
import io.netty.handler.codec.http.HttpServerCodec;
import io.netty.handler.codec.http.websocketx.WebSocketServerProtocolHandler;
import io.netty.handler.codec.serialization.ObjectEncoder;
import io.netty.handler.stream.ChunkedWriteHandler;
import lombok.extern.slf4j.Slf4j;
import org.springframework.beans.factory.annotation.Autowired;
import org.springframework.beans.factory.annotation.Value;
import org.springframework.stereotype.Component;import javax.annotation.PostConstruct;
import javax.annotation.PreDestroy;
import java.net.InetSocketAddress;@Slf4j
@Component
public class NettyServer {/*** webSocket协议名*/private static final String WEBSOCKET_PROTOCOL = "WebSocket";/*** 端口号*/@Value("${webSocket.netty.port:62632}")private int port;/*** webSocket路径*/@Value("${webSocket.netty.path:/webSocket}")private String webSocketPath;@Autowiredprivate WebSocketHandler webSocketHandler;private EventLoopGroup bossGroup;private EventLoopGroup workGroup;/*** 启动** @throws InterruptedException*/private void start() throws InterruptedException {bossGroup = new NioEventLoopGroup();workGroup = new NioEventLoopGroup();ServerBootstrap bootstrap = new ServerBootstrap();// bossGroup辅助客户端的tcp连接请求, workGroup负责与客户端之前的读写操作bootstrap.group(bossGroup, workGroup);// 设置NIO类型的channelbootstrap.channel(NioServerSocketChannel.class);// 设置监听端口bootstrap.localAddress(new InetSocketAddress(port));// 连接到达时会创建一个通道bootstrap.childHandler(new ChannelInitializer<SocketChannel>() {@Overrideprotected void initChannel(SocketChannel ch) throws Exception {// 流水线管理通道中的处理程序(Handler),用来处理业务// webSocket协议本身是基于http协议的,所以这边也要使用http编解码器ch.pipeline().addLast(new HttpServerCodec());ch.pipeline().addLast(new ObjectEncoder());// 以块的方式来写的处理器ch.pipeline().addLast(new ChunkedWriteHandler());/*说明:1、http数据在传输过程中是分段的,HttpObjectAggregator可以将多个段聚合2、这就是为什么,当浏览器发送大量数据时,就会发送多次http请求*/ch.pipeline().addLast(new HttpObjectAggregator(8192));/*说明:1、对应webSocket,它的数据是以帧(frame)的形式传递2、浏览器请求时 ws://localhost:58080/xxx 表示请求的uri3、核心功能是将http协议升级为ws协议,保持长连接*/ch.pipeline().addLast(new WebSocketServerProtocolHandler(webSocketPath, WEBSOCKET_PROTOCOL, true, 65536 * 10));// 自定义的handler,处理业务逻辑ch.pipeline().addLast(webSocketHandler);}});// 配置完成,开始绑定server,通过调用sync同步方法阻塞直到绑定成功ChannelFuture channelFuture = bootstrap.bind().sync();log.info("Server started and listen on:{}", channelFuture.channel().localAddress());// 对关闭通道进行监听channelFuture.channel().closeFuture().sync();}/*** 释放资源** @throws InterruptedException*/@PreDestroypublic void destroy() throws InterruptedException {if (bossGroup != null) {bossGroup.shutdownGracefully().sync();}if (workGroup != null) {workGroup.shutdownGracefully().sync();}}@PostConstruct()public void init() {//需要开启一个新的线程来执行netty server 服务器new Thread(() -> {try {start();log.info("消息推送线程开启!");} catch (InterruptedException e) {e.printStackTrace();}}).start();}
}
2)在handler目录下新建handler类
package com.example.xunfeigpt.netty.handler;import com.alibaba.fastjson.JSON;
import com.alibaba.fastjson.JSONObject;import com.example.xunfeigpt.bean.NettyGroup;
import com.example.xunfeigpt.bean.ResultBean;
import com.example.xunfeigpt.service.PushService;
import io.netty.channel.ChannelHandler;
import io.netty.channel.ChannelHandlerContext;
import io.netty.channel.SimpleChannelInboundHandler;
import io.netty.handler.codec.http.websocketx.TextWebSocketFrame;
import io.netty.util.AttributeKey;
import lombok.extern.slf4j.Slf4j;
import org.springframework.beans.factory.annotation.Autowired;
import org.springframework.stereotype.Component;@Slf4j
@Component
@ChannelHandler.Sharable
public class WebSocketHandler extends SimpleChannelInboundHandler<TextWebSocketFrame> {@Autowiredprivate PushService pushService;@Overridepublic void handlerAdded(ChannelHandlerContext ctx) throws Exception {log.info("handlerAdded被调用,{}", JSON.toJSONString(ctx));//todo 添加校验功能,校验合法后添加到group中// 添加到channelGroup 通道组NettyGroup.getChannelGroup().add(ctx.channel());}@Overrideprotected void channelRead0(ChannelHandlerContext ctx, TextWebSocketFrame msg) throws Exception {log.info("服务器收到消息:{}", msg.text());// 获取用户ID,关联channelJSONObject jsonObject = JSON.parseObject(msg.text());String channelId = jsonObject.getString("uid");// 将用户ID作为自定义属性加入到channel中,方便随时channel中获取用户IDAttributeKey<String> key = AttributeKey.valueOf("userId");//String channelId = CharUtil.generateStr(uid);NettyGroup.getUserChannelMap().put(channelId, ctx.channel());boolean containsKey = NettyGroup.getUserChannelMap().containsKey(channelId);//通道已存在,请求信息返回if (containsKey) {//接收消息格式{"uid":"123456","text":"中华人民共和国成立时间"}String text = jsonObject.getString("text");//请求大模型服务器,获取结果ResultBean resultBean = pushService.pushMessageToXFServer(channelId, text);String data = (String) resultBean.getData();//推送pushService.pushToOne(channelId, JSON.toJSONString(data));} else {ctx.channel().attr(key).setIfAbsent(channelId);log.info("连接通道id:{}", channelId);// 回复消息ctx.channel().writeAndFlush(new TextWebSocketFrame(JSON.toJSONString(ResultBean.success(channelId))));}}@Overridepublic void handlerRemoved(ChannelHandlerContext ctx) throws Exception {log.info("handlerRemoved被调用,{}", JSON.toJSONString(ctx));// 删除通道NettyGroup.getChannelGroup().remove(ctx.channel());removeUserId(ctx);}@Overridepublic void exceptionCaught(ChannelHandlerContext ctx, Throwable cause) throws Exception {log.info("通道异常:{}", cause.getMessage());// 删除通道NettyGroup.getChannelGroup().remove(ctx.channel());removeUserId(ctx);ctx.close();}private void removeUserId(ChannelHandlerContext ctx) {AttributeKey<String> key = AttributeKey.valueOf("userId");String userId = ctx.channel().attr(key).get();NettyGroup.getUserChannelMap().remove(userId);}
}
5、在service目录下
1)新建PushService接口
import com.example.xunfeigpt.bean.ResultBean;public interface PushService {void pushToOne(String uid, String text);void pushToAll(String text);ResultBean pushMessageToXFServer(String uid, String text);
}
2)在impl文件夹下新建PushServiceImpl类
package com.example.xunfeigpt.service.impl;import com.alibaba.fastjson.JSON;import com.example.xunfeigpt.bean.NettyGroup;
import com.example.xunfeigpt.bean.ResultBean;
import com.example.xunfeigpt.bean.RoleContent;
import com.example.xunfeigpt.config.XFConfig;
import com.example.xunfeigpt.listener.XFWebClient;
import com.example.xunfeigpt.listener.XFWebSocketListener;
import com.example.xunfeigpt.service.PushService;
import io.netty.channel.Channel;
import io.netty.handler.codec.http.websocketx.TextWebSocketFrame;
import lombok.extern.slf4j.Slf4j;
import okhttp3.WebSocket;
import org.springframework.beans.factory.annotation.Autowired;
import org.springframework.stereotype.Service;
import org.springframework.util.StringUtils;import java.util.ArrayList;
import java.util.concurrent.ConcurrentHashMap;@Slf4j
@Service
public class PushServiceImpl implements PushService {@Autowiredprivate XFConfig xfConfig;@Autowiredprivate XFWebClient xfWebClient;@Overridepublic void pushToOne(String uid, String text) {if (StringUtils.isEmpty(uid) || StringUtils.isEmpty(text)) {log.error("uid或text均不能为空");throw new RuntimeException("uid或text均不能为空");}ConcurrentHashMap<String, Channel> userChannelMap = NettyGroup.getUserChannelMap();for (String channelId : userChannelMap.keySet()) {if (channelId.equals(uid)) {Channel channel = userChannelMap.get(channelId);if (channel != null) {ResultBean success = ResultBean.success(text);channel.writeAndFlush(new TextWebSocketFrame(JSON.toJSONString(success)));log.info("信息发送成功:{}", JSON.toJSONString(success));} else {log.error("该id对于channelId不存在!");}return;}}log.error("该用户不存在!");}@Overridepublic void pushToAll(String text) {String trim = text.trim();ResultBean success = ResultBean.success(trim);NettyGroup.getChannelGroup().writeAndFlush(new TextWebSocketFrame(JSON.toJSONString(success)));log.info("信息推送成功:{}", JSON.toJSONString(success));}//测试账号只有2个并发,此处只使用一个,若是生产环境允许多个并发,可以采用分布式锁@Overridepublic synchronized ResultBean pushMessageToXFServer(String uid, String text) {RoleContent userRoleContent = RoleContent.createUserRoleContent(text);ArrayList<RoleContent> questions = new ArrayList<>();questions.add(userRoleContent);XFWebSocketListener xfWebSocketListener = new XFWebSocketListener();WebSocket webSocket = xfWebClient.sendMsg(uid, questions, xfWebSocketListener);if (webSocket == null) {log.error("webSocket连接异常");ResultBean.fail("请求异常,请联系管理员");}try {int count = 0;int maxCount = xfConfig.getMaxResponseTime() * 5;while (count <= maxCount) {Thread.sleep(200);if (xfWebSocketListener.isWsCloseFlag()) {break;}count++;}if (count > maxCount) {return ResultBean.fail("响应超时,请联系相关人员");}return ResultBean.success(xfWebSocketListener.getAnswer());} catch (Exception e) {log.error("请求异常:{}", e);} finally {webSocket.close(1000, "");}return ResultBean.success("");}
}
6、测试controller
import com.example.xunfeigpt.bean.ResultBean;
import com.example.xunfeigpt.service.PushService;
import lombok.extern.slf4j.Slf4j;
import org.apache.commons.lang3.StringUtils;
import org.springframework.beans.factory.annotation.Autowired;import org.springframework.web.bind.annotation.GetMapping;
import org.springframework.web.bind.annotation.RequestMapping;
import org.springframework.web.bind.annotation.RestController;@Slf4j
@RestController
@RequestMapping("/xfModel")
public class XFMessageController {@Autowiredprivate PushService pushService;@GetMapping("/test")public ResultBean test(String uid, String text) {if (StringUtils.isEmpty(uid) || StringUtils.isEmpty(text)) {log.error("uid或text不能为空");return ResultBean.fail("uid或text不能为空");}return pushService.pushMessageToXFServer(uid, text);}
}
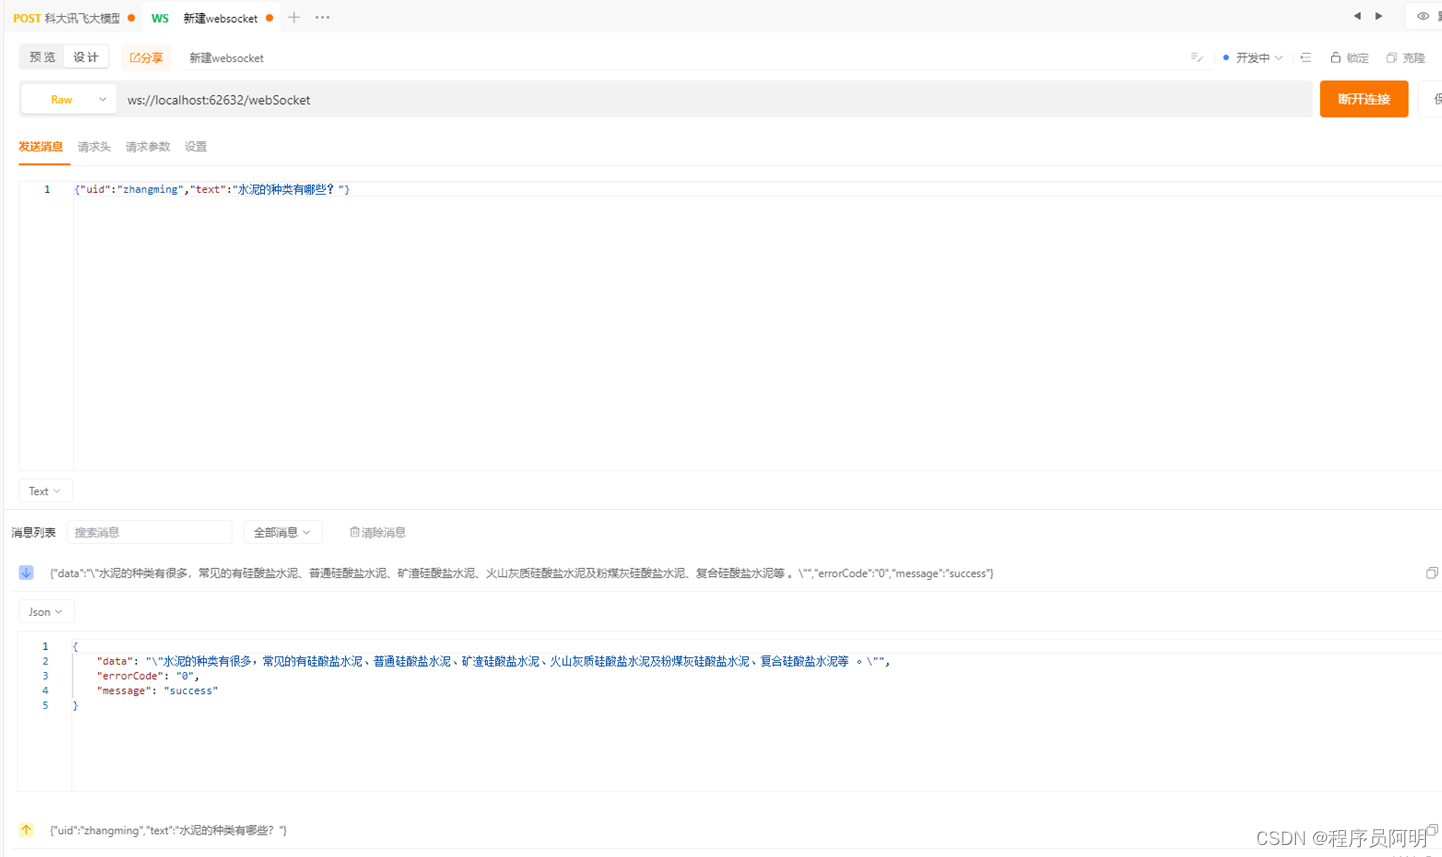
7、websocket测试
地址:ws://localhost:62632/webSocket
传参:
["uid":"xxxxxx","text";"水泥的种类有哪些?}
