文章目录
- 前言
- 相关链接
- 环境
- 信号
- 简单项目搭建
- 默认的信号
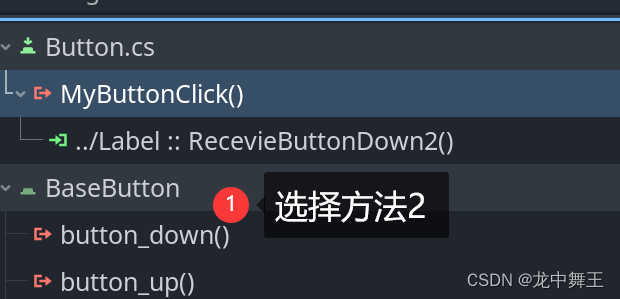
- 先在label里面预制接收函数
- 添加信号
- 自定义无参数信号
- 为了做区分,我们在label新增一个函数
- 自定义带参数信号
- Button代码
- label代码
- 连接信号
- 自定义复杂参数信号
- 自定义GodotObject类
- Button
- Label
- 连接信号
- 父传子
- Callable,信号回调
- Button
- Lable
- 连接信号
- 参数个数不对的异常问题
- 解决异常方法
- 手动连接信号
- 信号等待
- Node注入,取代信号
- 基于Action的信号模拟
- Button
- 总结
前言
这里我们深入学习一下Godot的信号。对于数据流的控制一直是前端最重要的内容。
相关链接
Godot Engine 4.2 简体中文文档
环境
- visual studio 2022
- .net core 8.0
- godot.net 4.2.1
- window 10
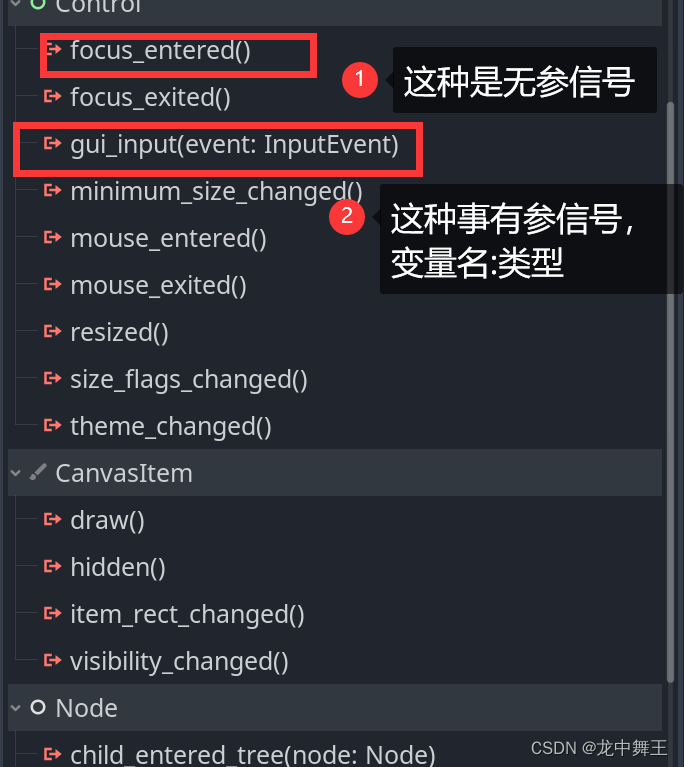
信号
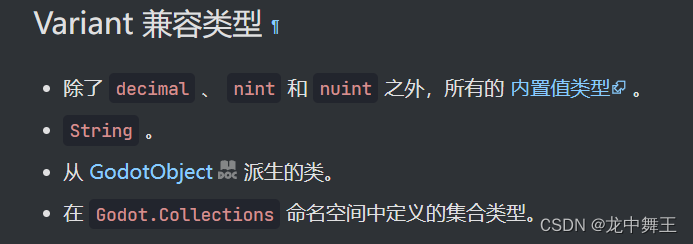
信号就是传输数据的一种方式,信号是单向数据流,信号默认是从下往上传递数据的。即子传父
简单项目搭建
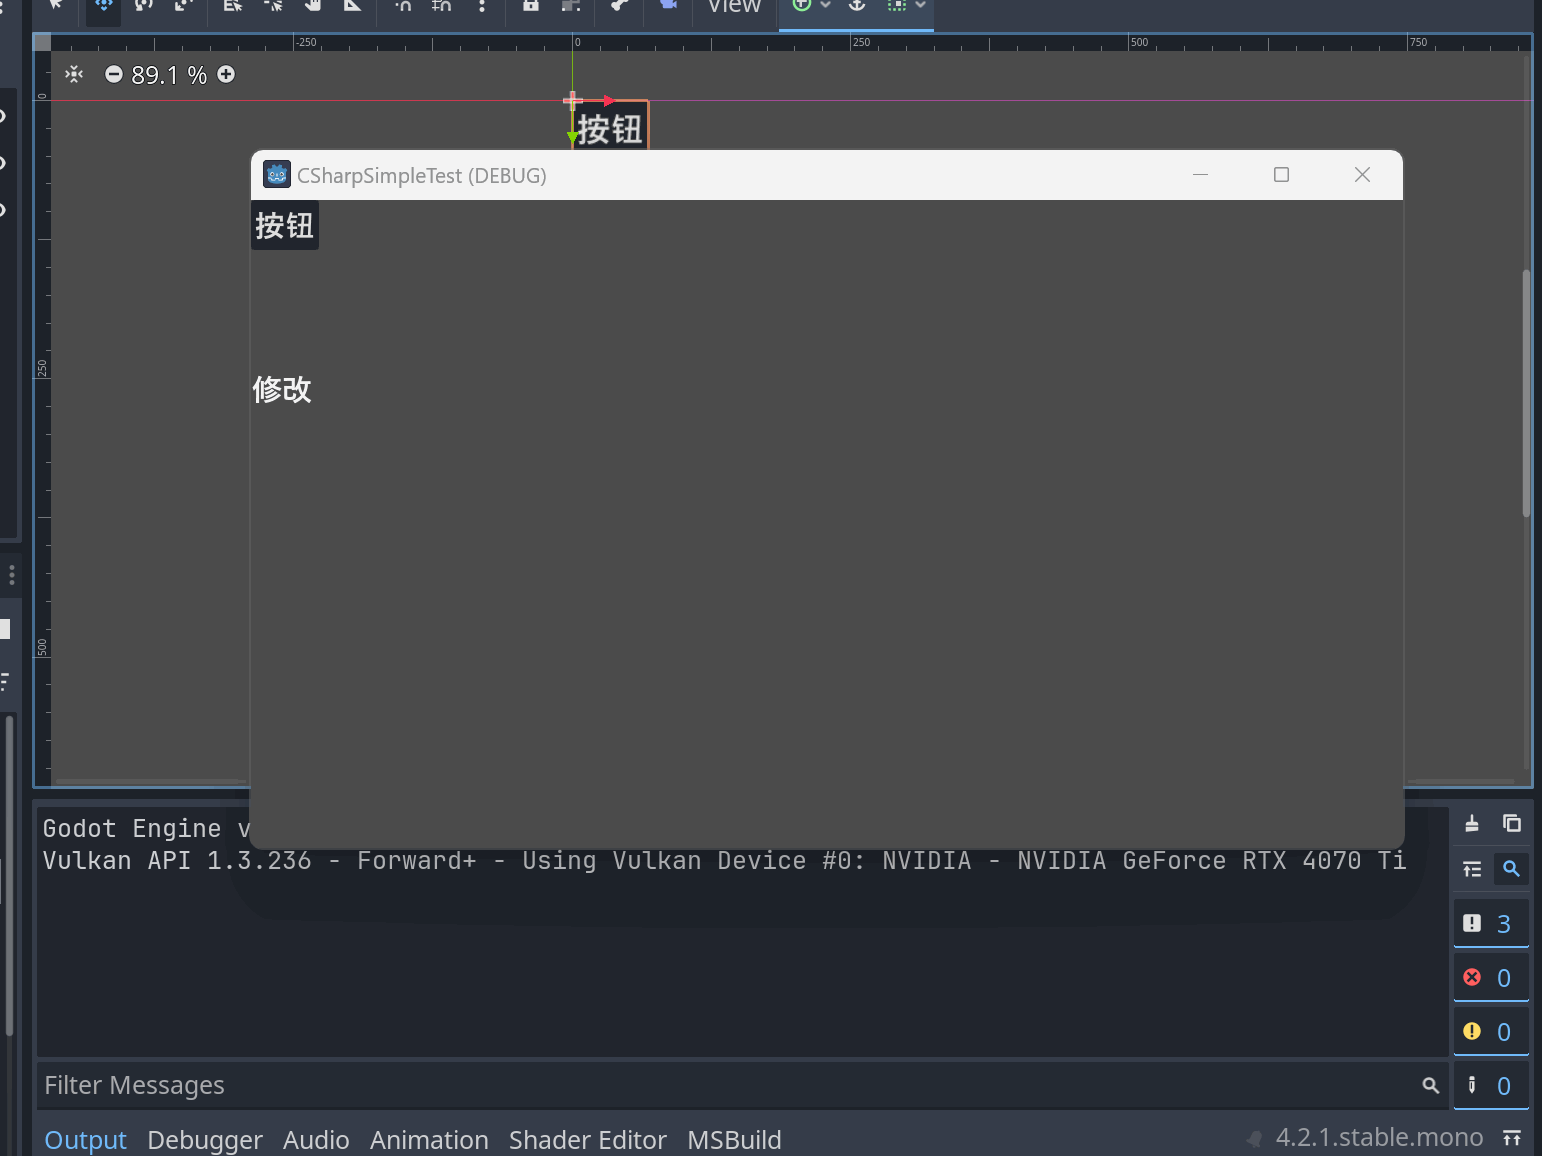
默认的信号
信号的发出和接收是需要配合的,有点像【发布订阅】模式。信号的发布是带有参数的。这里Button是发布者,Lable是订阅者。
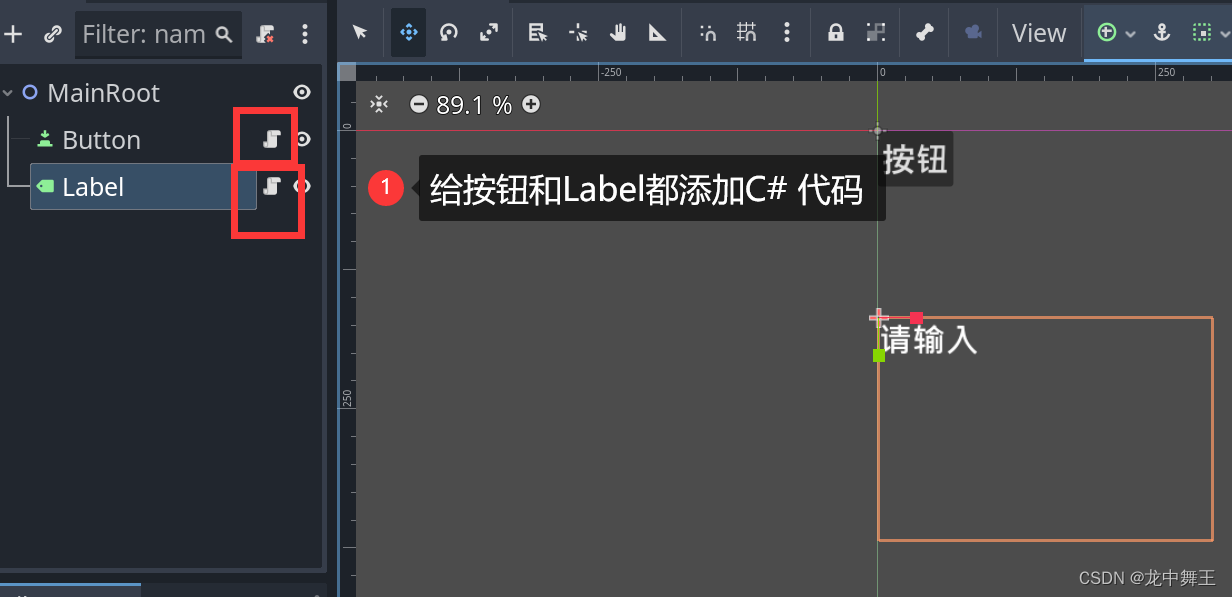
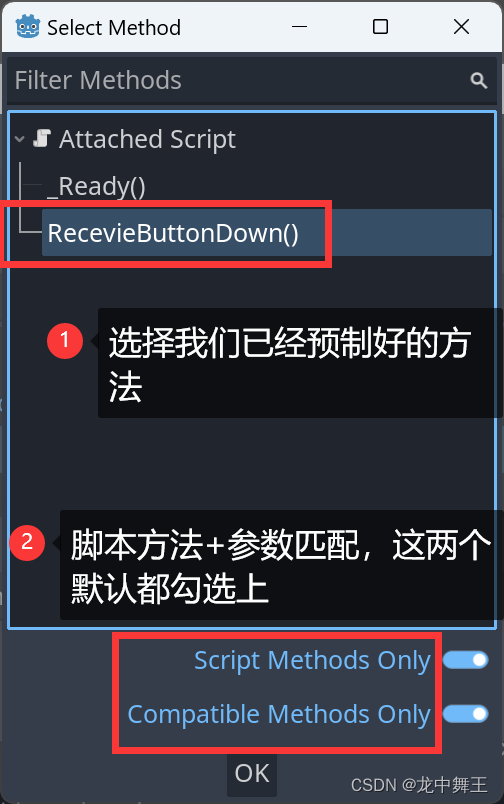
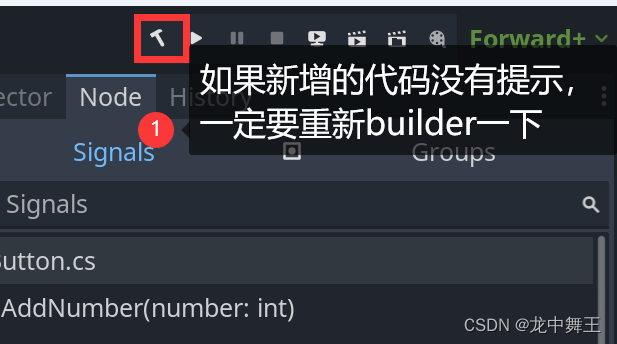
我这里建议先在订阅者一方先新建函数,再链接信号。因为Godot在gdscript中是可以自动新建代码的,但是在.net 中需要我们手动新建代码。
先在label里面预制接收函数
using Godot;
using System;public partial class Label : Godot.Label
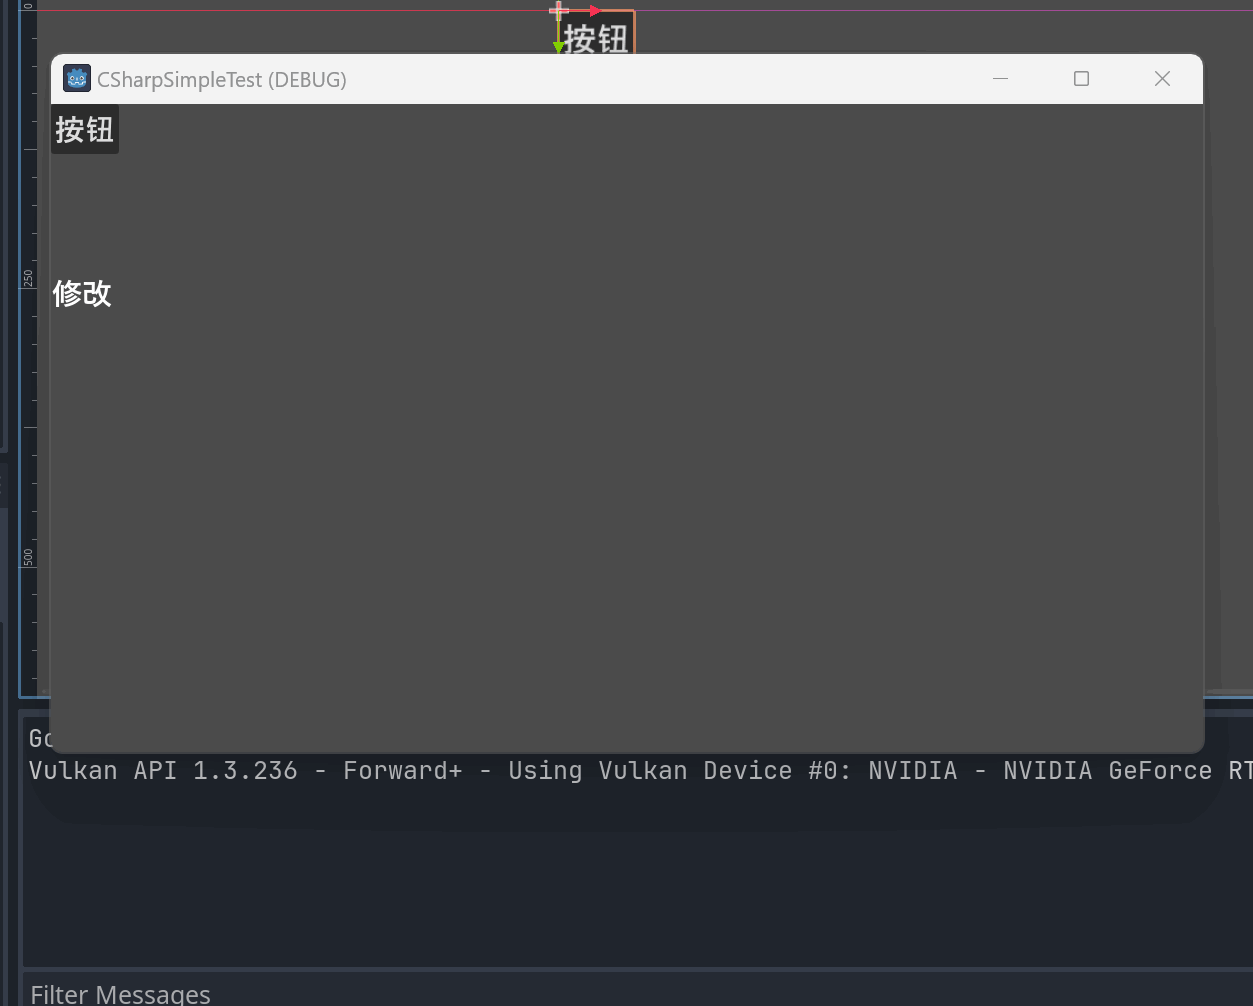
{private int num = 0;// Called when the node enters the scene tree for the first time.public override void _Ready(){this.Text = "修改";}// Called every frame. 'delta' is the elapsed time since the previous frame.public override void _Process(double delta){}/// <summary>/// 接受按钮点击/// </summary>public void RecevieButtonDown(){this.Text = $"{num}";num++;}}添加信号


自定义无参数信号
我们在Button的代码里面添加信号
using Godot;
using System;public partial class Button : Godot.Button
{// Called when the node enters the scene tree for the first time./// <summary>/// 添加自定义信号/// </summary>[Signal]public delegate void MyButtonClickEventHandler();public override void _Ready(){//在按钮按下时添加信号发送this.ButtonDown += () => EmitSignal(nameof(MyButtonClick));}// Called every frame. 'delta' is the elapsed time since the previous frame.public override void _Process(double delta){}}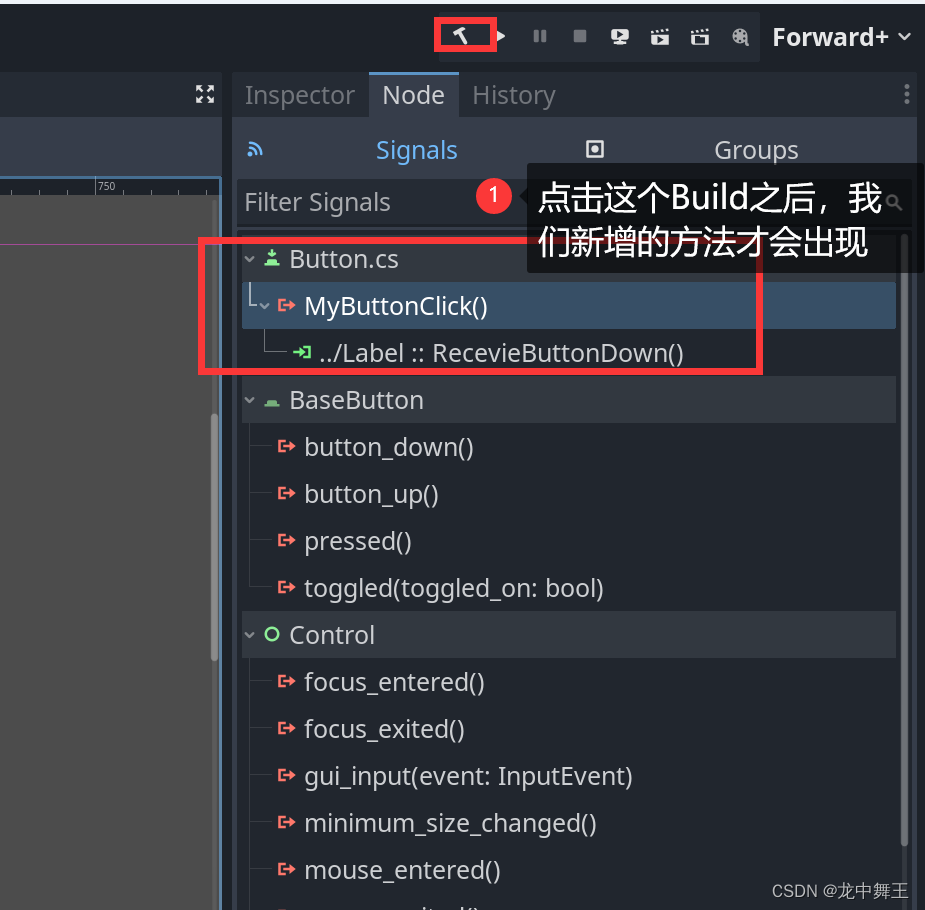
为了做区分,我们在label新增一个函数
/// <summary>/// 为了做区分,我们新增一个函数/// </summary>public void RecevieButtonDown2(){GD.Print("我是自定义无参信号");this.Text = $"{num}";num++;}
自定义带参数信号
这边比较复杂,需要了解C# 的delegate。
C#中委托(delegate)与事件(event)的快速理解
不理解的话那就先凑合着用好了。
Button代码
using Godot;
using System;public partial class Button : Godot.Button
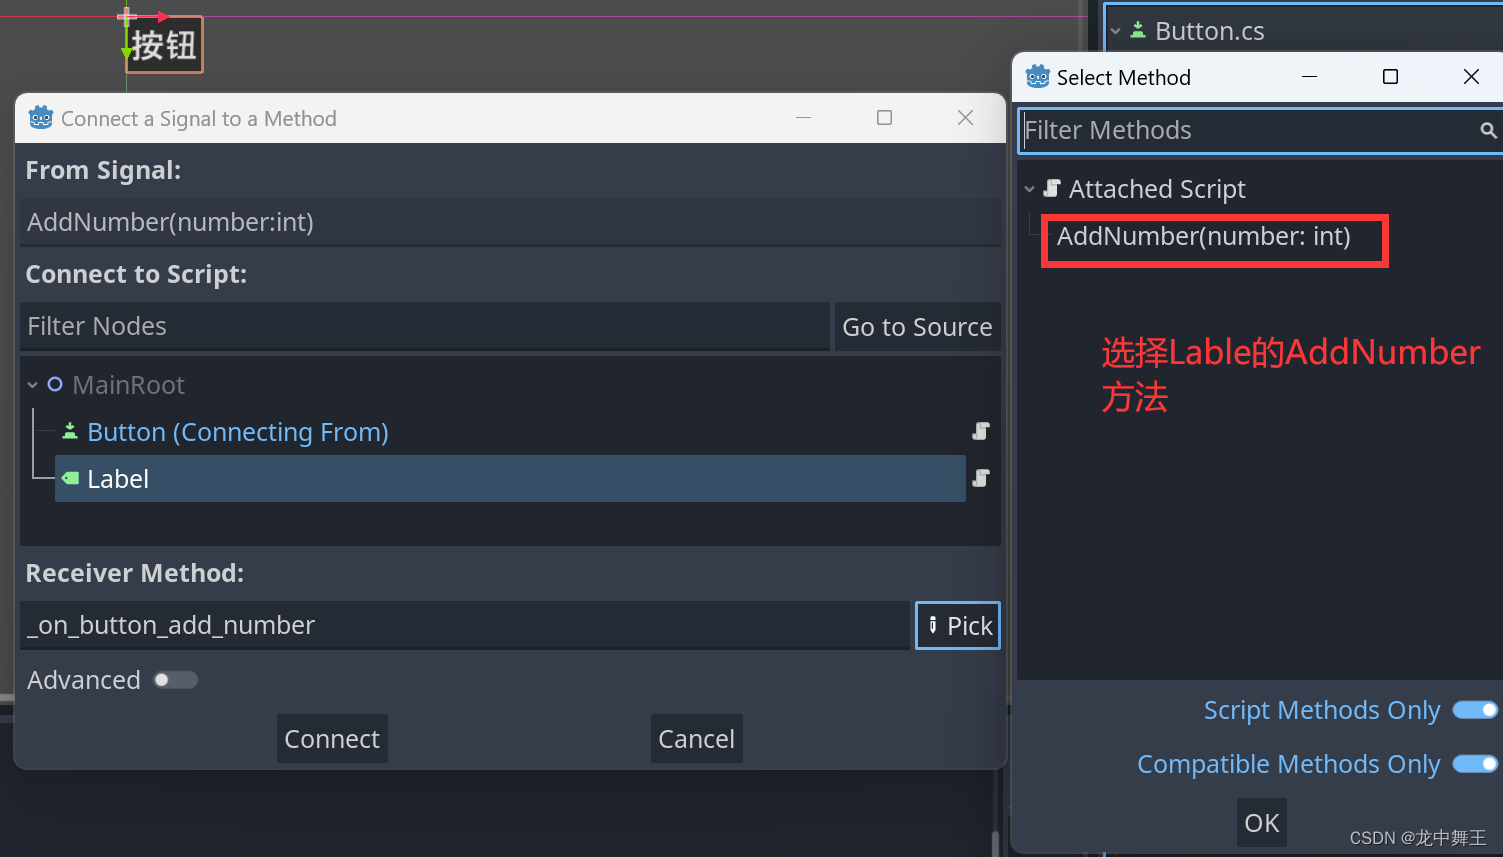
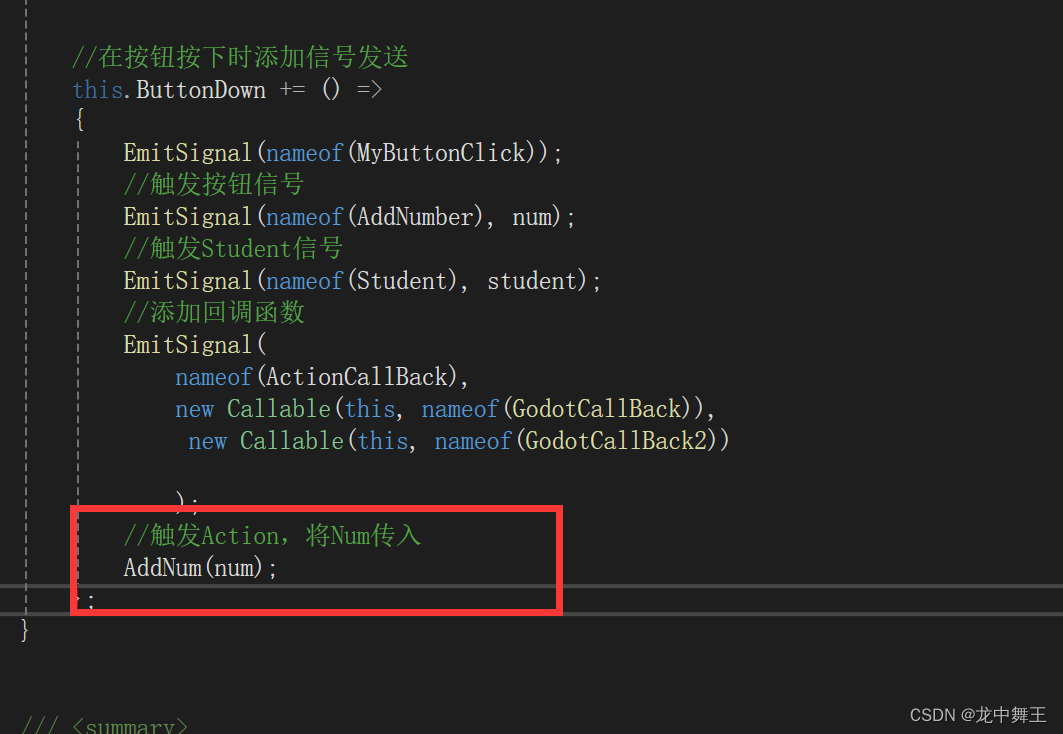
{// Called when the node enters the scene tree for the first time./// <summary>/// 添加自定义信号/// </summary>[Signal]public delegate void MyButtonClickEventHandler();private int num = 0;/// <summary>/// 添加带参数型号/// </summary>[Signal]public delegate void AddNumberEventHandler(int number);public override void _Ready(){//我们给AddNumber添加功能,delegate只能添加或者删除函数,有点类似于触发器。//每次调用的时候,num自动++AddNumber += (item) => num++;//在按钮按下时添加信号发送this.ButtonDown += () =>{EmitSignal(nameof(MyButtonClick));//触发按钮信号EmitSignal(nameof(AddNumber),num);};}// Called every frame. 'delta' is the elapsed time since the previous frame.public override void _Process(double delta){}}label代码
using Godot;
using System;public partial class Label : Godot.Label
{private int num = 0;// Called when the node enters the scene tree for the first time.public override void _Ready(){this.Text = "修改";}// Called every frame. 'delta' is the elapsed time since the previous frame.public override void _Process(double delta){}/// <summary>/// 接受按钮点击/// </summary>public void RecevieButtonDown(){this.Text = $"{num}";num++;}/// <summary>/// 为了做区分,我们新增一个函数/// </summary>public void RecevieButtonDown2(){GD.Print("我是自定义无参信号");this.Text = $"{num}";num++;}public void AddNumber(int number){this.Text = $"{number}";GD.Print($"我是代参数信号,num:[{number}]");}}
连接信号
自定义复杂参数信号
GD0202: The parameter of the delegate signature of the signal is not supported
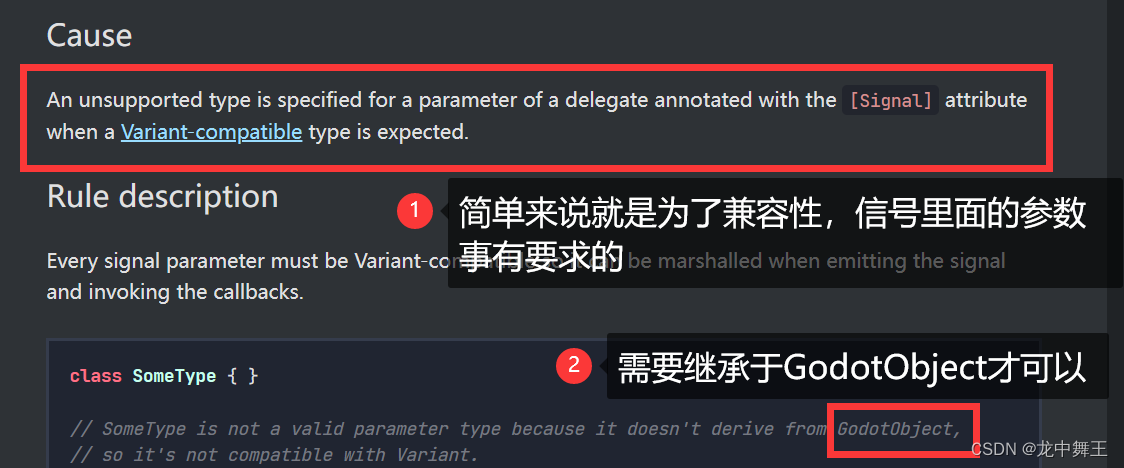
想要了解更多差异,需要看这个文章。
Godot Engine 4.2 简体中文文档 编写脚本 C#/.NET

自定义GodotObject类
using Godot;
using System;
using System.Collections.Generic;
using System.Linq;
using System.Text;
using System.Threading.Tasks;namespace CSharpSimpleTest.models
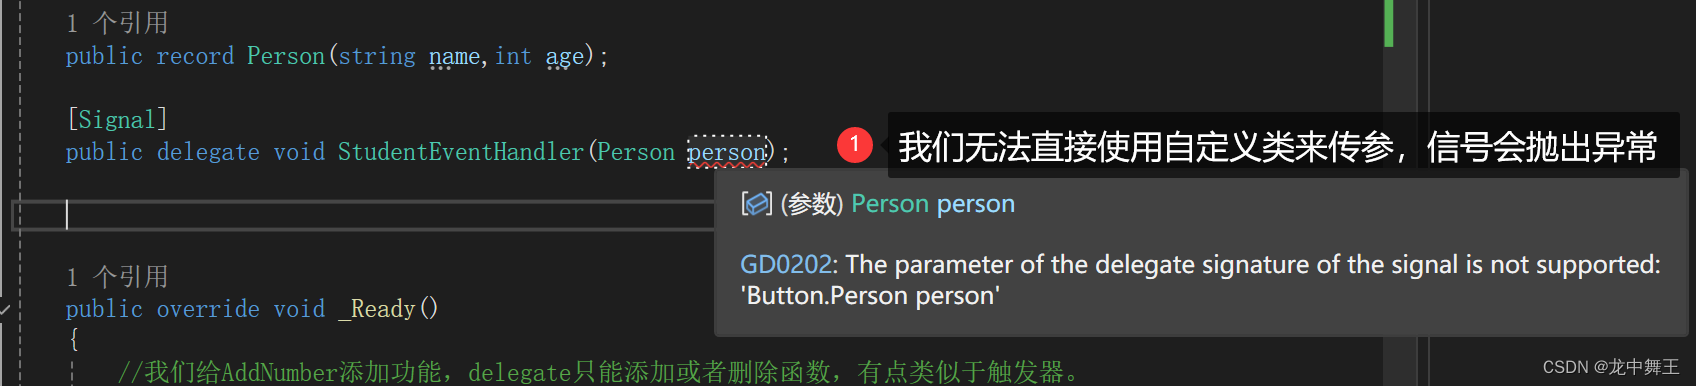
{public partial class Student:GodotObject{public string Name = "小王";public int Age = 5;public Student() { }}
}Button
using CSharpSimpleTest.models;
using Godot;
using System;public partial class Button : Godot.Button
{// Called when the node enters the scene tree for the first time./// <summary>/// 添加自定义信号/// </summary>[Signal]public delegate void MyButtonClickEventHandler();private int num = 0;/// <summary>/// 添加带参数型号/// </summary>[Signal]public delegate void AddNumberEventHandler(int number);private Student student = new Student() { Name = "小王",Age = 24};[Signal]public delegate void StudentEventHandler(Student student);  public override void _Ready(){//我们给AddNumber添加功能,delegate只能添加或者删除函数,有点类似于触发器。//每次调用的时候,num自动++AddNumber += (item) => num++;//在按钮按下时添加信号发送this.ButtonDown += () =>{EmitSignal(nameof(MyButtonClick));//触发按钮信号EmitSignal(nameof(AddNumber),num);//触发Student信号EmitSignal(nameof(Student),student);};}// Called every frame. 'delta' is the elapsed time since the previous frame.public override void _Process(double delta){}}
Label
using CSharpSimpleTest.models;
using Godot;
using System;public partial class Label : Godot.Label
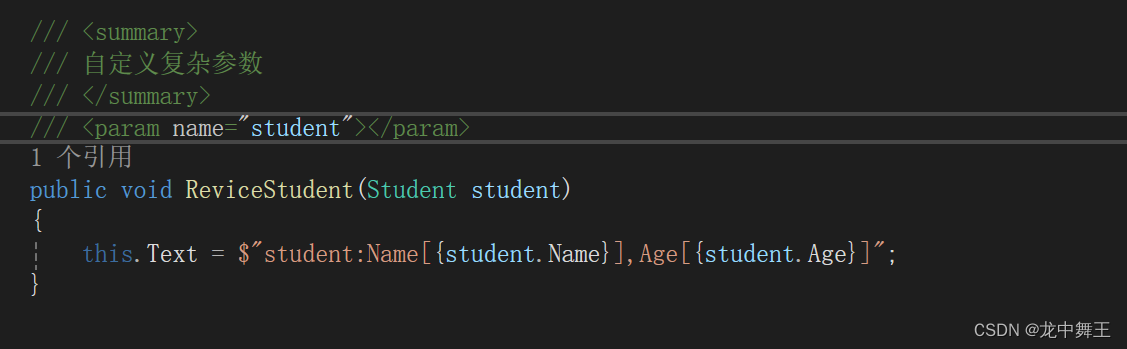
{private int num = 0;// Called when the node enters the scene tree for the first time.public override void _Ready(){this.Text = "修改";}// Called every frame. 'delta' is the elapsed time since the previous frame.public override void _Process(double delta){}/// <summary>/// 接受按钮点击/// </summary>public void RecevieButtonDown(){this.Text = $"{num}";num++;}/// <summary>/// 为了做区分,我们新增一个函数/// </summary>public void RecevieButtonDown2(){GD.Print("我是自定义无参信号");this.Text = $"{num}";num++;}public void AddNumber(int number){this.Text = $"{number}";GD.Print($"我是代参数信号,num:[{number}]");}/// <summary>/// 自定义复杂参数/// </summary>/// <param name="student"></param>public void ReviceStudent(Student student){this.Text = $"student:Name[{student.Name}],Age[{student.Age}]";}}连接信号
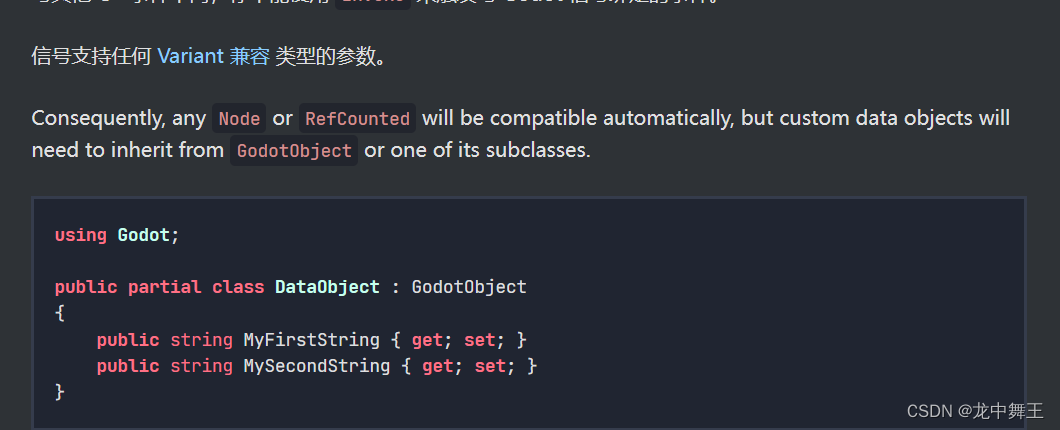
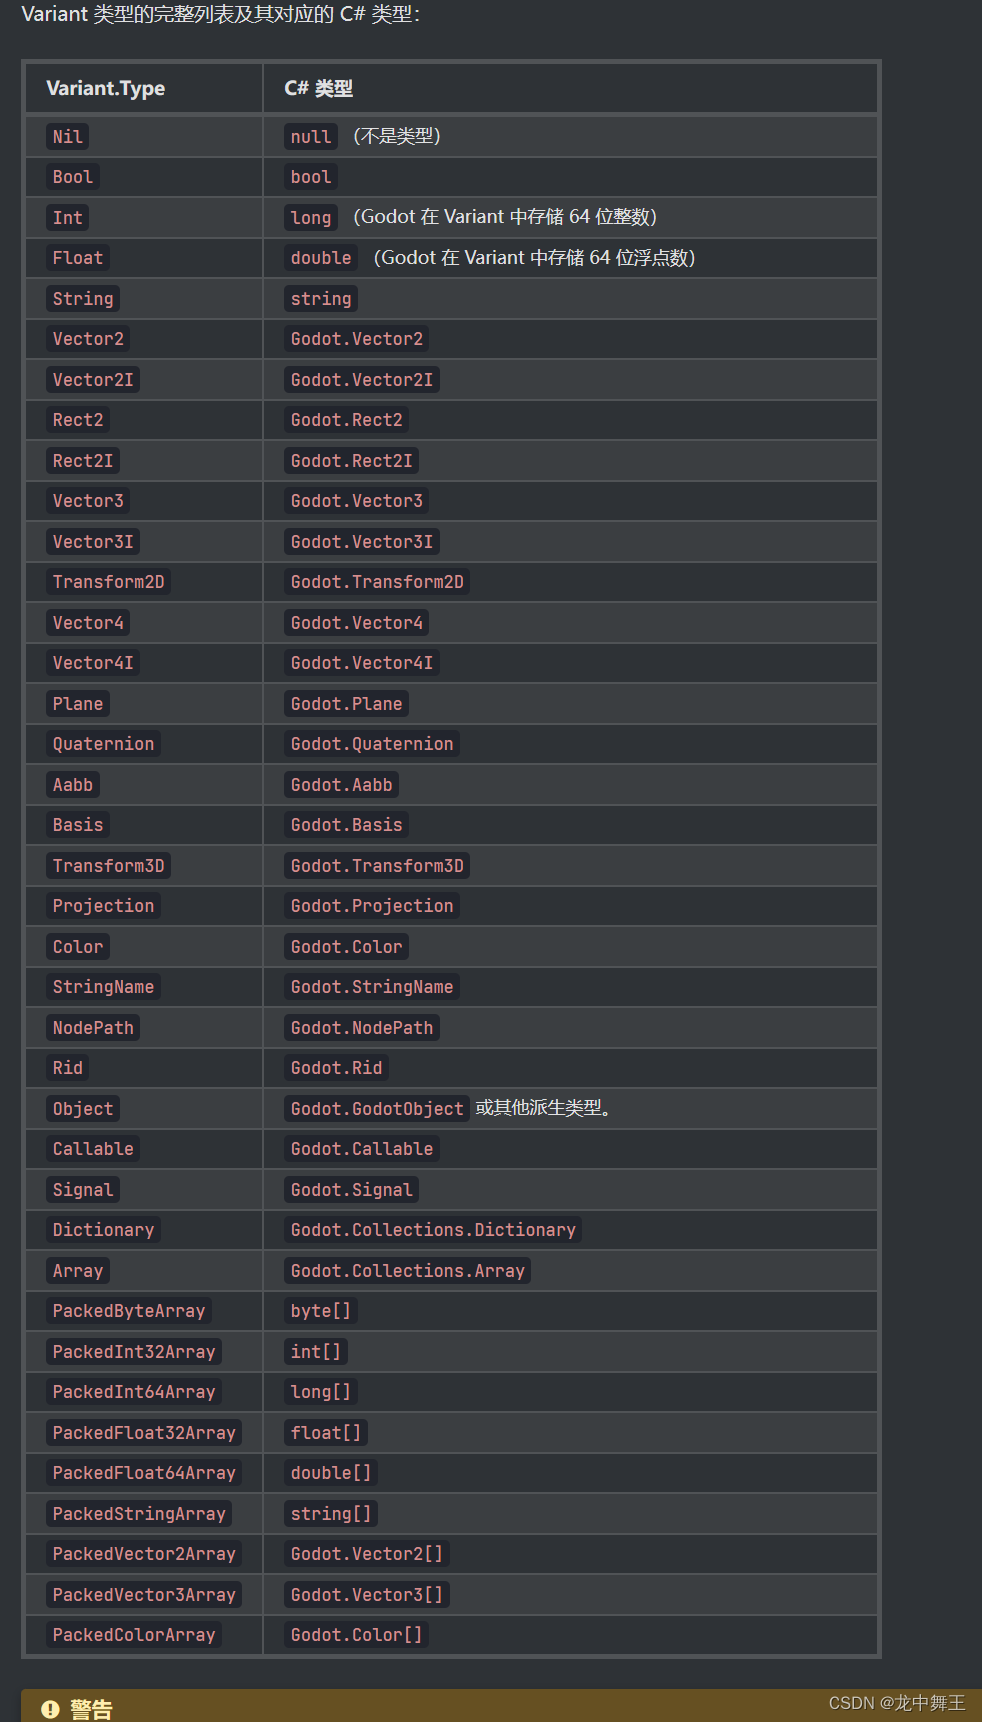
至于对于的显示逻辑,是基于C# Variant这个类
C# Variant

父传子
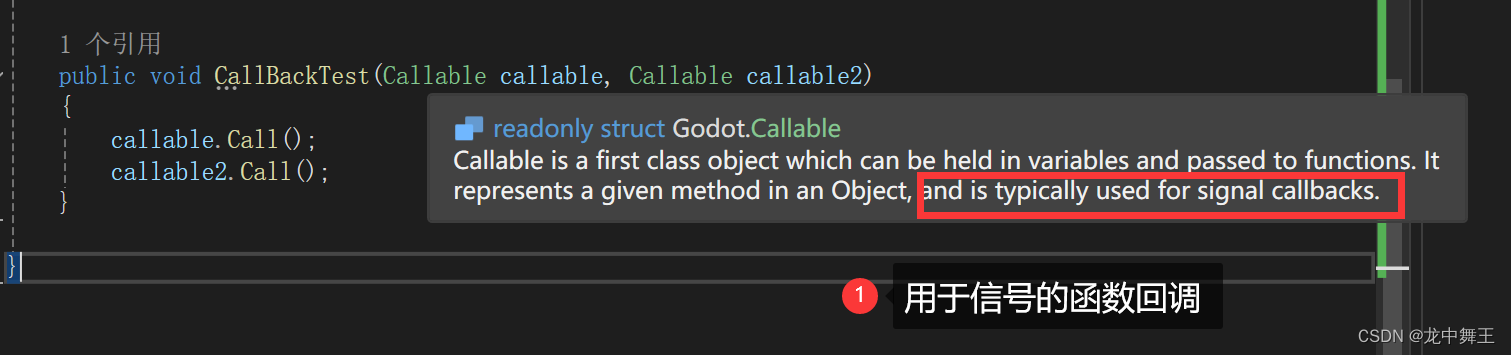
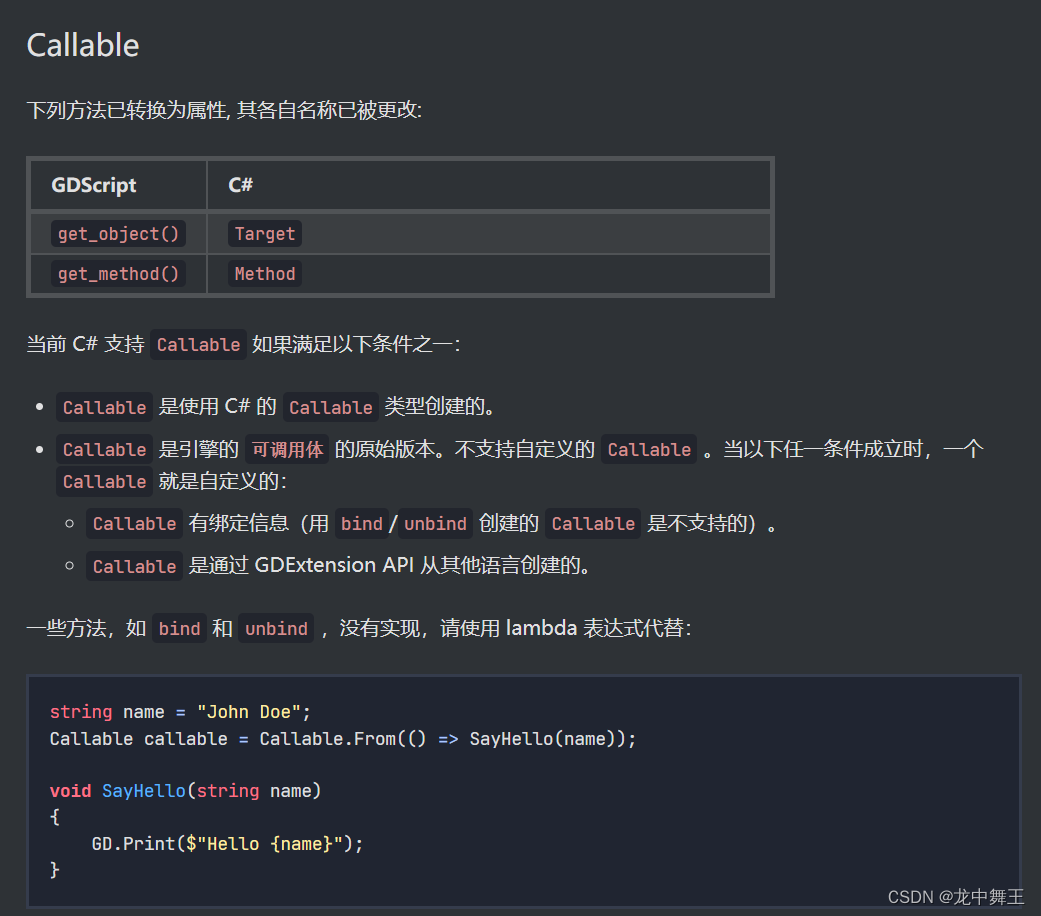
Callable,信号回调
[教程]Godot4 GDscript Callable类型和匿名函数(lambda)的使用
Button
using Godot;
using System;
using System.Diagnostics;public partial class test_node : Node2D
{// Called when the node enters the scene tree for the first time.private Label _lable;private Button _button;private int num = 0;[Signal]public delegate int NumAddEventHandler();public override void _Ready(){_lable = this.GetNode<Label>("Label");_button = this.GetNode<Button>("Button");_lable.Text = "修改";_button.ButtonDown += _button_ButtonDown;NumAdd += () => num;}public void _button_ButtonDown(){_lable.Text = $"按下修改{num}";GD.Print($"按下修改{num}");num++;}// Called every frame. 'delta' is the elapsed time since the previous frame.public override void _Process(double delta){}}
Lable
using CSharpSimpleTest.models;
using Godot;
using System;public partial class Label : Godot.Label
{private int num = 0;// Called when the node enters the scene tree for the first time.public override void _Ready(){this.Text = "修改";}// Called every frame. 'delta' is the elapsed time since the previous frame.public override void _Process(double delta){}/// <summary>/// 接受按钮点击/// </summary>public void RecevieButtonDown(){this.Text = $"{num}";num++;}/// <summary>/// 为了做区分,我们新增一个函数/// </summary>public void RecevieButtonDown2(){GD.Print("我是自定义无参信号");this.Text = $"{num}";num++;}public void AddNumber(int number){this.Text = $"{number}";GD.Print($"我是代参数信号,num:[{number}]");}/// <summary>/// 自定义复杂参数/// </summary>/// <param name="student"></param>public void ReviceStudent(Student student){this.Text = $"student:Name[{student.Name}],Age[{student.Age}]";}public void CallBackTest(Callable callable, Callable callable2){callable.Call();callable2.Call(23);}}
连接信号

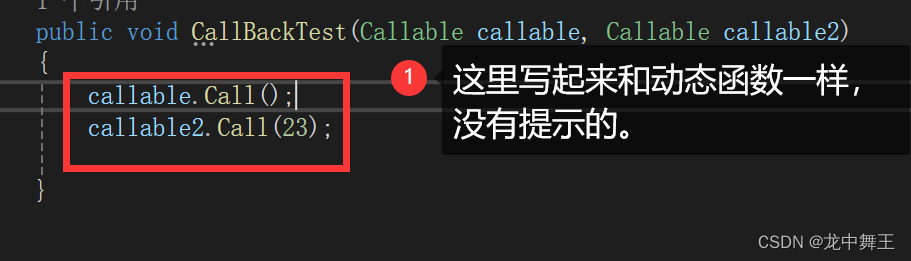

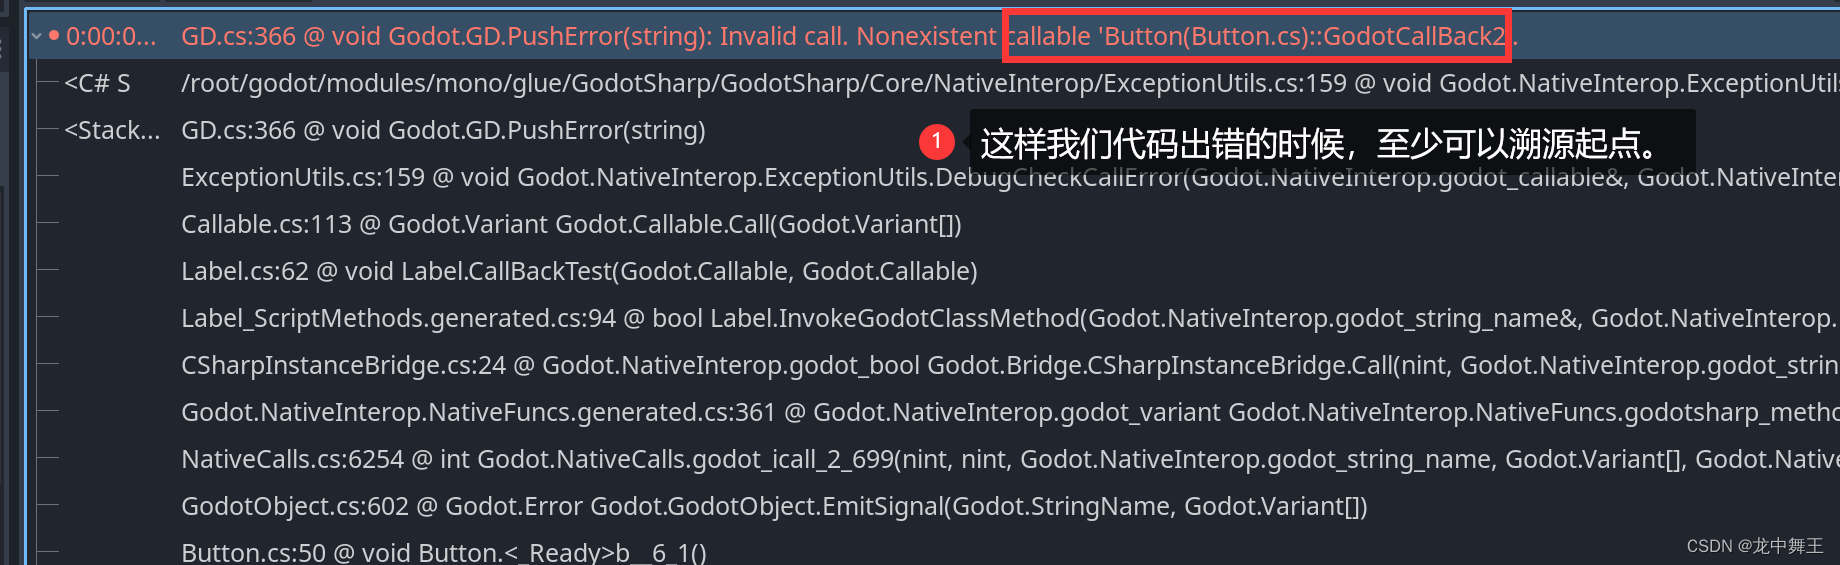
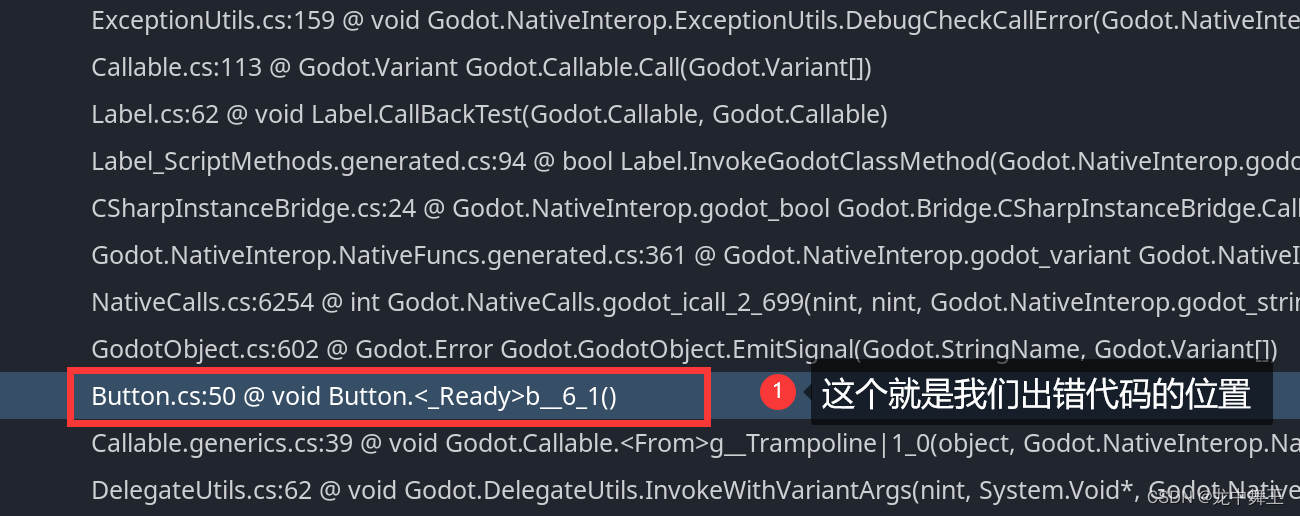
参数个数不对的异常问题
public void CallBackTest(Callable callable, Callable callable2)
{try{callable.Call();//callable2.Call(23);//如果我们参数个数不对,也不会在C#中抛出异常,会在Godot中抛出异常callable2.Call();}catch (Exception e){GD.Print("发送异常");GD.Print(e.ToString());}}

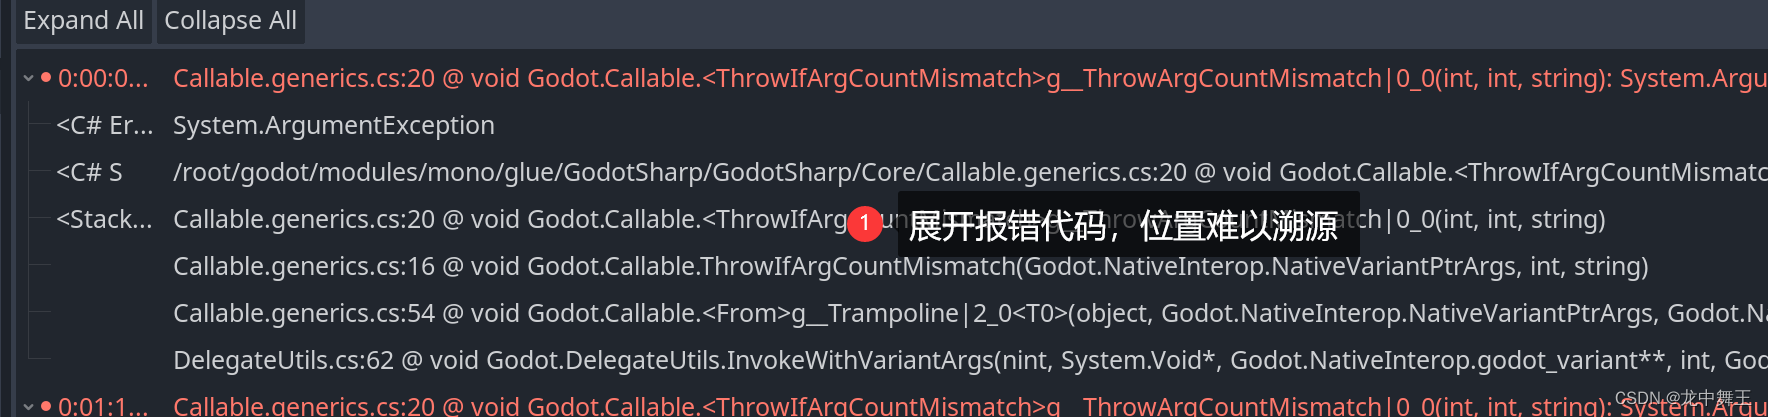
这是个十分危险的使用,因为我们无法溯源对应的代码,也无法try catch找到异常的代码,因为这个代码是在C++中间运行的。
解决异常方法

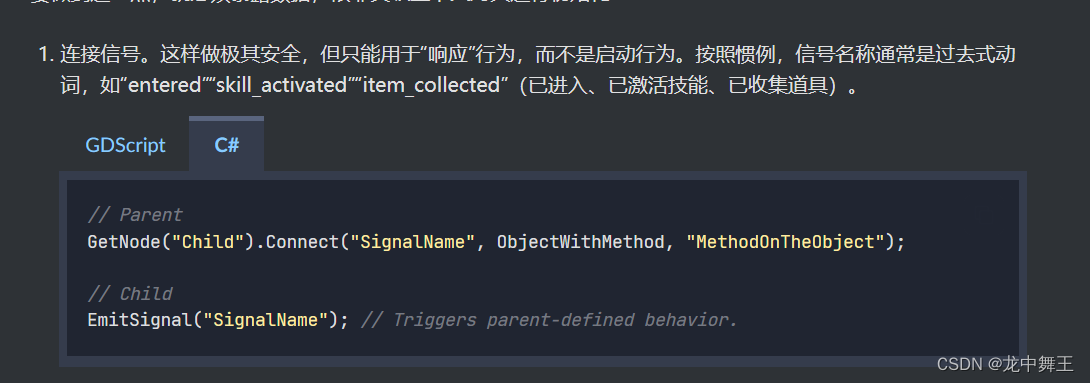
手动连接信号
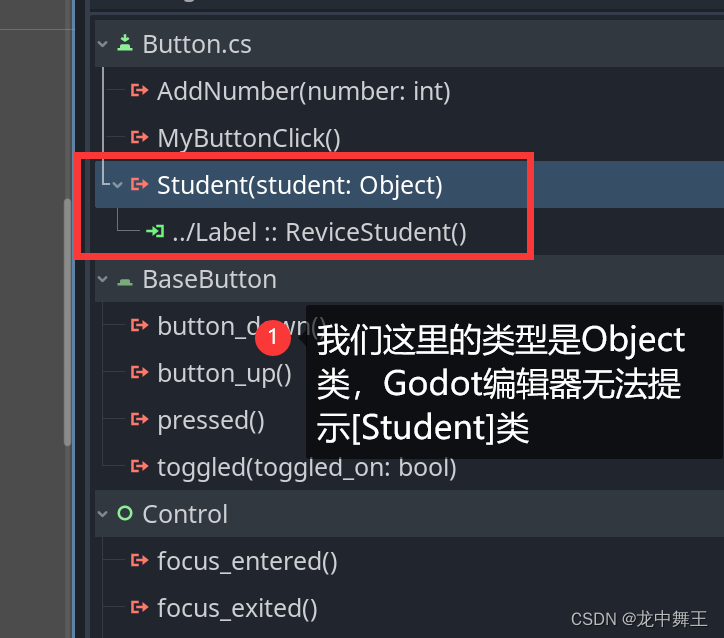
由于Godot 对C# 的支持不是很够,所以我们点击Go to Method的时候,是不能直接跳转到对应的代码的。

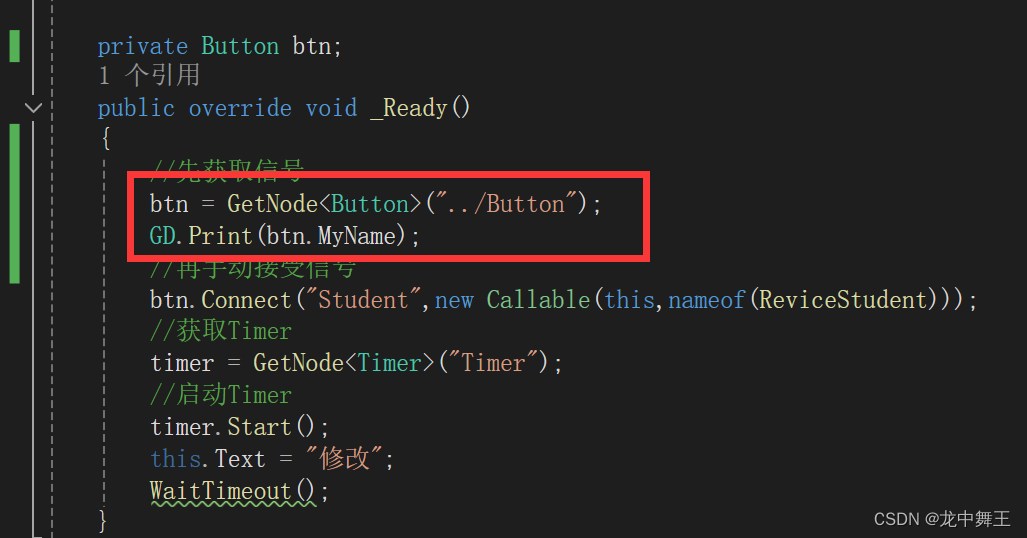
private Timer timer;private Godot.Button btn;public override void _Ready(){//先获取信号btn = GetNode<Button>("../Button");//再手动接受信号btn.Connect("Student",new Callable(this,nameof(ReviceStudent)));}
详细可以看官方文档的最佳实践
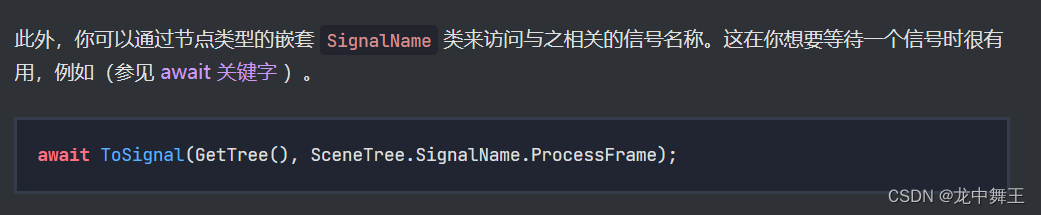
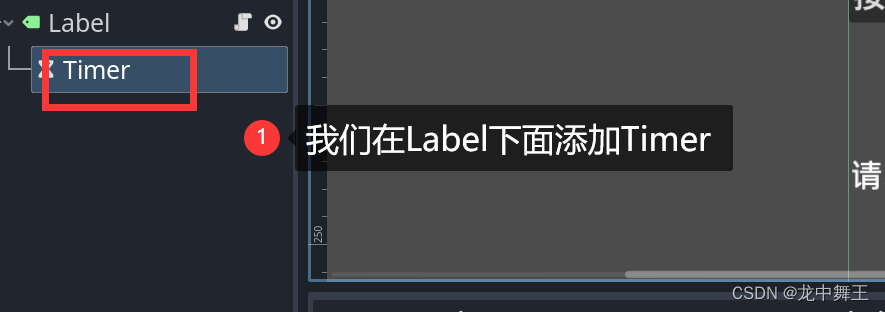
信号等待
using CSharpSimpleTest.models;
using Godot;
using System;
using System.Runtime.ExceptionServices;
using System.Threading.Tasks;public partial class Label : Godot.Label
{private int num = 0;// Called when the node enters the scene tree for the first time.private Timer timer;public override void _Ready(){//获取Timertimer = GetNode<Timer>("Timer");//启动Timertimer.Start();this.Text = "修改";WaitTimeout();}// Called every frame. 'delta' is the elapsed time since the previous frame.public override void _Process(double delta){}/// <summary>/// 接受按钮点击/// </summary>public void RecevieButtonDown(){this.Text = $"{num}";num++;}/// <summary>/// 为了做区分,我们新增一个函数/// </summary>public void RecevieButtonDown2(){GD.Print("我是自定义无参信号");this.Text = $"{num}";num++;}public void AddNumber(int number){this.Text = $"{number}";GD.Print($"我是代参数信号,num:[{number}]");}/// <summary>/// 自定义复杂参数/// </summary>/// <param name="student"></param>public void ReviceStudent(Student student){this.Text = $"student:Name[{student.Name}],Age[{student.Age}]";}public void CallBackTest(Callable callable, Callable callable2){callable.Call();//throw new Exception("error");//callable2.Call(23);//如果我们参数个数不对,也不会在C#中抛出异常,会在Godot中抛出异常callable2.Call();}public async Task WaitTimeout(){while (true){await ToSignal(timer, Timer.SignalName.Timeout);GD.Print($"收到Timer信号,num[{num}]");this.Text = $"{num}";num++;}}}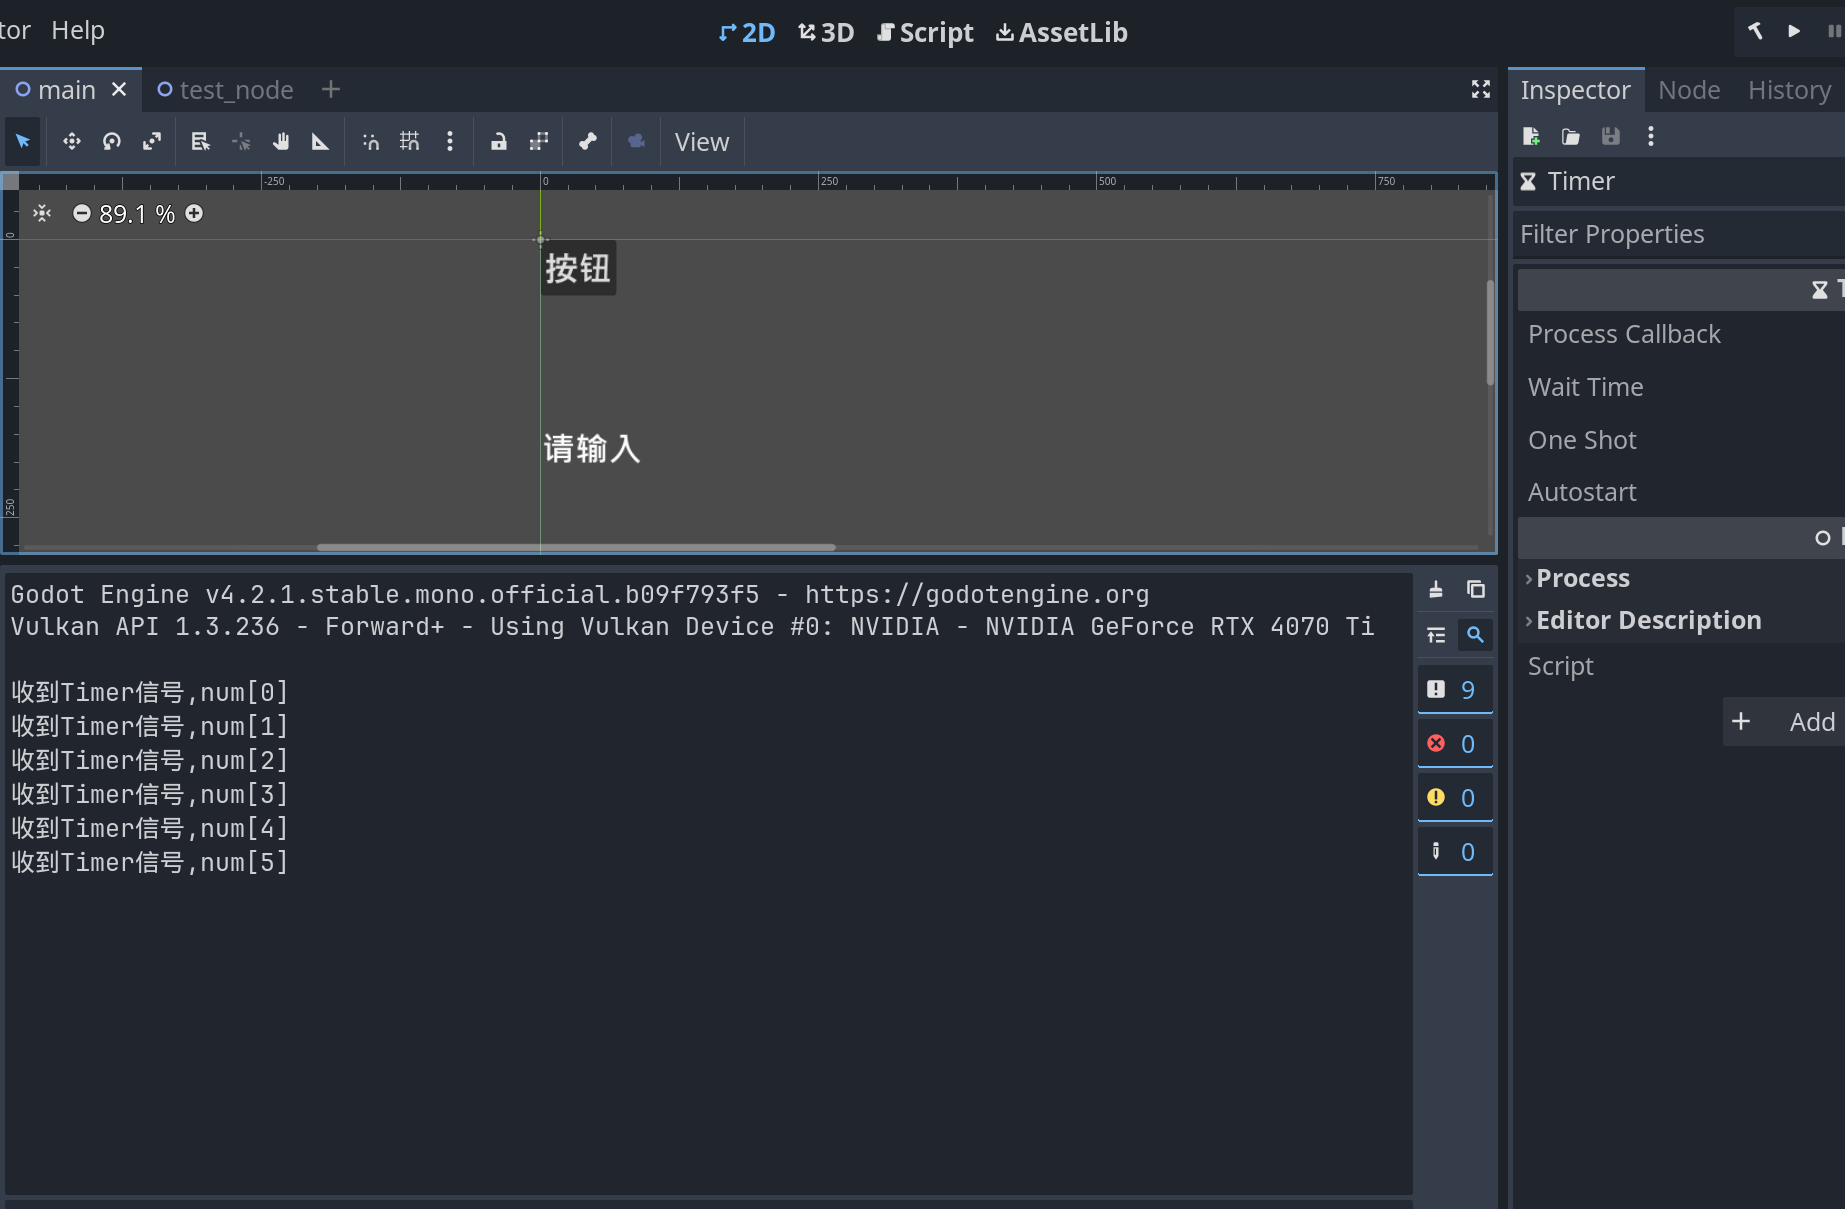
Node注入,取代信号
信号最大的问题就是:
- 入参不固定
- godot.net 对C# 支持力度不够
- 编译报错在外部C++代码,Debug难度大
- 不符合OOP的编程逻辑
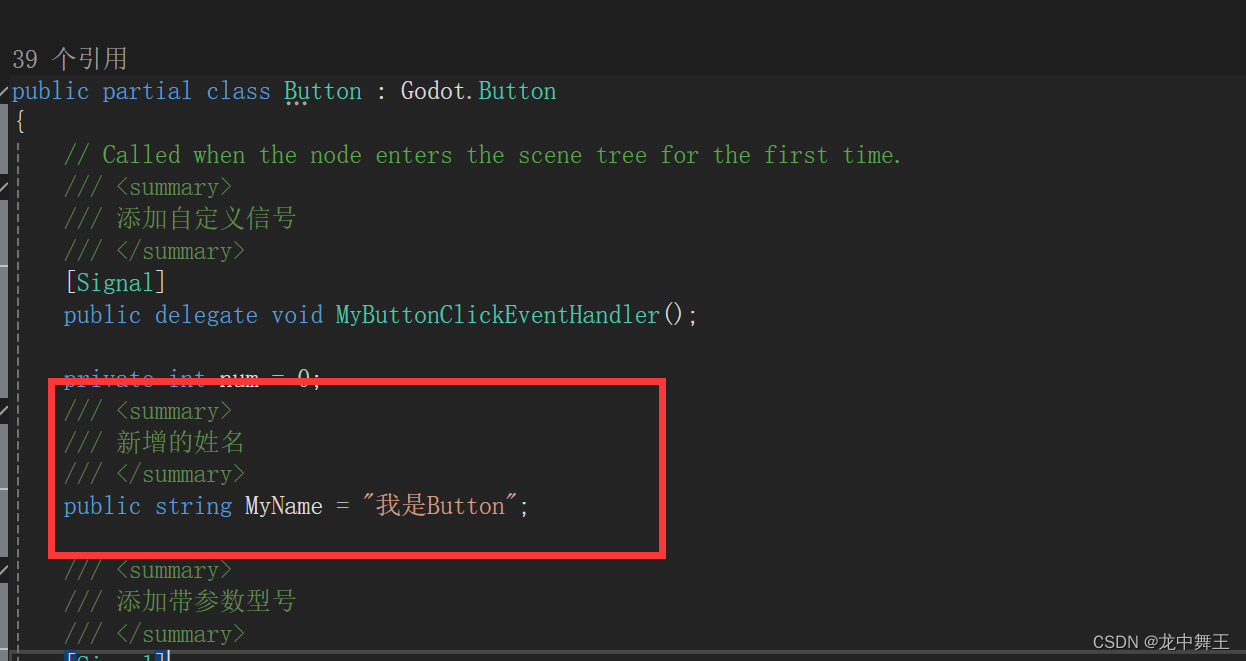
比如我们在Button.cs中添加如下属性
/// <summary>/// 新增的姓名/// </summary>public string MyName = "我是Button";
我们就可以在Lable中拿到这个属性

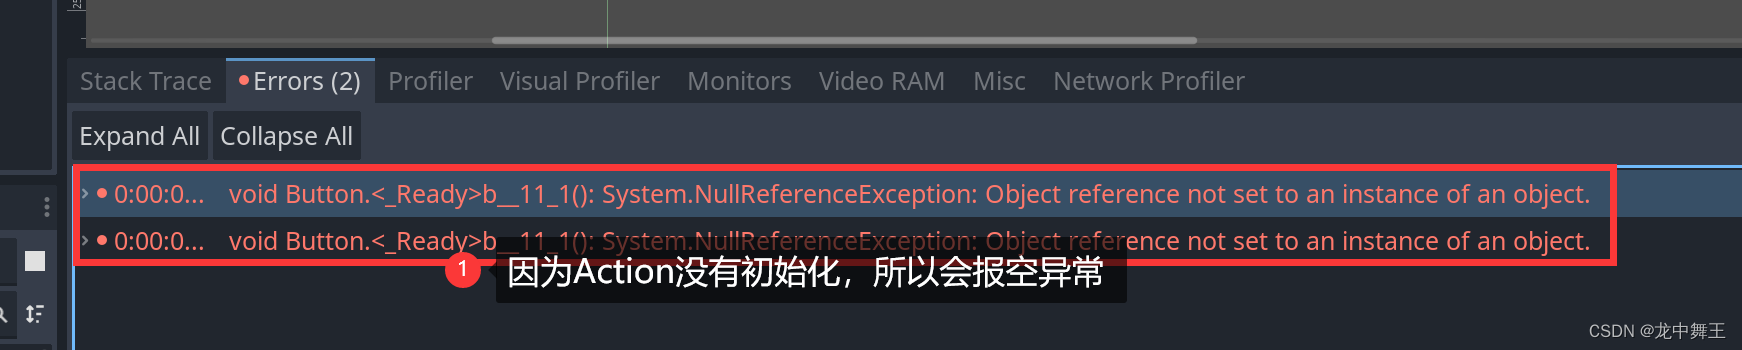
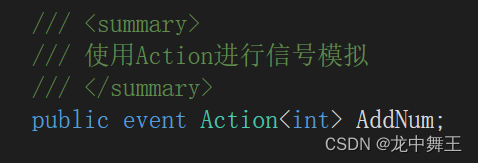
基于Action的信号模拟
Button
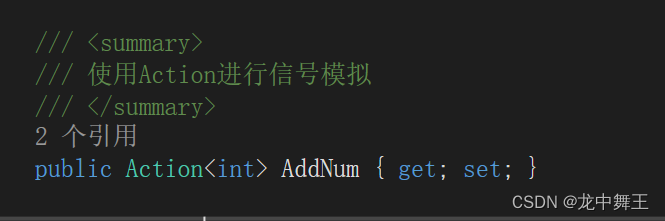
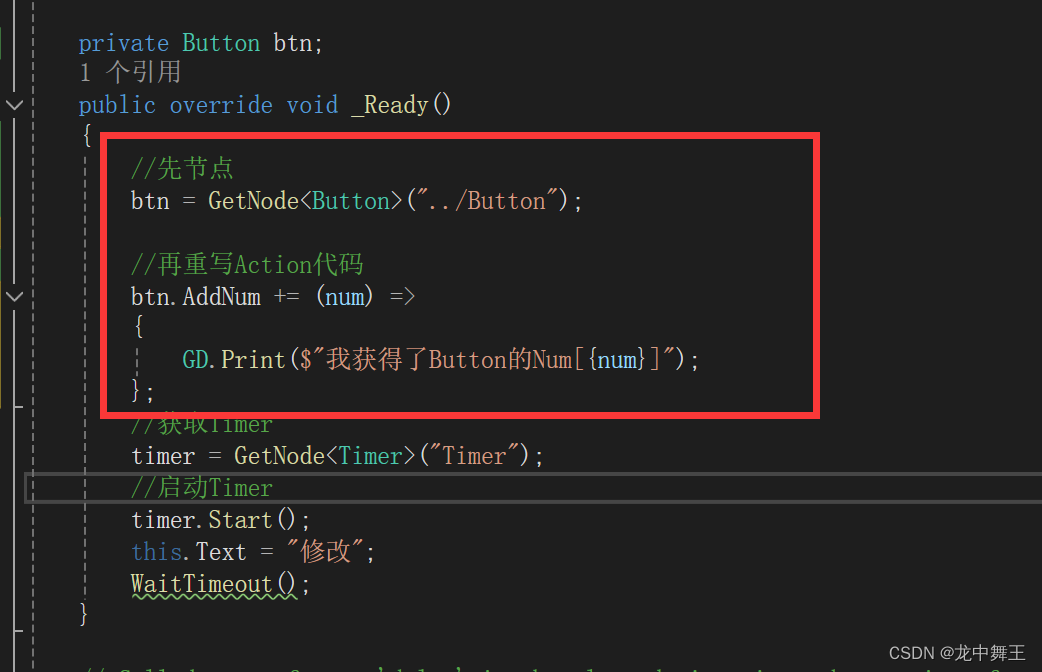
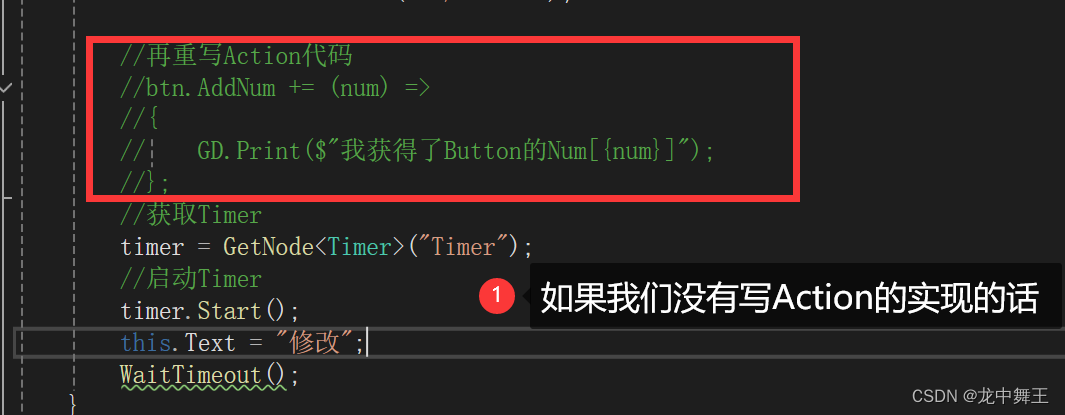
但是这样有个问题,Action需要初始化,不然会报空异常

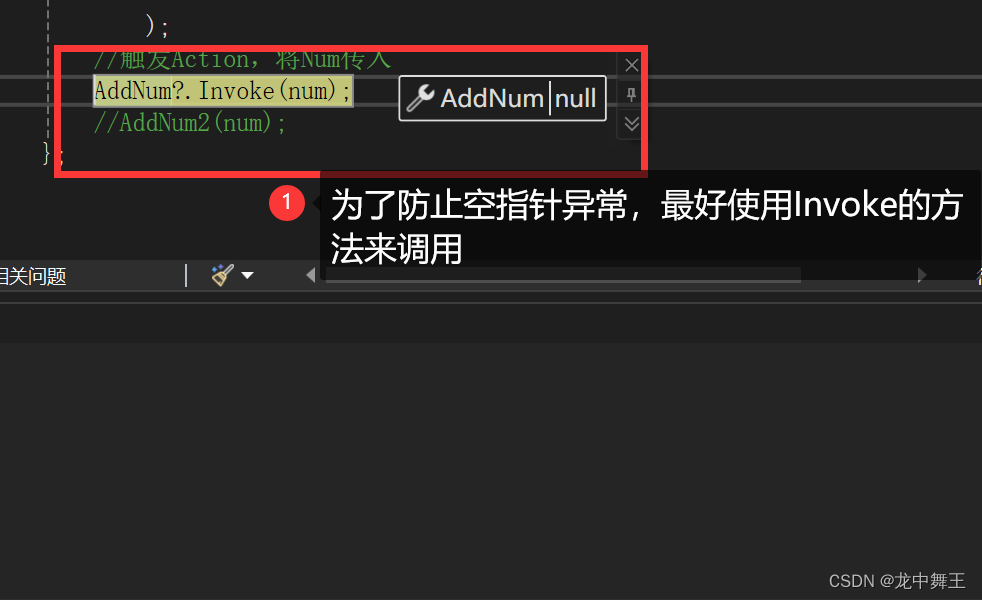
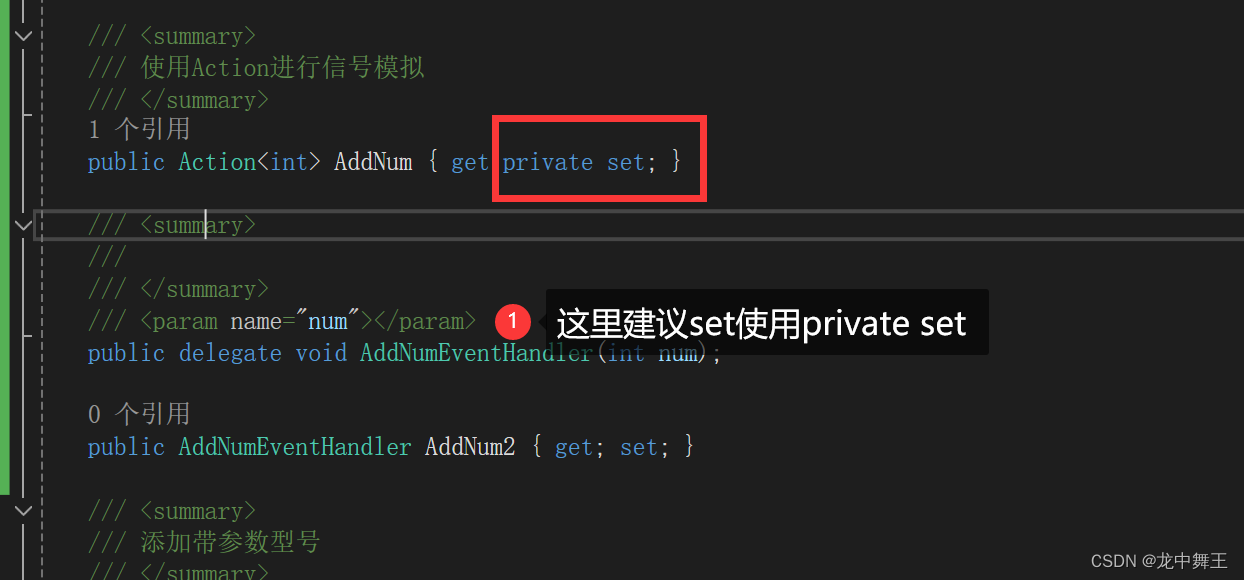
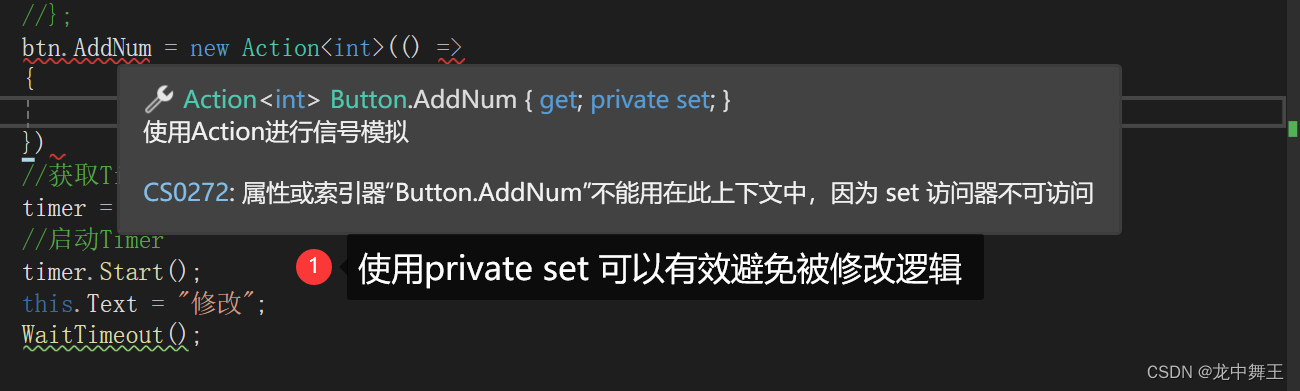
当然,也可以使用event Action,因为event Action是不允许在外部重写的。
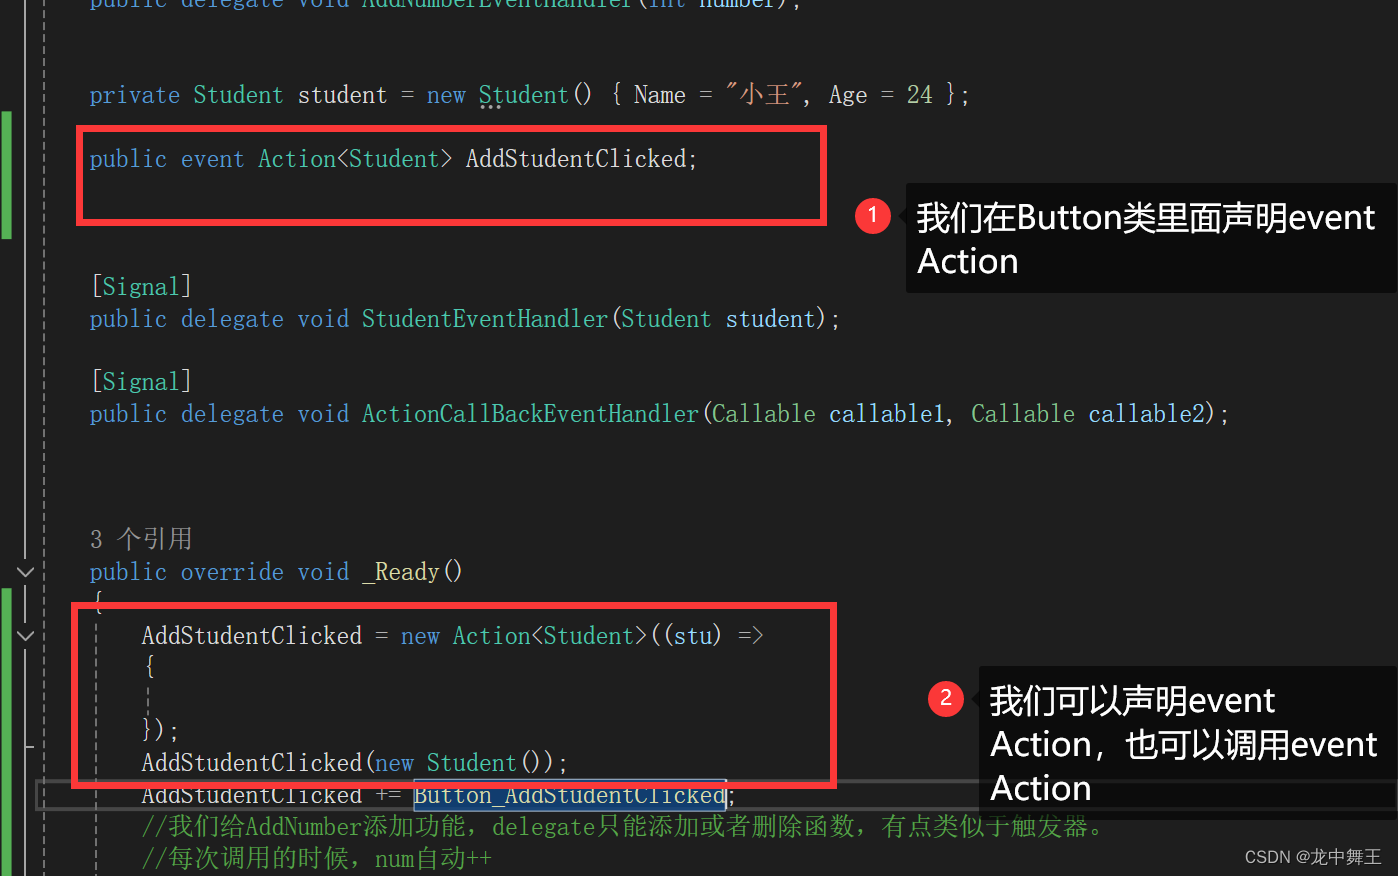
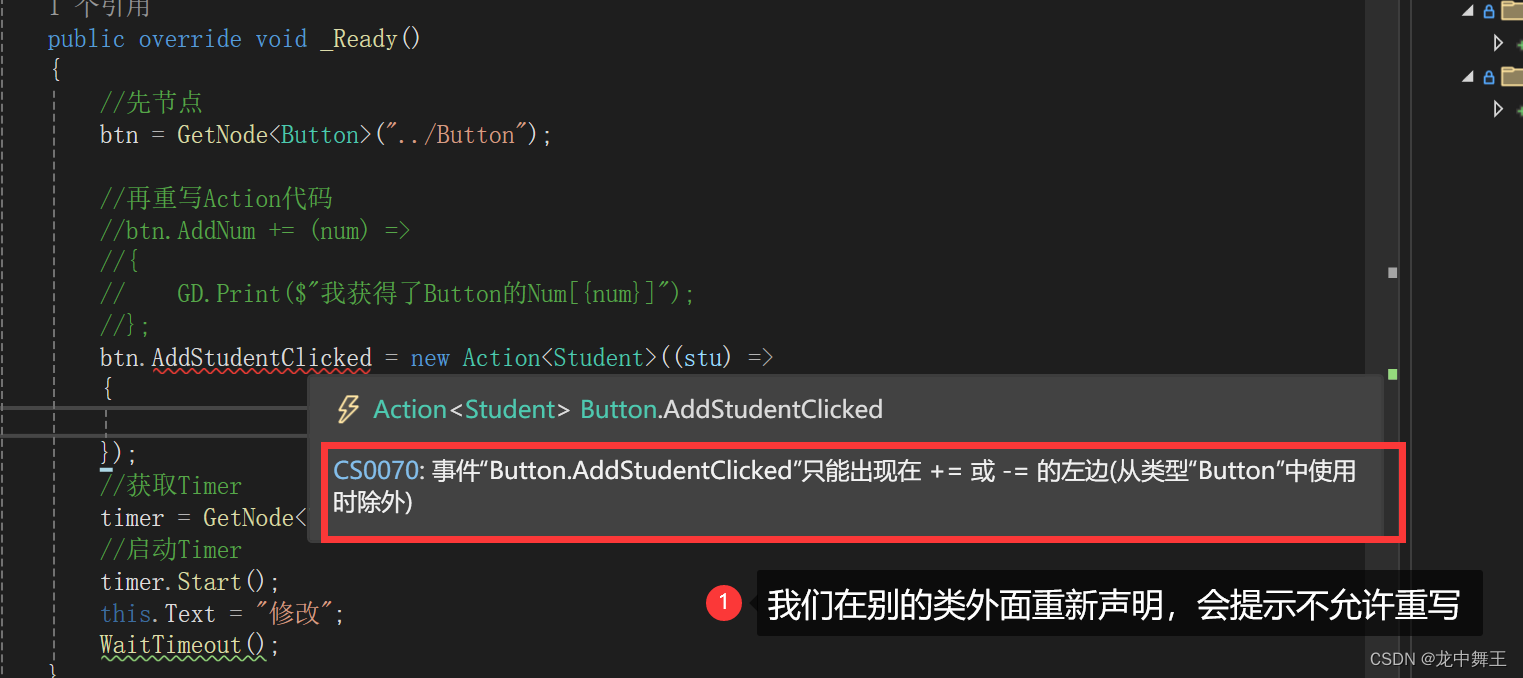
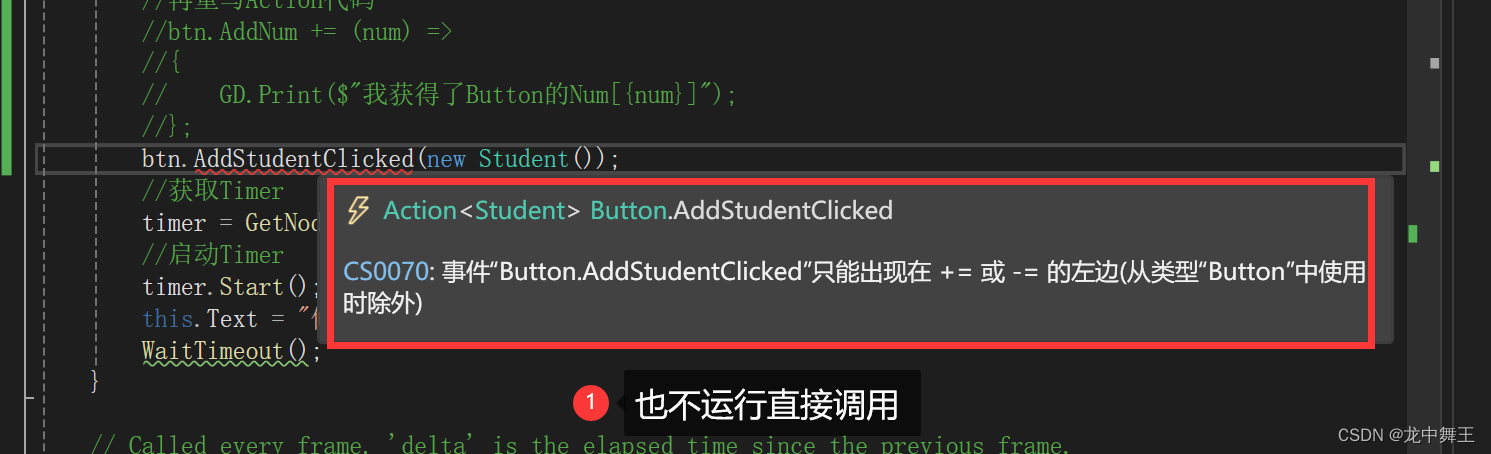
所以event Action 是最优的写法,是最不会出现问题的。
总结
信号就是Godot中数据沟通方式。信号的出现就是为了将复杂的数据处理简单化为接口的形式。再加上Godot中的Sence,这个就有利于我们面向对象的编程习惯。
但是信号是没有参数的声明的,而且参数出现问题会外部抛出异常,所以我们最好就使用event Action 回调来代替信号。


![[C语言]一维数组二维数组的大小](https://img-blog.csdnimg.cn/direct/8456245efec84329909bc73c5ac9225c.png)