项目代码(可直接下载运行)
一、项目的相关背景
学习编程的小伙伴,大家对力扣、牛客或其他在线编程的网站一定都不陌生,这些编程网站除了提供了在线编程,还有其他的一些功能。我们这个项目只是做出能够在线编程的功能。
二、所用技术栈和开发环境
技术栈:
负载均衡设计、多进程、多线程
C++ STL 标准库、Boost 标准库(字符串切割)、cpp-httplib 第三方开源网络库、ctemplate 第三方开源前端网页渲染库、jsoncpp 第三方开源序列化反序列化库
Ace前端在线编辑器(了解)、html/css/js/jquery/ajax (了解)
开发环境:
Centos 7 云服务器、vscode
三、项目的宏观结构
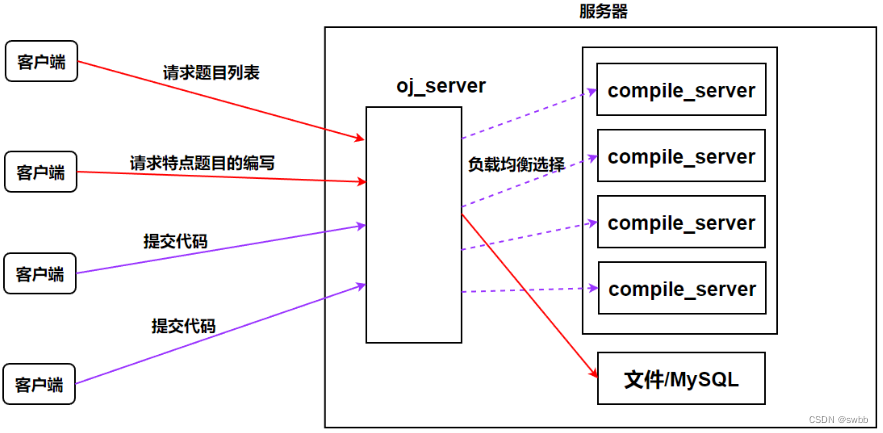
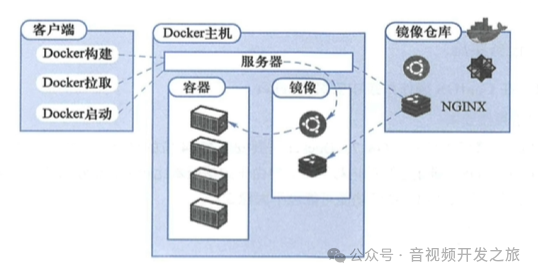
客户端向服务器的oj_server发起请求,有可能是请求题目的列表、请求特定题目的编写、请求代码提交;对于请求题目列表和编写,只需要向文件或MySQL获取数据,并显示成网页即可,但是提交代码的时候,我们就要考虑多用户提交的情况,所以oj_server在收到不同客户端发来的提交代码的请求时,就需要负载均衡式的选择后端的complie_server进行编译并运行,然后反馈最终结果。
四、工具类的设计
对于客户提交过来的文件(如1234),我们需要对文件进行路径拼接,拼接出(1234.cpp、1234.exe、1234.compiler_error),其中./temp是对用户提交过来的文件名进行路径的拼接,形成三个文件的存放位置,这是编译时需要的三个临时文件,有了这三个临时文件后,我们就可以对用户的代码进行编译的操作了。
用户提交的代码,虽然经过编译器编译后,形成了可执行程序,但是对于代码的运行也需要三个临时文件(1234.stdin、1234.stdout、1234.stderr) 这三个文件分别表示:1234.stdin:用户外部自测输入的参数(但是我们不考虑,直接使我们提供参数)1234.stdout:代表运行成功后的结果,我们不需要显示到显示器上,用文件保存起来,用于反馈给客户;1234.stderr:代表运行失败后的结果,我们不需要显示到显示器上,用文件保存起来,用于反馈给客户。
#pragma once
#include <iostream>
#include <string>
#include <atomic>
#include <fstream>
#include <sys/time.h>
#include <sys/types.h>
#include <sys/stat.h>
#include <boost/algorithm/string.hpp>
using namespace std;class PathUtil
{
public:static string addPath(const string &path, const string &suffix){string totalPath = "./temp/";totalPath += path;totalPath += suffix;return totalPath;}// 对文件进行路径拼接 1.cpp 1.exe 1.compile_errorstatic string srcPath(const string &path){return addPath(path, ".cpp");}static string exePath(const string &path){return addPath(path, ".exe");}static string errPath(const string &path){return addPath(path, ".compile_error");}// 代码的运行需要的三个临时的文件// 用户自行输入参数测试static string stdIn(const string &path){return addPath(path, ".stdin");}// 运行成功后的结果,不需要显示到显示器上,用文件保存起来,用于反馈给客户static string stdOut(const string &path){return addPath(path, ".stdout");}// 运行成功后的错误,不需要显示到显示器上,用文件保存起来,用于反馈给客户static string stdErr(const string &path){return addPath(path, ".stderr");}
};class TimeUtil
{
public:// 日志添加时间戳static string getTimeStamp(){struct timeval time;gettimeofday(&time, nullptr);return to_string(time.tv_sec);}// 为了保证文件的唯一性,使用毫秒级时间戳static string getTimeMs(){struct timeval time;gettimeofday(&time, nullptr);return to_string(time.tv_sec * 1000 + time.tv_usec / 1000);}
};class FileUtil
{
public:static bool isExistFile(const string &filename){struct stat st;if (stat(filename.c_str(), &st) == 0){// 获取文件属性成功return true;}return false;}// 毫秒级时间戳+原子递增唯一值,保证文件名的唯一性static string uniqueFile(){atomic_uint id(0);id++;string ms = TimeUtil::getTimeMs();string uniq_id = to_string(id);return ms + "_" + uniq_id;}static bool writer(const string &target, const string &content){ofstream ofs(target);if (!ofs.is_open()){return false;}ofs.write(content.c_str(), content.size());ofs.close();return true;}static bool reader(const string &target, string *content, bool flag){ifstream ifs(target);if (!ifs.is_open()){return false;}(*content).clear();string line;// getline:不保存分隔符,但有些时候需要保留\n// getline:内部重载了强制类型转换while (getline(ifs, line)){(*content) += line;(*content) += (flag ? "\n" : "");}ifs.close();return true;}
};class StringUtil
{
public:static void stringSpilt(const string &str, vector<string> *ret, const string spiltFlag){// boost::split(type, select_list, boost::is_any_of(","), boost::token_compress_on);// (1)、type类型是std::vector<std::string>,用于存放切割之后的字符串// (2)、select_list:传入的字符串,可以为空。// (3)、boost::is_any_of(","):设定切割符为,(逗号)// (4)、boost::algorithm::token_compress_on:将连续多个分隔符当一个,默认没有打开,当用的时候一般是要打开的。boost::split((*ret), str, boost::is_any_of(spiltFlag), boost::algorithm::token_compress_on);}
};
五、compile的代码设计
compile只负责代码的编译,要对代码进行编译,就需要有file_name(文件名)(如:1234.cpp)对代码进行编译,有可能成功,形成.exe文件,后续可以直接运行;也有可能失败,对于编译失败了的原因,也需要保存起来,用于反馈给用户,否则客户怎么知道错误在哪里。
#pragma once
#include <unistd.h>
#include <sys/wait.h>
#include <sys/types.h>
#include <sys/stat.h>
#include <fcntl.h>
#include "log.hpp"class Compiler
{
public:static bool Compile(const string &path){pid_t pid = fork();if (pid < 0){LOG(ERROR) << "子进程创建失败"<< "\n";return false;}else if (pid == 0){// 子进程umask(0); // 防止系统修改权限int fileId = open(PathUtil::errPath(path).c_str(), O_CREAT | O_WRONLY, 0644);if (fileId < 0){LOG(WARNING) << "没有形成compile_error文件"<< "\n";exit(1);}dup2(fileId, 2); // 重定向标准错误到compile_error中// 进程程序替换 并不影响进程的文件描述符// 子进程执行 g++ -o 1.exe 1.cpp -std=c++11execlp("g++", "g++", "-o", PathUtil::exePath(path).c_str(), PathUtil::srcPath(path).c_str(), "-std=c++11", "-D", "COMPILER_ONLINE", nullptr);LOG(ERROR) << "启动编译器g++失败,可能是参数错误" << "\n";exit(2);}else{// 父进程waitpid(pid, nullptr, 0);// 编译成功,查看是否有可执行文件生成.exeif (FileUtil::isExistFile(PathUtil::exePath(path))){LOG(INFO) << "编译成功,生成" << PathUtil::exePath(path) << "\n";return true;}}LOG(ERROR) << "编译失败,没有生成任何.exe文件" << "\n";return false;}
};
六、run的代码设计
我们已经完成的编译服务,相应的会在temp目录下形成三个临时文件,当然编译成功会形成.exe文件,失败会形成compiler_error文件不会形成.exe文件,相应的错误信息回报存在这个文件中。有了.exe文件后,我们接下来的工作就是对可执行程序进行运行了。
虽然已经基本完成了run,但是还是有缺陷的,我们常常在力扣或牛客上刷题时,明确标注了时间限制和内存限制。所以我们对资源的限制也需要做一些处理,我们这里只处理时间和内存上的限制。
#pragma once
#include <unistd.h>
#include <fcntl.h>
#include <sys/wait.h>
#include <sys/resource.h>
#include "log.hpp"class Runner
{
public:// 设置进程占用资源大小static void setProcLimit(int cpu_limit, int mem_limit){struct rlimit cpu;            // 调用setrlimit所需的结构体cpu.rlim_max = RLIM_INFINITY; // 硬约束 无穷cpu.rlim_cur = cpu_limit;     // 软约束 当前cpu能跑的时长setrlimit(RLIMIT_CPU, &cpu);struct rlimit mem;mem.rlim_max = RLIM_INFINITY;mem.rlim_cur = mem_limit * 1024; // 将单位字节转化为kbsetrlimit(RLIMIT_AS, &mem);}// 只关心程序是否运行,并不关心结果是否正确// 返回值 >  0:程序异常了,退出时收到了信号,返回值就是对应的信号编号// 返回值 == 0:正常运行完毕了,结果保存到了对应的临时文件中// 返回值 <  0:内部错误static int Run(const string &path, int cpu_limit, int mem_limit){string exe_path = PathUtil::exePath(path);string stdin_path = PathUtil::stdIn(path);string stdout_path = PathUtil::stdOut(path);string stderr_path = PathUtil::stdErr(path);umask(0);int inId = open(stdin_path.c_str(), O_CREAT | O_WRONLY, 0644);int outId = open(stdout_path.c_str(), O_CREAT | O_WRONLY, 0644);int errId = open(stderr_path.c_str(), O_CREAT | O_WRONLY, 0644);if (inId < 0 || outId < 0 || errId < 0){LOG(ERROR) << "打开文件描述符失败" << "\n";return -1;}pid_t pid = fork();if (pid < 0){LOG(ERROR) << "创建子进程失败" << "\n";close(inId);close(outId);close(errId);return -2; // 代表创建子进程失败}else if (pid == 0){dup2(inId, 0);dup2(outId, 1);dup2(errId, 2);setProcLimit(cpu_limit, mem_limit);//       我要执行谁     我想在命令行上如何执行该程序execl(exe_path.c_str(), exe_path.c_str(), nullptr);exit(1);}else{close(inId);close(outId);close(errId);int status = 0;waitpid(pid, &status, 0);LOG(INFO) << "运行完毕, info" << (status & 0x7F) << "\n";return (status & 0x7F);}}
};
七、编译运行服务(compileRun)
编译和运行有了之后,我们将其整合到一起(编译运行服务)
在编译中,我们是根据用户传过来的文件名,先形成三个临时文件(1234.cpp、1234.exe、1234.compiler_error)然后对1234.cpp进行编译,形成1234.exe。
在运行中,我们是对1234.exe进行运行,形成三个临时文件(1234.stdin、1234.stdout、1234.stderr)
在编译运行过程中才是真正的接收用户传过来的数据信息,通过编译和运行的分别处理,完成用户的请求编译运行工作,这些数据信息是通过网络传输过来的,我们知道通过网络接收用户传过来json串,其中json串中应该包含如下:
in_json:
{code: “#include <iostream> ....int main(){...}”,input: "用户的输入(像牛客哪些)",cpu_limit: "1024",mem_limit: "30"
}
我们提供一个start函数,用于解析这个in_json串,将数据解析出来;然后将提取出来的代码写入到特定的文件中,但是存在多个用户提交代码,我们就需要保证每个文件的唯一性。
如何保证每个文件的唯一性呢?我们采用毫秒级时间戳+原子递增的唯一值来实现。
我们可以获取到唯一的文件后,我们将获取到的in_json串进行解析, 提供路径拼接函数,形成唯一的源文件,将in_json中的代码写入到文件中(它保存在我们的temp目录下),然后进行编译工作,编译是通过创建子进程执行函数替换,其中所需的源文件和可执行程序文件都可以通过路径拼接来完成,最终形成可执行程序;紧接着就是去调用run进行程序的运行,也是通过路径拼接的方式找到文件,它的返回值是int(大于0:程序异常,退出时收到了信号,返回值就是对应的信号;小于0:内部错误,子进程创建失败;等于0:正常运行完毕,结果保存到对应的临时文件中)。我们可以通过这个返回值来进行判断程序运行的结果,并自行设置状态码,将状态码对应到不同的信息,我们可以通过实现一个CodeToDesc函数。当然,在temp目录下会不断的形成临时文件,我们需要做个清理工作。
#pragma once
#include <jsoncpp/json/json.h>
#include <sstream>
#include <memory>
#include "run.hpp"
#include "compile.hpp"class CompileRun
{
public:// code > 0:进程收到了信号导致异常崩溃// code < 0:整个过程非运行报错(代码为空,编译报错等)// code = 0:整个过程全部完成// 将错误代码转为描述(CodeToDesc())static string codeToDesc(int code, const string &filename){string ret;switch (code){case 0:ret = "编译成功";break;case -1:ret = "提交代码为空";break;case -2:ret = "未知错误";break;case -3:FileUtil::reader(PathUtil::errPath(filename), &ret, true); // 编译错误break;case SIGABRT:ret = "内存超出";break;case SIGXCPU:ret = "CPU使用超时";break;case SIGFPE:ret = "浮点数溢出";break;default:ret = "未知错误码" + to_string(code);break;}return ret;}// 删除临时文件  清理temp目录下的临时文件static void removeTempFile(const string &filename){if (FileUtil::isExistFile(PathUtil::srcPath(filename))){unlink(PathUtil::srcPath(filename).c_str());// unlink函数:是Linux下删除特定文件的一个函数,参数是字符串形式}if (FileUtil::isExistFile(PathUtil::exePath(filename))){unlink(PathUtil::exePath(filename).c_str());}if (FileUtil::isExistFile(PathUtil::errPath(filename))){unlink(PathUtil::errPath(filename).c_str());}if (FileUtil::isExistFile(PathUtil::stdIn(filename))){unlink(PathUtil::stdIn(filename).c_str());}if (FileUtil::isExistFile(PathUtil::stdOut(filename))){unlink(PathUtil::stdOut(filename).c_str());}if (FileUtil::isExistFile(PathUtil::stdErr(filename))){unlink(PathUtil::stdErr(filename).c_str());}}/** 输入:*      code:用户提交的代码*      input:用户给自己提交代码对应的输入,不做处理*      cpu_limit:时间要求*      mem_limit:空间要求** 输出:* 必填字段:*      status:状态码*      reason:请求结果* 选填字段:*      stdout:程序运行完的结果*      stderr:程序运行完的错误结果* *//** start函数功能:*      通过网络接收用户传过来的json串(in_json),其中in_json包含如下:*          in_json:*          {*              code: “#include <iostream> ....int main(){...}”,*              input: "用户的输入(像牛客哪些)",*              cpu_limit: "1024",*              mem_limit: "30"*          }*       start函数去解析这个in_json串,将数据取出来;*       然后将提取出来的代码写入到特定的文件中,因为存在多个用户提交代码,所以需要保证每个文件的唯一性;* */static void start(const string &in_json, string *out_json){// 反序列化Json::Value inRoot;Json::CharReaderBuilder crb;unique_ptr<Json::CharReader> cr(crb.newCharReader());string error;cr->parse(in_json.c_str(), in_json.c_str() + in_json.size(), &inRoot, &error);string code = inRoot["code"].asString();string input = inRoot["input"].asString();int cpu_limit = inRoot["cpu_limit"].asInt();int mem_limit = inRoot["mem_limit"].asInt();// 在goto之间定义的变量是不允许的,所以提前定义int status_code = 0;  // 状态码int run_result = 0;   // run运行返回值string filename = ""; // 需要内部形成唯一文件名Json::Value outRoot;if (code.size() == 0) // 提交代码为空{status_code = -1;goto END;}// 给每一个用户的每一次提交生成唯一的文件srcfilename = FileUtil::uniqueFile();// 生成.cpp文件if (!FileUtil::writer(PathUtil::srcPath(filename), code)){status_code = -2; // 未知错误goto END;}// 编译 .cpp->.exeif (!Compiler::Compile(filename)){status_code = -3; // 编译错误goto END;}// 运行可执行文件.exerun_result = Runner::Run(filename, cpu_limit, mem_limit);if (run_result < 0){status_code = -2;goto END;}else if (run_result > 0){status_code = run_result; // 程序运行崩溃了(源于某种信号)}else{status_code = 0; // 运行成功}END:outRoot["status"] = status_code;outRoot["reason"] = codeToDesc(status_code, filename);// 如果运行成功,输出运行结果if (status_code == 0){string out;FileUtil::reader(PathUtil::stdOut(filename), &out, true);outRoot["stdout"] = out;string err;FileUtil::reader(PathUtil::stdErr(filename), &err, true);outRoot["stderr"] = err;}// 序列化Json::StreamWriterBuilder swb;unique_ptr<Json::StreamWriter> sw(swb.newStreamWriter());stringstream ss;sw->write(outRoot, &ss);*out_json = ss.str();removeTempFile(filename);}
};
八、打包成网络服务(编译运行代码的测试)
#include "compileRun.hpp"
#include "./cpp-httplib/httplib.h"void Usage(string proc)
{cerr << "Usage: "<< "\n\t" << proc << endl;
}// 这里是测试代码
int main(int argc, char *argv[])
{// in_json:// {//     "code" : "#include...", "input" : " ", "cpu_limit" : 1, "mem_limit" : 10240// }// out_json:// {//     "status" : "0", "reason" : "", "stdout" : "", "stderr" : ""// }// 通过http让client给我们上传一个json string// 下面的工作,充当客户端请求的json串// std::string in_json;// Json::Value in_value;// in_value["code"] = R"(#include <iostream>//     int main(){//         std::cout << "你可以看见我了" << std::endl;//         return 0;// })";// in_value["input"] = "";// in_value["cpu_limit"] = 1;// in_value["mem_limit"] = 10240 * 3;// Json::FastWriter writer;// in_json = writer.write(in_value);// std::cout << in_json << std::endl;// std::string out_json; // 这个是将来给客户返回的json串// CompileRun::start(in_json, &out_json);// std::cout << out_json << std::endl;// ./compile_server portif (argc != 2){Usage(argv[0]);return 1;}httplib::Server ser;ser.Post("/compileAndRun", [](const httplib::Request &req, httplib::Response &resp){string inJson = req.body;string outJson;if (!inJson.empty()){CompileRun::start(inJson, &outJson);resp.set_content(outJson,"application/json;charset=utf-8");} });ser.listen("0.0.0.0", atoi(argv[1]));
}
九、基于MVC结构的设计
1. 什么是MVC结构
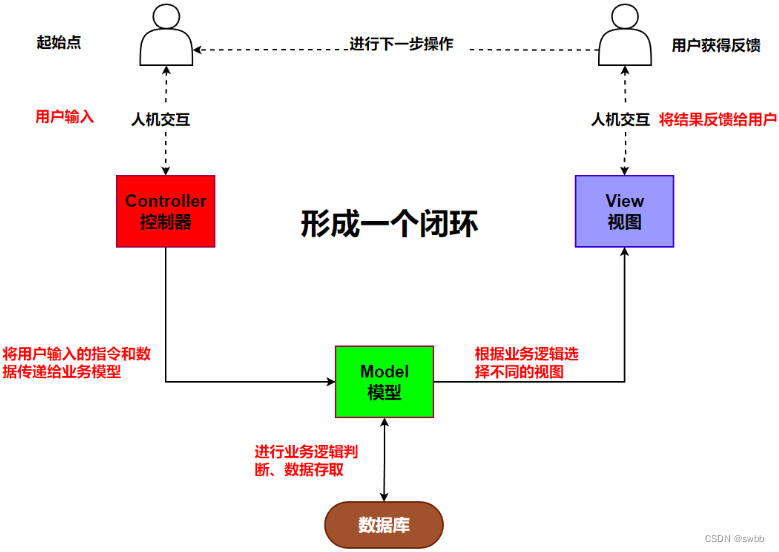
经典MVC模式中,M是指业务模型,V是指用户界面(视图),C则是控制器,使用MVC的目的是将M和V的实现代码分离,从而使同一个程序可以使用不同的表现形式。其中,View的定义比较清晰,就是用户界面。
M:model表示的是模型,代表业务规则。在MVC的三个部件中,模型拥有最多的处理任务,被模型返回的数据是中立的,模型与数据格式无关,这样一个模型就能够为多个视图提供数据,由于应用于模型的代码只需要写一次就可以被多个视图重用,所以减少了代码的重复性。
V:view表示的视图,代表用户看到并与之交互的界面。在视图中没有真正的处理发生,它只是作为一种输出数据并允许用户操作的方式。
C:controller表示的是控制器,控制器接收用户的输入并调用模型(M)和视图(V)去完成用户需求。控制器本身不输出任何东西和任何处理。它只接收请求并决定调用哪个模型构建去处理请求,然后再确定用哪个视图来显示返回的数据。
2. Model
题目应该包含如下的信息:
题目的编号(1)
题目的标题(求最大值)
题目的难度(简单、中等、困难)
题目的时间要求(1s)
题目的空间要求(30000KB)
题目的描述(给定一个数组,求最大值)
题目预设给用户在线编辑的代码(#include<iostream>...)
题目的测试用例
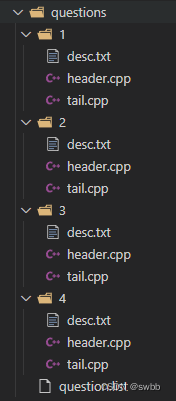
新增一个目录questions,用来存放我们的题库,这个questions目录下包含题目列表(文件形式)和每个题目的文件夹(其中又包含题目的描述、题目预设给用户在线编辑的代码header和题目的测试用例tail)
#pragma once
#include <iostream>
#include <fstream>
#include <vector>
#include <unordered_map>
#include <string>
#include "log.hpp"
using namespace std;struct Question
{string number;    // 题目编号string title;     // 题目标题string star;      // 题目难度int cpu_limit;    // 时间要求int mem_limit;    // 内存要求string desc;      // 题目描述string head_code; // 预设在线编辑的代码string test_code; // 测试用例
};const string questionsPath = "./questions/";
const string questionListPath = "./questions/question.list";class Model
{
private:unordered_map<string, Question> Questions;public:Model(){LoadQuestion(questionListPath);}bool LoadQuestion(const string &path){ifstream ifs(path);if (!ifs.is_open()){LOG(FATAL) << "加载题库失败,请检查是否存在题库文件" << endl;return false;}string line;while (getline(ifs, line)){vector<string> q;StringUtil::stringSpilt(line, &q, " ");if (q.size() != 5){LOG(WARNING) << "加载部分题目失败,请检查题目格式" << endl;continue;}Question ques;ques.number = q[0];ques.desc = q[1];ques.star = q[2];ques.cpu_limit = atoi(q[3].c_str());ques.mem_limit = atoi(q[4].c_str());string qPath = questionsPath;qPath += q[0];qPath += "/";FileUtil::reader(PathUtil::addPath(qPath, "desc.txt"), &(ques.desc), true);FileUtil::reader(PathUtil::addPath(qPath, "header.cpp"), &(ques.head_code), true);FileUtil::reader(PathUtil::addPath(qPath, "tail.cpp"), &(ques.test_code), true);Questions.insert({ques.number, ques});}LOG(INFO) << "加载题库......成功" << endl;ifs.close();return true;}bool getAllQuestions(vector<Question> *questions){if (Questions.empty()){LOG(ERROR) << "用户获取题库失败" << endl;return false;}for (const auto &e : Questions){(*questions).push_back(e.second);}return true;}bool getOneQuestion(const string &id, Question *question){auto iter = Questions.find(id);if (iter == Questions.end()){LOG(ERROR) << "用户获取指定题目失败" << endl;return false;}*question = iter->second;return true;}
};
3. View
将model中的数据进行渲染构建出网页,所以我们需要引入一个第三方库ctemplate。
#pragma once
#include <ctemplate/template.h>
#include "ojModel.hpp"const string template_html = "./template_html/";class View
{
public:// 所有题目的网页void AllExpendHtml(const vector<Question> &questions, string *html){// 题目编号 标题 难度 推荐使用表格// 形成路径string src_html = template_html + "all_questions.html";// 形成数据字典ctemplate::TemplateDictionary root("all_questions.html");for (const auto &q : questions){ctemplate::TemplateDictionary *td = root.AddSectionDictionary("question_list");td->SetValue("number", q.number);td->SetValue("title", q.title);td->SetValue("star", q.star);}// 获取被渲染的网页ctemplate::Template *t = ctemplate::Template::GetTemplate(src_html, ctemplate::DO_NOT_STRIP);// 开始渲染t->Expand(html, &root);}// 一道题目的网页void OneExpendHtml(const Question &question, string *html){string src_html = template_html + "one_question.html";ctemplate::TemplateDictionary root("one_question.html");root.SetValue("number", question.number);root.SetValue("title", question.title);root.SetValue("star", question.star);root.SetValue("desc", question.desc);root.SetValue("pre_code", question.head_code);ctemplate::Template *t = ctemplate::Template::GetTemplate(src_html, ctemplate::DO_NOT_STRIP);t->Expand(html, &root);}
};
4. Control
通过获取用户的输入调用不同的模型构建view。但是我们还需要完成负载均衡的概念,因为在后端进行编译服务的时候,如果只提供一台主机,当用户请求比较多或主机挂了,会影响用户体验。
#pragma once
#include <mutex>
#include <jsoncpp/json/json.h>
#include <sstream>
#include "./cpp-httplib/httplib.h"
#include "ojView.hpp"
#include "ojModel.hpp"class Machine
{
public:string ip;     // 编译服务的ipint port;      // 编译服务的portuint64_t load; // 编译服务的负载数量mutex *mtx;    // c++中mutex是禁止拷贝的,所以使用指针public:Machine() : ip(""), port(0), load(0), mtx(nullptr) {}void incrLoad(){if (mtx)mtx->lock();load++;if (mtx)mtx->unlock();}void descLoad(){if (mtx)mtx->lock();load--;if (mtx)mtx->unlock();}void clearLoad(){if (mtx)mtx->lock();load = 0;if (mtx)mtx->unlock();}uint64_t getLoad(){uint64_t l = 0;if (mtx)mtx->lock();l = load;if (mtx)mtx->unlock();return l;}
};const string confPath = "./conf/service_machine.conf";class LoadBlance
{
private:vector<Machine> machines; // 所有主机的集合 下标就是主机的idvector<int> online;       // 在线主机的idvector<int> offline;      // 离线主机的idmutex mtx;public:LoadBlance(){Load(confPath);LOG(INFO) << "加载" << confPath << "完成" << endl;}bool Load(const string &path){ifstream ifs(path);if (!ifs.is_open()){LOG(FATAL) << "加载" << path << "失败" << endl;return false;}string line;while (getline(ifs, line)){vector<string> ret;StringUtil::stringSpilt(line, &ret, ":");if (ret.size() != 2){LOG(WARNING) << "切分失败" << endl;return false;}Machine m;m.ip = ret[0];m.port = atoi(ret[1].c_str());m.load = 0;m.mtx = new mutex();online.push_back(machines.size());machines.push_back(m);}ifs.close();return true;}// Machine **m 使用双重指针的原因是为了能够通过指针间接地修改指向的对象,即Machine对象的地址。bool SmartChoice(int *id, Machine **m){mtx.lock();// 负载均衡:随机数算法、轮询+随机算法int num = online.size();if (num == 0){mtx.unlock();LOG(WARNING) << "所有主机都离线了,请运维人员迅速查看" << endl;return false;}*id = online[0];*m = &machines[online[0]];uint64_t min_load = machines[online[0]].load;for (int i = 1; i < online.size(); i++){uint64_t cur_load = machines[online[i]].load;if (cur_load < min_load){min_load = cur_load;*id = online[i];*m = &machines[online[i]];}}mtx.unlock();return true;}// 离线主机void offlineMachine(int which){mtx.lock();for (auto iter = online.begin(); iter != online.end(); iter++){if (*iter == which){machines[which].clearLoad();online.erase(iter);offline.push_back(which);break; // 因为有break存在,所以不需要考虑迭代器失效问题}}mtx.unlock();}// 上线主机void onlineMachine(){// 当所有主机已离线时,统一上线所有主机mtx.lock();online.insert(online.end(), offline.begin(), offline.end());offline.erase(offline.begin(), offline.end());mtx.unlock();LOG(INFO) << "所有离线主机已上线" << endl;}void showMachine(){mtx.lock();// 当前在线主机idcout << "当前在线主机id列表:" << endl;for (auto e : online){cout << e << " , ";}cout << endl;cout << "当前离线主机id列表:" << endl;for (auto e : offline){cout << e << " , ";}mtx.unlock();}
};class Control
{
private:Model model;View view;LoadBlance loadBlance;public:void RecoveryMachine(){loadBlance.onlineMachine();}bool AllQusetions(string *html){bool ret = true;vector<Question> q;if (model.getAllQuestions(&q)){sort(q.begin(), q.end(), [](const Question &q1, const Question &q2){ return atoi(q1.number.c_str()) < atoi(q2.number.c_str()); });view.AllExpendHtml(q, html);}else{*html = "获取题目失败,形成题目列表失败";ret = false;}return ret;}bool OneQusetion(const string &id, string *html){bool ret = true;Question q;if (model.getOneQuestion(id, &q)){view.OneExpendHtml(q, html);}else{*html = "获取指定题目" + id + "失败";ret = false;}return ret;}void Judge(const string &id, const string &inJson, string *outJson){Question q;model.getOneQuestion(id, &q);Json::CharReaderBuilder crb;unique_ptr<Json::CharReader> cr(crb.newCharReader());Json::Value inRoot;cr->parse(inJson.c_str(), inJson.c_str() + inJson.size(), &inRoot, nullptr);string code = inRoot["code"].asString();Json::Value compileRoot;compileRoot["input"] = inRoot["input"].asString();compileRoot["code"] = code + "\n" + q.test_code;compileRoot["cpu_limit"] = q.cpu_limit;compileRoot["mem_limit"] = q.mem_limit;Json::StreamWriterBuilder swb;unique_ptr<Json::StreamWriter> sw(swb.newStreamWriter());stringstream ss;sw->write(compileRoot, &ss);string compileString = ss.str();// 选择负载最低的主机// 一直选择,直到找到主机,否则全部挂掉while (true){int id = 0;Machine *m;if (!loadBlance.SmartChoice(&id, &m)){break;}// 客户端发起http请求,得到结果httplib::Client cli(m->ip, m->port);m->incrLoad();LOG(INFO) << " 选择主机成功,主机id:" << id << " 详情:" << m->ip << ":" << m->port << "当前主机的负载是:" << m->getLoad() << "\n";if (auto resp = cli.Post("/compile_and_run", compileString, "application/json;charset=utf-8")){if (resp->status == 200){*outJson = resp->body;m->descLoad();LOG(INFO) << " 请求编译和运行服务成功......"<< "\n";break;}else{// 请求失败LOG(ERROR) << " 选择当前请求的主机的id:" << id << " 详情:" << m->ip << ":" << m->port << " 可能已经离线"<< "\n";loadBlance.offlineMachine(id);loadBlance.showMachine();}}}}
};
5. 打包成网络服务(ojServer)
#include <signal.h>
#include "ojControl.hpp"static Control *con_ptr;void Recovery(int signo)
{con_ptr->RecoveryMachine();
}int main()
{signal(SIGQUIT, Recovery);httplib::Server ser;Control control;con_ptr = &control;// 获取所有题目内容ser.Get("/all_questions", [&control](const httplib::Request &req, httplib::Response &resp){ string html; // 返回一张包含所有题目的html网页control.AllQusetions(&html);// 用户看到的是什么?网页数据+拼上了题目相关的数据  resp.set_content(html,"text/html;charset=utf-8"); });// 用户要根据题目编号,获取题目内容ser.Get(R"(/question/(\d+))", [&control](const httplib::Request &req, httplib::Response &resp){string html;string id = req.matches[1];control.OneQusetion(id, &html);resp.set_content(html,"text/html;charset=utf-8"); });ser.Post("/judge/(\\d++)", [&control](const httplib::Request &req, httplib::Response &resp){string id = req.matches[1];string result;control.Judge(id,req.body,&result);resp.set_content(resp.body,"application/json;charset=utf-8"); });ser.set_base_dir("./wwwroot");ser.listen("0.0.0.0", 8080);
}
十、前端页面的设计
1. indx.html
当用户访问根目录时显示的网页
<!DOCTYPE html>
<html lang="en"><head><meta charset="UTF-8"><meta http-equiv="X-UA-Compatible" content="IE=edge"><meta name="viewport" content="width=device-width, initial-scale=1.0"><title>这是我的个人oj系统</title><style>/*起手式:100%保证我们的样式设置可以不受默认影响*/* {margin: 0px;/*消除网页的默认外边距*/padding: 0px;/*消除网页的默认内边距*/}html,body {width: 100%;height: 100%;}.container .navbar{width: 100%;height: 50px;background-color:black;/* 给父级标签overflow,取消后续float带来的影响 */overflow: hidden;}.container .navbar a{/* 设置a标签是行内块元素,允许你设置宽度*/display: inline-block;/* 设置a标签的宽度,默认a标签是行内元素,无法设置宽度*/width: 80px;/* 设置字体的颜色 */color: white;/* 设置字体的大小 */font-size: large;/* 设置文字的高度和导航栏一样的高度 */line-height: 50px;/* 去掉a标签的下划线 */text-decoration: none;/* 设置a标签的文字居中 */text-align: center;}/* 设置鼠标事件 */.container .navbar a:hover{background-color:green;}/* 设置浮动 */.container .navbar .login{float:right;}.container .content {/* 设置标签的宽度 */width: 800px;/* background-color: #ccc; *//* 整体居中 */margin: 0px auto;/* 设置文字居中 */text-align: center;/* 设置上外边距 */margin-top: 200px;}.container .content .front_ {/* 设置标签为块级元素,独占一行,可以设置高度宽度等属性 */display: block;/* 设置每个文字的上外边距 */margin-top: 20px;/* 去掉a标签的下划线 */text-decoration: none;}</style>
</head><!-- <body background="C:\Users\MLG\Desktop\壁纸.jpg"> --><body background="./壁纸.jpg">
<div class="container"><!--导航栏--><div class="navbar"><a href="/">首页</a><a href="/all_questions">题库</a><a href="#">竞赛</a><a href="#">讨论</a><a href="#">求职</a><a class="login" href="#">登录</a></div><!--网页的内容--><div class="content"><h1 class="front_">欢迎来到我的Online_Judge平台</h1><a class="front_" href="/all_questions">点击我开始编程啦!</a></div>
</div>
</body></html>
2. all_questions.html
当用户获取题目列表的时候显示的网页
<!DOCTYPE html>
<html lang="en"><head><meta charset="UTF-8"><meta name="viewport"content="width=device-width, user-scalable=no, initial-scale=1.0, maximum-scale=1.0, minimum-scale=1.0"><meta http-equiv="X-UA-Compatible" content="ie=edge"><title>在线OJ-题目列表</title><style>/*起手式:100%保证我们的样式设置可以不受默认影响*/* {margin: 0px;/*消除网页的默认外边距*/padding: 0px;/*消除网页的默认内边距*/}html,body {width: 100%;height: 100%;}.container .navbar {width: 100%;height: 50px;background-color: black;/* 给父级标签overflow,取消后续float带来的影响 */overflow: hidden;}.container .navbar a {/* 设置a标签是行内块元素,允许你设置宽度*/display: inline-block;/* 设置a标签的宽度,默认a标签是行内元素,无法设置宽度*/width: 80px;/* 设置字体的颜色 */color: white;/* 设置字体的大小 */font-size: large;/* 设置文字的高度和导航栏一样的高度 */line-height: 50px;/* 去掉a标签的下划线 */text-decoration: none;/* 设置a标签的文字居中 */text-align: center;}/* 设置鼠标事件 */.container .navbar a:hover {background-color: green;}.container .navbar .login{float: right;}.container .question_list {padding-top: 50px;width: 800px;height: 600px;margin: 0px auto;/* background-color: #ccc; */text-align: center;}.container .question_list table {width: 100%;font-size: large;font-family:'Lucida Sans', 'Lucida Sans Regular', 'Lucida Grande', 'Lucida Sans Unicode', Geneva, Verdana, sans-serif;margin-top: 50px;background-color: #c6cbcc;}.container .question_list h1{color: green;}.container .question_list table .item{width: 100px;height: 40px;font-size: large;font-family:'Times New Roman', Times, serif;}.container .question_list table .item a{text-decoration: none;color:black;}.container .question_list table .item a:hover{color: blue;text-decoration: underline;}</style>
</head><body>
<div class="container"><div class="navbar"><!--导航栏--><div class="navbar"><a href="/">首页</a><a href="/all_questions">题库</a><a href="#">竞赛</a><a href="#">讨论</a><a href="#">求职</a><a class="login" href="#">登录</a></div></div><div class="question_list"><h1>Online_Judge题目列表</h1><table><tr><th class="item">编号</th><th class="item">标题</th><th class="item">难度</th></tr>{{#question_list}}<tr><td class="item">{{number}}</td><td class="item"><a href="/question/{{number}}">{{title}}</a></td><td class="item">{{star}}</td></tr>{{/question_list}}</table></div></div></body></html>
3. one_question.html
当用户获取单道题目所显示的网页
<!DOCTYPE html>
<html lang="en"><head><meta charset="UTF-8"><meta name="viewport"content="width=device-width, user-scalable=no, initial-scale=1.0, maximum-scale=1.0, minimum-scale=1.0"><meta http-equiv="X-UA-Compatible" content="ie=edge"><title>{{number}}.{{title}}</title><!-- 引入ACE CDN --><script src="https://cdnjs.cloudflare.com/ajax/libs/ace/1.2.6/ace.js" type="text/javascript"charset="utf-8"></script><!-- 引入语法 --><script src="https://cdnjs.cloudflare.com/ajax/libs/ace/1.2.6/ext-language_tools.js" type="text/javascript"charset="utf-8"></script><script src="http://code.jquery.com/jquery-2.1.1.min.js"></script><style>* {margin: 0;padding: 0;}html,body {width: 100%;height: 100%;}.container .navbar {width: 100%;height: 50px;background-color: black;/* 给父级标签overflow,取消后续float带来的影响 */overflow: hidden;}.container .navbar a {/* 设置a标签是行内块元素,允许你设置宽度*/display: inline-block;/* 设置a标签的宽度,默认a标签是行内元素,无法设置宽度*/width: 80px;/* 设置字体的颜色 */color: white;/* 设置字体的大小 */font-size: large;/* 设置文字的高度和导航栏一样的高度 */line-height: 50px;/* 去掉a标签的下划线 */text-decoration: none;/* 设置a标签的文字居中 */text-align: center;}/* 设置鼠标事件 */.container .navbar a:hover {background-color: green;}.container .navbar .login {float: right;}.container .part1 {width: 100%;height: 600px;overflow: hidden;}.container .part1 .left_desc {width: 50%;height: 600px;float: left;overflow: scroll;/* 添加滚动条*/}.container .part1 .left_desc h3 {padding-top: 10px;padding-left: 10px;}.container .part1 .left_desc pre {padding-top: 10px;padding-left: 10px;font-size: medium;font-family: 'Franklin Gothic Medium', 'Arial Narrow', Arial, sans-serif;}.container .part1 .right_code {width: 50%;float: right;}.container .part1 .right_code .ace_editor {height: 600px;}.container .part2 {width: 100%;overflow: hidden;}.container .part2 .result {width: 300px;float: left;}.container .part2 .btn-submit {width: 100px;height: 30px;margin-top: 1px;margin-right: 1px;font-size: large;float: right;background-color: #26bb9c;color: #FFF;border-radius: 1ch;/* 给按钮带圆角*/border: 0px;}.container .part2 button:hover {color: green;}.container .part2 .result{margin-top: 15px;margin-left: 15px;}.container .part2 .result pre{font-size: larger;}</style>
</head><body>
<div class="container"><div class="navbar"><a href="/">首页</a><a href="/all_questions">题库</a><a href="#">竞赛</a><a href="#">讨论</a><a href="#">求职</a><a class="login" href="#">登录</a></div><!-- 左右呈现,题目描述和预设代码 --><div class="part1"><div class="left_desc"><h3><span id="number">{{number}}</span>.{{title}}.{{star}}</h3><pre>{{desc}}</pre></div><div class="right_code"><pre id="code" class="ace_editor"><textarea class="ace_text-input">{{pre_code}}</textarea></pre></div></div><!-- 提交结果并显示 --><div class="part2"><div class="result"></div><button class="btn-submit" onclick="submit()">提交代码</button></div>
</div><script>//初始化对象editor = ace.edit("code");//设置风格和语言(更多风格和语言,请到github上相应目录查看)// 主题大全:http://www.manongjc.com/detail/25-cfpdrwkkivkikmk.htmleditor.setTheme("ace/theme/monokai");editor.session.setMode("ace/mode/c_cpp");// 字体大小editor.setFontSize(16);// 设置默认制表符的大小:editor.getSession().setTabSize(4);// 设置只读(true时只读,用于展示代码)editor.setReadOnly(false);// 启用提示菜单ace.require("ace/ext/language_tools");editor.setOptions({enableBasicAutocompletion: true,enableSnippets: true,enableLiveAutocompletion: true});function submit() {// 1. 收集当前页面的有关数据:1.题号 2.代码我们采用JQuery// console.log("哈哈!");var code = editor.getSession().getValue();//console.log(code);var number = $(".container .part1 .left_desc h3 #number").text();//console.log(number);var judge_url = "/judge/" + number;console.log(judge_url);// 2. 构建json,并向后台发起基于http的json请求$.ajax({method: 'Post',    //向后端发起请求的方式(post、get)url: judge_url,    //向后端指定的url发起请求dataType: 'json',  //告知server,我们需要什么格式contentType: 'application/json;charset=utf-8', //告知server我给你的是什么格式data: JSON.stringify({'code': code,'input': ''}),success: function (data) {//成功得到结果//console.log(data);show_result(data);}});// 3. 得到结果,解析并显示到result中function show_result(data) {// console.log(data.status);// console.log(data.reason);// 拿到result结果标签var result_div = $(".container .part2 .result");// 清空上一次的运行结果result_div.empty();// 首先拿到结果的状态码和原因结果var _status = data.status;var _reason = data.reason;var reson_lable = $("<p>",{text: _reason});reson_lable.appendTo(result_div);if (status == 0) {// 请求是成功的,编译运行没出问题,但是结果是否通过看测试用例的结果var _stdout = data.stdout;var _stderr = data.stderr;var reson_lable = $("<p>",{text: _reason});var stdout_lable = $("<pre>",{text: _stdout});var stderr_lable = $("<pre>",{text: _stderr});stdout_lable.appendTo(result_div);stderr_lable.appendTo(result_div);} else {}}}
</script>
</body></html>