文章目录
- run方法核心流程
- SpringApplicationRunListener监听器
- 监听器的配置与加载
- SpringApplicationRunListener源码解析
- 实现类EventPublishingRunListener
- 初始化ApplicationArguments
- 初始化ConfigurableEnvironment
- 获取或创建环境
- 配置环境
- 打印Banner
- Spring应用上下文的创建
- Spring应用上下文的准备
- Spring应用上下文的刷新
- 调用ApplicationRunner和CommandLineRunner
run方法核心流程
在分析和学习整个run方法的源代码及操作之前,我们先通过下图所示的流程图来看一下SpringApplication调用的run方法处理的核心操作都包含哪些。

上面的流程图可以看出,SpringApplication在run方法中重点做了以下操作。
- 获取监听器和参数配置。
- 打印Banner信息。
- 创建并初始化容器。
- 监听器发送通知。
当然,除了核心操作,run方法运行过程中还涉及启动时长统计、异常报告、启动日志、异常处理等辅助操作。
public ConfigurableApplicationContext run(String... args) {StopWatch stopWatch = new StopWatch();stopWatch.start();ConfigurableApplicationContext context = null;Collection<SpringBootExceptionReporter> exceptionReporters = new ArrayList();this.configureHeadlessProperty();SpringApplicationRunListeners listeners = this.getRunListeners(args);listeners.starting();Collection exceptionReporters;try {// 创建 ApplicationArguments 对象ApplicationArguments applicationArguments = new DefaultApplicationArguments(args);//  加载属性配置ConfigurableEnvironment environment = this.prepareEnvironment(listeners, applicationArguments);this.configureIgnoreBeanInfo(environment);//  打印bannerBanner printedBanner = this.printBanner(environment);// 创建容器context = this.createApplicationContext();//  异常报告器exceptionReporters = this.getSpringFactoriesInstances(SpringBootExceptionReporter.class, new Class[]{ConfigurableApplicationContext.class}, context);//  准备容器this.prepareContext(context, environment, listeners, applicationArguments, printedBanner);// 初始化容器this.refreshContext(context);//  初始化容器后this.afterRefresh(context, applicationArguments);// 停止时长统计stopWatch.stop();//  打印日志if (this.logStartupInfo) {(new StartupInfoLogger(this.mainApplicationClass)).logStarted(this.getApplicationLog(), stopWatch);}//  通知监听器容器启动完成listeners.started(context);this.callRunners(context, applicationArguments);} catch (Throwable var10) {//  异常处理this.handleRunFailure(context, var10, exceptionReporters, listeners);throw new IllegalStateException(var10);}try {//  通知监听器:容器正在运行listeners.running(context);return context;} catch (Throwable var9) {// 异常处理this.handleRunFailure(context, var9, exceptionReporters, (SpringApplicationRunListeners)null);throw new IllegalStateException(var9);}
}
SpringApplicationRunListener监听器
监听器的配置与加载
SpringApplicationRunListeners 可以理解为一个SpringApplicationRunListener的容器,它将SpringApplicationRunListener的集合以构造方法传入,并赋值给其listeners成员变量,然后提供了针对listeners 成员变量的各种遍历操作方法,比如,遍历集合并调用对应的starting、started、running等方法。
SpringApplicationRunListeners 的构建很简单,SpringApplication中getRunListeners方法代码如下:
private SpringApplicationRunListeners getRunListeners(String[] args) {Class<?>[] types = new Class[]{SpringApplication.class, String[].class};return new SpringApplicationRunListeners(logger, this.getSpringFactoriesInstances(SpringApplicationRunListener.class, types, this, args));
}
SpringApplicationRunListeners构造方法的第二个参数便是SpringApplicationRunListener的集合,SpringApplication中调用构造方法时该参数是通过getSpringFactoriesInstances方法获取(都是一样的套路)的,代码如下:
private <T> Collection<T> getSpringFactoriesInstances(Class<T> type, Class<?>[] parameterTypes, Object... args) {// 获取类加载器ClassLoader classLoader = this.getClassLoader();//  加载监听器,并放入set中Set<String> names = new LinkedHashSet(SpringFactoriesLoader.loadFactoryNames(type, classLoader));// 实例化监听器List<T> instances = this.createSpringFactoriesInstances(type, parameterTypes, classLoader, args, names);//  排序AnnotationAwareOrderComparator.sort(instances);return instances;
}
通过方法名便可得知,getSpringFactoriesInstances是用来获取factories配置文件中的注册类,并进行实例化操作。
关于通过SpringFactoriesLoader获取META-INF/spring.factories中对应的配置,构造方法章节已经多次提到,这里不再赞述。SpringApplicationRunListener的注册配置位于spring-boot项目中的spring.factories文件内,SpringBoot默认仅有一个监听器进行了注册,关于其功能后面会专门讲到。
private <T> List<T> createSpringFactoriesInstances(Class<T> type, Class<?>[] parameterTypes, ClassLoader classLoader, Object[] args, Set<String> names) {List<T> instances = new ArrayList(names.size());Iterator var7 = names.iterator();while(var7.hasNext()) {String name = (String)var7.next();try {Class<?> instanceClass = ClassUtils.forName(name, classLoader);Assert.isAssignable(type, instanceClass);Constructor<?> constructor = instanceClass.getDeclaredConstructor(parameterTypes);T instance = BeanUtils.instantiateClass(constructor, args);instances.add(instance);} catch (Throwable var12) {throw new IllegalArgumentException("Cannot instantiate " + type + " : " + name, var12);}}return instances;
}
在上面的代码中,实例化监听器时需要有一个默认的构造方法,且构造方法的参数为Class<?>[]parameterTypes。我们向上追踪该参数的来源,会发现该参数的值为Class数组,数组的内容依次为SpringApplication.class和String[].class。也就是说,SpringApplicationRunListener的实现类必须有默认的构造方法,且构造方法的参数必须依次为SpringApplication和String[]类型。
SpringApplicationRunListener源码解析
接口SpringApplicationRunListener是SpringApplication的run方法监听器。上节提到了 SpringApplicationRunListener通过SpringFactoriesLoader加载,并且必须声明一个公共构造函数,该函数接收SpringApplication实例和String[]的参数,而且每次运行都会创建一个新的实例。
SpringApplicationRunListener提供了一系列的方法,用户可以通过回调这些方法,在启动各个流程时加入指定的逻辑处理。
class SpringApplicationRunListeners {private final Log log;private final List<SpringApplicationRunListener> listeners;SpringApplicationRunListeners(Log log, Collection<? extends SpringApplicationRunListener> listeners) {this.log = log;this.listeners = new ArrayList(listeners);}public void starting() {Iterator var1 = this.listeners.iterator();while(var1.hasNext()) {SpringApplicationRunListener listener = (SpringApplicationRunListener)var1.next();listener.starting();}}public void environmentPrepared(ConfigurableEnvironment environment) {Iterator var2 = this.listeners.iterator();while(var2.hasNext()) {SpringApplicationRunListener listener = (SpringApplicationRunListener)var2.next();listener.environmentPrepared(environment);}}public void contextPrepared(ConfigurableApplicationContext context) {Iterator var2 = this.listeners.iterator();while(var2.hasNext()) {SpringApplicationRunListener listener = (SpringApplicationRunListener)var2.next();listener.contextPrepared(context);}}public void contextLoaded(ConfigurableApplicationContext context) {Iterator var2 = this.listeners.iterator();while(var2.hasNext()) {SpringApplicationRunListener listener = (SpringApplicationRunListener)var2.next();listener.contextLoaded(context);}}public void started(ConfigurableApplicationContext context) {Iterator var2 = this.listeners.iterator();while(var2.hasNext()) {SpringApplicationRunListener listener = (SpringApplicationRunListener)var2.next();listener.started(context);}}public void running(ConfigurableApplicationContext context) {Iterator var2 = this.listeners.iterator();while(var2.hasNext()) {SpringApplicationRunListener listener = (SpringApplicationRunListener)var2.next();listener.running(context);}}public void failed(ConfigurableApplicationContext context, Throwable exception) {Iterator var3 = this.listeners.iterator();while(var3.hasNext()) {SpringApplicationRunListener listener = (SpringApplicationRunListener)var3.next();this.callFailedListener(listener, context, exception);}}private void callFailedListener(SpringApplicationRunListener listener, ConfigurableApplicationContext context, Throwable exception) {try {listener.failed(context, exception);} catch (Throwable var6) {if (exception == null) {ReflectionUtils.rethrowRuntimeException(var6);}if (this.log.isDebugEnabled()) {this.log.error("Error handling failed", var6);} else {String message = var6.getMessage();message = message != null ? message : "no error message";this.log.warn("Error handling failed (" + message + ")");}}}
}
我们通过源代码可以看出,SpringApplicationRunListener为run方法提供了各个运行阶段的监听事件处理功能。
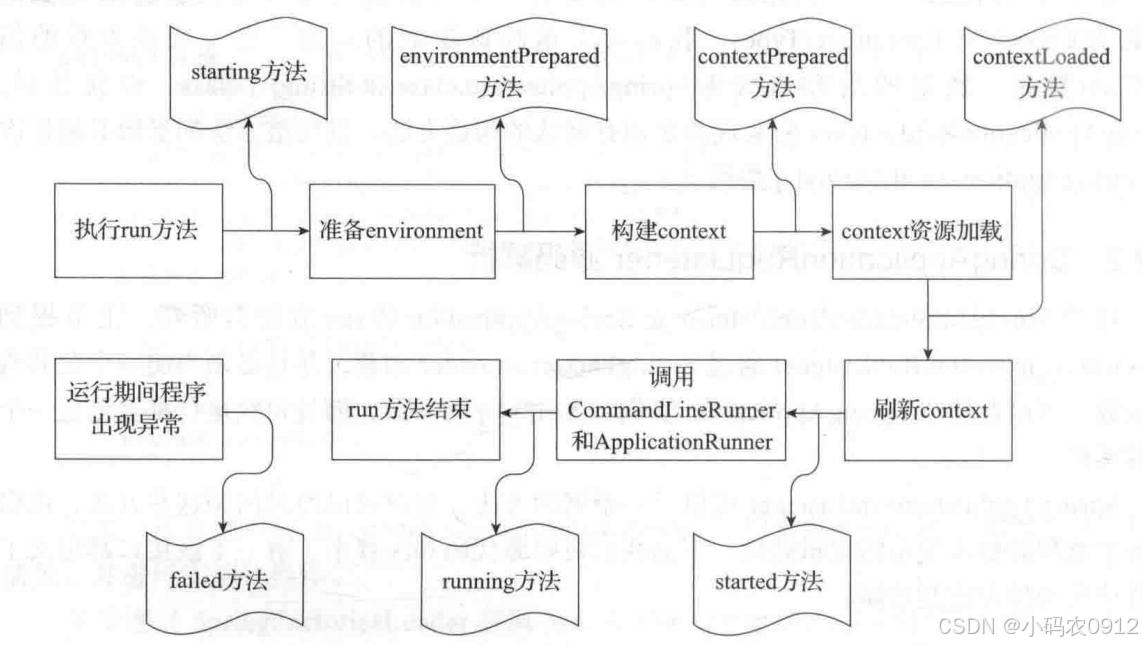
下图展示了在整个run方法的生命周期中SpringApplicationRunListener的所有方法所处的位置,该图可以帮助我们更好地学习run方法的运行流程。在前面run方法的代码中已经看到相关监听方法被调用,后续的源代码中也将涉及对应方法的调用,我们可参考此图以便理解和加深记忆。
实现类EventPublishingRunListener
EventPublishingRunListener是SpringBoot中针对SpringApplicationRunListener接口的唯一内建实现。EventPublishingRunListener使用内置的SimpleApplicationEventMulticaster来广播在上下文刷新之前触发的事件。
默认情况下,SpringBoot在初始化过程中触发的事件也是交由EventPublishingRunListener来代理实现的。
SpringBoot完成基本的初始化之后,会遍历SpringApplication的所有ApplicationListener实例,并将它们与SimpleApplicationEventMulticaster进行关联,方便SimpleApplicationEventMulticaster后续将事件传递给所有的监听器。
EventPublishingRunListener针对不同的事件提供了不同的处理方法,但它们的处理流程基本相同。
public void contextLoaded(ConfigurableApplicationContext context) {ApplicationListener listener;for(Iterator var2 = this.application.getListeners().iterator(); var2.hasNext(); context.addApplicationListener(listener)) {listener = (ApplicationListener)var2.next();if (listener instanceof ApplicationContextAware) {((ApplicationContextAware)listener).setApplicationContext(context);}}this.initialMulticaster.multicastEvent(new ApplicationPreparedEvent(this.application, this.args, context));
}
contextLoaded方法在发布事件之前做了两件事:第一,遍历application的所有监听器实现类,如果该实现类还实现了ApplicationContextAware接口,则将上下文信息设置到该监听器内;第二,将application中的监听器实现类全部添加到上下文中。最后一步才是调用事件广播。
也正是这个方法形成了不同事件广播形式的分水岭,在此方法之前执行的事件广播都是通过multicastEvent来进行的,而该方法之后的方法则均采用publishEvent来执行。这是因为只有到了contextLoaded方法之后,上下文才算初始化完成,才可通过它的publishEvent方法来进行事件的发布。
初始化ApplicationArguments
监听器启动之后,紧接着便是执行ApplicationArguments对象的初始化,ApplicationArguments是用于提供访问运行SpringApplication时的参数。
ApplicationArguments的初始化过程非常简单,只是调用了它的实现类DefaultApplicationArguments并传入main方法中的args参数。
在DefaultApplicationArguments中将参数args封装为Source对象,Source对象是基于Spring框架的SimpleCommandLinePropertySource来实现的。
初始化ConfigurableEnvironment
完成ApplicationArguments参数的准备之后,便开始通过prepareEnvironment方法对ConfigurableEnvironment对象进行初始化操作。
ConfigurableEnvironment接口继承自Environment接口和ConfigurablePropertyResolver,最终都继承自接口PropertyResolverConfigurableEnvironment接口的主要作用是提供当前运行环境的公开接口,比如配置文件profiles各类系统属性和变量的设置、添加、读取、合并等功能。
通过ConfigurableEnvironment接口中方法定义,可以更清楚地了解它的功能,代码如下:
public interface ConfigurableEnvironment extends Environment, ConfigurablePropertyResolver {void setActiveProfiles(String... var1);void addActiveProfile(String var1);void setDefaultProfiles(String... var1);MutablePropertySources getPropertySources();Map<String, Object> getSystemProperties();Map<String, Object> getSystemEnvironment();void merge(ConfigurableEnvironment var1);
}
通过接口提供的方法,我们可以看出ConfigurableEnvironment就是围绕着这个“环境”来提供相应的功能,这也是为什么我们也将它称作“环境”。
了解了ConfigurableEnvironment的功能及方法,我们回归到SpringApplication的流程看相关源代码。run方法中调用prepareEnvironment方法相关代码如下:
private ConfigurableEnvironment prepareEnvironment(SpringApplicationRunListeners listeners, ApplicationArguments applicationArguments) {ConfigurableEnvironment environment = this.getOrCreateEnvironment();this.configureEnvironment((ConfigurableEnvironment)environment, applicationArguments.getSourceArgs());listeners.environmentPrepared((ConfigurableEnvironment)environment);this.bindToSpringApplication((ConfigurableEnvironment)environment);if (!this.isCustomEnvironment) {environment = (new EnvironmentConverter(this.getClassLoader())).convertEnvironmentIfNecessary((ConfigurableEnvironment)environment, this.deduceEnvironmentClass());}ConfigurationPropertySources.attach((Environment)environment);return (ConfigurableEnvironment)environment;
}
通过以上代码可知,prepareEnvironment进行了以下的操作:
- 获取或创建环境。
- 配置环境。
- ConfigurationPropertySources附加到指定环境:将ConfigurationPropertySources附加到指定环境中的第一位,并动态跟踪环境的添加或删除(当前版本新增了该行代码,与最后一步操作相同)。
- 设置listener监听事件:前面章节已经讲过,此处主要针对准备环境的监听。
- 绑定环境到SpringApplication:将环境绑定到name为“spring.main”的目标上。
- 转换环境:判断是否是定制的环境,如果不是定制的,则将环境转换为StandardEnvironment。此时判断条件isCustomEnvironment默认为false,在后面的操作中会将其设置为true,如果为true则不再会进行此转换操作。
- ConfigurationPropertySources附加到指定环境:将ConfigurationPropertySources附加到指定环境中的第一位,并动态跟踪环境的添加或删除操作。
获取或创建环境
SpringApplication类中通过getOrCreateEnvironment方法来获取或创建环境。在该方法中首先判断环境是否为null,如果不为null则直接返回;如果为null,则根据前面推断出来的WebApplicationType类型来创建指定的环境。
配置环境
在获得环境变量对象之后,开始对环境变量和参数进行相应的设置,主要包括转换服务的设置、PropertySources的设置和activeProfiles的设置。
打印Banner
完成环境的基本处理之后,下面就是控制台Banner的打印了。SpringBoot的Banner打印是一个比较酷炫的功能,但又显得有些华而不实,特别是打印图片时启动速度会变慢。
private Banner printBanner(ConfigurableEnvironment environment) {if (this.bannerMode == Mode.OFF) {return null;} else {ResourceLoader resourceLoader = this.resourceLoader != null ? this.resourceLoader : new DefaultResourceLoader(this.getClassLoader());SpringApplicationBannerPrinter bannerPrinter = new SpringApplicationBannerPrinter((ResourceLoader)resourceLoader, this.banner);return this.bannerMode == Mode.LOG ? bannerPrinter.print(environment, this.mainApplicationClass, logger) : bannerPrinter.print(environment, this.mainApplicationClass, System.out);}
}
上面的代码中展示了Banner的开启及打印位置的设置。程序通过Banner.Mode枚举值来判断是否开启Banner打印,此项参数可以在SpringBoot入口nmain方法中通过setBannerMode方法来设置,也可以通过application.properties中的spring.main.banner-mode进行设置。
SpringApplicationBannerPrinter类承载了Banner初始化及打印的核心功能,比如默认如何获取Banner信息、如何根据约定优于配置来默认获得Banner的内容、Banner支持的文件格式等。
而具体打印的信息是由Banner接口的实现类来完成的,比如默认情况下使用SpringBootBanner来打印SpringBoot的版本信息及简单的图形。当然还有通过资源文件打印的ResourceBanner,通过图片打印的ImageBanner等方法。
Spring应用上下文的创建
SpringBoot创建Spring的应用上下文时,如果未指定要创建的类,则会根据之前推断出的类型来进行默认上下文类的创建。
在SpringBoot中通过SpringApplication类中的createApplicationContext来进行应用上下文的创建,代码如下:
protected ConfigurableApplicationContext createApplicationContext() {//  获取容器的类变量Class<?> contextClass = this.applicationContextClass;//  如果为null,则根据Web应用类型按照默认类进行创建if (contextClass == null) {try {switch(this.webApplicationType) {case SERVLET:contextClass = Class.forName("org.springframework.boot.web.servlet.context.AnnotationConfigServletWebServerApplicationContext");break;case REACTIVE:contextClass = Class.forName("org.springframework.boot.web.reactive.context.AnnotationConfigReactiveWebServerApplicationContext");break;default:contextClass = Class.forName("org.springframework.context.annotation.AnnotationConfigApplicationContext");}} catch (ClassNotFoundException var3) {throw new IllegalStateException("Unable create a default ApplicationContext, please specify an ApplicationContextClass", var3);}}return (ConfigurableApplicationContext)BeanUtils.instantiateClass(contextClass);
}
Spring应用上下文的准备
我们在上一节完成了应用上下文的创建工作,SpringApplication继续通过prepareContext方法来进行应用上下文的准备工作。
private void prepareContext(ConfigurableApplicationContext context, ConfigurableEnvironment environment, SpringApplicationRunListeners listeners, ApplicationArguments applicationArguments, Banner printedBanner) {// 设置应用上下文环境context.setEnvironment(environment);// 设置应用上下文后置处理this.postProcessApplicationContext(context);// 初始化contextthis.applyInitializers(context);// 通知监听器上下文准备阶段listeners.contextPrepared(context);// 打印 profileif (this.logStartupInfo) {this.logStartupInfo(context.getParent() == null);this.logStartupProfileInfo(context);}//  获取 ConfigurableListableBeanFactory ConfigurableListableBeanFactory beanFactory = context.getBeanFactory();beanFactory.registerSingleton("springApplicationArguments", applicationArguments);if (printedBanner != null) {beanFactory.registerSingleton("springBootBanner", printedBanner);}if (beanFactory instanceof DefaultListableBeanFactory) {((DefaultListableBeanFactory)beanFactory).setAllowBeanDefinitionOverriding(this.allowBeanDefinitionOverriding);}//  获取全部配置源Set<Object> sources = this.getAllSources();Assert.notEmpty(sources, "Sources must not be empty");//  将获取到的配置源加载到context中this.load(context, sources.toArray(new Object[0]));//  通知监听器 context 加载完成listeners.contextLoaded(context);
}
Spring应用上下文的刷新
Spring应用上下文的刷新,是通过调用SpringApplication中的refreshContext方法来完成的。SpringApplication中refreshContext方法相关代码如下:
private void refreshContext(ConfigurableApplicationContext context) {this.refresh(context);if (this.registerShutdownHook) {try {context.registerShutdownHook();} catch (AccessControlException var3) {}}}protected void refresh(ApplicationContext applicationContext) {Assert.isInstanceOf(AbstractApplicationContext.class, applicationContext);((AbstractApplicationContext)applicationContext).refresh();
}
其中refresh方法调用的是AbstractApplicationContext中的refresh方法,该类属于spring-context包。AbstractApplicationContext的refresh方法更多的是Spring相关的内容。
public void refresh() throws BeansException, IllegalStateException {synchronized(this.startupShutdownMonitor) {this.prepareRefresh();ConfigurableListableBeanFactory beanFactory = this.obtainFreshBeanFactory();this.prepareBeanFactory(beanFactory);try {this.postProcessBeanFactory(beanFactory);this.invokeBeanFactoryPostProcessors(beanFactory);this.registerBeanPostProcessors(beanFactory);this.initMessageSource();this.initApplicationEventMulticaster();this.onRefresh();this.registerListeners();this.finishBeanFactoryInitialization(beanFactory);this.finishRefresh();} catch (BeansException var9) {if (this.logger.isWarnEnabled()) {this.logger.warn("Exception encountered during context initialization - cancelling refresh attempt: " + var9);}this.destroyBeans();this.cancelRefresh(var9);throw var9;} finally {this.resetCommonCaches();}}
}
在上面的代码中,调用finishRefresh方法初始化容器的生命周期处理器并发布容器的生命周期事件之后,Spring应用上下文正式开启,SpringBoot核心特性也随之启动。完成refreshContext方法操作之后,调用afterRefresh方法。
完成以上操作之后,调用SpringApplicationRunListeners的started方法,通知监听器容器启动完成,并调用ApplicationRunner和CommandLineRunner的运行方法。
调用ApplicationRunner和CommandLineRunner
ApplicationRunner和CommandLineRunner是通过 SpringApplication类的callRunners方法来完成的,具体代码如下:
private void callRunners(ApplicationContext context, ApplicationArguments args) {List<Object> runners = new ArrayList();runners.addAll(context.getBeansOfType(ApplicationRunner.class).values());runners.addAll(context.getBeansOfType(CommandLineRunner.class).values());AnnotationAwareOrderComparator.sort(runners);Iterator var4 = (new LinkedHashSet(runners)).iterator();while(var4.hasNext()) {Object runner = var4.next();if (runner instanceof ApplicationRunner) {this.callRunner((ApplicationRunner)runner, args);}if (runner instanceof CommandLineRunner) {this.callRunner((CommandLineRunner)runner, args);}}}以上代码,首先从context中获得类型为ApplicationRunner和CommandLineRunner的Bean,将它们放入List列表中并进行排序。然后再遍历调用其run方法,并将ApplicationArguments参数传入。
SpringBoot提供这两个接口的目的,是为了我们在开发的过程中,通过它们来实现在容器启动时执行一些操作,如果有多个实现类,可通过@Order注解或实现Ordered接口来控制执行顺序。
这两个接口都提供了一个run方法,但不同之处在于:ApplicationRunner中run方法的参数为ApplicationArguments,而CommandLineRunner接口中run方法的参数为String数组。
以上方法执行完成后,会通过SpringApplicationRunListeners的running方法通知监听器:容器此刻已处于运行状态。至此,SpringApplication的run方法执行完毕。


