理解Window和WindowManager(一)
Window是一个抽象类,它的具体实现是PhoneWindow,创建一个WindowManager就可以创建一个Window,
Window的具体实现位于WindowManagerService中,WindowManager和WindowManagerService是一个IPC过程
为什么使用Window
首先就是Window可以决定谁覆盖在谁的上面,这个会根据z-ordered的大小来决定,z-ordered越大,它的优先级就越大,就越容易排在谁的上面
还有
比如当你想让一个悬窗在你的手机界面显示出来,你可能不知道怎么弄出来,一般情况下我们设置的控件一退出响应的Activity就没了,但是如果你用Window进行操作,给它的type赋响应的值,在保证不杀掉那个Activity后台的情况下,那个控件可以出现在任意地方。
还有
你可以不在XML界面布置相应的控件,直接通过WindowManager进行添加就可以了
Window相关的知识
view树是window的存在形式,我们看不到Window我们只能看到View树
其中view树中每个view的显示次序是固定的,例如我们的Activity布局,每一个控件的显示都是已经安排好的,对于window机制来说,属于“不可再分割的view”。Activity里面就是DecorView。
Window和WindowManager
下面是WindowManager如何添加Window
Button button = new Button(this);button.setText("button");
WindowManager.LayoutParams layoutParams = new WindowManager.LayoutParams(WindowManager.LayoutParams.WRAP_CONTENT, WindowManager.LayoutParams.WRAP_CONTENT,
WindowManager.LayoutParams.TYPE_APPLICATION,WindowManager.LayoutParams.FLAG_NOT_TOUCH_MODAL| WindowManager.LayoutParams.FLAG_NOT_FOCUSABLE, PixelFormat.TRANSPARENT);layoutParams.gravity = Gravity.LEFT|Gravity.CENTER;layoutParams.x = 100;layoutParams.y = 300;WindowManager windowManager = (WindowManager) getSystemService(Context.WINDOW_SERVICE);windowManager.addView(button,layoutParams);
首先是创建了一个text为button的Button,其中LayoutParams.WRAP_CONTENT表示该WindowManager.LayoutParams对象的宽度和高度分别使用包裹内容的方式,即根据内容自适应调整大小;
WindowManager.LayoutParams.TYPE_APPLICATION为type
WindowManager.LayoutParams.FLAG_NOT_TOUCH_MODAL| WindowManager.LayoutParams.FLAG_NOT_FOCUSABLE为flag
;PixelFormat.TRANSPARENT表示该WindowManager.LayoutParams对象的背景为透明。
type表示WindowManager的种类
其中一下几个比较重要
| WindowManager.LayoutParams.TYPE_APPLICATION | 可交互的窗口类型 |
|---|---|
| WindowManager.LayoutParams.TYPE_APPLICATION_OVERLAY | 悬浮窗口类型 |
注意:
弄type = WindowManager.LayoutParams.TYPE_APPLICATION_OVERLAY即悬浮窗口模式的时候
不断的给我报错,因为我没有加权限
因为我没有加权限
然后我把
<uses-permission android:name="android.permission.SYSTEM_ALERT_WINDOW" />
加上,还是报错,然后我以为是没有动态申请权限
然后我这么弄
  if (ContextCompat.checkSelfPermission(MainActivity.this, Manifest.permission.SYSTEM_ALERT_WINDOW)== PackageManager.PERMISSION_GRANTED) {init();Log.d("TAG","JINRU");} else {// 未拥有权限,需要请求权限ActivityCompat.requestPermissions(this,new String[]{Manifest.permission.SYSTEM_ALERT_WINDOW},1);Log.d("TAG","ELSE");}
@Override
public void onRequestPermissionsResult(int requestCode, @NonNull String[] permissions, @NonNull int[] grantResults) {super.onRequestPermissionsResult(requestCode, permissions, grantResults);if (requestCode == 1) {if (grantResults.length > 0 && grantResults[0] == PackageManager.PERMISSION_GRANTED) {init();} else {Log.d("TAG","拒绝");Log.d("TAG",""+requestCode);}}
}
想这样动态申请权限
但是发现它不会进入**init()**方法而是直接进入了
else {Log.d("TAG","拒绝");Log.d("TAG",""+requestCode);}
正当我一筹莫展的时候
我搜了一下Android13应该怎么开启悬浮窗权限
发现它用的并不是 ActivityCompat.requestPermissions来动态开启权限而是startActivityForResult
if (Build.VERSION.SDK_INT >= Build.VERSION_CODES.M && !Settings.canDrawOverlays(MainActivity.this)) {// 悬浮窗权限未授予,需要请求权限Intent intent = new Intent(Settings.ACTION_MANAGE_OVERLAY_PERMISSION, Uri.parse("package:" + getPackageName()));startActivityForResult(intent, 1);
} else {// 悬浮窗权限已授予,可以显示悬浮窗init();
}@Overrideprotected void onActivityResult(int requestCode, int resultCode, Intent data) {super.onActivityResult(requestCode, resultCode, data);if (requestCode == 1) {if (Build.VERSION.SDK_INT >= Build.VERSION_CODES.M && Settings.canDrawOverlays(this)) {// 用户已授予悬浮窗权限init();} else {Log.d("TAG","不让你进");}}}
这时候它就可以进入init方法了
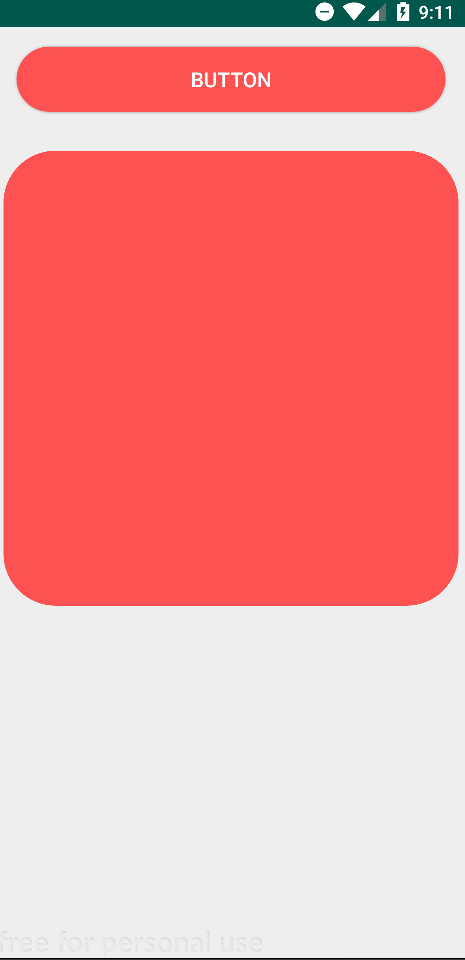
最后的效果是:进行编译我可以看到两个button,其中有一个button在除了息屏以外的任何界面都可以看到,这就是type = WindowManager.LayoutParams.TYPE_APPLICATION_OVERLAY的作用
那么
开权限什么时候用startActivityForResult什么时候用ActivityCompat.requestPermissions
chatgpt给出的解释是
startActivityForResult() 方法通常用于启动一个需要返回结果的活动,例如打开系统设置页面或其他需要用户交互的操作。你可以通过设置请求码和在目标活动中调用 setResult() 来获取返回的结果。
ActivityCompat.requestPermissions() 方法用于请求动态权限。当你需要请求权限,并且只关心用户是否授予了权限时,可以使用此方法。系统会显示一个权限请求对话框,用户可以选择授予或拒绝权限。你需要重写 onRequestPermissionsResult() 方法来处理权限请求的结果。
在悬浮窗权限的情况下,Android 6.0(API 级别 23)及更高版本使用动态权限模型,因此你应该使用 ActivityCompat.requestPermissions() 来请求悬浮窗权限。如果权限已被授予,你可以直接显示悬浮窗。如果权限被拒绝,你可以在 onRequestPermissionsResult() 方法中处理相应的逻辑。
然而,在某些情况下,如在 Android 13 中打开悬浮窗权限时,你需要使用 startActivityForResult() 方法打开系统设置页面,并在返回结果时处理权限请求的结果。这是因为在某些设备和系统版本中,悬浮窗权限的设置页面可能无法通过动态权限请求打开,而需要通过 ACTION_MANAGE_OVERLAY_PERMISSION 意图来打开。
综上所述,根据需要进行选择:
- 如果你只关心用户是否授予了权限,可以使用
ActivityCompat.requestPermissions()方法。 - 如果你需要在用户授予或拒绝权限后执行特定操作,或者需要打开系统设置页面以获取权限,可以使用
startActivityForResult()方法。
因为我用的是Android13所以最后打开就只能用startActivityForResult了
刚才的完整代码
public class MainActivity extends AppCompatActivity {private WindowManager windowManager;@Overrideprotected void onCreate(Bundle savedInstanceState) {super.onCreate(savedInstanceState);setContentView(R.layout.activity_main);if (Build.VERSION.SDK_INT >= Build.VERSION_CODES.M && !Settings.canDrawOverlays(MainActivity.this)) {// 悬浮窗权限未授予,需要请求权限Intent intent = new Intent(Settings.ACTION_MANAGE_OVERLAY_PERMISSION, Uri.parse("package:" + getPackageName()));startActivityForResult(intent, 1);} else {// 悬浮窗权限已授予,可以显示悬浮窗init();}}//    @Override
//    public void onRequestPermissionsResult(int requestCode, @NonNull String[] permissions, @NonNull int[] grantResults) {
//        super.onRequestPermissionsResult(requestCode, permissions, grantResults);
//        if (requestCode == 1) {
//            if (grantResults.length > 0 && grantResults[0] == PackageManager.PERMISSION_GRANTED) {
//                init();
//            } else {
//                Log.d("TAG","拒绝");
//                Log.d("TAG",""+requestCode);
//            }
//        }
//    }@Overrideprotected void onActivityResult(int requestCode, int resultCode, Intent data) {super.onActivityResult(requestCode, resultCode, data);if (requestCode == 1) {if (Build.VERSION.SDK_INT >= Build.VERSION_CODES.M && Settings.canDrawOverlays(this)) {// 用户已授予悬浮窗权限init();} else {Log.d("TAG","不让你进");}}}private void init(){Button button = new Button(this);button.setText("button");WindowManager.LayoutParams layoutParams = new WindowManager.LayoutParams(WindowManager.LayoutParams.WRAP_CONTENT,WindowManager.LayoutParams.WRAP_CONTENT,WindowManager.LayoutParams.TYPE_APPLICATION,WindowManager.LayoutParams.FLAG_NOT_TOUCH_MODAL | WindowManager.LayoutParams.FLAG_NOT_FOCUSABLE,PixelFormat.TRANSPARENT);layoutParams.gravity = Gravity.LEFT | Gravity.CENTER;layoutParams.x = 100;layoutParams.y = 300;windowManager = (WindowManager) getSystemService(Context.WINDOW_SERVICE);windowManager.addView(button, layoutParams);Button button1 = new Button(this);WindowManager.LayoutParams layoutParams1 = new WindowManager.LayoutParams(WindowManager.LayoutParams.WRAP_CONTENT,WindowManager.LayoutParams.WRAP_CONTENT,WindowManager.LayoutParams.TYPE_APPLICATION_OVERLAY,WindowManager.LayoutParams.FLAG_NOT_TOUCH_MODAL | WindowManager.LayoutParams.FLAG_NOT_FOCUSABLE,PixelFormat.TRANSPARENT);layoutParams1.gravity = Gravity.LEFT | Gravity.CENTER;layoutParams1.x = 200;layoutParams1.y = 400;windowManager.addView(button1, layoutParams1);Log.d("TAG","JINRU");}
}
然后是flag了
其中一下几个比较常用
| FLAG_NOT_TOUCH_MODAL | 在此模式下,系统会将当前Window区域以外的单机事件传递给底层的Window,当前Window区域以内的单击事件自己处理 |
|---|---|
| FLAG_NOT_FOCUSABLE | 当前Window不需要获取焦点,也不需要接受各种输入事件,此标记会同时启动FLAG_NOT_TOUCH_MODAL |
| FLAG_SHOW_WHEN_LOCKED | 开启此模式可以让Window显示在锁屏的界面上 |
但是FLAG_SHOW_WHEN_LOCKED已经过时了
FLAG_SHOW_WHEN_LOCKED标志在Android P(API级别28)开始被弃用。该标志用于在锁定屏幕上显示窗口。
请注意,显示Window在锁屏界面上的行为可能会受到设备和系统设置的限制。某些设备或ROM可能会禁止在锁屏界面上显示Window。因此,这段代码可能在所有设备上都不能完全适用。你可能需要根据具体情况进行调整和适配。
Type参数表示Window的类型,Window有3种类型,分别是:应用Window,子Window,和系统Window。
应用类Window对应着一个Activity,
子Window不能单独存在。需要附属在特定的父Window中如dialog,
系统Window是需要神明权限才能创建的Window,如Toast和系统状态栏
Window是分层的,每个Window都有对应的z-ordered,层级大的会覆盖在层级小的Window上面,
其中应用类Window的层级范围是1-99
子Window为1000-1999
系统Window为2000-2999
这些层级范围对应这WindowManager.LayoutParams的type属性。如果想让Window位于所有Window的最顶层,那么z-orderd就得更大
WindowManager的几种方法
WindowManager所提供的常用方法就3个,这三个方法定义在ViewManager里面,WindowManager继承了ViewManager
public interface ViewManager
{/*** Assign the passed LayoutParams to the passed View and add the view to the window.* <p>Throws {@link android.view.WindowManager.BadTokenException} for certain programming* errors, such as adding a second view to a window without removing the first view.* <p>Throws {@link android.view.WindowManager.InvalidDisplayException} if the window is on a* secondary {@link Display} and the specified display can't be found* (see {@link android.app.Presentation}).* @param view The view to be added to this window.* @param params The LayoutParams to assign to view.*/public void addView(View view, ViewGroup.LayoutParams params);public void updateViewLayout(View view, ViewGroup.LayoutParams params);public void removeView(View view);
}
很容易看懂,addView是添加View
updataViewLayout是更新View
remoteView是删除View
现在举个最简单的更新View的例子
@Override
public boolean onTouchEvent(MotionEvent event) {int rawX = (int)event.getRawX();int rawY = (int)event.getRawY();switch (event.getAction()){case MotionEvent.ACTION_MOVE:layoutParams1.x = rawX;layoutParams1.y = rawY;windowManager.updateViewLayout(button1,layoutParams1);break;default:break;}return false;
}
该Window就可以跟着你手指的移动而移动
因为我的这个window的type = WindowManager.LayoutParams.TYPE_APPLICATION_OVERLAY
为小窗模式,在该界面中是可以随手指的移动而移动的,
但是退到其他界面虽然可以展示小窗,但是它不再会随着手指的移动而移动了
Window的内部机制
Window是一个抽象的概念,每一个Window都对应一个View和一个ViewRootImpl
看到ViewRootImpl是不是会想起来一个东西:
那就是View的工作原理那块。当Activity对象被创建的时候,会把DecorView添加到Window中,并创建
ViewRootImpl将它和DecorView关联起来。而连接WindowManager和DecorView的纽带就是ViewRoot,同时View的三大流程均是通过ViewRoot完成的
这下,全部联系起来了
Window并不是实际存在的,它是以View的形式存在着,View是Window存在的实体,实际使用中无法直接访问Window,只能通过访问WindowManager才可以
WindowManager是外界访问Window的入口,Window的具体实现位于WindowManagerService中,WindowManager和Window-ManagerService的交互是一个IPC过程。
WindowManager是一个接口,它的真正实现是WindowManagerImpl类。
为了分析Window的内部机制,我们从WindowManager的三个重要的方法开始讲起
Window的添加过程
我们刚才看过代码,WindowManager所提供的常用方法就3个,这三个方法定义在ViewManager里面,WindowManager继承了ViewManager
而WindowManager真正实现的是WindowManagerImpl类
但是WindowManagerImpl并没有直接实现3大操作,而是全部交给WindowManagerGlobal来处理
WindowManagerGlobal以工厂的形式向外提供自己的实例,在WindowManagerGlobal中有如下一段代码:
private final WindowManagerGlobal mGlobal = WindowManagerGlobal.getInstance()。
WindowManagerImpl这种工作模式是典型的桥接模式,将所有的操作全部委托给WindowManagerGlobal来实现。
WindowManagerGlobal的addView主要为以下几步
1.检查参数是否合法,如果是子Window那么还需要调整一些布局参数
public void addView(View view, ViewGroup.LayoutParams params,Display display, Window parentWindow) {// 首先判断参数是否合法if (view == null) {throw new IllegalArgumentException("view must not be null");}if (display == null) {throw new IllegalArgumentException("display must not be null");}if (!(params instanceof WindowManager.LayoutParams)) {throw new IllegalArgumentException("Params must be WindowManager.LayoutParams");}
final WindowManager.LayoutParams wparams = (WindowManager.LayoutParams) params;
// **如果不是子window,会对其做参数的调整,**这个好理解,子window要跟随父window的特性。
if (parentWindow != null) {parentWindow.adjustLayoutParamsForSubWindow(wparams);
} else {final Context context = view.getContext();if (context != null&& (context.getApplicationInfo().flags& ApplicationInfo.FLAG_HARDWARE_ACCELERATED) != 0) {wparams.flags |= WindowManager.LayoutParams.FLAG_HARDWARE_ACCELERATED;}
}synchronized (mLock) {...                              // 这里新建了一个viewRootImpl,并设置参数root = new ViewRootImpl(view.getContext(), display);view.setLayoutParams(wparams);// 添加到windowManagerGlobal的三个重要list中,后面会讲到mViews.add(view);mRoots.add(root);mParams.add(wparams);// 最后通过viewRootImpl来添加windowtry {root.setView(view, wparams, panelParentView);} ...
}
}
从这里可以看到,它会判断view,display和判断传入的LayoutParams对象是否为WindowManager.LayoutParams类型。
之后如果View是子Window,则需要对LayoutParams进行调整,以符合父Window的特性。具体实现中,会调用parentWindow.adjustLayoutParamsForSubWindow方法对LayoutParams进行调整。
如果View不是子Window,则需要根据View所在的Context判断是否需要开启硬件加速。如果Context的ApplicationInfo中设置了FLAG_HARDWARE_ACCELERATED标志,则会将WindowManager.LayoutParams对象的flags属性设置为FLAG_HARDWARE_ACCELERATED,从而开启硬件加速。
2.创建ViewRootImpl并将View添加到列表中
在WindowManagerGlobal内部有如下几个列表比较重要
private final ArrayList<View>mViews = new ArrayList<View>();
private final ArrayList<ViewRootImpl>mRoots = new ArrayList<ViewRootImpl>();
private final ArrayList<WindowManager.LayoutParams>mParams = new ArrayList<WindowManager.LayoutParams>();
private final ArraySet<View>mDyingViews = new ArraySet<View>();
mViews是存储所有Window对应的view的集合,mRoots是存储所有ViewRootImpl的集合,mParams是存放所有布局的集合,mDyingViews是存放正在被删除的View的集合,或者说是存放调用了remoteView但还没删除操作完成的Window对象
然后我们再看这块
synchronized (mLock) {
...
// 这里新建了一个viewRootImpl,并设置参数
root = new ViewRootImpl(view.getContext(), display);
view.setLayoutParams(wparams);// 添加到windowManagerGlobal的三个重要list中
mViews.add(view);
mRoots.add(root);
mParams.add(wparams);// 最后通过viewRootImpl来添加window
try {root.setView(view, wparams, panelParentView);
}
...
}
它用了一个锁把在这块进行参数的设置与添加到响应的集合中
3.通过ViewRootImpl更新界面并完成Window的添加过程
刚才说过了ViewRootImpl是view的最高层级,属于所有View的根,但它不是View,实现了viewParent接口,控件的测量、布局、绘制以及输入事件的派发处理都由ViewRootImpl触发,是view和windowManager的通信桥梁。viewRootImpl可以处理两边的对象,然后联结起来
我们点开setView的源码
public void setView(View view, WindowManager.LayoutParams attrs, View panelParentView) {synchronized (this) {...// Schedule the first layout -before- adding to the window// manager, to make sure we do the relayout before receiving// any other events from the system.requestLayout();...try {mOrigWindowType = mWindowAttributes.type;mAttachInfo.mRecomputeGlobalAttributes = true;collectViewAttributes();res = mWindowSession.addToDisplay(mWindow, mSeq, mWindowAttributes,getHostVisibility(), mDisplay.getDisplayId(), mTmpFrame,mAttachInfo.mContentInsets, mAttachInfo.mStableInsets,mAttachInfo.mOutsets, mAttachInfo.mDisplayCutout, mInputChannel,mTempInsets);setFrame(mTmpFrame);} ...}
}
它首先会调用requestLayout方法触发一次布局操作,以确保在将View添加到Window之前能够进行一次布局操作。然后,会调用collectViewAttributes方法收集View的属性,并将其保存到mWindowAttributes对象中。
接着,会调用mWindowSession.addToDisplay方法将mWindow对象添加到指定的Display中。其中,mWindowSession是与WindowManagerService通信的会话对象,mSeq是会话的序列号,mWindowAttributes是Window的属性,getHostVisibility方法用于获取View的可见性,mDisplay.getDisplayId方法用于获取Display的ID,mTmpFrame用于保存Window的位置和大小等信息,mInputChannel用于与InputMethodManager通信,mTempInsets用于保存Window的Insets信息等。
mWindowSession是IWindowSession类型,它是一个Binder对象,真正的实现类是Session,Window的添加过程是一次IPC调用
最后,会调用setFrame方法设置View的位置和大小等属性,以确保View能正确地显示在屏幕上。
我们先看requestLayout,它进行异步刷新请求
public void requestLayout() {if (! mHandlingLayoutInLayoutRequest) {checkThread();mLayoutRequested = true;scheduleTraversals();//View绘制的入口}
}
res = mWindowSession.addToDisplay(mWindow, mSeq, mWindowAttributes,getHostVisibility(), mDisplay.getDisplayId(), mTmpFrame,mAttachInfo.mContentInsets, mAttachInfo.mStableInsets,mAttachInfo.mOutsets, mAttachInfo.mDisplayCutout, mInputChannel,mTempInsets);
的这段代码中我们看看addToDisplay这段操作
在Session内部会通过WindowManagerService来实现Window的添加
public int addToDisplay(IWindow window, int seq, WindowManager.LayoutParams
attrs,int viewVisibility, int displayId, Rect outContentInsets,InputChannel outInputChannel) {return mService.addWindow(this, window, seq, attrs, viewVisibility,displayId,outContentInsets, outInputChannel);
}
Window添加过程流程图
![[外链图片转存失败,源站可能有防盗链机制,建议将图片保存下来直接上传(img-nuxRcgmw-1685254611136)(../../assets/流程图-导出-1685212005635-1.png)]](https://img-blog.csdnimg.cn/e11727ae59e545b19eeabc131e419267.png)
Window的删除过程
Window的删除过程和Window的添加过程大致差不多,都是先通过WindowManagerImpl后进一步通过WindowManagerGlobal来实现
我们点开remove的源码
public void removeView(View view, boolean immediate) {if (view == null) {throw new IllegalArgumentException("view must not be null");}
synchronized (mLock) {int index = findViewLocked(view, true);View curView = mRoots.get(index).getView();removeViewLocked(index, immediate);if (curView == view) {return;}throw new IllegalStateException("Calling with view " + view+ " but the ViewAncestor is attached to " + curView);
}
}
会发现与addView不一样的是,removeView在if判断的时候只判断了view是否为null
但是在addView中不仅判断view==null,还判断display是否为null,传入的LayoutParams对象是否为WindowManager.LayoutParams类型。
然后在锁中通过findViewLocked来查找待删除的View的索引
其中findViewLocked的源码大概如下:
// 伪代码实现
// 参数:
//   view:要查找的视图
//   includeRoot:是否包括根视图在内
// 返回值:
//   找到视图的索引,如果未找到,则为 -1
private int findViewLocked(View view, boolean includeRoot) {// 如果要查找的视图为空,则抛出异常if (view == null) {throw new IllegalArgumentException("view must not be null");}
// 如果包括根视图,则从根视图开始查找
int start = includeRoot ? 0 : 1;// 遍历所有视图,查找与给定视图相同的视图
for (int i = start; i < mRoots.size(); i++) {ViewRootImpl root = mRoots.get(i);if (root.getView() == view) {// 如果找到相同的视图,则返回它的索引```return i;}
}// 如果未找到相同的视图,则返回 -1
return -1;
}
我们会发现这个查找过程依然是先判断view是否为null,
然后就是对建立的数组遍历,如果找到就返回它的下标,找不到就返回-1
View curView = mRoots.get(index).getView();
这段代码的作用就是找到那个相对应的view
然后调用removeViewLocked来做进一步删除
private void removeViewLocked(int index, boolean immediate) {ViewRootImpl root = mRoots.get(index);View view = root.getView();if (view ! = null) {InputMethodManager imm = InputMethodManager.getInstance();if (imm ! = null) {imm.windowDismissed(mViews.get(index).getWindowToken());}}boolean deferred = root.die(immediate);if (view ! = null) {view.assignParent(null);if (deferred) {mDyingViews.add(view);}}}
其中
ViewRootImpl root = mRoots.get(index);
这段代码又和之前的代码对应上了
我们在addView方法的第二步操作中讲到
WindowManagerGlobal内部有如下几个列表比较重要
private final ArrayList<View>mViews = new ArrayList<View>();//存放Window对应的View的
private final ArrayList<ViewRootImpl>mRoots = new ArrayList<ViewRootImpl>();//所有ViewRootImpl的集合
private final ArrayList<WindowManager.LayoutParams>mParams = new ArrayList<WindowManager.LayoutParams>();//存放布局的集合
private final ArraySet<View>mDyingViews = new ArraySet<View>();//存放已经执行了remoteView但还没删完的view的集合
这里removeViewLocked就用到了
存放ViewRootImpl的集合,具体的删除操作是调用了ViewRootImpl的die方法,
注意
这里要简单说明一下,其实WindowManager提供了2个接口来进行删除操作,
第一个是removeView就是我们现在用的这个
第二个是removeViewImmediate
它们两个不同的地方在于,第一个是异步操作,第二个是同步操作.之所以不怎么用第二个就是因为它的同步操作容易发生意外的错误
我们继续调用了die方法,它只是发送了一个请求删除的消息后就立刻返回了,这个时候View还没有完成删除操作。
这时候就会把该View添加到
mDyingViews这个集合中
我们来看看die的源码吧
boolean die(boolean immediate) {// Make sure we do execute immediately if we are in the middle of a traversalor the damage// done by dispatchDetachedFromWindow will cause havoc on return.if (immediate && ! mIsInTraversal) {doDie();return false;}
if (! mIsDrawing) {destroyHardwareRenderer();
} else {Log.e(TAG, "Attempting to destroy the window while drawing! \n" +" window=" + this + ", title=" + mWindowAttributes.getTitle());}mHandler.sendEmptyMessage(MSG_DIE);return true;}
在die方法内部只是做了简单的判断,如果是异步删除就发送一个MSG_DIE的消息,ViewRootImpl中的Handler会处理此消息并调用doDie方法,如果是同步删除(立即删除),就不发消息直接调用doDie方法。在doDie内部会调用此ViewRootImpl的dispatchDetachedFromWindow方法,真正删除View的逻辑在dispatchDetachedFromWindow方法的内部实现。
dispatchDetachedFromWindow方法主要做四件事:
(1)垃圾回收相关的工作,比如清除数据和消息、移除回调。
(2)通过Session的remove方法删除Window。mWindowSession.remove(mWindow),这同样是一个IPC过程,最终会调用WindowManagerService的removeWindow方法。
(3)调用View的dispatchDetachedFromWindow方法,在内部会调用View的onDetached-FromWindow()以及onDetachedFromWindowInternal()。当View从Window中移除时onDetachedFromWindow()也会被调用,可以在这个方法内部做一些资源回收的工作,比如终止动画、停止线程等。
(4)调用WindowManagerGlobal的doRemoveView方法刷新数据,包括mRoots、mParams以及mDyingViews,需要将当前Window所关联的这三类对象从列表中删除。
Window的删除过程流程图
![[外链图片转存失败,源站可能有防盗链机制,建议将图片保存下来直接上传(img-STR8UvjY-1685254611138)(../../assets/流程图-导出 (2)]-1685249851079-1.png)](https://img-blog.csdnimg.cn/c7b748d5cfbc41b4b357aab51cd6c3e9.png)
Window的更新过程
这个就非常容易了
我们看updateViewLayout的源码
public void updateViewLayout(View view, ViewGroup.LayoutParams params) {if (view == null) {throw new IllegalArgumentException("view must not be null");}if (! (params instanceof WindowManager.LayoutParams)) {throw new IllegalArgumentException("Params must be WindowManager.LayoutParams");}final WindowManager.LayoutParams wparams = (WindowManager.Layout-Params)params;view.setLayoutParams(wparams);synchronized (mLock) {int index = findViewLocked(view, true);ViewRootImpl root = mRoots.get(index);mParams.remove(index);mParams.add(index, wparams);root.setLayoutParams(wparams, false);}}
也是先进行判断,但是和addView()相比它少了一个判断display的
然后获取布局,之后在锁中又调用了刚才removeView的那个
findViewLocked通过遍历数组来找到下表
但是不同的地方在于,removeView是获得view,但是updataViewLayout获得root
mParams.remove(index);
这一步是替换掉之前的布局
然后
mParams.add(index, wparams);root.setLayoutParams(wparams, false);
再更新ViewRootImpl中的LayoutParams,这一步是通过ViewRootImpl的setLayoutParams方法来实现的。在ViewRootImpl中会通过scheduleTraversals方法来对View重新布局,包括测量、布局、重绘这三个过程。除了View本身的重绘以外,ViewRootImpl还会通过WindowSession来更新Window的视图,这个过程最终是由WindowManagerService的relayoutWindow()来具体实现的,它同样是一个IPC过程
简单来说调用setLayoutParams不仅会重新执行View的三大工作,也会更新Window的视图
在这里我们会发现,好像Window的addView(),removeView(),updateViewLayout这3个有一个共同的特点,那就是都与IPC有关
Window内部的三大方法与IPC
添加过程中的IPC(addToDisplay())
addToDisplay() 方法:
这个方法是addView中第三步setView中调用的
setView会执行3个操作
- requestLayout进行异步刷新请求,并进行重新的布局
- 就是addToDisplay了,该方法用于将 Window 添加到指定的 Display 中(即将视图添加到显示器上)。在多用户或多进程环境中,不同的用户或进程可能拥有不同的 Display,并且需要使用 IPC 将 Window 添加到指定的 Display 中。
3.是setFrame(),设置View的位置与大小
删除过程中的IPC(removeFromDisplay())
removeFromDisplay() 方法:
这个方法是removeView是在removeViewLocked中调用**die()**方法后执行的
我们还是先回顾removeView的几个操作
- 判断传递的View是否为null
- 调用findViewLocked进行数组的遍历,找到符合要求的view的下标
- 通过ViewRootImpl中调用get获得view
- 调用removeViewLocked执行有异步操作,发送MSG_DIE消息后调用die并调用dispatchDetachedFromWindow后**会调用removeFromDisplay()**该方法用于将 Window 从指定的 Display 中移除。同样,在多用户或多进程环境中,不同的用户或进程可能需要使用 IPC 将 Window 从指定的 Display 中移除。
- 将待删除的view传入mDyingViews中
当时的一个问题
当时我不太明白在调用removeViewLocked后会调用die方法然后调用异步方法将MSG_DIE传进去后调用dispatchDetachedFromWindow,书上说真正删除View就是在dispatchDetachedFromWindow中。可是又说removeViewLocked执行完后会将待删除的放入另一个集合中。这不是有点矛盾嘛,它dispatchDetachedFromWindow已经在内部删除了,那么为什么还会把它放到一个集合中
后来突然想起来,这是一个异步操作,它是先进行removeViewLocked,然后起到一个标记作用,然后会把标记了的View放入集合中。之后再调用removeViewLocked中的die方法后调用dispatchDetachedFromWindow实现View的删除
更新过程中的IPC(relayoutWindow())
因为更新过程挺容易的,就不细说了
因为更新它会先更新View的布局再更新ViewRootImpl的布局,再更新后者的时候,会通过WindowSession更新Window的视图
它是调用WMS的relayoutWindow()来实现的
总结
viewRootImpl的逻辑很多,重要的就是调用了mWindowSession的方法调用了WindowManagerService的方法。mWindowSession是一个IWindowSession类型对象,IWindowSession是一个IBinder接口,他的具体实现类在WindowManagerService,本地的mWindowSession只是一个Binder对象,通过这个mWindowSession就可以直接调用WindowManagerService的方法进行跨进程通信
换一句话来说就是Window的内部是WindowManagerService实现的
而Window的访问是通过WindowManager来实现的
Window中的WindowManagerService与WindowManager就是以IPC方式通讯的
所以只要设计到Window中的WindowManagerService与WindowManager的通信,那么那个方法必然是IPC过程
dispatchDetachedFromWindow**已经在内部删除了,那么为什么还会把它放到一个集合中
后来突然想起来,这是一个异步操作,它是先进行removeViewLocked,然后起到一个标记作用,然后会把标记了的View放入集合中。之后再调用removeViewLocked中的die方法后调用dispatchDetachedFromWindow实现View的删除
更新过程中的IPC(relayoutWindow())
因为更新过程挺容易的,就不细说了
因为更新它会先更新View的布局再更新ViewRootImpl的布局,再更新后者的时候,会通过WindowSession更新Window的视图
它是调用WMS的relayoutWindow()来实现的
总结
viewRootImpl的逻辑很多,重要的就是调用了mWindowSession的方法调用了WindowManagerService的方法。mWindowSession是一个IWindowSession类型对象,IWindowSession是一个IBinder接口,他的具体实现类在WindowManagerService,本地的mWindowSession只是一个Binder对象,通过这个mWindowSession就可以直接调用WindowManagerService的方法进行跨进程通信
换一句话来说就是Window的内部是WindowManagerService实现的
而Window的访问是通过WindowManager来实现的
Window中的WindowManagerService与WindowManager就是以IPC方式通讯的
所以只要设计到Window中的WindowManagerService与WindowManager的通信,那么那个方法必然是IPC过程